Timing Chain (TC) replace wisdom needed!

Tiny
JDMENN
  • MEMBER
  • 1999 CHEVROLET BLAZER
  • 4.3L
  • 6 CYL
  • 2WD
  • AUTOMATIC
  • 200,000 MILES
Hi, I was given the vehicle listed above with a bunch of brand-new parts, including a complete distributor assembly, new timing chain with two gears. Timing cover/gasket, oil pan gasket, SPs and SP wire set, filters, radiator and two hoses, etc. I saw you guys working on 4.3s on your YouTube channel! There's no distributor in it, just a rag over the hole. Plans: set the thing at TDC on the compression stroke by sticking something in the #1 SP hole, remove radiator/hoses, remove fan/serpentine belt, drain oil/remove pan, remove whatever else in the way, remove timing chain cover, chain and two gears (no tensioner for this model!). The finer details are what I need to know, like putting the motor gear marks down (if it's at perfect TDC already, they should be there, right?) Then new TC gear dimples point to each other? Please give me your wisdom on anything that generally goes wrong here! For reassembly, what do I put on the new TC gasket to ensure it does not leak the first time? (I know to carefully, slowly, and evenly tighten the TC cover bolts a little at a time.) I know how to install the dizzy and get the oil pump gear lined up just fine. Just tell me some Murphy's law ideas about this.
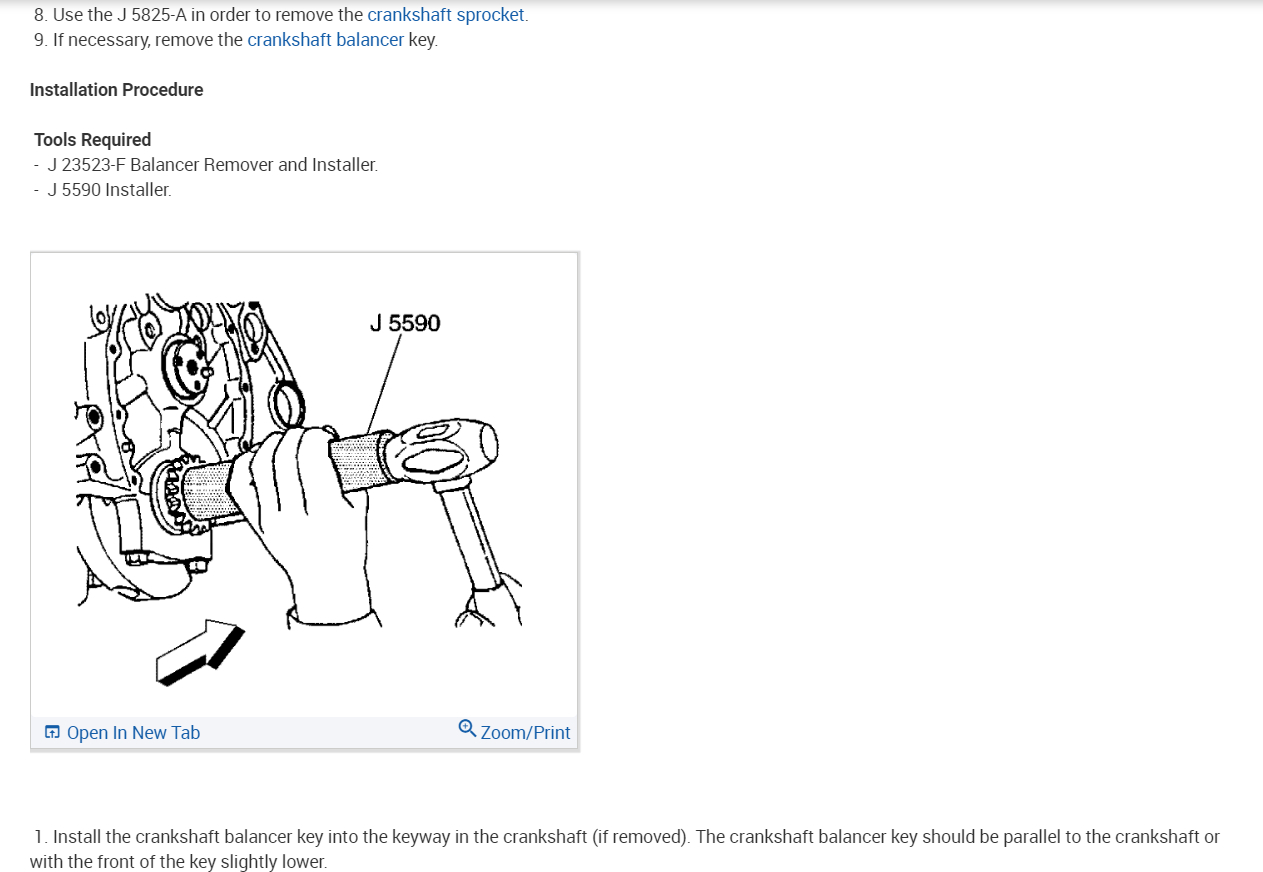
Tuesday, October 18th, 2022 AT 5:55 AM

1 Reply

Tiny
KEN L
  • MASTER CERTIFIED MECHANIC
  • 44,463 POSTS
I would get the good timing cover gaskets and use sealer to help stop leaks. Also, to reinstall the harmonic balancer heat it up to 170 degrees in an oven before installation. Here are the marks for the timing chain set.

Notice: Use the correct fastener in the correct location. Replacement fasteners must be the correct part number for that application. Fasteners requiring replacement or fasteners requiring the use of thread locking compound or sealant are identified in the service procedure. Do not use paints, lubricants, or corrosion inhibitors on fasteners or fastener joint surfaces unless specified. These coatings affect fastener torque and joint clamping force and may damage the fastener. Use the correct tightening sequence and specifications when installing fasteners in order to avoid damage to parts and systems.

7. Install the camshaft sprocket bolts. Tighten the camshaft sprocket bolts to 25 Nm (18 lb ft).
8. Install the crankshaft position sensor reluctor ring.
9. Install the engine front cover.

Please upload images of any question or problems you are having so I can help walk you through it. Check out the images (below). Please let us know what happens.
Was this
answer
helpful?
Yes
No
Tuesday, October 18th, 2022 AT 11:15 AM

Please login or register to post a reply.

Sponsored links