Will not start

Tiny
FRSNKLIN
  • MEMBER
  • 1982 FORD F-250
  • 5.8L
  • V8
  • 200,000 MILES
The chain broke and replaced it and the distributor shaft pin broke and replace it. Still won't start. Could the oil pump be seized?
Monday, April 13th, 2020 AT 3:11 PM

5 Replies

Tiny
CJ MEDEVAC
  • MECHANIC
  • 11,004 POSTS
Turn the key "on".

What is the voltage at the positive side of the distributor?

Do you have spark at any (just check one) spark plug?

Pic 1) of my '77 Jeep CJ-5

Pic 2) My '46 Willys Jeep

The Medic
Was this
answer
helpful?
Yes
No
Monday, April 13th, 2020 AT 3:29 PM
Tiny
JACOBANDNICKOLAS
  • MECHANIC
  • 108,383 POSTS
Hi,

That is a very good question and an easy one to answer. As it appears, you already realize the oil pump plays a role in the distributor's operation. The bottom of the distributor should align with an intermediate drive shaft to the oil pump. Now, if the you suspect the oil pump has locked up and isn't being turned, do this. Remove the distributor cap and crank the engine. Is the rotor turning? If it is, chances are the pump isn't locked. Next, you can remove the distributor and using a long handle screw driver, see if you can turn the pump by hand.

__________________________________

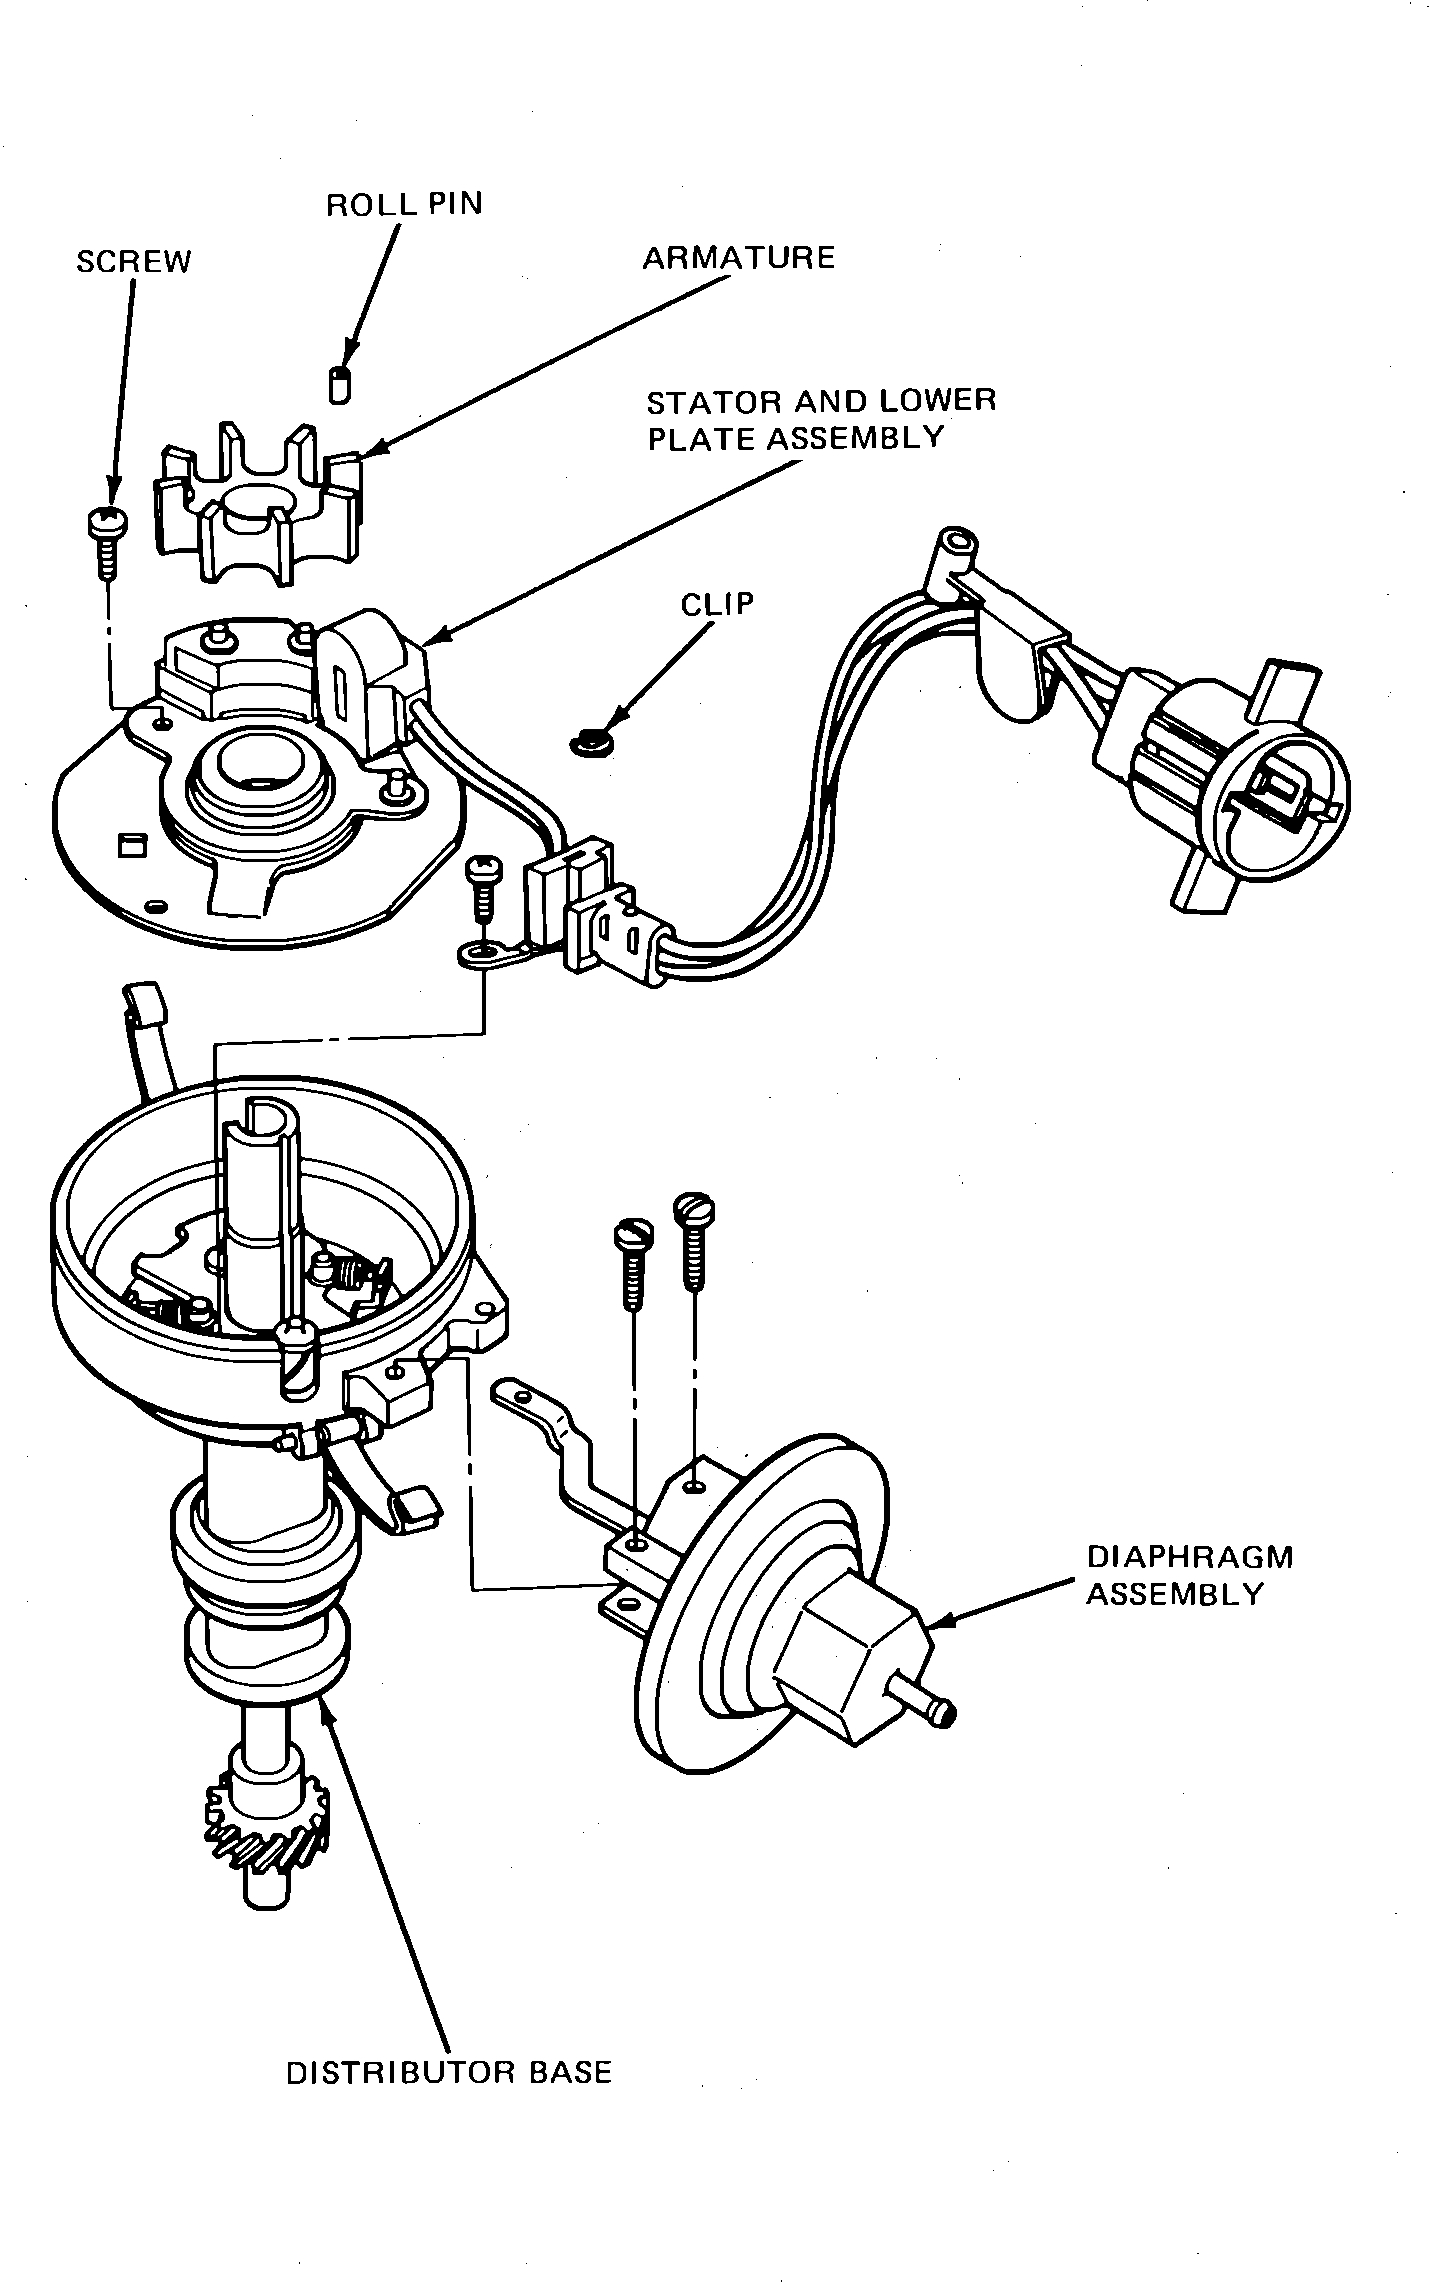
I don't know if this will help, but here are the directions for installing the distributor. The attached pic correlates with the directions.

__________________________________

1982 Ford Truck F 250 2WD Pickup V8-351 5.8L
DS II
Vehicle Powertrain Management Ignition System Distributor Service and Repair Procedures Removal and Installation DS II
DS II
Distributor - Exploded view

Pic 1

REMOVAL

On some models, it may be necessary to position thermactor air pump aside to gain access to distributor. It may also be necessary to disconnect the thermactor air filter.
1. Disconnect distributor electrical connector from engine wiring harness.
2. Disconnect vacuum advance hose, then remove distributor cap and position aside.
3. Remove rotor and adapter, then reinstall rotor.
4. Mark position of distributor in engine and position of rotor on distributor housing for installation reference.
5. Remove distributor hold-down bolt and clamp, then lift distributor out of engine. Do not crank engine after distributor has been removed.

INSTALLATION

1. If engine was not cranked after distributor was removed, proceed as follows:
a. Position distributor in engine, aligning housing to block marks and rotor to housing marks made during removal.
B. Install distributor hold-down bolt and clamp. Do not tighten at this time.
C. Install distributor cap and wire, then connect distributor electrical connector to engine wiring harness and attach vacuum advance hose.
D. Adjust ignition timing to specifications.
2. If engine was cranked after distributor was removed, proceed as follows:
a. Remove No. 1 spark plug and crank engine until compression pressure is felt in No. 1 cylinder. Slowly rotate engine until correct initial timing mark on crankshaft damper aligns with timing pointer.
B. Position distributor in engine with rotor at number one firing position and armature tooth aligned with starter. Ensure oil pump intermediate shaft properly engages the distributor shaft. It may be necessary to crank engine with starter after distributor drive gear is partially engaged in order to engage the oil pump intermediate shaft.
C. Install distributor hold down bolt and clamp. Do not tighten at this time.
D. Install distributor cap and wires, then connect distributor electrical connector to engine wiring harness and attach vacuum advance hose.
3. Adjust ignition timing to specifications. Due to higher ignition system voltage, a timing light specifically designed for this system should be used when checking ignition timing. If a timing light designed for this system is not available, an inductive pickup type timing light may operate satisfactorily in a piece of split vacuum hose is first placed around the spark plug wire.

NOTE: Refer to ADJUSTMENTS for rotor alignment.

________________________________________

Let me know if this helps. Also, let me know exactly what is happening so I can better help. Honestly, as long as the distributor is turning (as I mentioned above to check) and the timing is correct, as long as you have fuel and spark it should run.

Let me know if I can help.

Joe
Was this
answer
helpful?
Yes
No
Monday, April 13th, 2020 AT 4:03 PM
Tiny
FRSNKLIN
  • MEMBER
  • 1 POST
The pump can't turn after taking the distributor out. What next?
Was this
answer
helpful?
Yes
No
Tuesday, April 14th, 2020 AT 11:54 AM
Tiny
JACOBANDNICKOLAS
  • MECHANIC
  • 108,383 POSTS
Hi,

If it is locked, you need to remove the pump and inspect it for damage. That is the reason why the distributor shaft pin broke. Also, make sure the drive shaft between the distributor and oil pump is correctly installed. If it isn't, it can actually cause an issue like this. Remember, the oil pump is driven by the distributor, which is driven by the camshaft. There is an intermediate shaft between the two. If it is properly installed and the pump doesn't turn, you have to replace the pump.

___________________________________

Here are directions for removal and replacement of the oil pan. Once it is off, the pump will be accessible.

__________________________________

Removal
Vehicle Engine, Cooling and Exhaust Engine Engine Lubrication Oil Pan Service and Repair Procedures Oil Pan, Engine Removal
REMOVAL
1. Remove the oil dipstick (on pan entry models only).
2. Remove the bolts attaching the fan shroud to the radiator and position the shroud over the fan.
3. Remove the nuts and lockwashers attaching the engine support insulators to the chassis bracket.
4. If equipped with an automatic transmission, disconnect the oil cooler line at the left side of the radiator.
5. Raise the engine and place wood blocks under the engine supports.
6. Drain the crankcase.
7. Remove the oil pan attaching bolts and lower the oil pan onto the crossmember.
8. Remove the two bolts attaching the oil pump pick up tube to the oil pump. Remove nut attaching oil pump pickup tube to the number 3 main bearing cap stud. Lower the pick-up tube and screen into the oil pan.
9. Remove the oil pan from the vehicle.
_________________________________________-

1982 Ford Truck F 250 2WD Pickup V8-351 5.8L
Installation
Vehicle Engine, Cooling and Exhaust Engine Engine Lubrication Oil Pan Service and Repair Procedures Oil Pan, Engine Installation
INSTALLATION
1. Clean oil pan, inlet tube and gasket surfaces. Inspect the gasket sealing surface for damages and distortion due to overtightening of the bolts. Repair and straighten as required.

See pic 1

2. Position a new oil pan gasket and seals to the cylinder block.
3. Position the oil pick up tube and screen to the oil pump and install the lower attaching bolt and gasket loosely. Install nut attaching to number 3 main bearing cap stud.
4. Place the oil pan on the crossmember. Install the upper pick-up tube bolt. Tighten the pick-up tube bolts to specifications.
5. Position the oil pan to the cylinder block and install the attaching bolts. Tighten to 13 - 14 N.M (9 - 11 ft. Lbs.).
6. Raise the engine and move the wood blocks. Lower the engine and install the insulator to chassis bracket nuts and washers. Tighten the nuts to 73 - 100 N.M (54 - 74 ft. Lbs.).
7. If equipped with an automatic transmission, connect the oil cooler line at the radiator.
8. Stall the fan shroud attaching bolts.
9. Fill the crankcase with the proper grade and quantity of engine oil. Install the oil dipstick. Start the engine and operate it until it reaches normal operating temperature, then check for leaks.

____________________________________

Let me know what you find or if you have other questions.

Joe
Was this
answer
helpful?
Yes
No
Tuesday, April 14th, 2020 AT 5:36 PM
Tiny
FRSNKLIN
  • MEMBER
  • 1 POST
Thank you very much for your a great help.
Franklin
Was this
answer
helpful?
Yes
No
Wednesday, April 15th, 2020 AT 10:42 AM

Please login or register to post a reply.

Sponsored links