Sway bar link replacement?

Tiny
BEN HALBERT
  • MEMBER
  • 2008 TOYOTA TACOMA
  • 2.7L
  • 4 CYL
  • 2WD
  • AUTOMATIC
  • 131,000 MILES
I need to replace a broken left front sway bar link. I don’t want to replace the pair. I’m told I must loosen the right link in order to replace the left one.
Sunday, November 27th, 2022 AT 5:37 AM

5 Replies

Tiny
CARADIODOC
  • MECHANIC
  • 33,752 POSTS
There's a number of different designs for attaching the anti-sway bar to the control arms, and for some of them, you were told correctly. The bar has to be moved to allow the link to be inserted, and the link on the other side prevents you from doing that. Almost all links are easier to replace when both are removed at the same time.

This article provides more information:

https://www.2carpros.com/articles/how-to-replace-a-sway-bar-link

but here they are replacing the most common design, and loosening the other link is almost a requirement. With this design you almost always get both links in the kit because the bushings all wear out at the same rate. You aren't saving anything by replacing just one as the other one is going to fail shortly too.

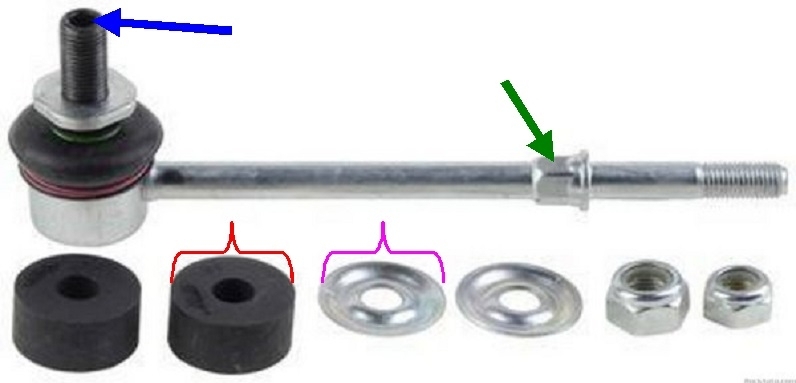
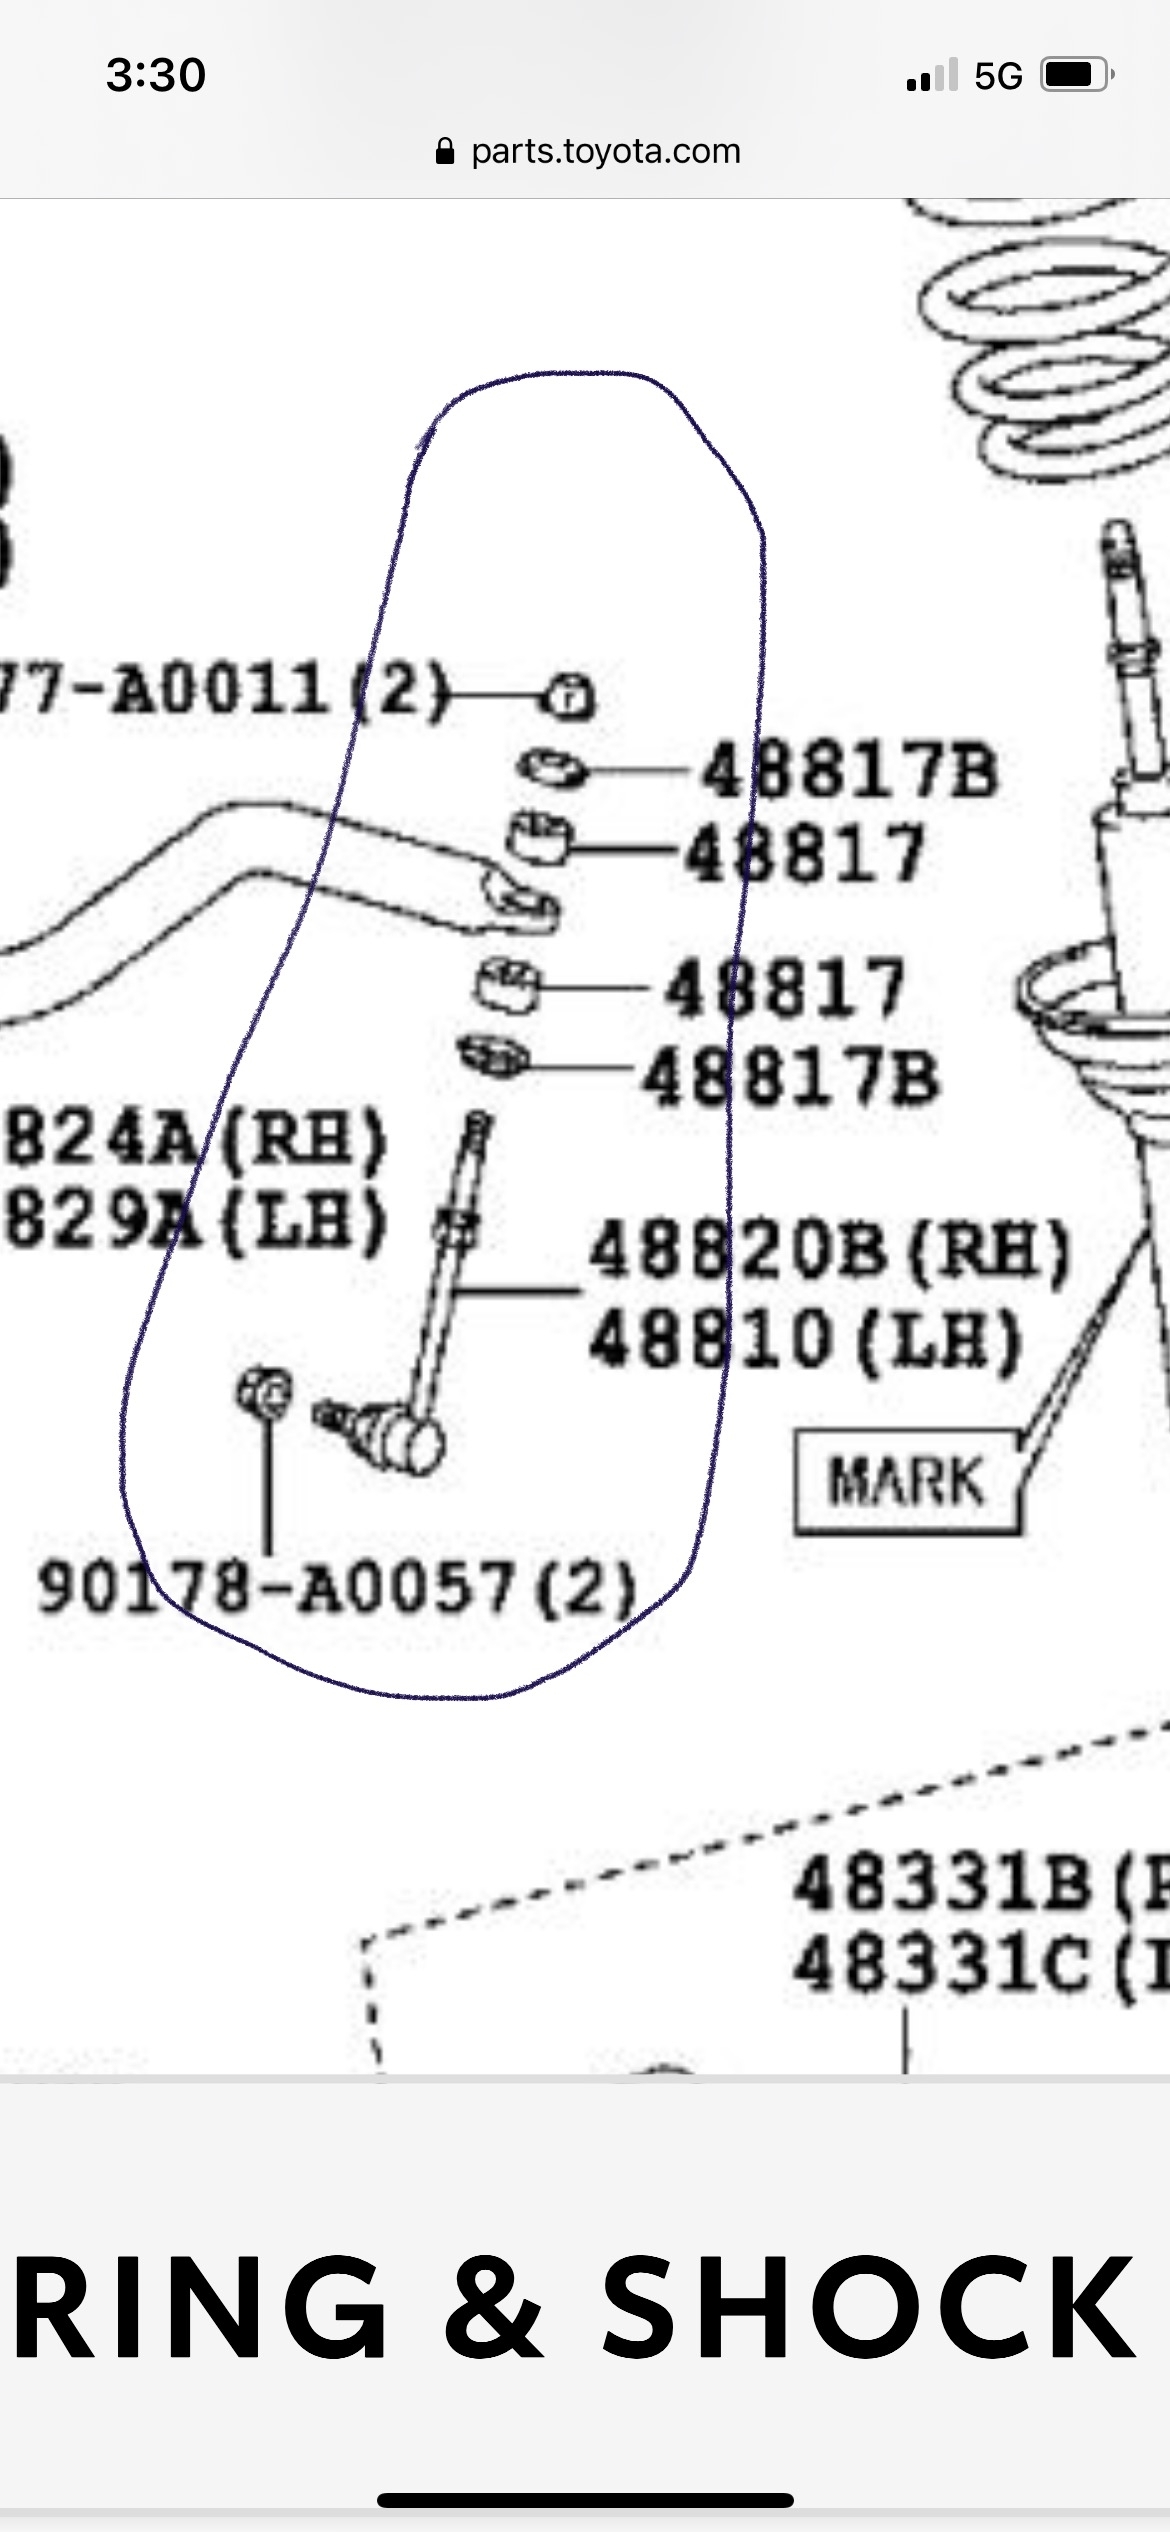
For your design, the job is not going to be much easier if you do both or if you loosen the other link. The photo below shows the kit you will get. First notice near the end of the threaded shaft on the right, there's a hex nut, (green arrow), to allow you to hold the link from spinning when you remove the nut. You'll need that hex if the ball and socket on the other end has come apart, otherwise, that other end will hold the stud from spinning. Sometimes that top nut gets rusted so tight, you end up rounding it or that hex off. If that happens, the fastest solution is to use an air-powered cutoff tool to cut through the nut, then crack it off.

On the other end, the blue arrow is pointing to a six-sided hole to insert an Allen wrench to hold that stud from spinning as you turn the nut off. One word of warning here. If you live in an area like I do in Wisconsin where they throw a pound of salt on an ounce of snow, that nut is also going to be rusted tight. Often we just start with the cutoff tool because we know what frustration that rust causes. If you are able to use an Allen wrench, be sure it is not a cheap dime store tool, and be sure it fits snugly. That will reduce the chances of the hole or tool rounding off. It can take a lot of elbow grease to get that nut off.

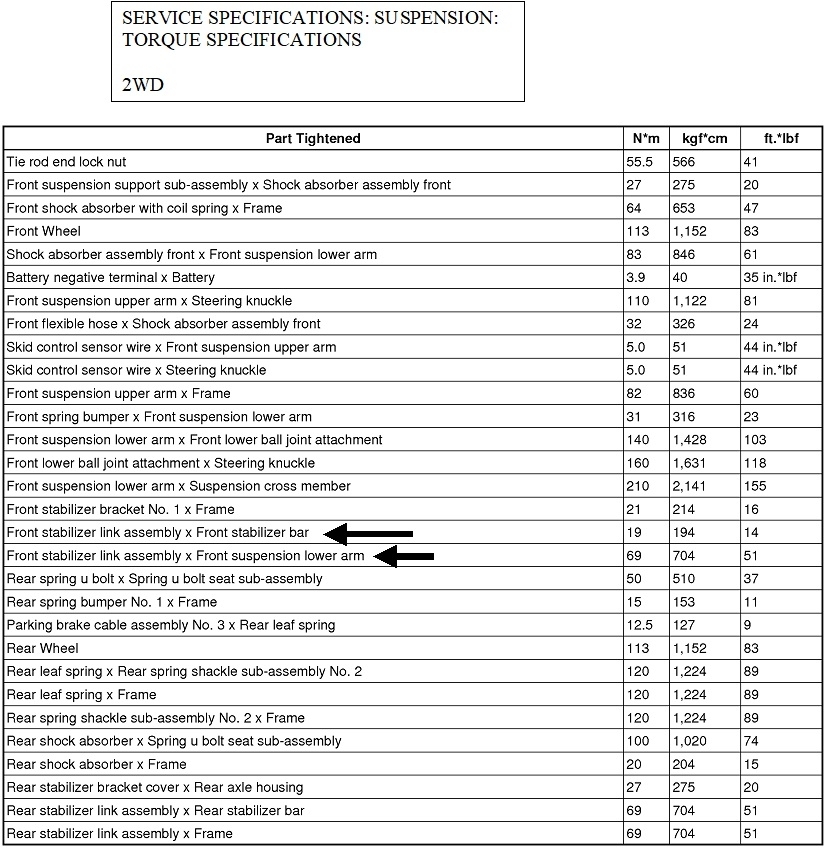
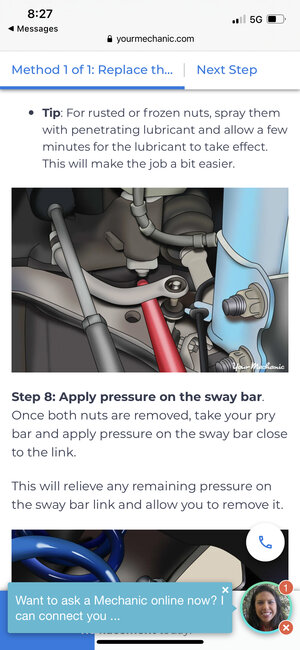
One of the most common mistakes made by competent do-it-yourselfers occurs when tightening the nut at the end of the anti-sway bar, (orange arrow in the fourth drawing). The specs call for 14 foot-pounds which is plenty, but very difficult to measure in a confined space. Instead, with all bushings of this type, tighten the nut just enough until the rubber bushings squish out to match the diameter of the metal washers, and no more. (Red bracket diameter should match the diameter of the purple bracket in the first photo). Often people, including inexperienced mechanics, will run those nuts as tight as they can get them by hand. That smashes the bushings so tight that they have no flex left as the suspension travels up and down. That leads to very early failure of those bushings, and then a rattle. You'll often find the same stud and bushing design on shock absorbers. When the bushings have expanded to match the diameter of the washers, the nut will not be fully tightened yet.

Now that I described that warning, it may not apply to your links. Normally that threaded section is over twice as long as needed to allow the part to be used on a lot of different brands and models. Notice on your links that threaded section isn't very long. The nut may indeed bottom out and then allow you to tighten it to 14 foot-pounds. My recommendation is to tighten the nut to specs unless you see the bushings expand to a larger diameter than the washers, then stop at that point.
Was this
answer
helpful?
Yes
No
+1
Sunday, November 27th, 2022 AT 3:57 PM
Tiny
BEN HALBERT
  • MEMBER
  • 3 POSTS
Thank you for your prompt response. At about $180.00 each for part and labor at my repair shop, couldn’t I go with the method shown in attached image using a pry bar?
Was this
answer
helpful?
Yes
No
Sunday, November 27th, 2022 AT 4:22 PM
Tiny
CARADIODOC
  • MECHANIC
  • 33,752 POSTS
Depends on how strong you are, but what I see in the photo is not the part I found shown on Rock Auto. The link in your photo is a long bolt that runs through the four bushings and four washers. Those can work on a lot of different models and years but you have to see my warning on how tight to make the nut. You would have to pry the bar far enough away from the control arm to fit all those pieces in there, then hold them lined up so you can run the bot in. For many models it doesn't matter if you put the nut up or down, as long as the threaded end doesn't hit anything. There's no advantage in replacing just one of this style of link. You're most likely going to get two in a kit. Replacing just one at a time is a real lot more difficult, then the other one is going fail in short order, then you'll have another very difficult job. Better to just do one easy job and be done with it. This style link is normally very inexpensive.

In the photo I posted, the link is of a different design, and is not difficult to do just one at a time. Once the ball and socket end is removed, you just twist it to the side a little to clear the control arm, then just slide the threaded bolt down out of the hole in the bar. Even if you did both at the same time, you still wouldn't have to shove the bar out of the way, so here it does pay to do just one at a time.

Is your photo of a generic link you found on a web search? If it is, it doesn't pertain to your car. If my photo is wrong, it wouldn't be the first time, but Rock Auto had the same design listed from a lot of different manufacturers. Then I would guess I looked up the wrong model or year.
Was this
answer
helpful?
Yes
No
+1
Monday, November 28th, 2022 AT 11:31 PM
Tiny
BEN HALBERT
  • MEMBER
  • 3 POSTS
Thanks again, I do appreciate and accept your response. I will attach an image of the link for my 2008 Tacoma (just FYI). And take your advice to heart.
Was this
answer
helpful?
Yes
No
Monday, November 28th, 2022 AT 11:55 PM
Tiny
CARADIODOC
  • MECHANIC
  • 33,752 POSTS
Yup, that's what I found. Removing the nuts will be the most difficult part of the job. Once they're off, you will find the link can easily be slipped out without having to push on the bar. The new one will go in just as easy. Slide the first rubber bushing and washer on, insert the stem, then slide on the last washer and bushing and nut. The bottom stud will swing right into place.

If the link comes with an instruction sheet, always go by that instead of what I say. I suspect it will tell you to run that top nut down tight as that will set the "squish" of the bushings. It's only on that other more common design that you have to be in charge of how much the bushings expand.

Let me know when this job is done.
Was this
answer
helpful?
Yes
No
Tuesday, November 29th, 2022 AT 7:39 PM

Please login or register to post a reply.

Sponsored links