Hello,
Below is the timing belt replacement procedure.
It sounds like there might a possible timing belt tensioner failure.
Always make sure your belt routing is correct and the belt doesn't have too many teeth, use correct belt.
Here is the procedure.
Removal
1. Disconnect negative battery cable. (Have radio anti-theft code) Raise and support vehicle. Remove engine splash shield from right wheel well.
2. Remove generator and A/C compressor drive belt. Remove dipstick tube from front of engine. Remove generator with wires attached, and secure out of way. Remove power steering pump drive belt.
3. Lower vehicle. Support weight of engine with jack. Remove engine mount from timing belt end of engine. Using Tensioner Wrench (MB990767) and Crankshaft Pulley Holder Pin (MD998715), hold crankshaft pulley stationary and remove crankshaft pulley bolt. Remove crankshaft pulley.
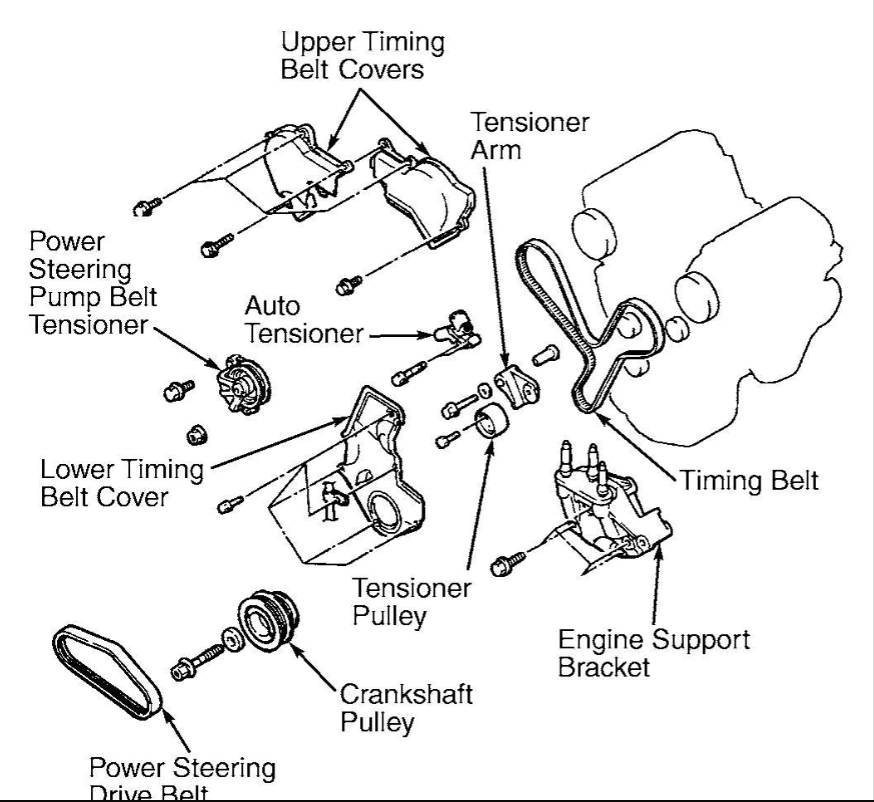
4. Remove power steering pump belt tensioner. See Fig. 1 . Remove upper and lower timing belt covers. Remove engine support bracket from front of engine.
CAUTION:
Always turn crankshaft in clockwise direction (as viewed from front of engine).
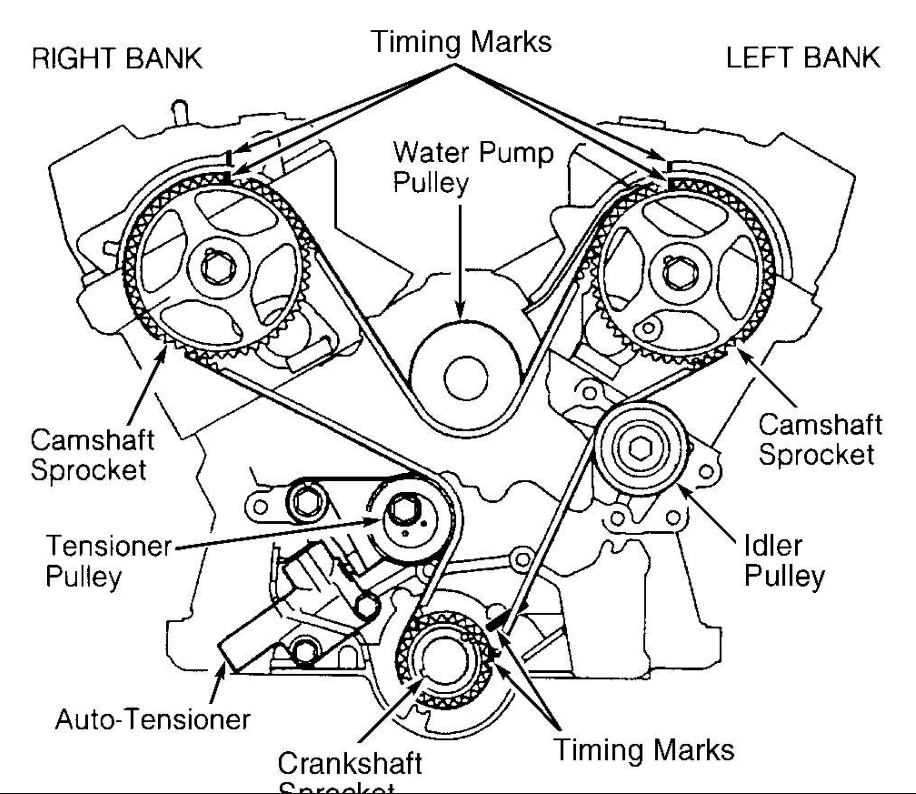
5. If timing belt is to be reused, place arrow on belt to indicate direction of belt rotation. Turn crankshaft clockwise to align camshaft and crankshaft timing marks. See Fig. 2 . Loosen center bolt of timing belt tensioner pulley, and remove timing belt. Remove timing belt auto-tensioner from engine block.
Install:
Installation (Eclipse & Galant)
1. Place auto-tensioner in soft-jawed vise to SLOWLY compress the push rod. If there is a plug at the base of the auto-tensioner body, place flat washer around plug so it will not contact vise jaw.
CAUTION:
Never compress the auto-tensioner too fast, or the push rod will be damaged.
2. Slowly compress auto-tensioner push rod until holes in push rod and auto-tensioner housing are aligned. Insert a locking pin into the alignment holes. Install auto-tensioner on engine.
WARNING:
Right bank camshaft can turn easily due to applied spring force, so keep fingers out of the way.
3. Ensure all timing marks are still aligned. See Fig. 2 . Install timing belt on crankshaft sprocket, idler pulley, left bank camshaft sprocket, water pump pulley, right bank camshaft sprocket, and tensioner pulley. Take all slack out of timing belt.
4. Loosen the tensioner pulley center bolt. Using Tensioner Pulley Socket Wrench (MD998767), rotate tensioner pulley against timing belt. Temporarily tighten tensioner pulley center bolt. Using Crankshaft Pulley Spacer (MD998769), turn crankshaft 1/4 turn counter clockwise. Turn crankshaft 1/4 turn clockwise. Ensure all timing belt marks are still aligned.
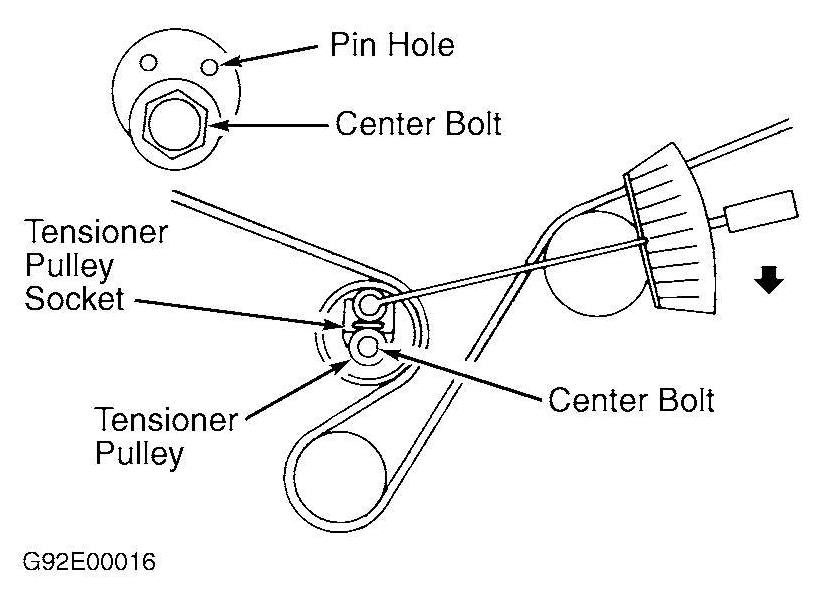
5. For 1999-00 models, loosen tensioner pulley center bolt. Position tensioner pin holes at BOTTOM of tensioner. Install Tensioner Pulley Socket Wrench (MD998767) on tensioner pulley. See Fig. 6 . Use a torque wrench to apply 39 INCH lbs. (4.4 N.m) of torque (counter clockwise direction) to tensioner pulley. Tighten tensioner center bolt to specification while holding tensioner stationary. See TORQUE SPECIFICATIONS .
6. For 2001 and later models, loosen tensioner pulley center bolt. Position tensioner pin holes at TOP of tensioner. Install Tensioner Pulley Socket Wrench (MD998767) on tensioner pulley. See Fig. 7 . Use a torque wrench to apply 39 INCH lbs. (4.4 N.m) of torque (clockwise direction) to tensioner pulley. Tighten tensioner center bolt to specification while holding tensioner stationary. See TORQUE SPECIFICATIONS .
7. On all models, remove locking pin from auto-tensioner. Turn crankshaft 2 revolutions clockwise and align all timing marks. DO NOT rotate counter clockwise.
8. Wait for at least 5 minutes, then check auto-tensioner push rod protrusion. To check push rod protrusion, measure clearance between body of auto-tensioner and bottom of tensioner pulley bracket arm. Clearance should be 0.15-0.20" (3.8-5.0 mm). If protrusion is not correct, repeat timing belt tensioning procedure.
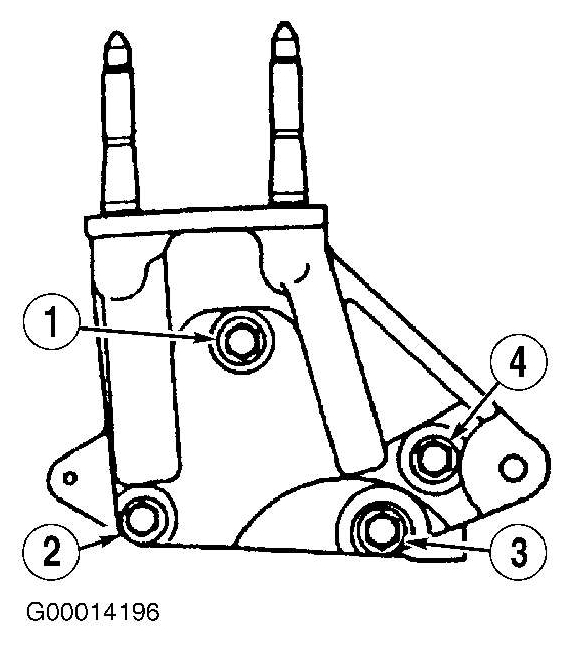
9. Install engine support bracket on engine block. Tighten top bolt first, then working in a counter clockwise direction, tighten the remaining bolts. See Fig. 8 . Install timing belt covers. Install crankshaft pulley. Apply engine oil to crankshaft pulley bolt, then tighten bolt to specification. See TORQUE SPECIFICATIONS .
10. To install remaining components, reverse removal procedure. Adjust drive belts to proper tension.
TORQUE SPECIFICATIONS
Application
Ft. Lbs. (N.m)
Auto-Tensioner-To-Engine Block Bolt
18 (24)
Camshaft Sprocket Bolt
65 (88)
Crankshaft Pulley Bolt
(1) 131-137 (177-186)
Dipstick Tube Bolt
10 (14)
Engine Mount
To-Body Through-Bolt
(2) 61 (83)
To-Engine Support Bracket Nut/Bolt
63 (86)
Engine Support Bracket-To-Engine Bolt
33 (44)
Generator Pivot Bolt
33 (44)
Generator Top Bolt
15 (21)
Power Steering Pump Belt Tensioner Bolt
33 (44)
Timing Belt Tensioner Center Bolt
35 (48)
Timing Belt Tensioner Arm Pivot Bolt
33 (44)
Water Pump Bolt
M8 Bolt
17 (23)
M10 Bolt
30 (41)
INCH Lbs. (N.m)
Timing Belt Cover Bolt
106 (12)
(1)
Apply engine oil to bolt threads before installation.
(2)
Final tighten bolt with full weight of engine on mount.
Hope this helps.
Cheers, Boris
Images (Click to enlarge)
Sep 1, 2023 at 7:52 AM