Good afternoon,
This sounds like the shifter cable itself between the gear shifter and the transmission.
Check the shift linkage first at the transmission to be sure it is secure.
Roy.
procedure.
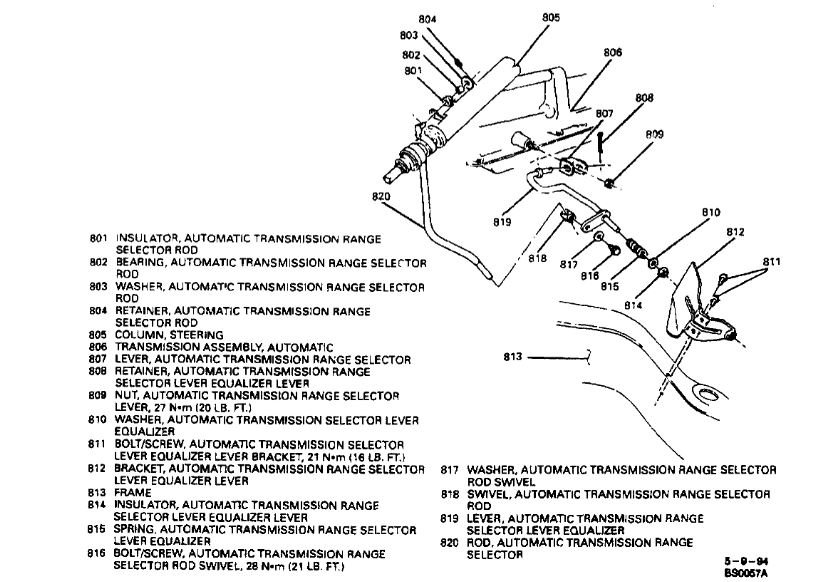
Remove or Disconnect
1. Place transmission control lever in neutral gate notch.
2. Retainer (804), washer (803), bearing (802) and insulator (801).
3. Rod (820) from steering column (805).
4. Raise and suitably support vehicle.
5. Rod (820) from equalizer lever (819).
- Remove swivel bolt/screw (816), washer (817) and swivel (818).
6. Equalizer lever (819).
A. Remove retainer (808) and disconnect from lever (807).
B. Insulator (814), washer (810), spring (815).
7. Bracket bolts/screws (811).
8. Bracket (812).
9. Nut (809).
10. Selector lever (807).
Install or Connect
NOTICE: Always use the correct fastener in the proper location. When you replace a fastener, use ONLY the exact part number for that application. General Motors will call out those fasteners that require a replacement after removal. General Motors will also call out the fasteners that require thread lockers or thread sealant. UNLESS OTHERWISE SPECIFIED, do not use supplemental coatings (paints, greases, or other corrosion inhibitors) on threaded fasteners or fastener joint interfaces. Generally, such coatings adversely affect the fastener torque and the joint clamping force, and may damage the fastener. When you install fasteners, use the correct tightening sequence and specifications. Following these instructions can help you avoid damage to parts and systems.
1. Selector lever (807) to stud.
2. Nut (809).
Tighten
- Nut (809) to 27 Nm (20 lb. ft.).
3. Bracket (812) to frame (813).
4. Bracket bolts/screws (811).
Tighten
- Bracket bolts/screws (811) to 21 Nm (16 lb. ft.).
5. Spring (815), washer (810) and insulator (814) to equalizer lever (819).
- Install equalizer lever (819) to bracket (812).
6. Equalizer lever (819) to selector lever (807) and secure with retainer (808).
- Make sure transmission is in neutral.
7. Swivel (818), washer (817) and swivel bolt/screw (816) to rod (820).
- Do not tighten at this time.
8. Rod (820) through bracket on steering column (805).
- Attach insulator (80 l ), bearing (802), washer (803) and retainer (804) to rod (820).
9. Lower vehicle.
10. Adjust floor shift control linkage if necessary.
Refer to See: Shift Linkage, A/T > Adjustments
Apr 10, 2019 at 12:38 PM