Welcome to 2CarPros.
Was it determined where the smoke was coming from? Also, did he remove the timing belt cover to inspect the belt? I have to be honest, that's a bit odd if he did. That belt will either break or skip time at which time the engine will shut off. It won't slip an burn up causing smoke.
If the serpentine belt was slipping due to a faulty tensioner or a component seizing, that could cause smoke, so I'm a bit confused. Also, which heat shield wasn't installed? Was something touching a hot component and smoking? As far as the timing belt, that is a concern if in fact it is loose.
If the timing belt has excessive play, the tensioner must be failing. That is a concern because the engine is an interference engine. If the belt breaks or jumps time while the engine is running, it will cause internal damage to the engine.
There is no quick and easy fix to a timing belt tensioner. The timing belt will need removed and then the tensioner can be replaced. At that point, I would strongly recommend replacing the belt at the same time.
Here are directions showing how the timing belt is replaced. You will see in the directions the tensioner. All attached pics correlate with the directions. You will see in the directions that the timing belt cover must be removed to access the belt. That is the part that makes me question what he told you. It is odd for it to be considered based on the symptoms you had. Regardless, I wish there was an easier way to deal with the timing belt tensioner, but here are the directions.
______________________________________
2004 Hyundai Sonata L4-2.4L
Procedures
Vehicle Engine, Cooling and Exhaust Engine Timing Components Timing Belt Service and Repair Procedures
PROCEDURES
pic 1
DISASSEMBLY
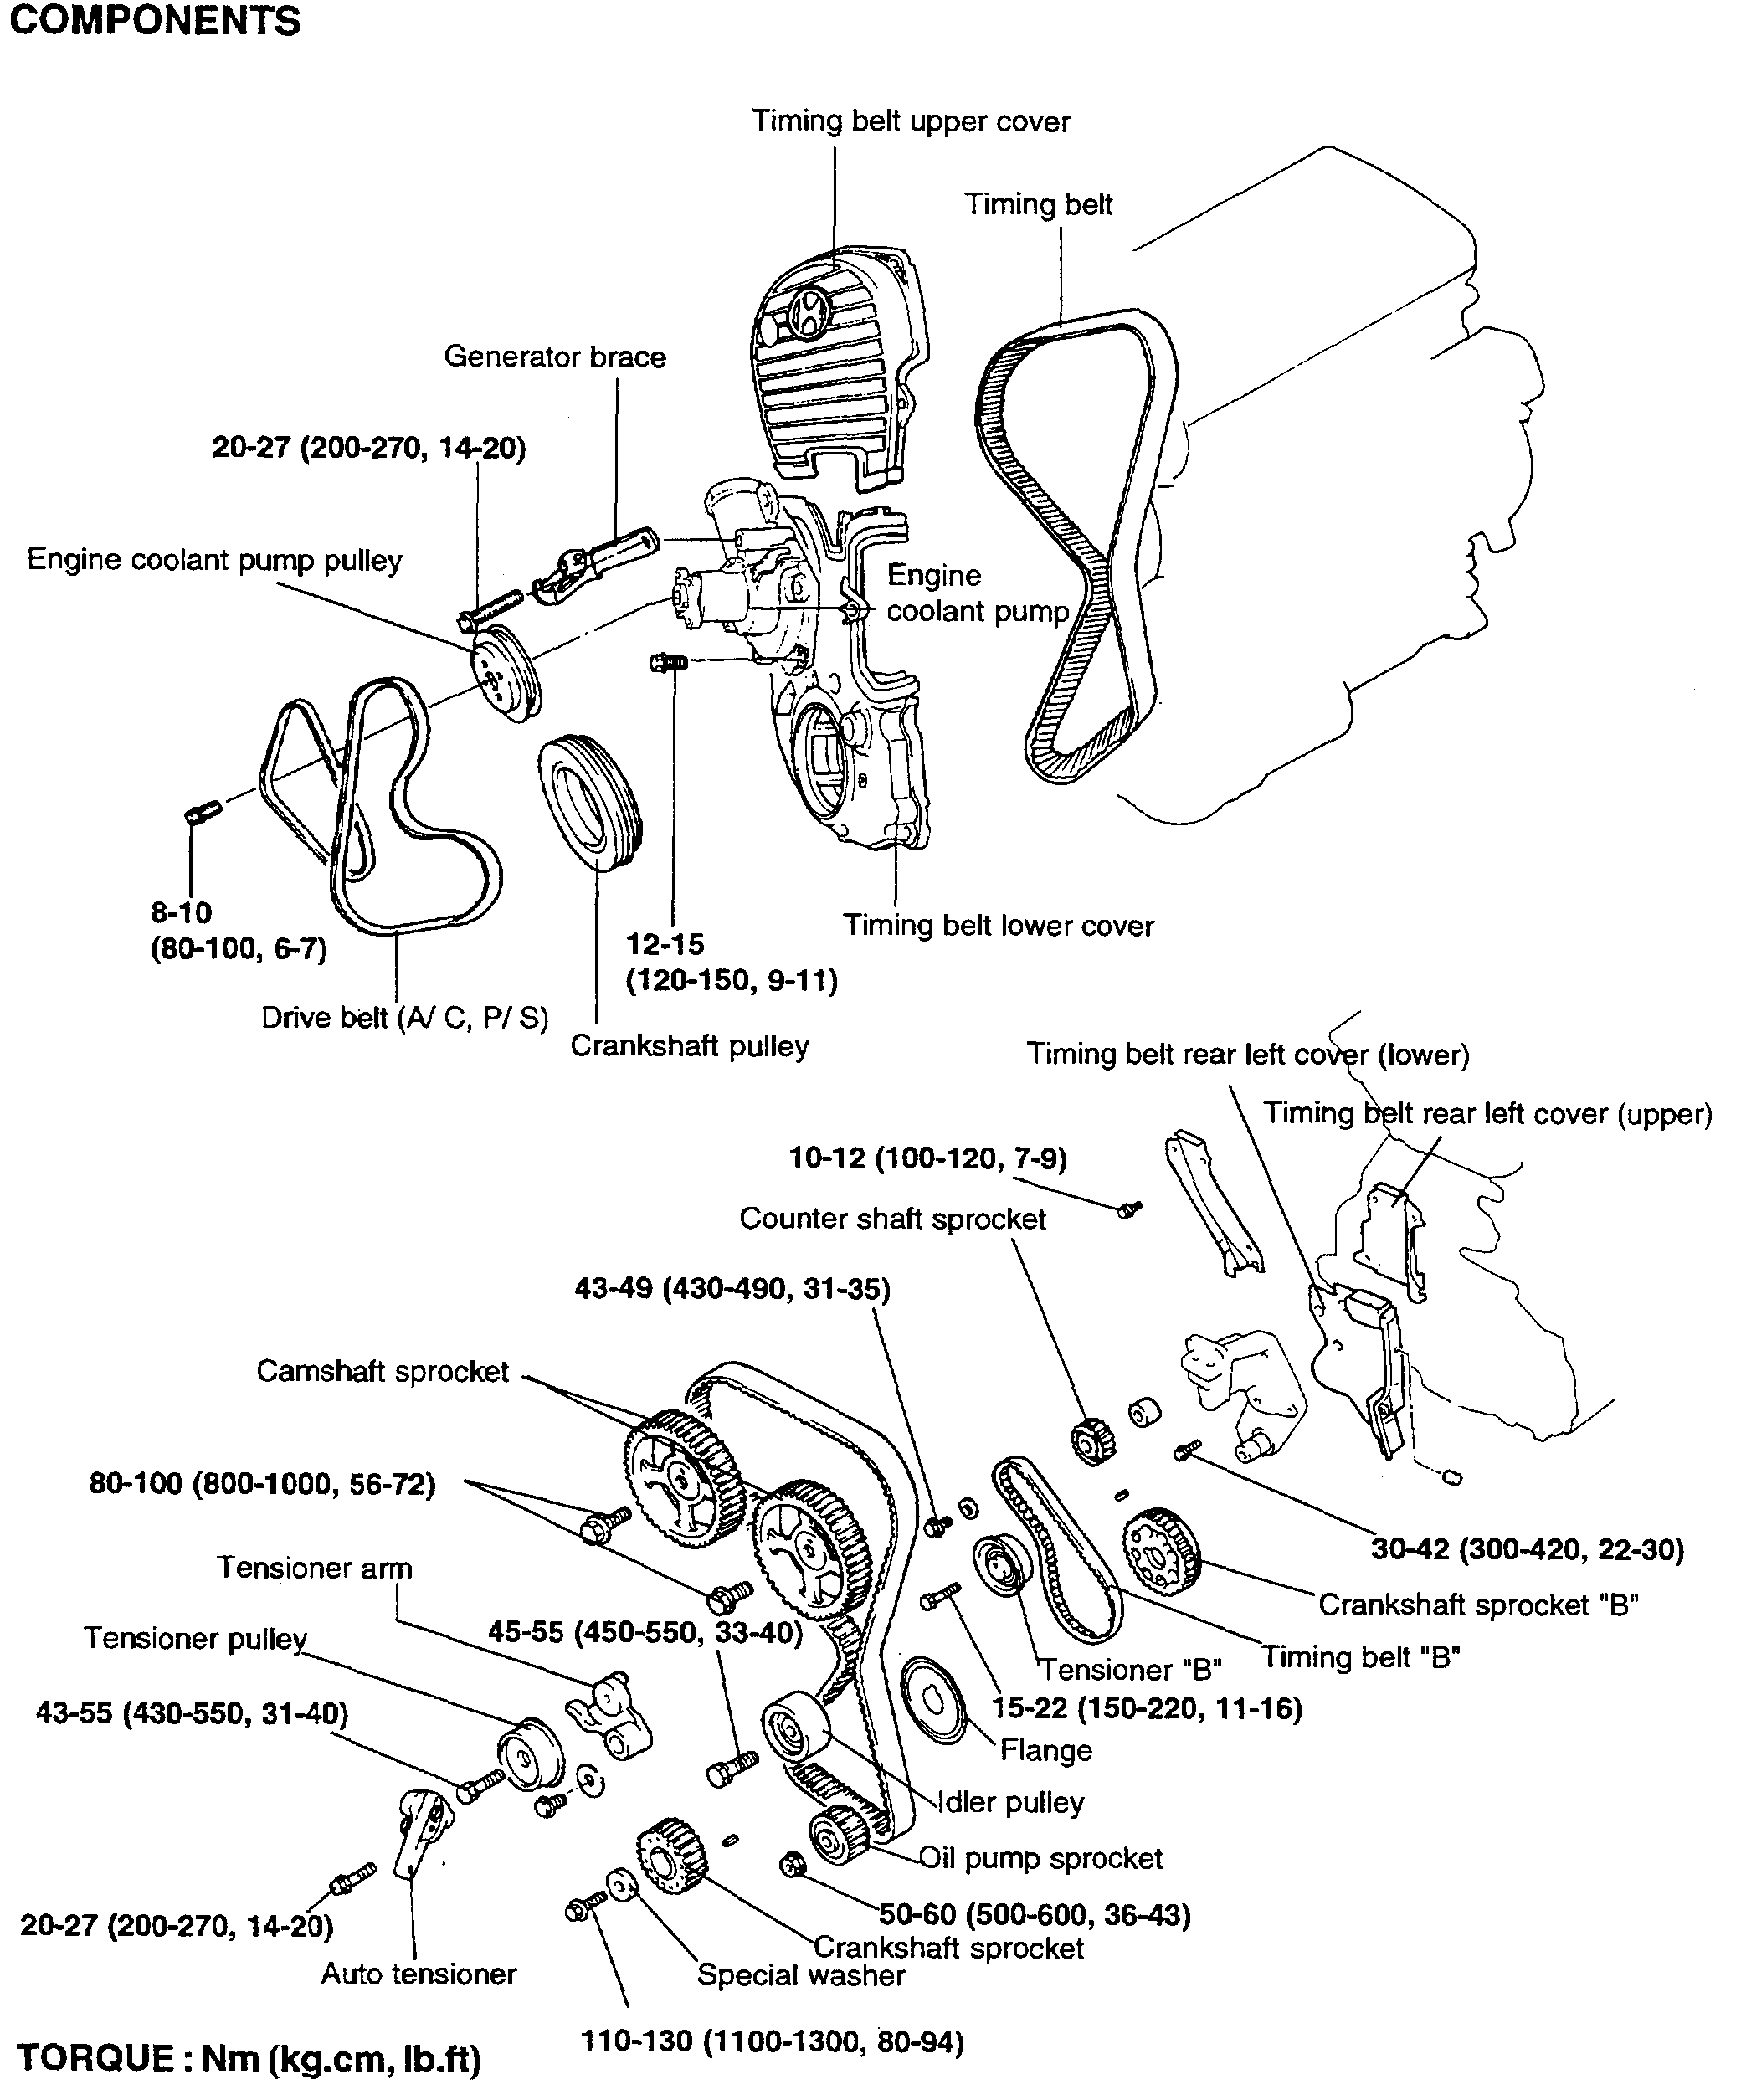
1. Remove the crankshaft pulley, engine coolant pump pulley and drive belt.
2. Remove the timing belt cover.
pic 2
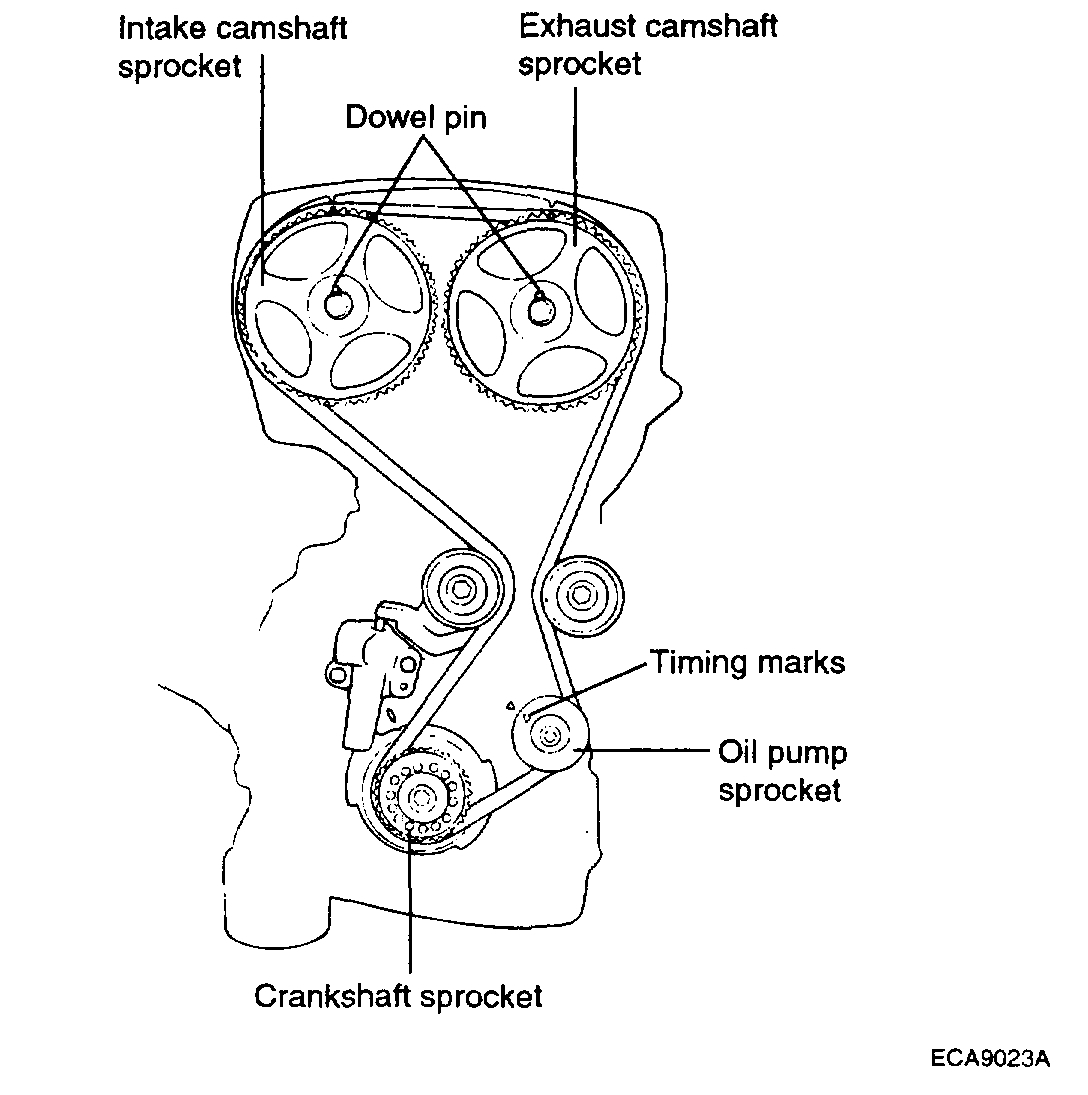
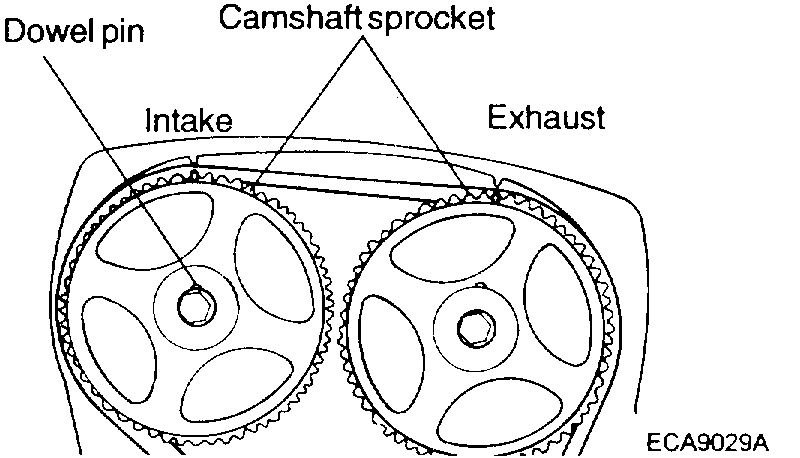
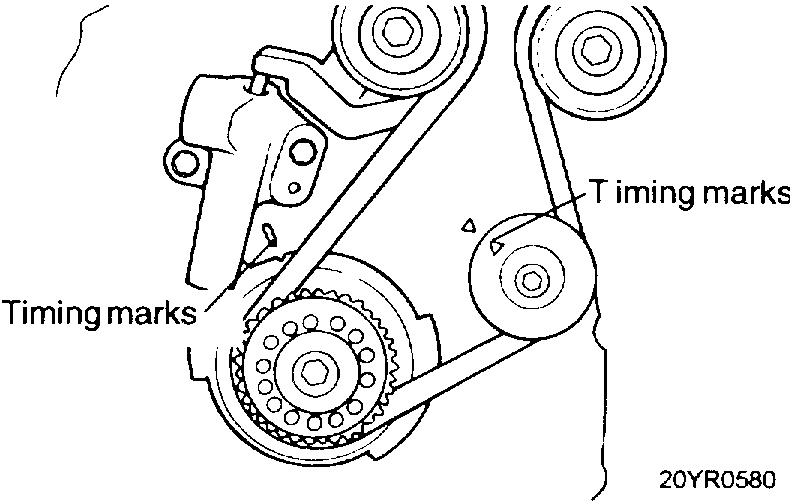
3. Turn the crankshaft clockwise and align the timing marks so as to bring the No. 1 cylinder to compression top-dead-center position.
At this time the timing marks of the camshaft sprocket and the upper surface of the rocker cover should coincide, and the dowel pin of the camshaft sprocket should be at the upper side.
Remove the auto tensioner.
CAUTION: Rotate the crankshaft clockwise.
pic 3
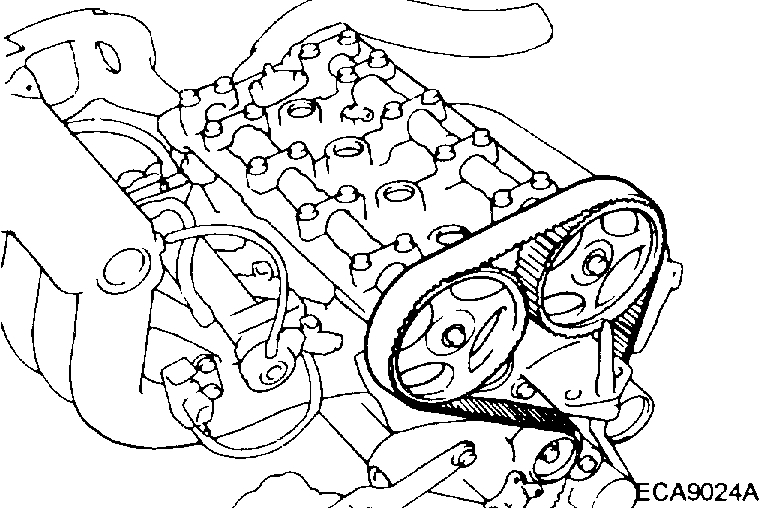
4. Remove the timing belt.
NOTE: If the timing belt is reused, make an arrow mark indicating the turning direction (or the front of the engine) to make sure that the belt is reinstalled in the same direction as before.
pic 4
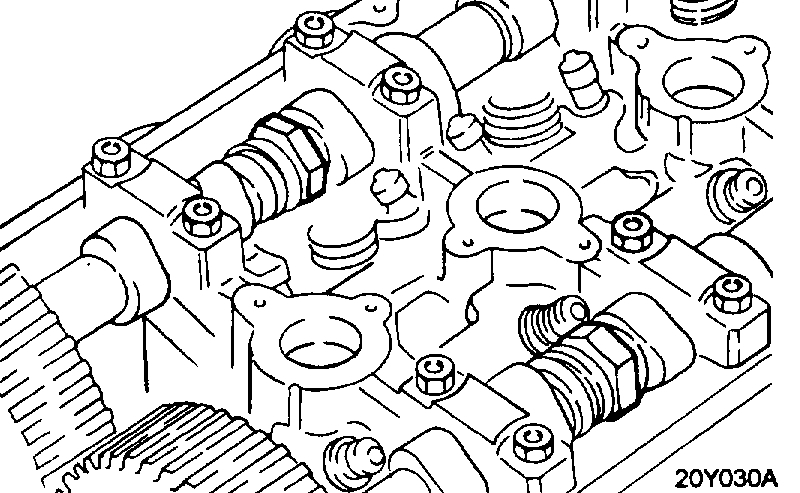
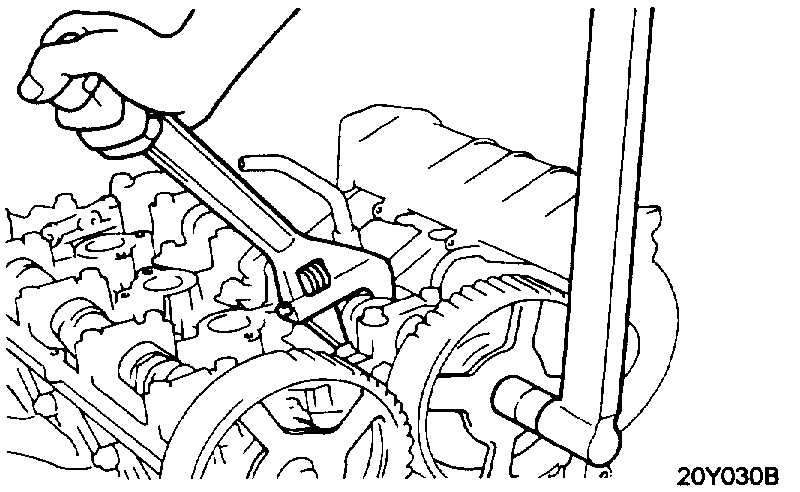
5. Remove the camshaft sprockets.
NOTE: Be careful not to damage the cylinder head with the wrench.
pic 5
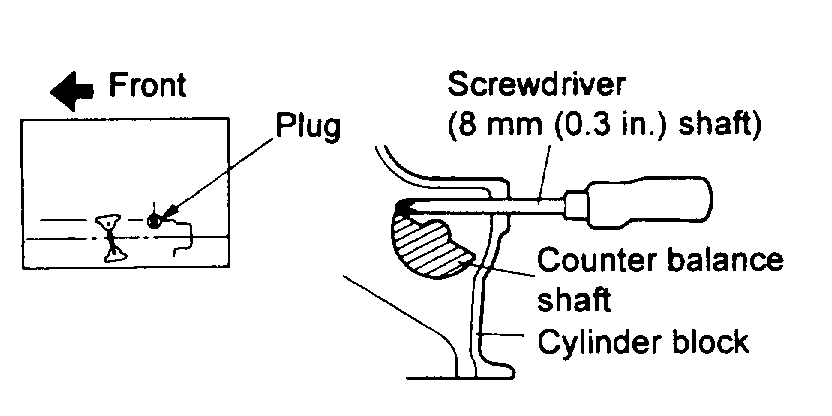
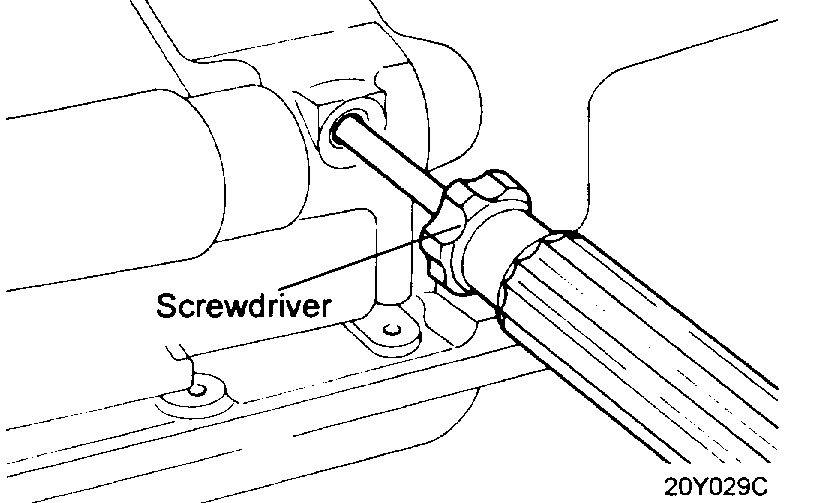
6. When the oil pump sprocket nut is removed, first remove the plug at left side of the cylinder block and insert a screwdriver to check the left counter balance shaft in position. Screwdriver used for this purpose should have a shaft 8 mm (0.3 inch) in diameter which can be inserted more than 60 mm (2.36 inch)
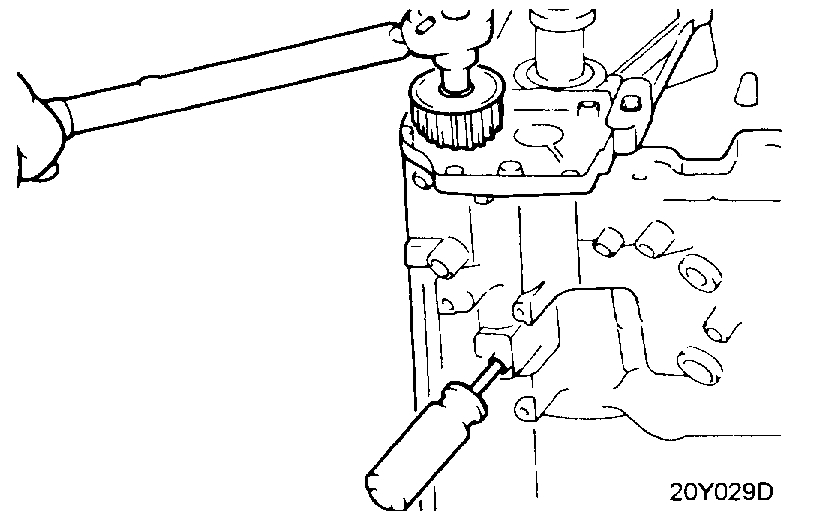
7. Remove the oil pump sprocket retaining nut and remove the oil pump sprocket.
8. Loosen the right counter balance shaft sprocket mounting bolt until it can be loosened by hand.
pic 6
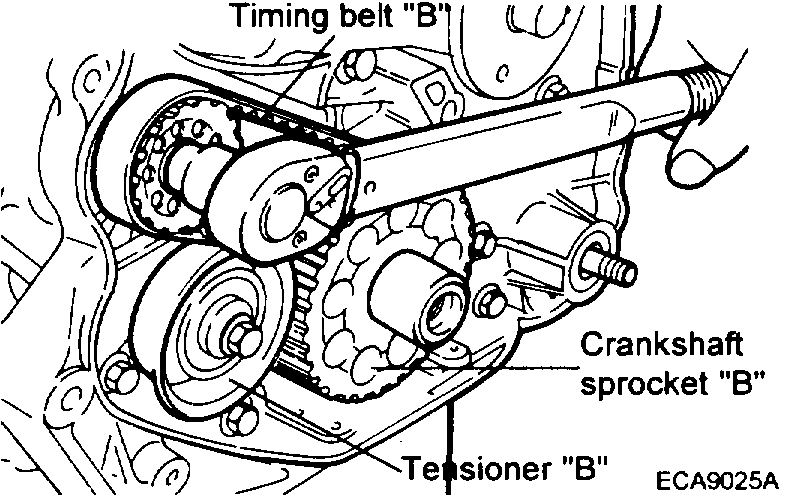
9. Next, remove tensioner "B" and remove timing belt "B".
CAUTION: After timing belt "B" has been removed, do not attempt to loosen bolt while holding sprocket with pliers, etc.
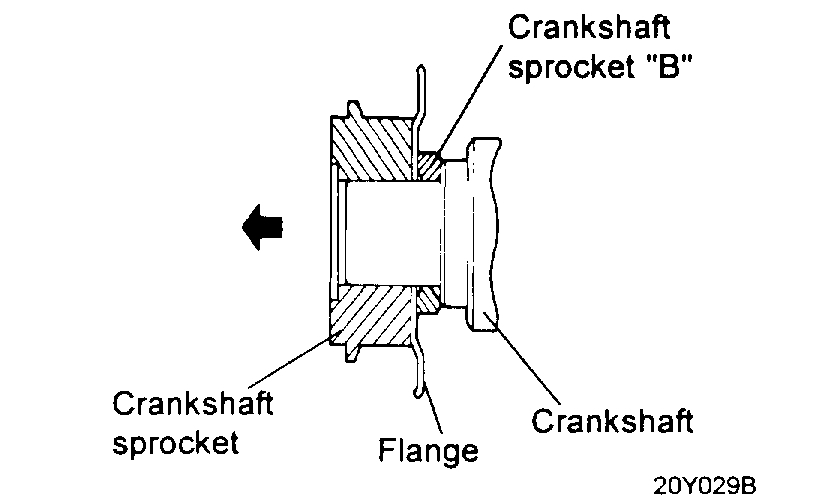
10. Remove the crankshaft sprocket "B" from crankshaft.
INSPECTION
Sprockets, Tensioner Pulley, and Idler Pulley
1. Check the camshaft sprocket, crankshaft sprocket, tensioner pulley, and idler pulley for abnormal wear, cracks, or damage. Replace as necessary.
pic 7
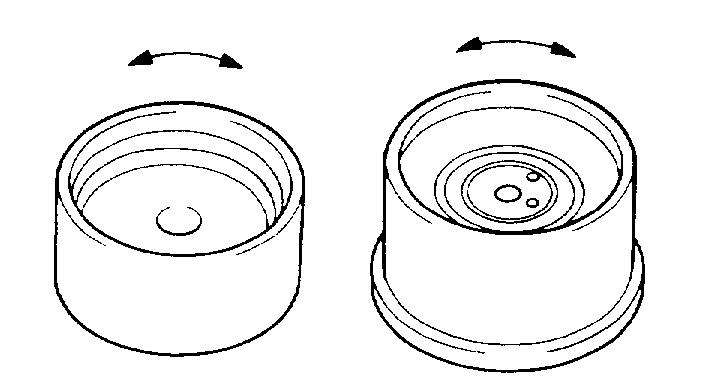
2. Inspect the tensioner pulley and the idler pulley for easy and smooth pulley rotation and check for play or noise. Replace as necessary.
3. Replace if there is grease leak.
Auto Tensioner
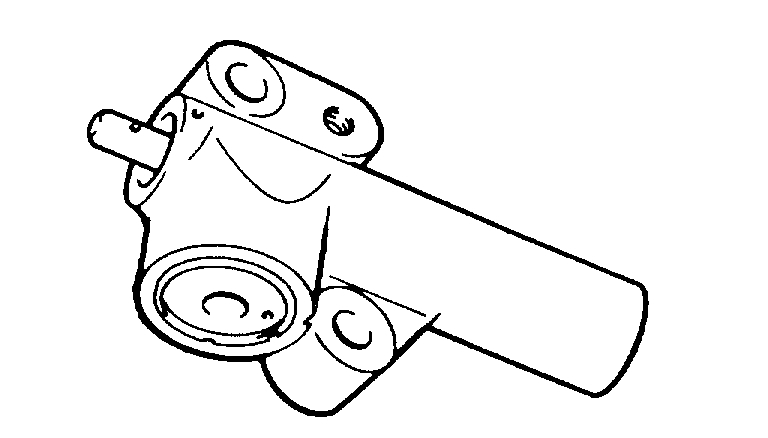
1. Check the auto tensioner for leak and replace as necessary.
pic 8
2. Check the rod end for wear or damage and replace as necessary.
pic 9
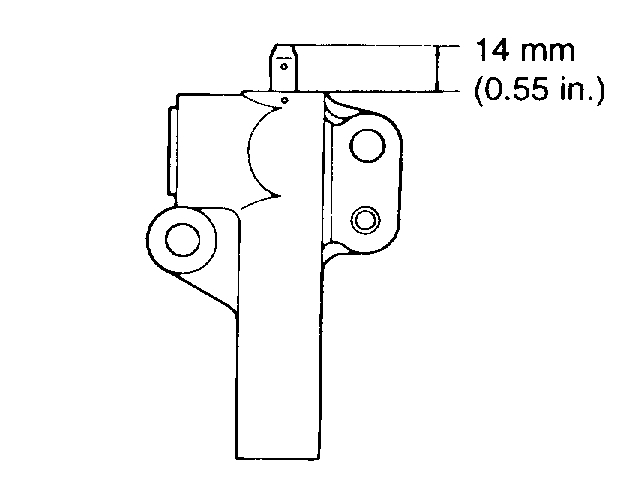
3. Measure the rod protrusion. If it is out of specification, replace the auto tensioner.
Standard value 14 mm (0.55 inch)
pic 10
4. Using a vise soft jaws push the auto tensioner rod. If the rod can be easily retracted, replace the auto tensioner. You should feel big resistance when pushing the rod in.
CAUTION: Clamp the auto tensioner in the vise so that it can be level. Use soft jaws in the vise to avoid damaging the auto tensioner.
Timing Belt
pic 11
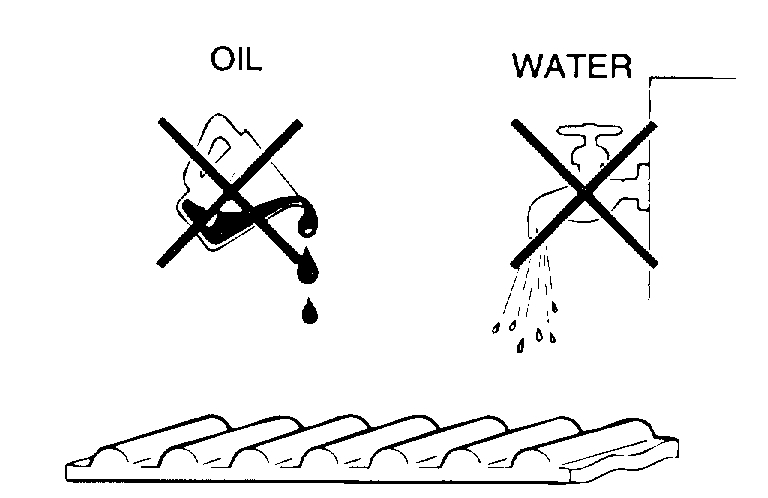
1. Check the belt for oil or dust deposits. Replace if necessary.
Small deposits should be wiped away with a dry cloth or paper. Do not clean with solvent.
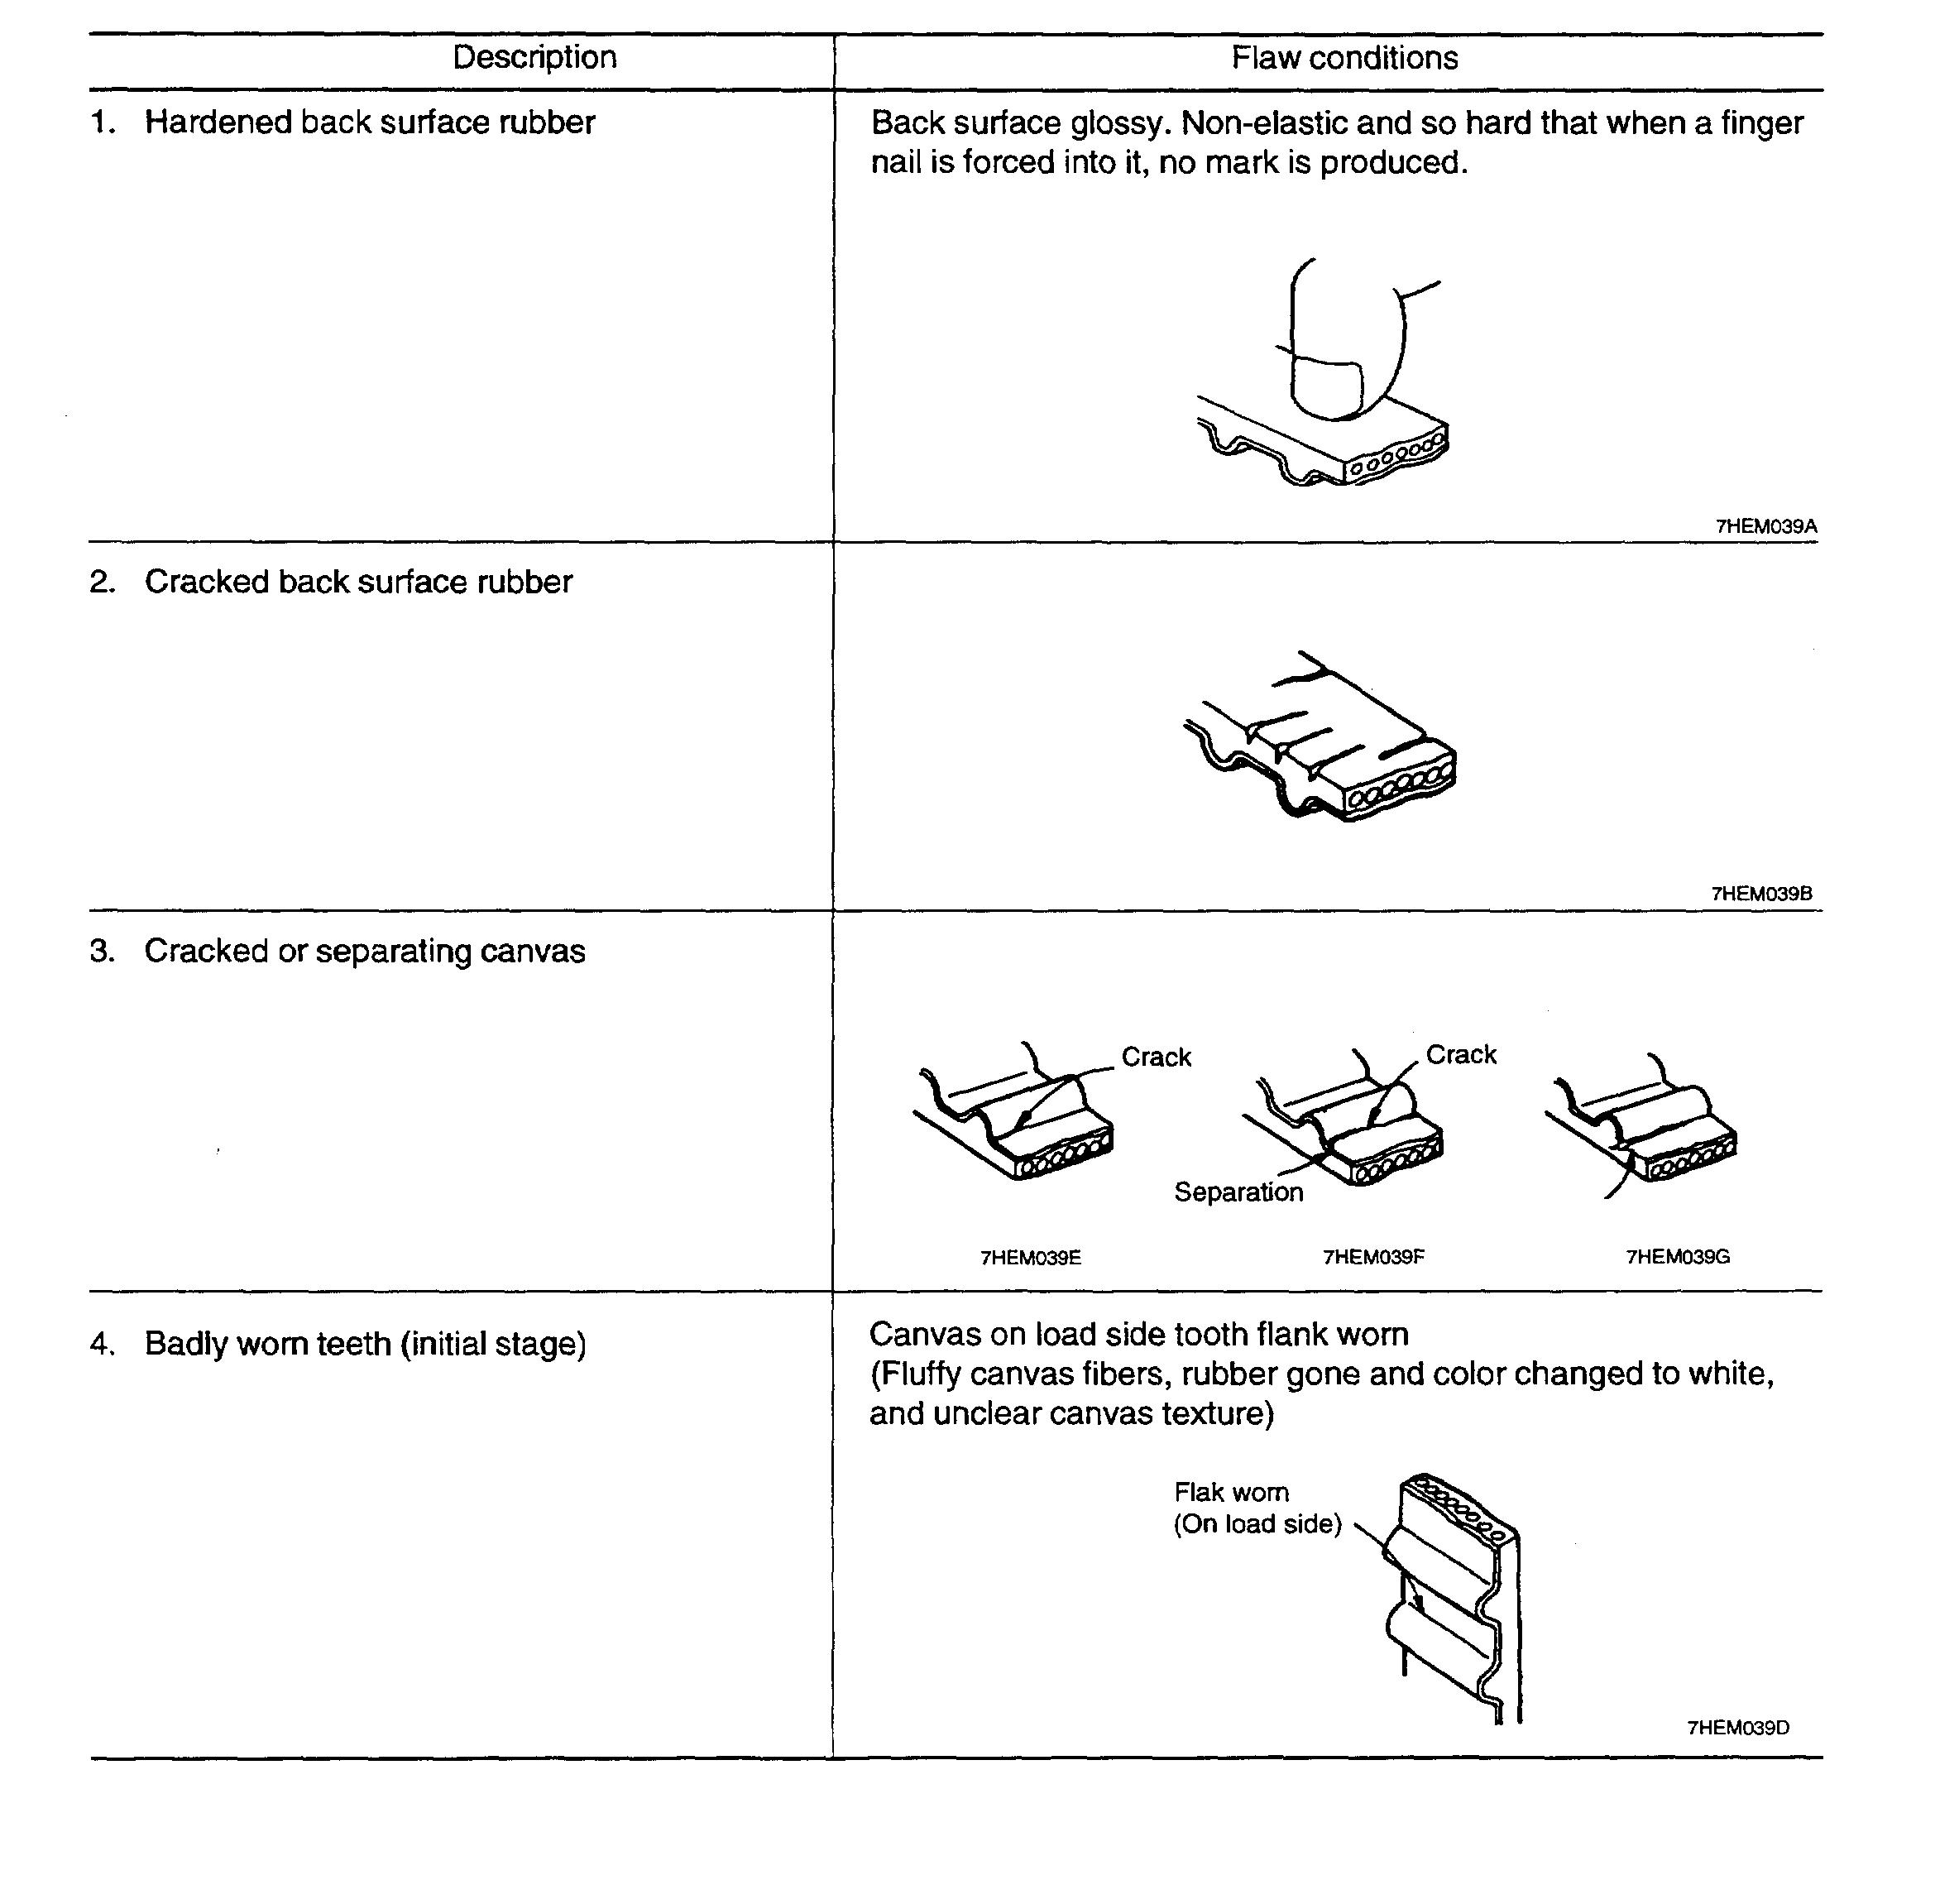
2. When the engine is overhauled or belt tension adjusted, check the belt in detail. If the following flaws are evident, replace the belt with a new one.
Description/Flaw Conditions
pic 12
1 of 2
pic 13
2 of 2
REASSEMBLY
pic 14
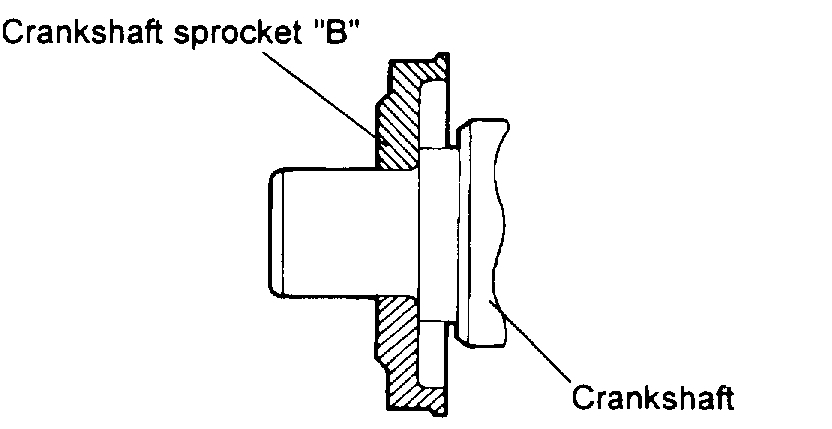
1. Install crankshaft sprocket "B" into crankshaft.
CAUTION: Pay special attention to the direction of the flange. If it is installed in the wrong direction, a broken belt could result from it.
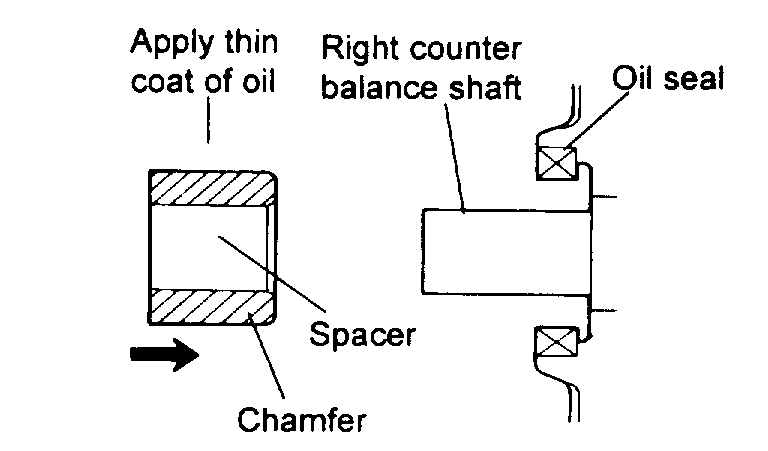
pic 15
2. Lightly apply engine oil to the outer surface of spacer, and then install the spacer to the right counter balance shaft. Be sure to install as the direction shown in illustration.
3. Install the counter balance shaft sprocket onto the right counter balance shaft, and then tighten flange bolt by hand tightly.
pic 16
4. Align the timing mark on each sprocket with the corresponding timing mark on the front case.
pic 17
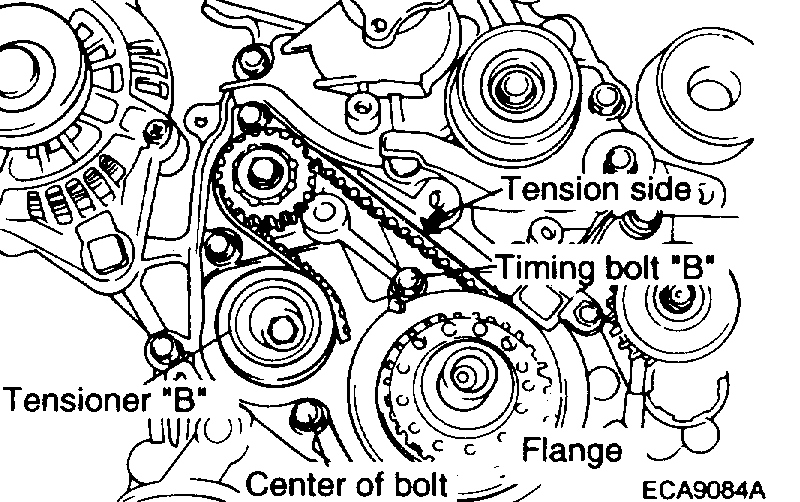
5. When the timing belt "B" is installed, make certain that tension side has no slack.
Install tensioner "B" in the center of pulley located on the left side of mounting bolt and in the pulley flange directed toward front of engine.
Align the timing mark on the right counter balance shaft sprocket with the timing mark on the front case.
pic 18
6. Lift tensioner "B" to tighten the timing belt "B" so that its tension side will be pulled tight. In this condition, tighten a bolt to secure tensioner "B". When a bolt is tightened, be careful to prevent from fuming together. If the shaft is turned together, the belt will be over tightened.
7. Check to ensure that timing marks are in alignment.
pic 19
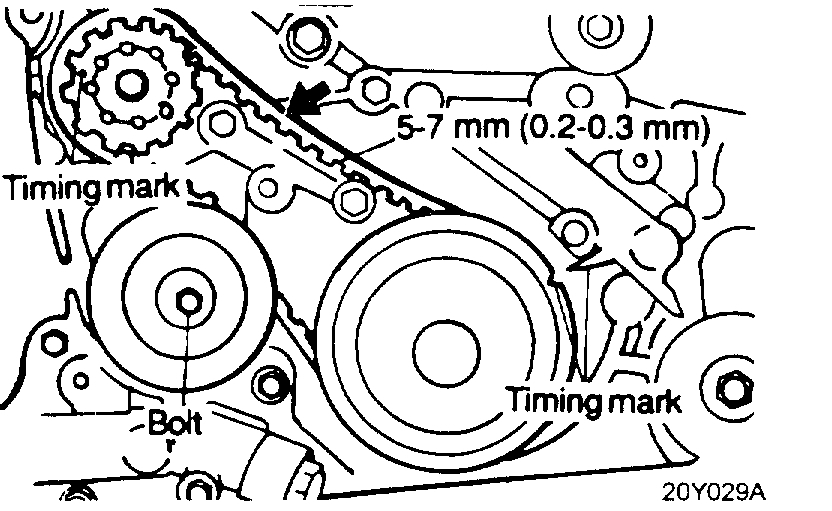
8. Check to ensure that when the center of span on the tension side is depressed with index finger in direction of arrow, deflection of belt is within specification.
Belt deflection 5 - 7 mm (0.2 - 0.3 inch)
pic 20
9. Install the flange and crankshaft sprocket onto crankshaft. Be sure to install as the direction shown in illustration.
CAUTION: Pay attention to direction of flange. If it is installed in wrong direction, a broken belt could result
10. Install the special washer and sprocket bolt to crankshaft, and then tighten the sprocket bolt.
Tightening torque
Crankshaft sprocket bolt 110 - 130 Nm (1100 - 1300 kg. cm, 80 - 94 ft. lbs.)
pic 21
11. Insert a screwdriver through the plug hole in left side of cylinder block to keep shaft in position.
pic 22
12. Install the oil pump sprocket, and tighten the nut to the specified torque.
pic 23
1 of 2
pic 24
2 of 2
13. Install the camshaft sprocket and tighten the bolt to the specified torque.
Tightening torque
Camshaft sprocket bolt 80 - 100 Nm (800 - 1000 kg. cm, 56 - 72 ft. lbs.)
pic 25
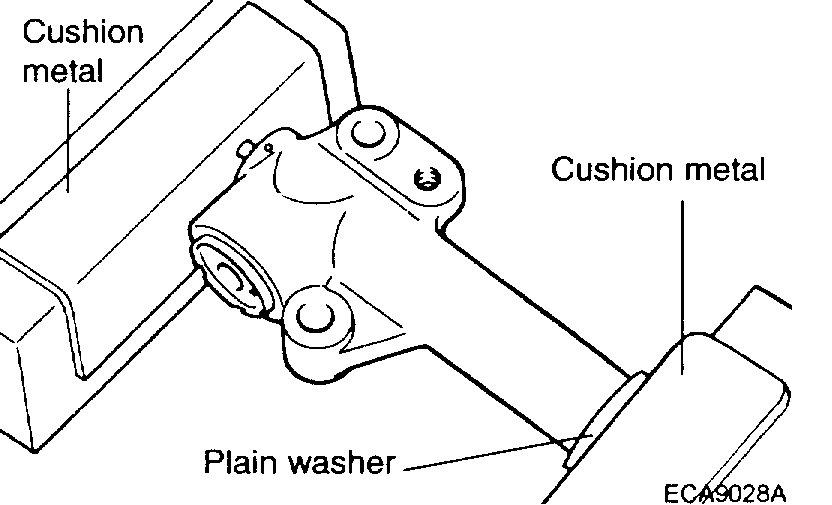
14. Install the auto tensioner.
CAUTION: Leave the set pin installed in the auto tensioner.
pic 26
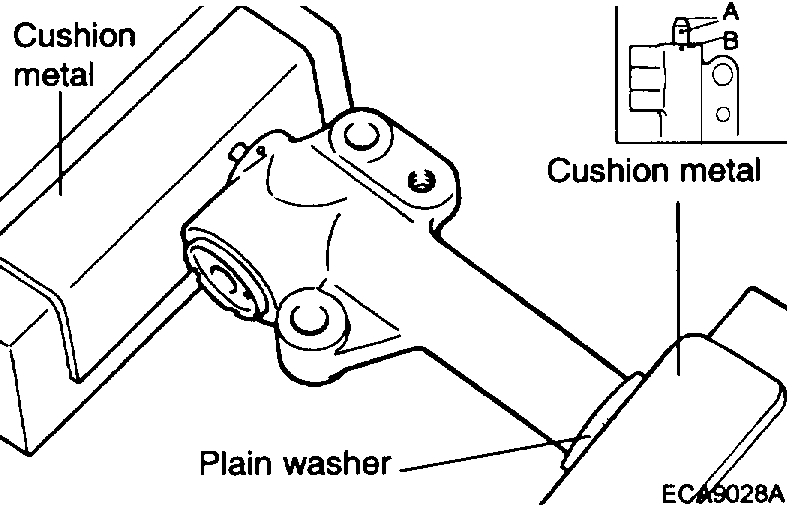
NOTE: If the auto tensioner rod is in its fully extended position, reset it as follows.
1. Clamp it in the vise with soft jaws in a level position. Apply a plain washer if there is a plug at the bottom of the auto tensioner.
2. Push in the rod slowly with the vise until the set hole A in the rod is aligned with the set hole B in the cylinder.
pic 27
15. Install the tensioner pulley onto the tensioner arm.
CAUTION: Leave the wire installed in the auto tensioner.
pic 28
16. After installing the crankshaft sensor, set the timing mark of sprocket correctly.
NOTE:
1. Before installing the timing belt, If the timing mark of cam sprocket doesn't coincide with that of rocker cover, do not rotate the cam sprocket more than 2 teeth of sprocket in any direction.
Rotating sprocket more than 2 teeth makes valve and piston touched each other.
2. In case of rotating the cam sprocket unavoidably more than 2 teeth, rotate the can sprocket after rotating crank sprocket counter clock wise on basis of timing mark.
pic 29
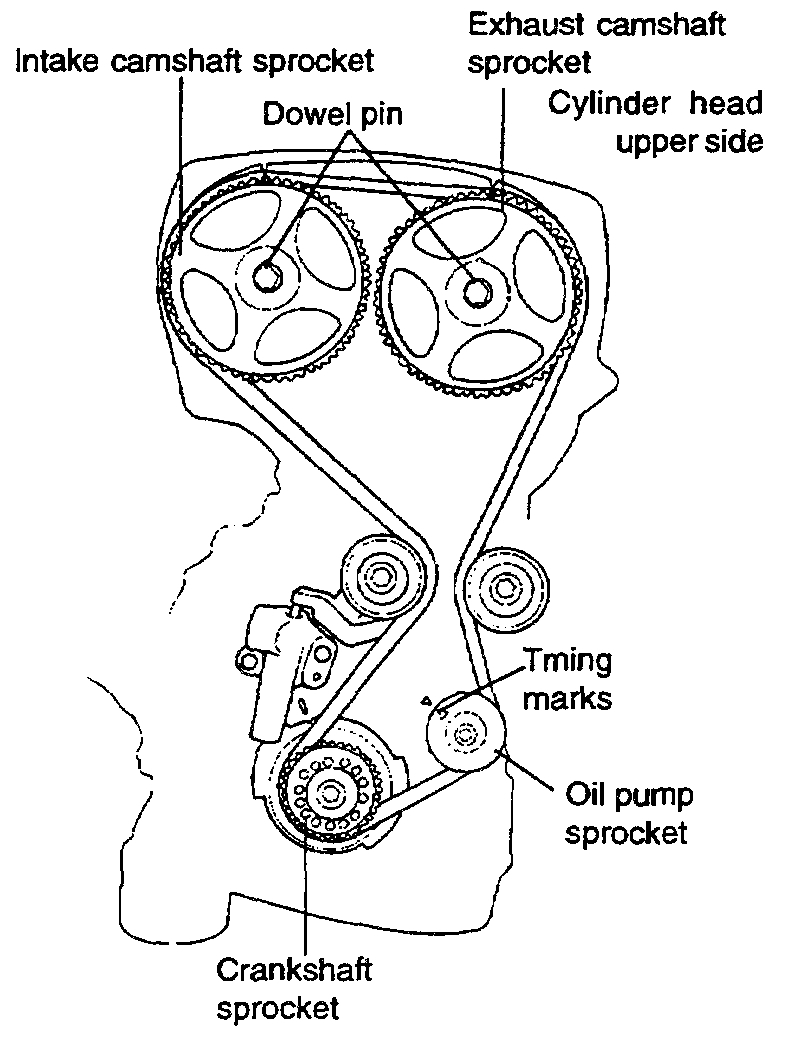
17. Align the crankshaft sprocket timing marks.
18. Align the oil pump sprocket timing marks.
pic 30
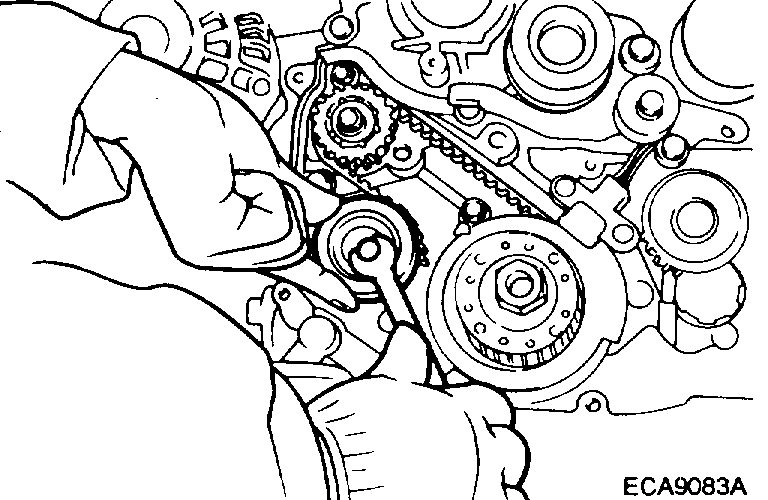
19. Install the timing belt around the tensioner pulley and crankshaft sprocket. Then secure the timing belt onto the tensioner pulley with your left hand.
20. Pulling the belt with your right hand, install it around the oil pump sprocket.
21. Install the belt around the idler pulley.
22. Install it around the intake camshaft sprocket.
23. Turn the exhaust camshaft sprocket one tooth clockwise to align its timing mark with the cylinder head top surface [see illustration in step 16]. Then, pulling the belt with both hands, install it around the exhaust camshaft sprocket.
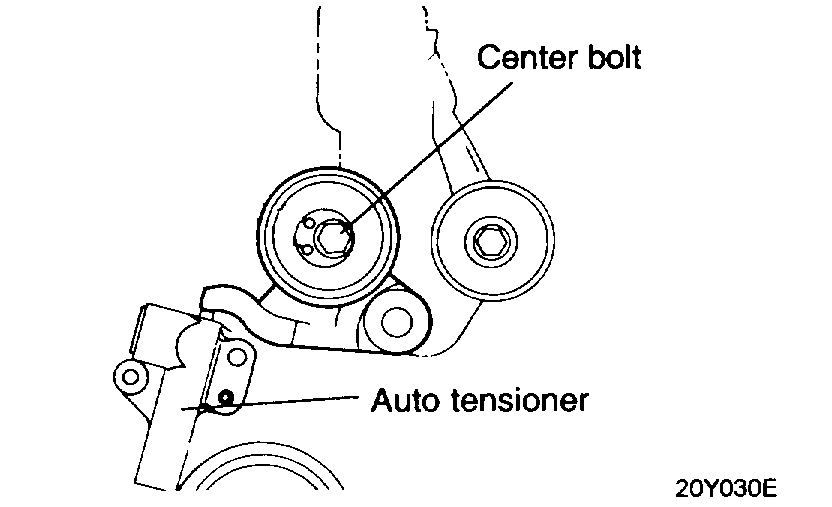
24. Gently raise the tensioner pulley as shown by the arrow so that the belt can't sag, and temporarily tighten the center bolt.
25. Check again whether the timing mark of each sprocket is correct or not.
26. Remove the fixed wire that is attached to auto tensioner.
pic 31
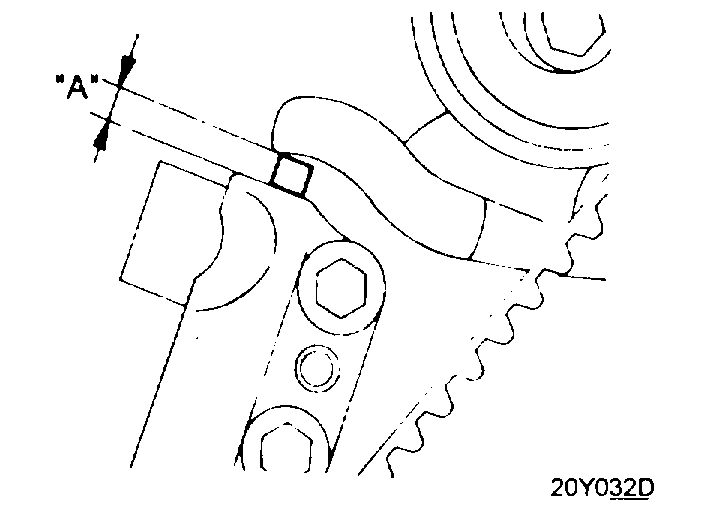
27. Rotate the crankshaft two complete turns clockwise and leave it for about 15 minutes. Then, measure the auto tensioner protrusion "A" (distance between the tensioner arm and auto tensioner body) to ensure that it is up to specification.
Standard value 6 - 8 mm (0.24 - 0.32 inch)
pic 32
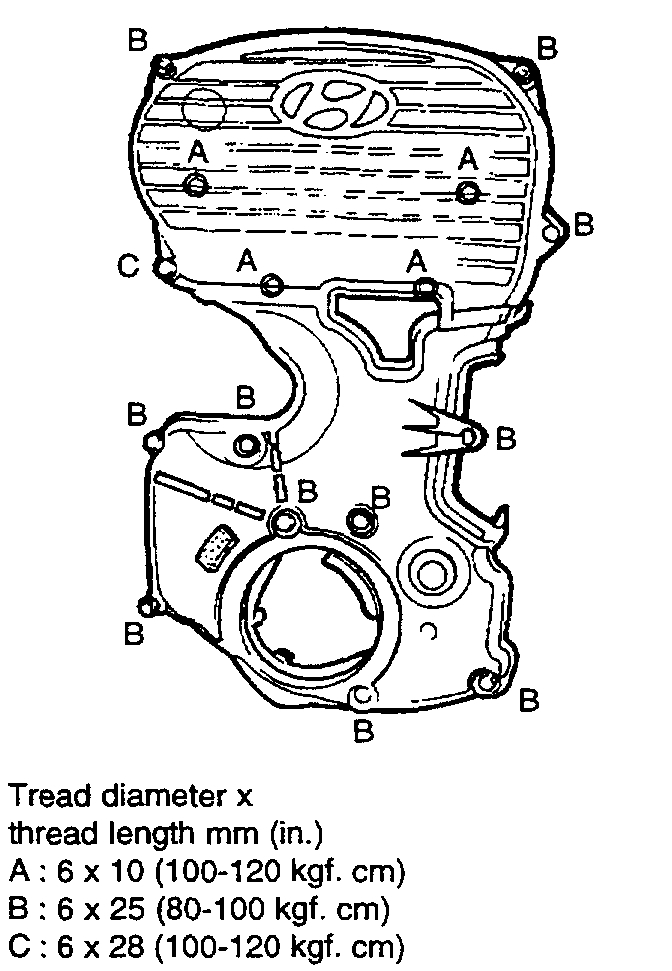
28. Install the timing belt lower cover and the timing belt upper cover.
_______________________________________
I hope this helps. Let me know if you have other questions.
Take care,
Joe
Images (Click to enlarge)
Aug 24, 2019 at 9:39 PM