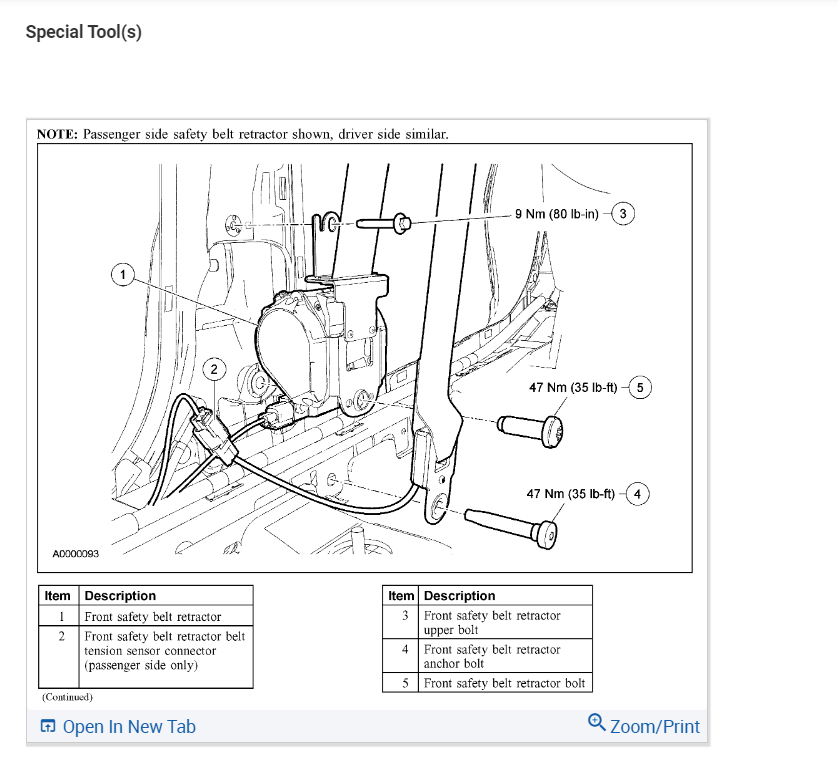
The seat belt mounting bolts will be pretty tight FYI. Here is the instructions on how to replace the seat belt which you will need to get from the dealer. Some interior panels will need to be removed which is not to difficult. Please check out the images below for further instructions.
SAFETY BELT SYSTEM
When replacing any active occupant restraint components, use only the replacement parts specified in the Ford Customer Service Division Master Parts Catalog.
The active restraint system consists of the following:
- Front row safety belt buckles and pretensioners, attached to the inboard side of the seats.
- Driver safety belt retractor pretensioner (Hybrid only).
- Front row safety belt retractors, located behind the lower B-pillar trim panels.
- Second row outboard safety belt retractors, located behind the rear quarter trim panels.
- Second row 60/40 seat center safety belt retractor and LH safety belt buckle assembly integrated into the 60 percent seat back.
- Second row dual safety belt buckle assembly for the 60/40 seat attached to the floor pan under the RH seat cushion.
- Second row lower anchors and tethers for children (LATCH) at all outboard seating positions, welded to the seat backrest frame.
- The child safety seat tether anchors are attached to the roof near the rear liftgate door.
BELT MINDER DEACTIVATING/ACTIVATING
Preparation
1. Apply the parking brake before deactivating/activating the belt minder.
2. Place the gear selector lever in PARK or NEUTRAL (manual transaxle).
3. Place the ignition switch in the OFF position.
4. Close all the vehicle doors.
5. Unbuckle the driver safety belt.
6. Place the parking lamps/headlamps switch in the OFF position.
Deactivating/Activating
1. Turn the ignition switch to the RUN position. (Do not start the engine.)
2. Wait until the safety belt warning lamp turns off (approximately 1 to 2 minutes).
3. NOTE: Steps 3 through 5 must be completed within 60 seconds or the procedure must be repeated.
Uncoil, then retract, the safety belt 3 times, ending with the safety belt retracted. This portion of the procedure can be done before or during the belt minder warning activation.
4. Turn the parking lamps/headlamps ON, then OFF.
5. Uncoil, then retract, the safety belt 3 times, ending with the safety belt retracted. After this step the safety belt warning lamp is illuminated for 3 seconds.
6. Within 7 seconds of the safety belt warning lamp turning off, uncoil then retract the safety belt. This enables the belt minder if disabled or disables the belt minder if enabled. The following sequence of events confirms the belt minder is enabled:
- flashing of the safety belt warning lamp 4 times per second for 3 seconds
- 3 seconds with the safety belt lamp off
- flashing the safety belt lamp 4 times per second for 3 seconds again
7. The safety belt lamp flashing 4 times per second for 3 seconds provides confirmation that the belt minder is disabled.
8. After confirmation, the deactivation/activation procedure is complete.
Check out the images (below). Let us know what happens and please upload pictures or videos of the problem so we can see what's going on.
Images (Click to enlarge)
Jun 6, 2023 at 8:51 AM