It sounds like the reverse shift solenoid has gone out. Here are diagrams to help you located the part and how to change it out. Check out the diagrams (below).
COMPONENT NOTES AND INFORMATION
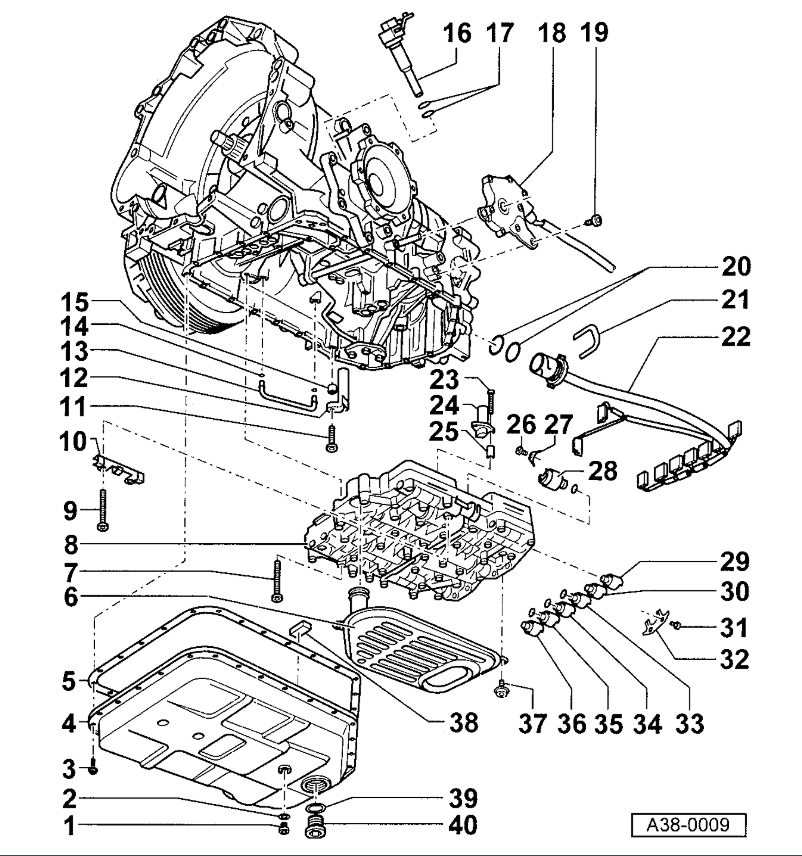
1. Drain plug
- Tighten to: 40 Nm (30 ft lb)
- 5 mm hex socket
2. Seal
- Always replace
3. Oil Pan Retaining Bolt
- Tighten to: 10 Nm (7 ft lb)
- Tighten bolts for oil pan diagonally in several stages
4. Oil Pan
- Removing and installing, refer to "Oil Pan Removing and Installing", below
5. Gasket
- Always replace
6. Oil strainer
- Removing and installing, refer to "Oil Strainer Removing and Installing", below
7. Valve Body Retaining Bolt
- Tighten to: 8 Nm (70 inch lbs)
- For attaching valve body:
1 bolt 6 x 30 mm
16 bolts 6 x 60 mm
- Note tightening method, refer to valve Body Replacement
8. Valve body
- Removing and installing, refer to "Valve Body Removing and Installing", below.
9. Wire Harness Bracket Retaining Bolt
- Tighten to: 8 Nm (70 inch lbs)
- Item 7
10. Bracket for wiring harness
- Insert wiring harness
- Attached with bolts for valve body
11. Transmission Vehicle Speed Sensor Retaining Bolt
- Tighten to: 6 Nm (53 inch lbs)
- Always replace
12. Transmission Vehicle Speed Sensor
- Replacement, refer to "Transmission Vehicle Speed Sensor, Replacing", below
13. Inner oil line
- Always replace after removing
- Removing and installing, refer to "Inner Oil Line Removing and Installing", below
14. O-ring
- Always replace
- Coat with petroleum jelly
15. Spacer sleeve
- Height: 8 mm
16. Speedometer Vehicle Speed Sensor
- Replacing, refer to "Speedometer Vehicle Speed Sensor Removing and Installing", below
17. O-ring
- Always replace
- Coat with special grease
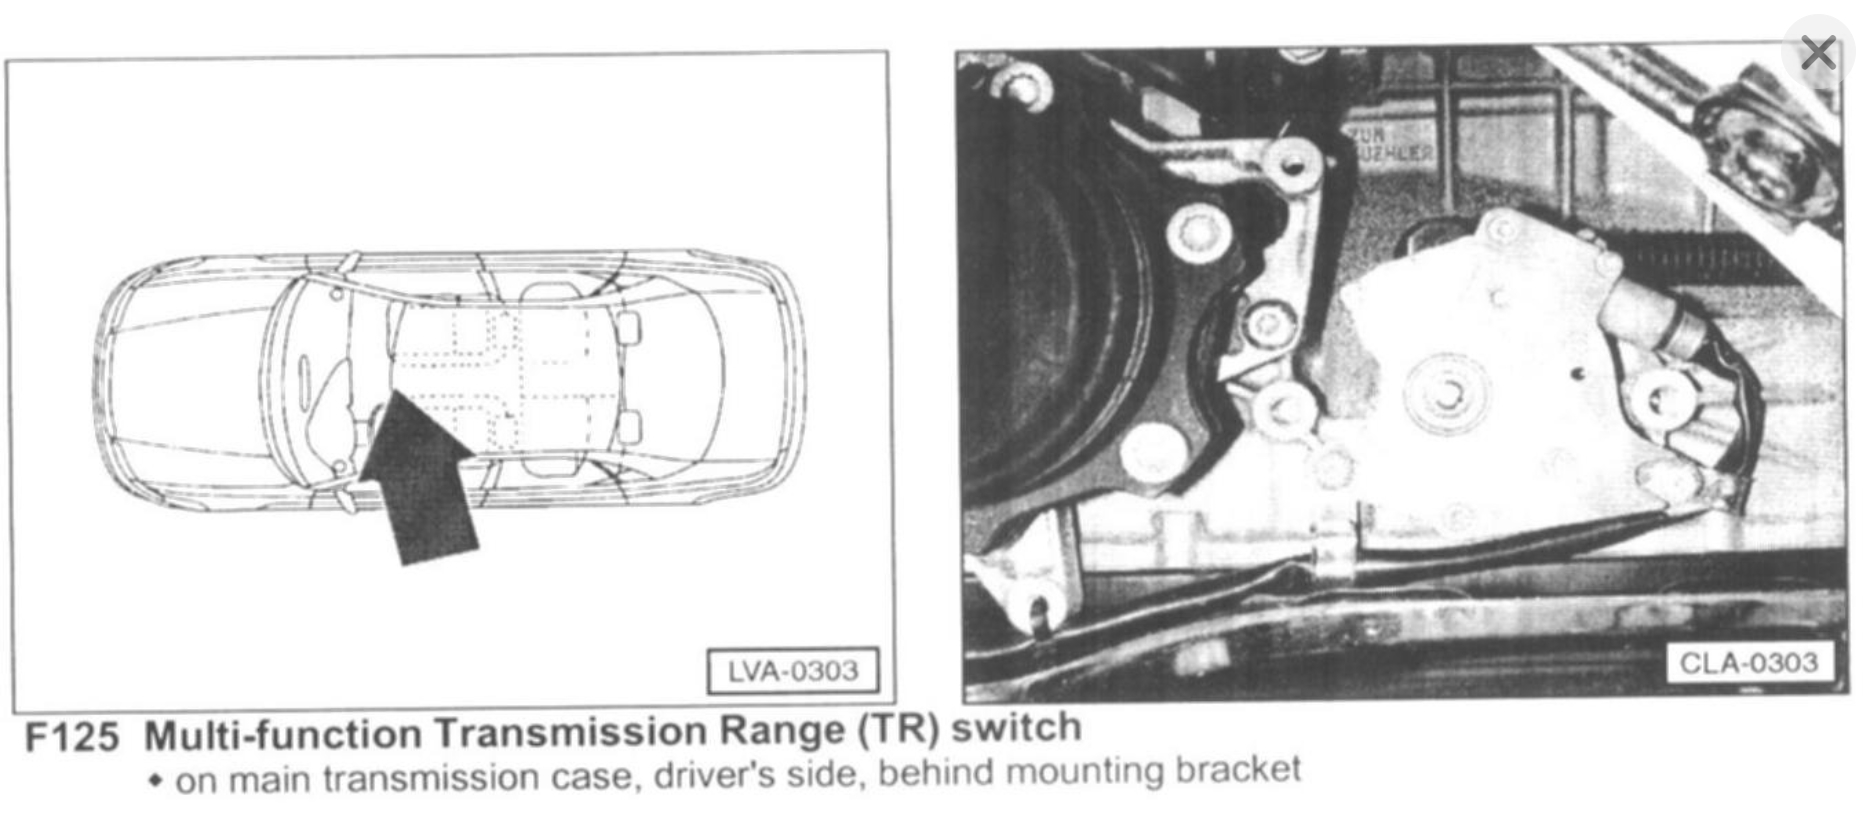
18. Multi-Function Transmission Range Switch
- Replacement, Refer to "Multi-Function Transmission Range Switch, Replacing" below.
19. Multi-Function Transmission Range Switch Retaining Bolt
- Tighten to: 8 Nm (70 inch lbs)
20. O-ring
- Always replace
- Coat with petroleum jelly
21. Locking clasp
- For wiring harness connector
- Ensure complete engagement when installing
22. Wiring harness
- Transmission Fluid Temperature Sensor
- Integrated in wiring harness
- To replace, refer to "Valve Body Removing and Installing", below
- Release from bracket for wiring harness, -item 10-
- Location of wiring harness connector: flat point of rear shoulder faces down, the lugs on the shoulder are horizontal
23. Transmission Input Speed Sensor Retaining Bolt
- Tighten to: 6 Nm (53 inch lbs)
24. Transmission Input Speed Sensor
- Replacement, refer to "Transmission Input Speed Sensor Replacing", below.
25. Spacer sleeve
- Height: 20 mm
26. Pressure Regulator Retaining Bracket Screw
- Tighten to: 6 Nm (53 inch lbs)
27. Bracket for pressure regulator
28. Solenoid Valve 4
- With O-ring
- Apply a thin coat of petroleum jelly to O-ring before installing
- To replace, refer to "Valve Body Removing and Installing", below
29. Solenoid Valve 3
- Without O-ring
- To replace, "Oil Pan Removing and Installing", below
30. Solenoid Valve 2
- Without O-ring
- To replace, refer to "Oil Pan Removing and Installing", below
31. Solenoid Retaining Bracket Screw
- Tighten to: 6 Nm (53 inch lbs)
32. Bracket for solenoid valves
33. Solenoid Valve 6
- With O-ring
- Apply a thin coat of petroleum jelly to O-ring for installing
- To replace, refer to "Oil Pan Removing and Installing", below
34. Solenoid Valve 7
- With O-ring
- Apply a thin coat of petroleum jelly to O-ring before installing
- To replace, refer to "Oil Pan Removing and Installing", below
35. Solenoid Valve 5
- With O-ring
- Apply a thin coat of petroleum jelly to O-ring before installing
- To replace, refer to "Oil Pan Removing and Installing", below
36. Solenoid Valve 1
- Without O-ring
- To replace, refer to "Oil Pan Removing and Installing", below and unbolt guide plate for park lock mechanism
- When installing, do not tighten bolts for guide plate (23 Nm) when selector lever is in position "P"
37. Oil Strainer Retaining Bolt
- Tighten to: 6 Nm (53 inch lbs)
38. Magnet
- 4 magnets in the beads of oil pan
- Clean
- Ensure that magnet is making contact with the oil pan over its full surface
39. O-ring
- Always replace
40. ATF filler plug
- Tighten to: 80 Nm (59 ft lb)
- 17 mm hex socket
Shift Solenoid Removal/Installation
- Remove oil pan
- Refer to numbers 28 through 36 above for instructions.
Please let us know what happens.
Image (Click to make bigger)
Friday, November 2nd, 2018 AT 12:23 PM