Hi,
What you did is the fastest way to do it. I agree there is no room; however, take a look at what the manual recommends.
Here are the directions right from Alldata. The attached pics correlate with the directions.
_______________________________
2011 Ford Truck F 150 4WD V8-5.0L
Camshaft Position (CMP) Sensor
Vehicle Powertrain Management Sensors and Switches - Powertrain Management Sensors and Switches - Computers and Control Systems Camshaft Position Sensor Service and Repair Removal and Replacement Camshaft Position (CMP) Sensor
CAMSHAFT POSITION (CMP) SENSOR
303-14 Electronic Engine Controls 2011 F-150
REMOVAL AND INSTALLATION
Camshaft Position (CMP) Sensor — 5.0L (4V)
Removal
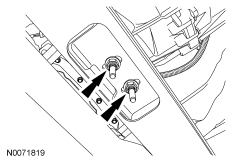
Both RH and LH intake Camshaft Position (CMP) sensors and RH exhaust CMP sensor
Disconnect the Camshaft Position (CMP) sensor electrical connector.
Remove the bolt and the CMP sensor.
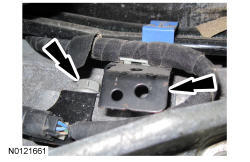
LH exhaust Camshaft Position (CMP) sensor
Position the vehicle on a hoist. For additional information, refer to Section 100-02 .
If equipped with 4 wheel drive, remove the transfer case. Section 308-07B
If equipped, remove the 2 bolts and the LH heat shield from the rear of the LH cylinder head.
Disconnect the LH CMP sensor electrical connector.
Disconnect the LH HO2S and the LH CMS electrical connectors, and remove the pushpins from the fuel line bracket.
Position the LH HO2S and the LH CMS harness from the top of the transmission
Remove the fuel line bracket bolt from the left side of the transmission and position the fuel lines and bracket aside.
pic 1
Remove the CMP sensor bolt.
NOTE: Make sure the transmission jack contacts the outer ribs of the transmission fluid pan.
2 wheel drive vehicles, position a suitable high-lift transmission jack under the transmission and remove the 2 transmission support insulator nuts. All vehicles, raise the transmission until the CMP sensor can be removed.
Remove the CMP sensor.
pic 2
Installation
LH exhaust Camshaft Position (CMP) sensor
NOTE: The bolt must be torqued while the transmission is raised
Position the Camshaft Position (CMP) sensor and install the bolt.
Tighten to 10 Nm (89 lb-in).
All vehicles, using the suitable high-lift transmission jack, lower the transmission. 2 wheel drive vehicles, install the 2 transmission support insulator nuts.
Tighten to 103 Nm (75 lb-ft).
imageOpen In New TabZoom/Print
Position the fuel lines and bracket back and Install the bolt.
Tighten to 25 Nm (18 lb-ft).
pic 3
Position the LH CMS and the LH HO2S harness back over the top of the transmission.
Install the harness pushpins to the fuel line bracket and connect the LH side CMS and LH side HO2S electrical connectors.
Connect the CMP sensor electrical connector.
If equipped, position the LH heat shield onto the rear of the LH cylinder head and install the 2 bolts.
Tighten to 10 Nm (89 lb-in).
If equipped with 4 wheel drive, Install the transfer case. Section 308-07B
Both RH and LH intake CMP sensors and RH exhaust CMP sensor
pic 4
.
Tighten to 10 Nm (89 lb-in).
Connect the CMP sensor electrical connector.
____________________________
Let me know if you have questions or if I can help.
Joe
Images (Click to enlarge)
Dec 12, 2020 at 10:14 PM