Here are the directions for the key tumbler:
____________________________________________
2008 Volkswagen Jetta GLI (1K2) L4-2.0L Turbo (CBFA)
Lock Cylinder
Vehicle Starting and Charging Sensors and Switches - Starting and Charging Ignition Switch Service and Repair Removal and Replacement Ignition Switch and Lock Cylinder, through 05.10 Lock Cylinder
LOCK CYLINDER
Lock Cylinder
When disconnecting and connecting the Battery, the procedure must be followed as described in the repair information. Refer to=> [ Battery, Disconnecting and Connecting ].
Steering lock may be destroyed.
If steering lock is operated without lock cylinder, it locks and must be replaced.
Steering lock must not be operated without lock cylinder.
Removal
- Disconnect the battery. Refer to => [ Battery, Disconnecting and Connecting ].
- Remove the steering wheel.
- Remove the steering column trim.
- Remove the steering column electronic systems control module (J527). Refer to=> [ Steering Column Electronic Systems Control Module ] See: Steering Mounted Controls Communication Module > Removal and Replacement > Steering Column Electronic Systems Control Module (J527).
- Remove the airbag spiral spring/return spring with slip ring (F138). Refer to => [ Airbag Spiral Spring/Return Spring With Slip Ring ] See: Steering Mounted Controls Communication Module > Removal and Replacement > Airbag Spiral Spring/Return Spring With Slip Ring (F138).
- Remove the steering angle sensor (G85). Refer to => [ Steering Angle Sensor ] See: Steering Mounted Controls Communication Module > Removal and Replacement > Steering Angle Sensor (G85).
Switches must not be removed when removing lock cylinder.
The Anti-theft immobilizer reader coil (D2) is attached to the lock cylinder and cannot be replaced separately.
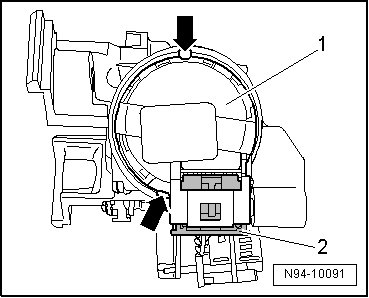
Pic 1t
- Disconnect the connector - arrow - from the anti-theft immobilizer reader coil - 3 -.
- Insert ignition key into lock cylinder and turn into position "Drive".
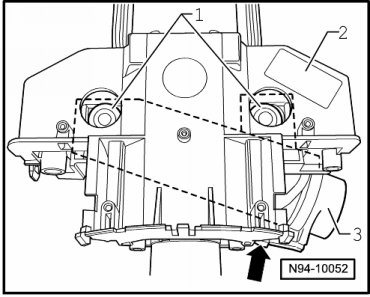
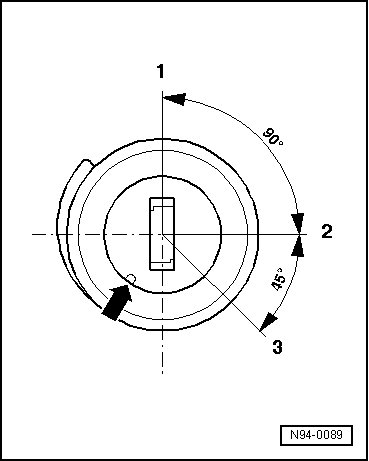
Pic 2
Key positions of lock cylinder:
1. Position Off
2. Position Run
3. Position Start
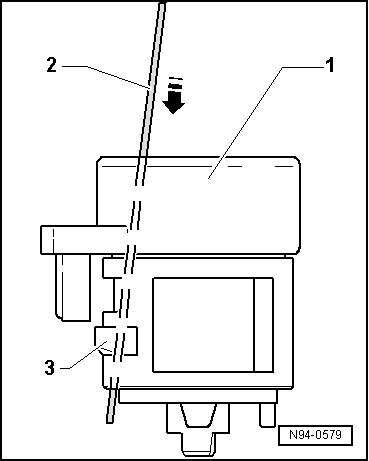
For reasons of clarity, the following illustration depicts lock cylinder as removed and without ignition key.
Pic 3
- Insert steel wire (1.2 mm diameter) into hole next to ignition key - arrow -.
- Using the steel wire - 2 -, release - arrow - the retaining lever - 3 - of the lock cylinder - 1 -.
- Remove the lock cylinder - 1 - from the steering lock housing.
Installation
pic 4
To improve clarity, the ignition key is not shown in the following illustration.
- Insert the ignition key into the lock cylinder - 1 - and turn to the "Drive" position.
- Use the steel wire - 2 - to release the securing lever - 3 - of the lock cylinder - 1 - - arrow -.
- Insert the lock cylinder - 1 - into the steering lock housing.
The Anti-Theft Immobilizer Reader Coil (D2) connection must be inserted into the guide on the steering lock housing.
- Remove the steel wire - 2 - from the lock cylinder - 1 - and then make sure the lock cylinder fit securely in the steering lock housing.
- Connect the connector to the anti-theft immobilizer reading coil.
Further installation is done in reverse order of removal.
_____________________________________
Let me know if that is what you needed.
Joe
Images (Click to make bigger)
Friday, December 13th, 2019 AT 6:37 PM