This should be self-explanatory once you have the new one in your hand to look at, but I can offer some additional hints. First, observe the mounting bar is offset. For most applications it will not fit if you try to mount it backward, but that does not stop some people from trying. You will need a deep socket to reach through holes on the outside of the frame rail to reach the bolt heads. I use a deep socket because short ones with an extension have a better chance of snagging when you pull it out, then it can fall off and get lost inside the frame rail.
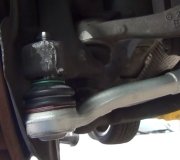
Use a tie rod separator to disconnect the center link's tapered stud from the hole in the idler arm. The design of your idler arm has been changed from the better design that was used years earlier. On those older ones, you could use a "pickle fork" with a hammer or an air hammer, to separate the parts, and since that destroyed the rubber boot on the tapered stud, it did not matter because you were getting a new stud and boot with the new arm. On your truck, the stud is on the center link and has to be reused, so you do not want to use tools that will damage the boot or put excessive sideways stress on the stud. The proper tool has a pair of fingers that grab around the end of the idler arm, then there is a center bolt that will press on the end of the tapered stud when you tighten it. You can convince the parts to separate by applying as much pressure with that bolt as possible, then lightly smacking the end of the idler arm with a hammer to shock the two parts apart.
In the unlikely event you find that stud is already loose and wobbling around, or the stud falls out of the idler arm's hole as soon as the nut is removed, both the idler arm and the center link must be replaced. When a tapered stud is loose, it wobbles around and hammers against the hole every time a tire hits a bump in the road. That hammering deforms the hole, then a new stud will never remain tight. Being not fully-supported within the hole can lead to the stud snapping off too.
There is a torque spec. For the castle nut that goes on the tapered stud. That spec. Will be listed on the instruction sheet that comes with the new idler arm. Get in the habit of using a click-type torque wrench to set the tightness of that nut. That will insure it is tight enough to stay tight, not too tight that it peels the threads, and your job will not become part of any future lawsuit. Once that nut is tightened to specs, never loosen it to get the cotter pin through the hole. Always continue to tighten the nut just until the cotter pin will go through the hole.
With this design, you also have to be aware that when you are done, the center link must be perfectly parallel to the ground. There is some play in the two mounting holes in the frame. Most people just dump the new arm in and run the bolts tight, and most of the time that is okay, but it is when you are looking for the elusive cause of steering wander when going over bumps that we look at whether the center link is level or if it is high or low on one end. The height sets the height of the studs for the inner tie rod ends, and those are supposed to be very close to inline with the pivot point, (bushings), for the lower control arms.
Tuesday, January 23rd, 2018 AT 1:37 PM