Hi,
There are two different options. The vehicle came with rear disc brakes but may have drum type brakes. I am going to provide directions for both. To determine what you have, look through the wheel at the front brakes. If the rear are disc brakes, they will look much like the front. If there rear doesn't have a brake rotor but instead a drum, then you have drum brakes.
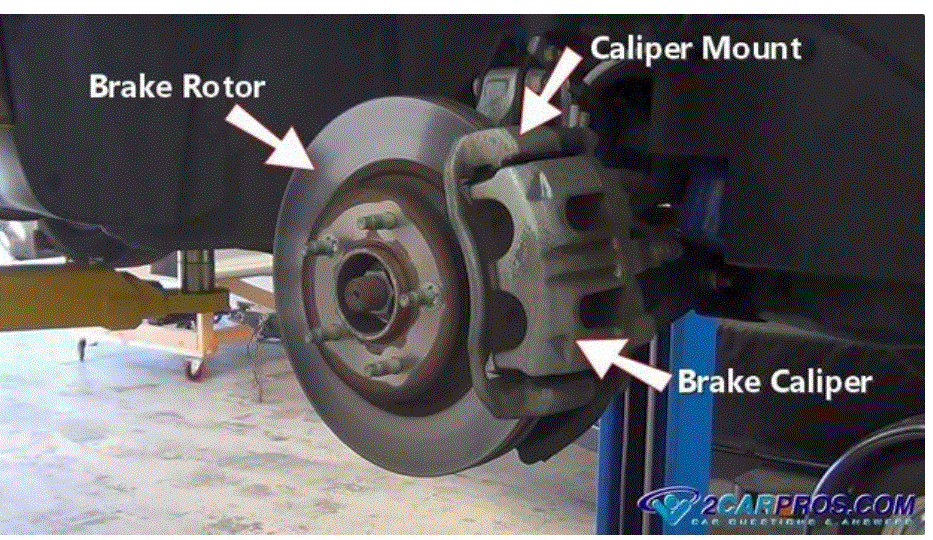
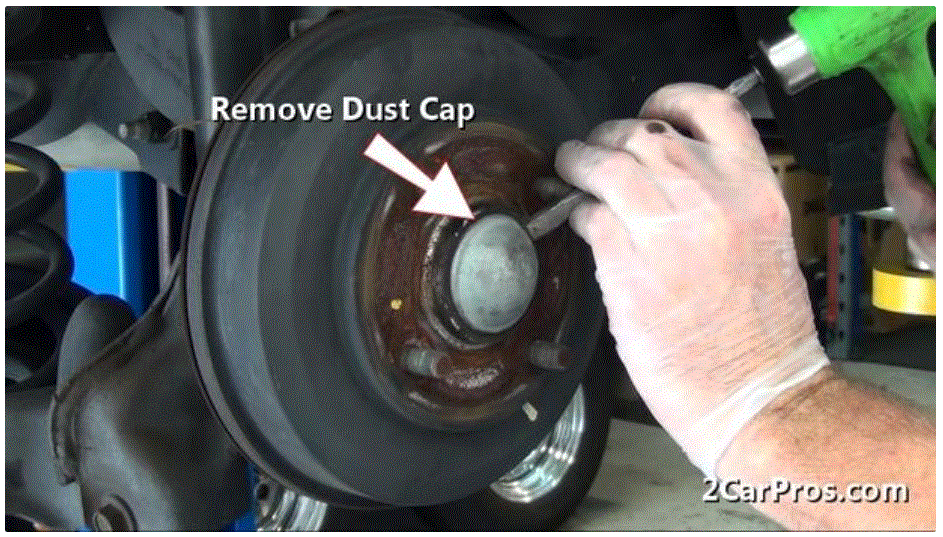
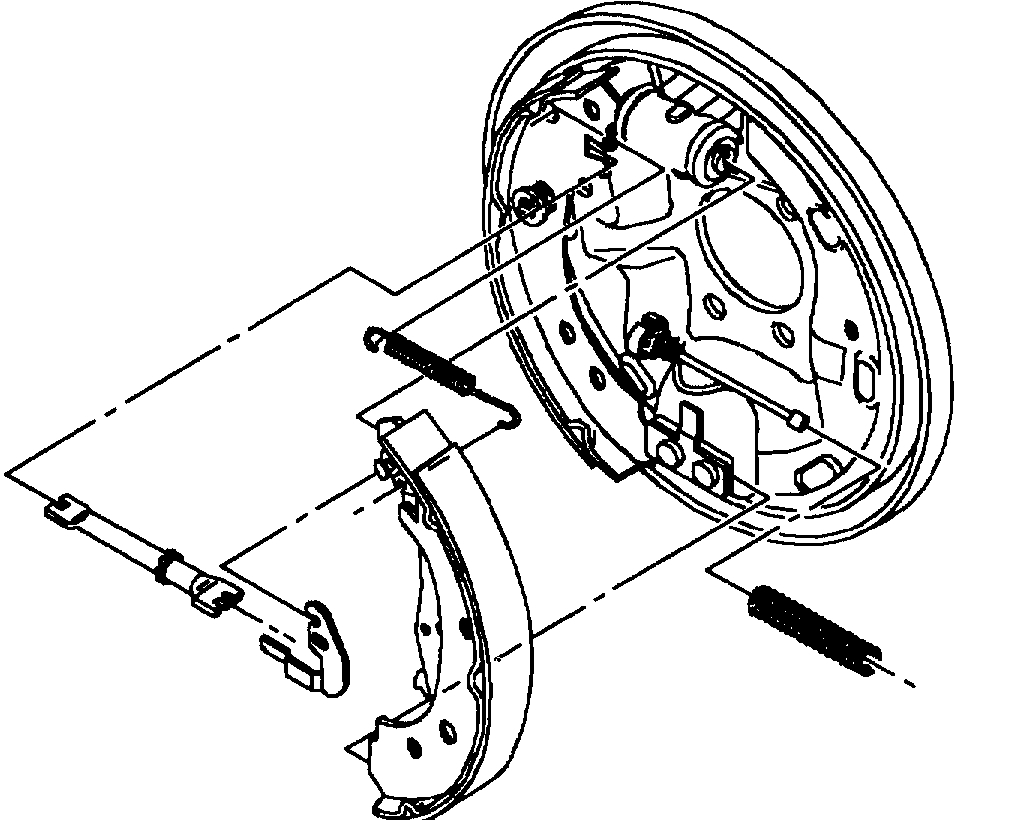
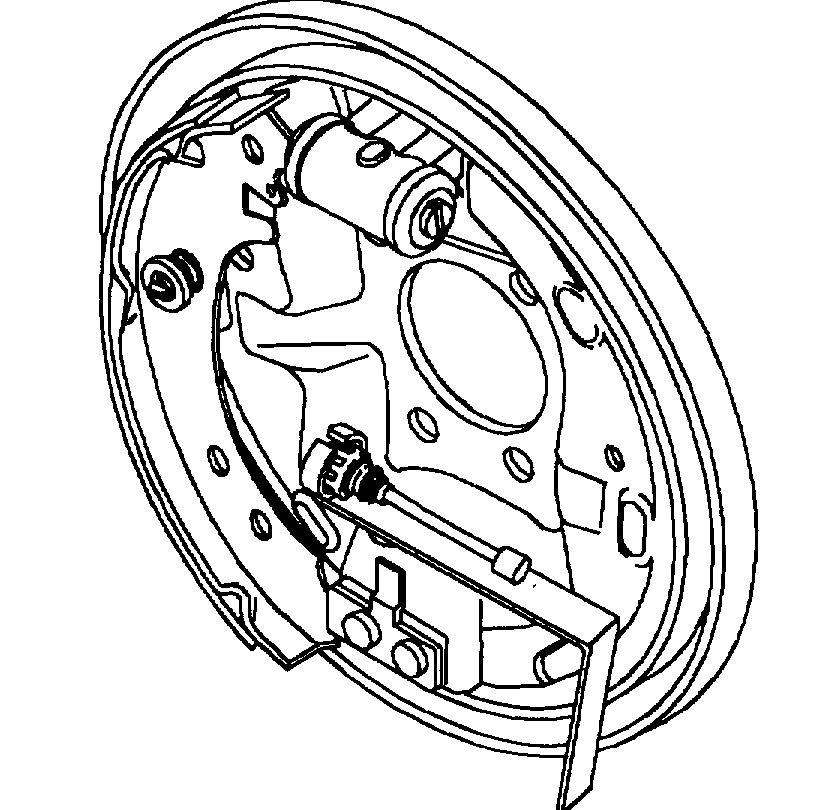
Pic 1 below shows what a disc brake looks like and pic 2 shows the drum type.
____________________________
I will start with disc brake (rear cable). The attached pics correlate with the directions.
____________________________
Removal
1998 Saturn SL1 L4-1.9L SOHC VIN 8
Removal
Vehicle Brakes and Traction Control Parking Brake System Parking Brake Cable Service and Repair Procedures Service Procedures Park Brake Cable(Disc Brake) Removal
REMOVAL
1. Disable the Supplemental Inflatable Restraint (SIR) System. Refer to Disabling the SIR System.
2. Remove console. Refer to Console removal.
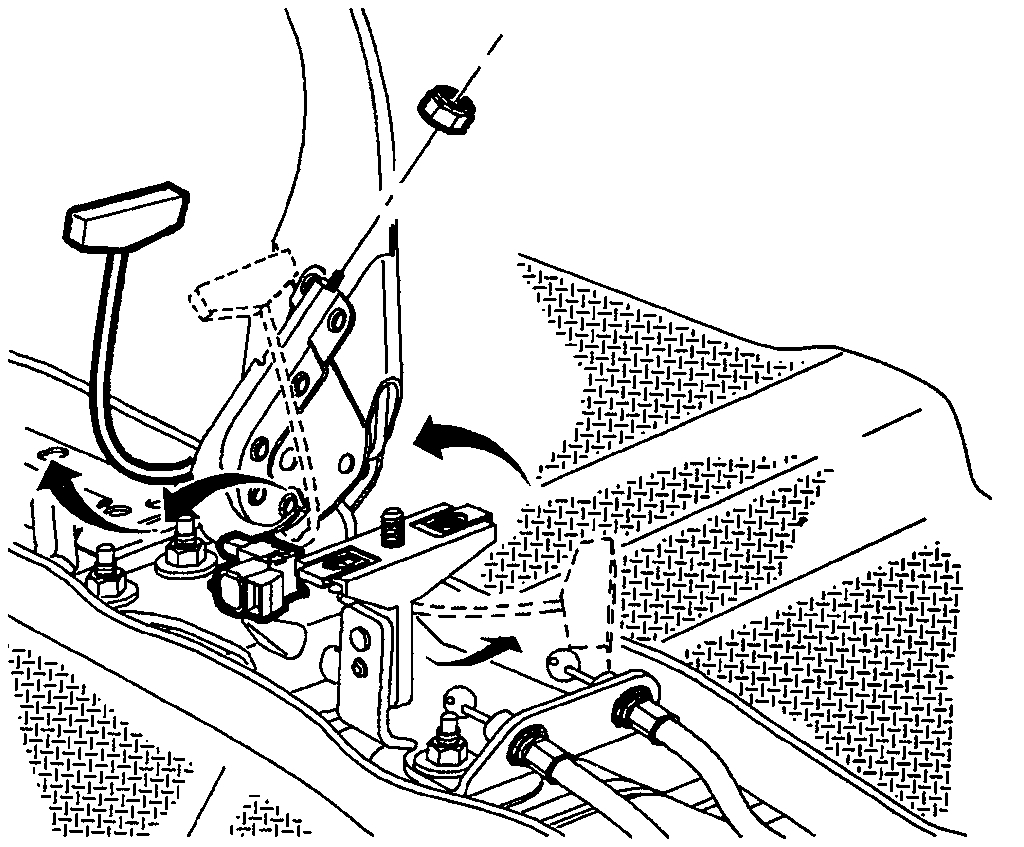
3. Loosen adjuster nut.
pic 3
4. Remove park brake cable(s) from equalizer assembly.
5. Remove park brake cable(s) from the park brake base.
IMPORTANT: Tie a piece of string or wire to the console end of the cable to be removed. After removal, the string or wire can be tied to the new cable and used to pull the cable into position through the floor pan.
6. Remove rear seat cushion.
7. Pull back carpeting.
Caution: make sure vehicle is properly supported and squarely positioned on hoist. To help avoid personal injury, provide additional support to the opposite end of the vehicle that components will be removed from.
8. Raise vehicle on hoist.
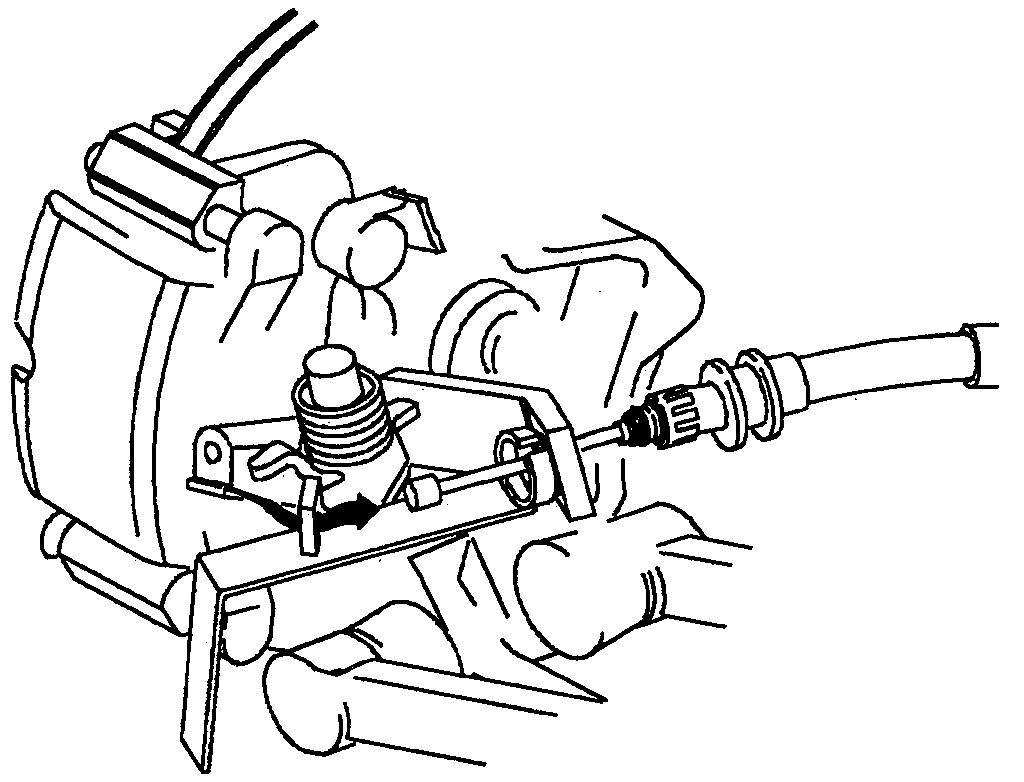
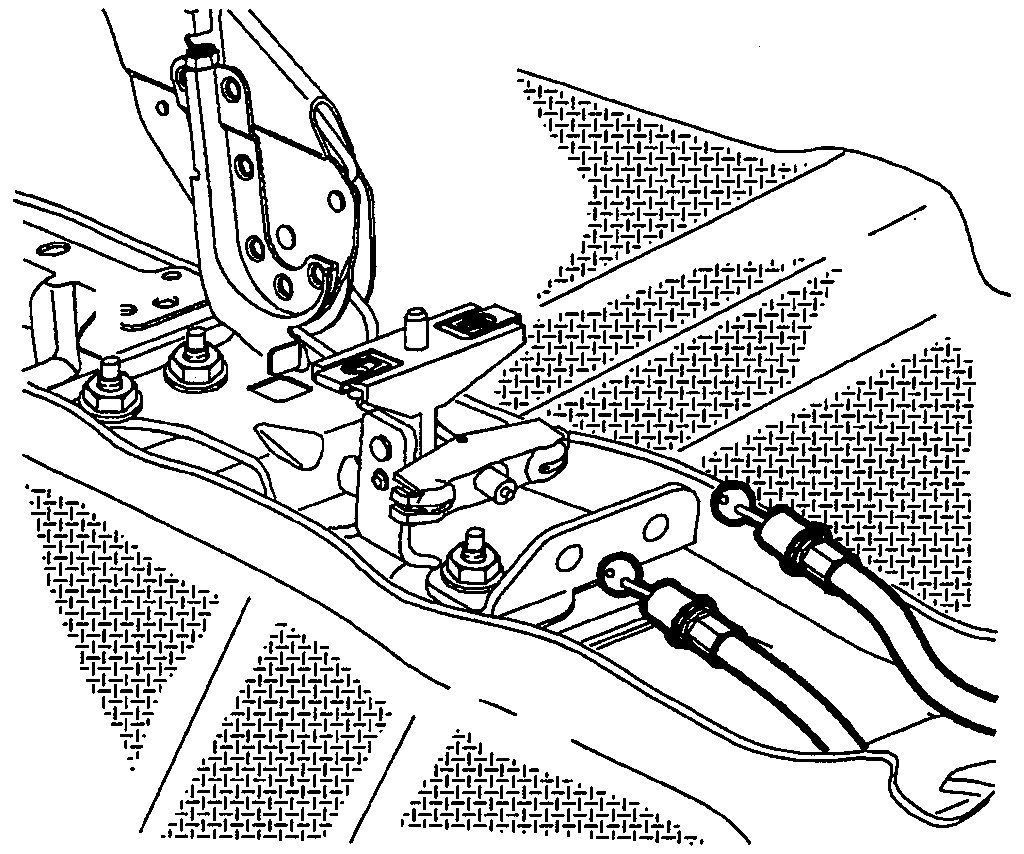
9. Remove park brake grommet/cable assembly from floor pan.
pic 4
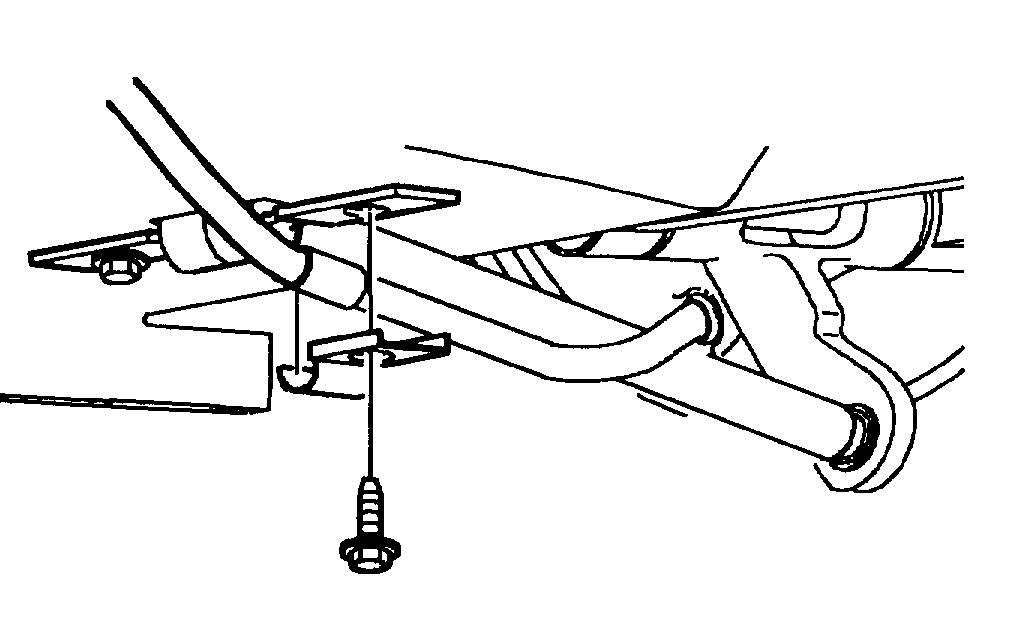
10. Remove trailing arm/park brake cable to body fastener.
pic 5
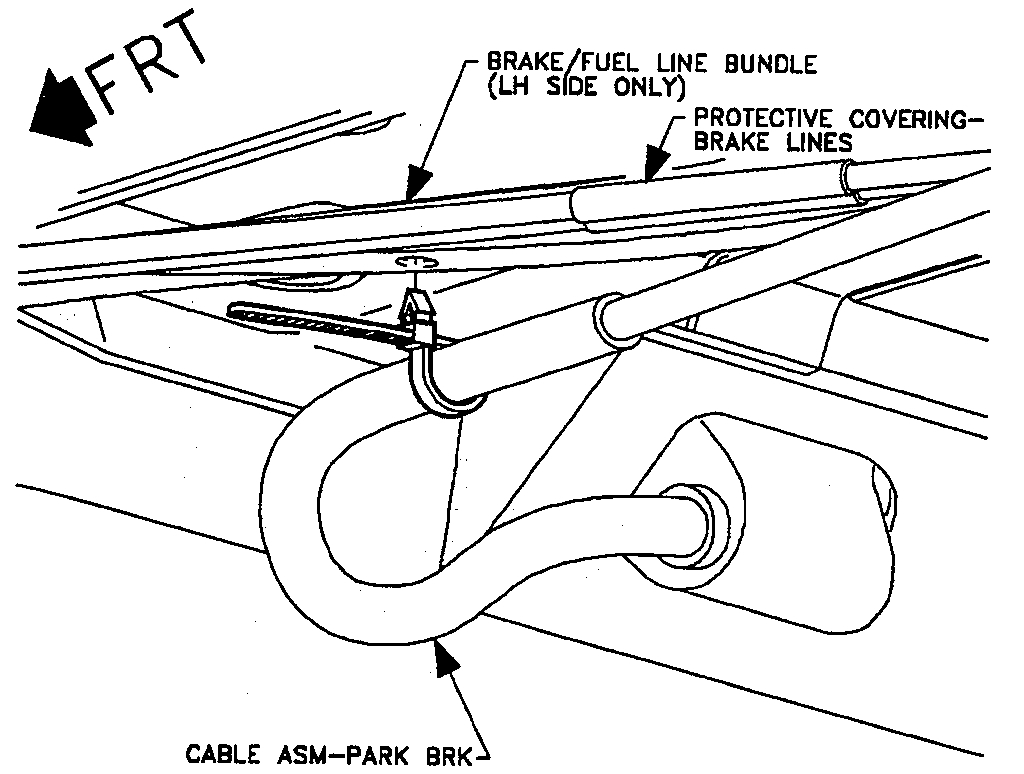
11. Cut and remove cable retaining tie strap.
12. Remove nut securing cable to stud in floor pan.
13. Disconnect cable from caliper lever. Remove cable from bracket using park brake cable release tool SA91S1BR or equivalent.
14. Remove cable from vehicle.
_____________________
Disc brake type install of cable.
1998 Saturn SL1 L4-1.9L SOHC VIN 8
Installation
Vehicle Brakes and Traction Control Parking Brake System Parking Brake Cable Service and Repair Procedures Service Procedures Park Brake Cable(Disc Brake) Installation
INSTALLATION
pic 6
1. Install park brake cable into caliper bracket and attach cable to caliper lever.
pic 7
2. Install trailing arm/park brake cable to body fasteners.
^ Torque: 120 Nm (89 ft. lbs.)
3. Install cable bracket to stud in floor pan and secure with fastener.
^ Torque: 2.8 Nm (25 inch lbs.)
4. Install park brake grommet/cable assembly onto floor pan.
pic 8
5. Install park brake cable tie strap.
6. Lower vehicle from hoist.
7. Route cable under carpeting and install park brake cable into the park brake base. Push carpeting back to its original position.
pic 9
8. Install cable(s) into equalizer bracket.
9. Adjust park brake. Refer to Park Brake Adjustment.
10.Install rear seat cushion.
11.Install console. Refer to Console.
12.Enable the SIR System. Refer to Enabling the SIR System.
______________________________________________________________________________________
Drum Type Removal
1998 Saturn SL1 L4-1.9L SOHC VIN 8
Removal
Vehicle Brakes and Traction Control Parking Brake System Parking Brake Cable Service and Repair Procedures Service Procedures Park Brake Cable(Drum Brake) Removal
REMOVAL
pic 10
1. Disable the Supplemental Inflatable Restraint (SIR) System. Refer to Disabling the SIR System.
2. Remove console. Refer to Console.
3. Loosen adjuster nut.
4. Remove park brake cable(s) from equalizer assembly.
5. Remove park brake cable(s) from the park brake base.
6. Remove rear seat cushion.
7. Pull back carpeting.
IMPORTANT: Tie a piece of string or wire to the console end of the cable to be removed. After removal, the string or wire can be tied to the new cable and used to pull the cable into position through the floor pan.
CAUTION: MAKE SURE VEHICLE IS PROPERLY SUPPORTED AND SQUARELY POSITIONED ON HOIST. TO HELP AVOID PERSONAL INJURY, PROVIDE ADDITIONAL SUPPORT TO THE OPPOSITE END OF THE VEHICLE THAT COMPONENTS WILL, BE REMOVED FROM.
8. Raise vehicle on hoist.
9. Remove rear road wheel.
10. Remove park brake grommet/cable assembly from floor pan.
pic 11
11. Remove trailing arm/park brake cable to body fastener.
pic 12
12. Cut and remove cable retaining tie strap.
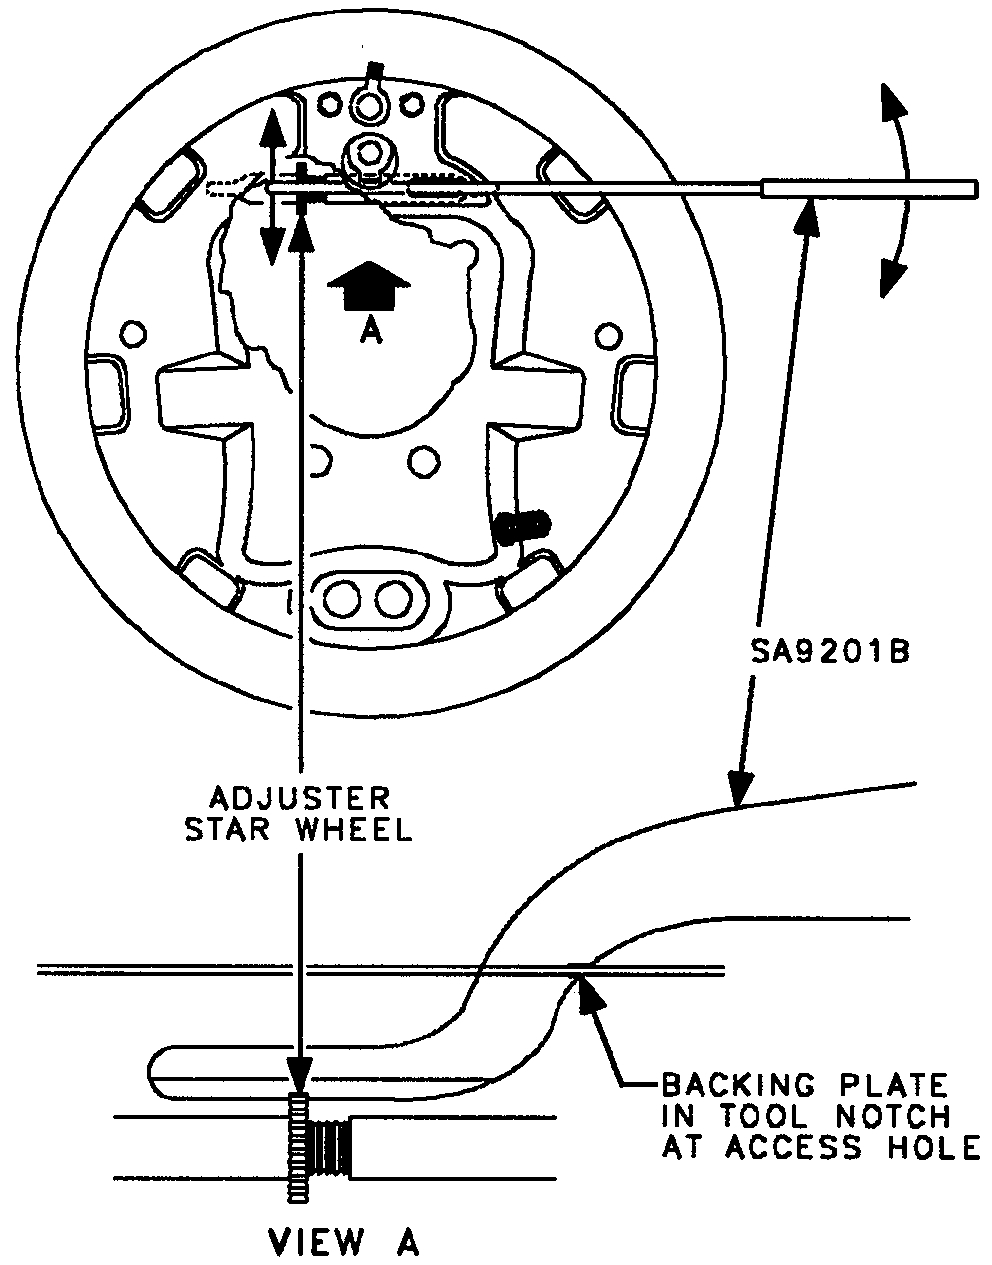
13. Remove brake drum.
pic 13
IMPORTANT: If difficulty is encountered removing drum, use drum brake adjusting tool SA9201BR or equivalent, to turn star wheel of adjuster assembly to shorten its length and provide sufficient drum-to-shoe clearance for drum removal.
NOTICE: Do not peg against brake backing plate. This will bend plate.
pic 14
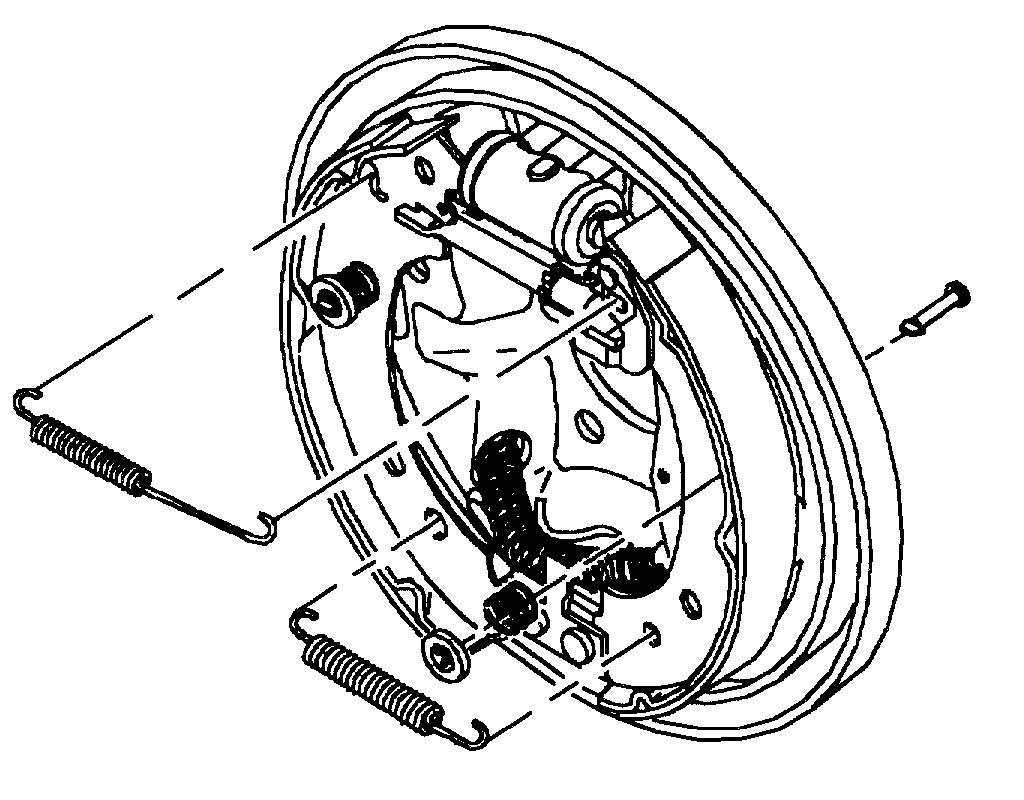
14. Remove lower return spring.
NOTICE: Do not over extend spring. Over extending the spring will cause it to weaken.
15. Remove adjuster spring.
NOTICE: Do not over extend spring. Over extending the spring will cause it to weaken.
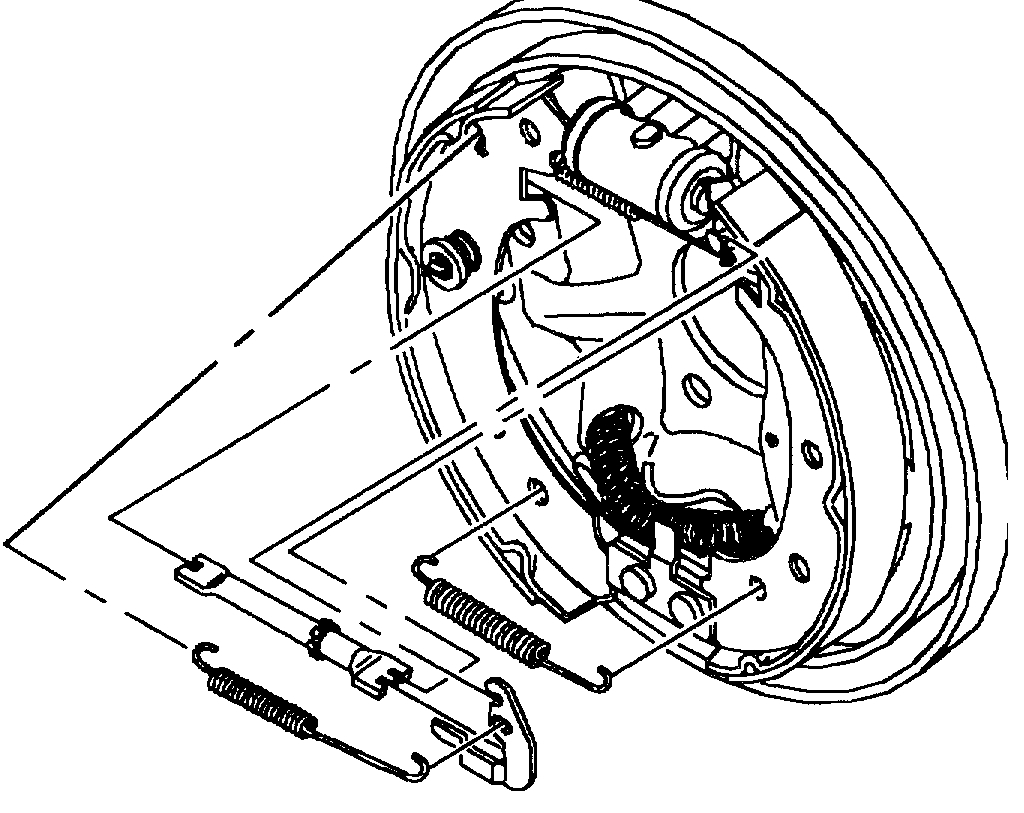
16. Remove park brake shoe hold down cup, spring, and pin.
pic 15
17. Remove adjuster assembly and adjuster lever. If difficulty is encountered, proceed as follows:
a. Pull park brake shoe towards rear of vehicle, freeing adjuster assembly. Remove assembly.
b. If necessary turn star wheel on adjuster to shorten its length.
18. Remove upper return spring from hole in park brake shoe.
pic 16
19. Remove park brake cable from park brake lever by pushing lever into cable spring. At the same time disengage cable end from lever.
20. Remove park brake cable spring.
pic 17
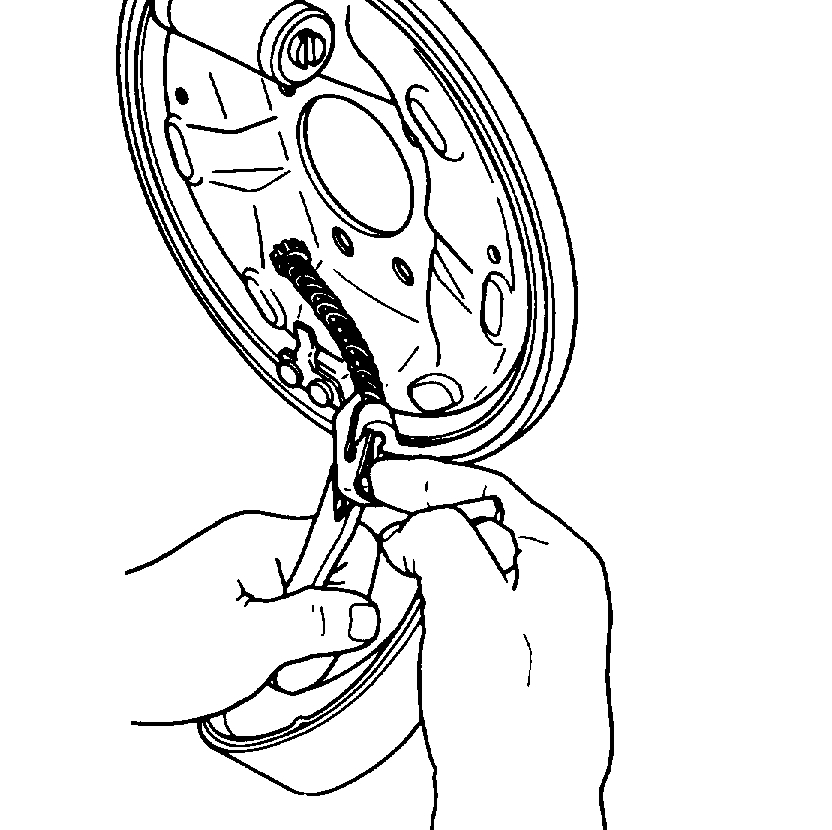
21. With SA9151BR or equivalent, remove park brake cable from backing plate.
22. Remove park brake cable from vehicle.
_______________________________________
Drum Type Install
1998 Saturn SL1 L4-1.9L SOHC VIN 8
Installation
Vehicle Brakes and Traction Control Parking Brake System Parking Brake Cable Service and Repair Procedures Service Procedures Park Brake Cable(Drum Brake) Installation
INSTALLATION
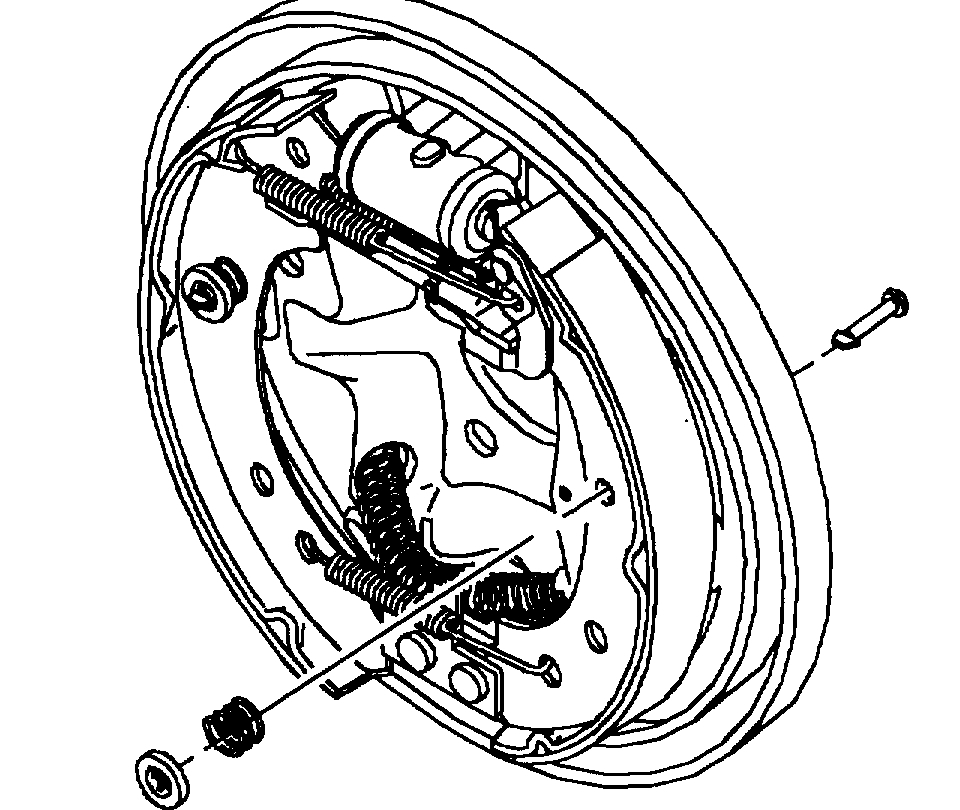
1. Install park brake cable through backing plate until retaining fingers are correctly seated against backing plate.
pic 18
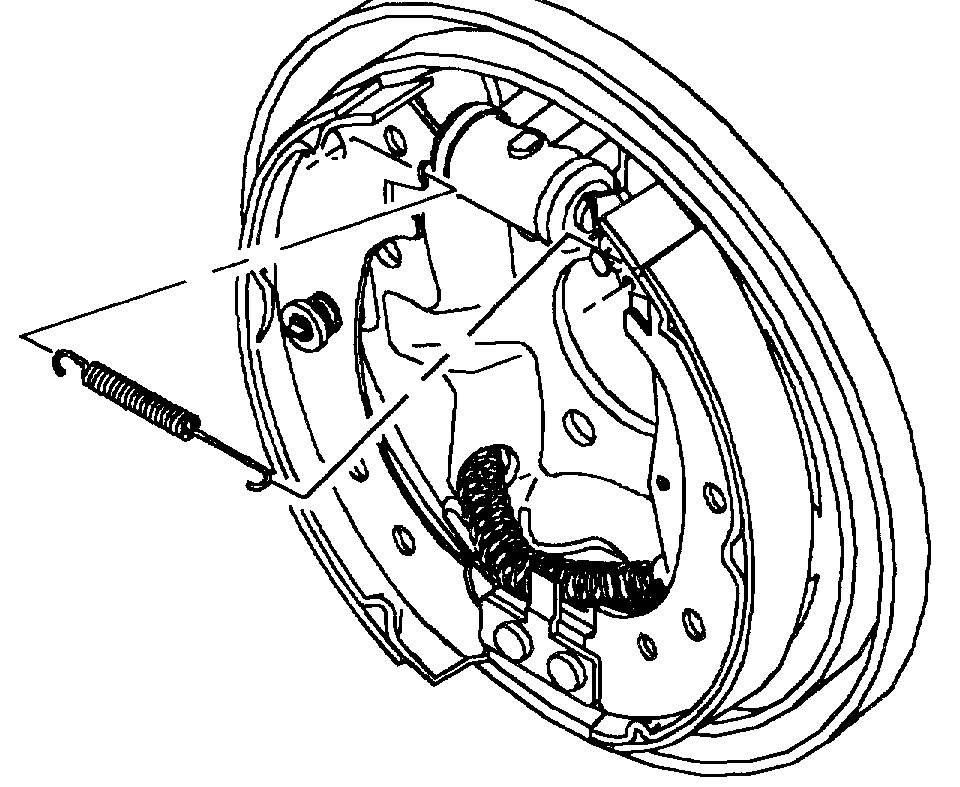
2. Install park brake cable spring onto the park brake cable and install cable to lever.
NOTICE: Check that park brake cable end is correctly seated in park brake lever.
pic 19
3. Install short end of upper return spring into back of hole in leading brake shoe.
4. Stretch upper return spring to install other end of spring into the back of the park brake shoe.
NOTICE: Check that park brake shoe is correctly engaged (in wheel cylinder on top, anchor on bottom).
pic 20
5. Pull park brake shoe toward rear of vehicle and install adjuster assembly between park and leading brake shoes.
NOTICE: Check that adjuster notches properly engage in the brake shoe notches.
6. Install adjuster lever.
NOTICE: Check that notch on adjuster lever engages pin on park brake shoe and notch on adjusting socket.
NOTICE: Check that lower leg of adjusting lever engages teeth of star wheel on adjuster assembly.
7. Install adjuster spring by placing short end of adjuster spring into hole in leading shoe and stretching other end of spring into hole in adjuster lever.
8. Install lower return spring.
pic 21
9. Position park brake shoe and install hold down pin, hold down spring, and hold down cup.
NOTICE: Check that brake shoe is correctly engaged (in wheel cylinder on top, anchor on bottom).
pic 22
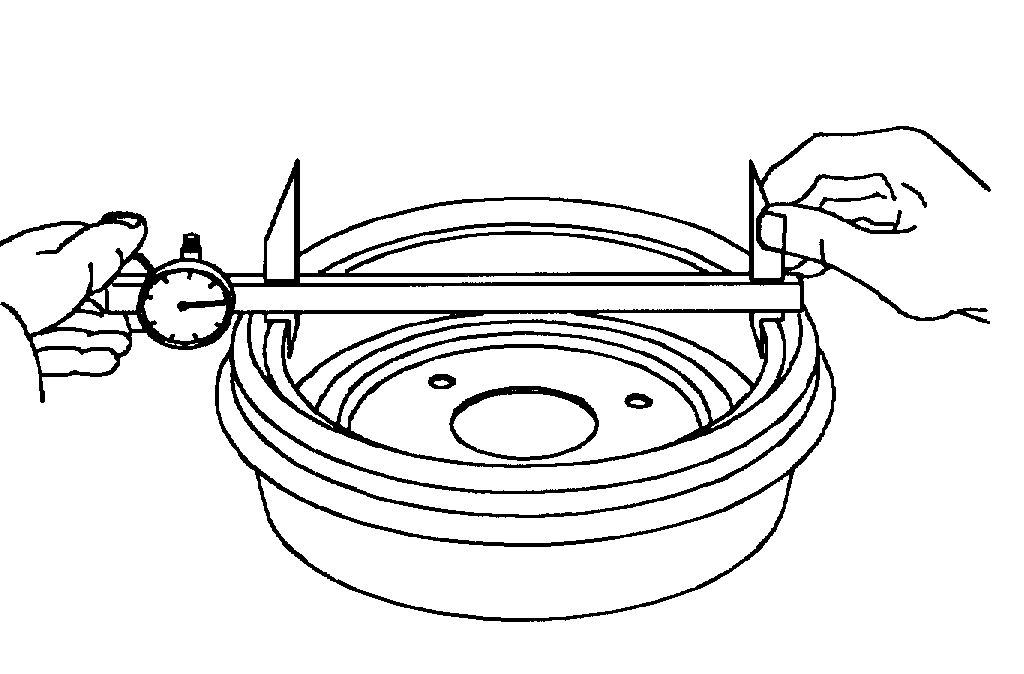
10. Using a 0-200 mm (0-8 in.) caliper such as SA 92109NE (or equivalent) measure the inside diameter of the brake drum.
pic 23
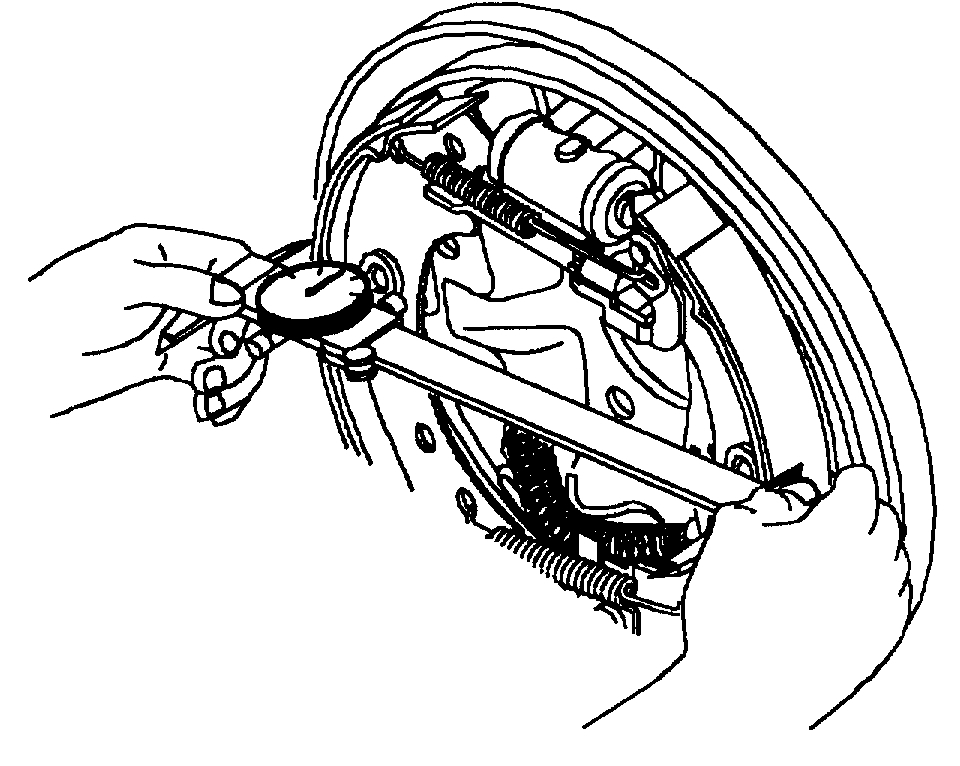
11.Measure outside diameter of brake shoes and adjust brake adjuster to obtain 0.50 mm (0.020 in.) less than the reading obtained in step 10.
12. Install brake drum.
pic 24
13. Install trailing arm/park brake cable fasteners to body.
^ Torque: 120 Nm (89 ft. lbs.)
14. Install park brake grommet/cable assembly onto floor pan.
pic 25
15. Install park brake cable retaining tie strap.
NOTICE: Before installing wheels, remove rust or corrosion from wheel mounting surfaces and brake rotors/drums. Failure to do so can cause wheel nuts to loosen in service.
16. Position wheel onto hub.
17. Install wheel nuts and tighten in a crisscross pattern. Repeat tightening pattern to be sure torque is correct.
^ Torque: 140 Nm (103 ft. lbs.)
18. Lower vehicle from hoist.
19. Route the cable under carpeting and install park brake cable into the park brake base. Push carpeting back to its original position.
pic 26
20. Install park brake cables into equalizer.
21. Apply and release service brake pedal 20 times to allow drum brake adjuster to position brake shoes.
22. Adjust park brake. Refer to Park Brake Adjustment.
23. Install rear seat cushion.
24. Install console. Refer to Console.
25. Enable the Supplemental Inflatable Restraint (SIR) System. Refer to Enabling the SIR System.
______________________________________
Now, there is another cable that is designed to provide equal pressure. I'm suspecting that isn't the one you are replacing. However, here are the directions for it.
1998 Saturn SL1 L4-1.9L SOHC VIN 8
Park Brake Equalizer Cable
Vehicle Brakes and Traction Control Parking Brake System Parking Brake Cable Service and Repair Procedures Service Procedures Park Brake Equalizer Cable
PARK BRAKE EQUALIZER CABLE
REMOVAL
1. Disable the Supplemental Inflatable Restraint (SIR) System. Refer to Disabling the SIR System. Remove console. Refer to Console.
pic 27
3. Remove park brake adjuster nut.
4. Remove park brake cables from equalizer assembly.
5. Pull park brake lever to highest position.
6. Lift equalizer cable over park brake indicator switch and swing forward. Pull cable down and out of park brake lever.
INSTALLATION
1. Slide equalizer cable into park brake lever. Hand start adjuster nut.
2. Swing equalizer cable rearward and lift over park brake indicator switch.
3. Release and lower park brake lever fully.
4. Install both park brake cables into equalizer.
5. Adjust park brake. Refer to Park Brake Adjustment.
6. Install console. Refer to Console.
7. Enable the SIR System. Refer to Enabling the SIR System.
_________________________________
I hope this helps. Let me know if you have questions or need help.
Take care,
Joe
Images (Click to enlarge)
Dec 14, 2020 at 6:05 PM