What is the correct recalibration process after replacing the blend door actuator?

Tiny
BECCAH98740
  • MEMBER
  • 2002 GMC YUKON
  • 5.3L
  • V8
  • 4WD
  • AUTOMATIC
  • 285,000 MILES
I've found multiple different ways from looking online, but none of them have worked.
Wednesday, June 28th, 2023 AT 9:42 AM

16 Replies

Tiny
MATHGEN
  • MECHANIC
  • 128 POSTS
Here is the procedure as outlined in one of our shop manuals.
Disconnecting the negative post of the battery will make sure all power is disconnected from the module without pulling fuses.

The HVAC control module will relearn the actuator limits whenever power is disconnected and re-connected to the module.

Use the following steps to perform the calibration update:
1. Turn off the ignition.
2. Remove the battery positive voltage circuit fuse of the HVAC Control Module.

IMPORTANT:
- The scan tool must be disconnected from the vehicle to properly perform the calibration procedure. If a scan tool is connected before this procedure is completed, then new calibration values will not be stored.
- Failure to wait 60 seconds will not allow the HVAC control module sufficient time to clear the old calibration values.
3. Wait 60 seconds.
4. Install the fuse.
5. Turn on the ignition.
6. Wait 60 seconds before installing a scan tool.
Was this
answer
helpful?
Yes
No
Wednesday, June 28th, 2023 AT 10:35 AM
Tiny
BECCAH98740
  • MEMBER
  • 12 POSTS
I will try it as soon as I get home and get back to you.
Was this
answer
helpful?
Yes
No
Wednesday, June 28th, 2023 AT 12:20 PM
Tiny
BECCAH98740
  • MEMBER
  • 12 POSTS
I tried that and it's not throwing any codes but it's not working on its own. I can get it to work with the scan tool though.
Was this
answer
helpful?
Yes
No
Wednesday, June 28th, 2023 AT 6:38 PM
Tiny
MATHGEN
  • MECHANIC
  • 128 POSTS
Based on what you have said, this makes me think the the HVAC control head may be damaged. Does your scan tool report the position of the mode door?
Was this
answer
helpful?
Yes
No
Thursday, June 29th, 2023 AT 6:14 AM
Tiny
BECCAH98740
  • MEMBER
  • 12 POSTS
I apologize for my delay in responding. I just replaced the front and rear HVAC controls within the last 2 weeks and yes, my scan tool tells me the position.
Was this
answer
helpful?
Yes
No
Friday, June 30th, 2023 AT 9:31 AM
Tiny
MATHGEN
  • MECHANIC
  • 128 POSTS
As far as I know, a scan tool basically will see what a module sees. Any output state tests commanded from the scan tool are carried out in whatever module you're testing. So, I think I'm going to need some more information.

First off, which type of HVAC are we working on? Manual or Auto and does it have dual zone or not?

Secondly, could you please describe the concern you are having: no temperature change at all, noises, etc.

I really want to help get this figured out. Thanks in advance.
Was this
answer
helpful?
Yes
No
Friday, June 30th, 2023 AT 12:44 PM
Tiny
BECCAH98740
  • MEMBER
  • 12 POSTS
It's an automatic system and not dual zone. The problem is the blend door keeps going out of range.
Was this
answer
helpful?
Yes
No
Saturday, July 1st, 2023 AT 9:16 AM
Tiny
MATHGEN
  • MECHANIC
  • 128 POSTS
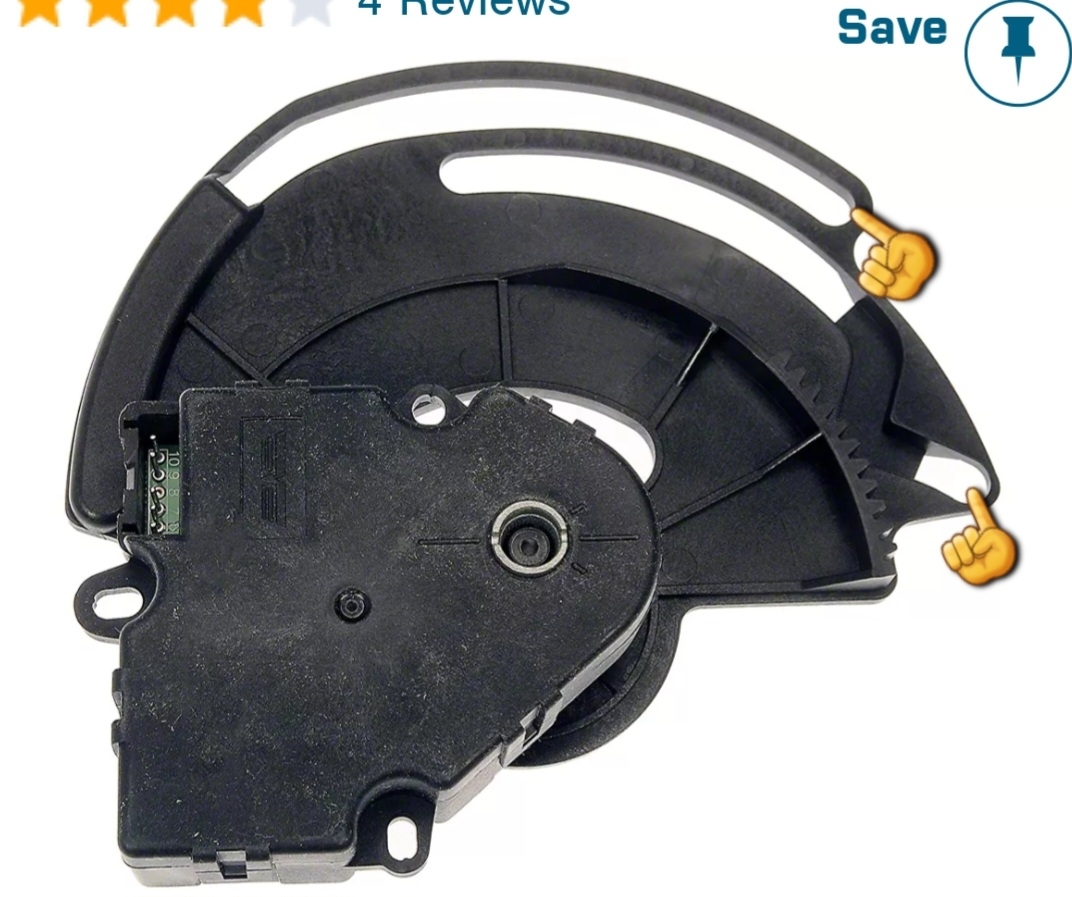
Thank you for that info. It's possible you may have a faulty actuator or even a damaged blend door. But first, I think we should do a little circuit testing. There may be an issue in the circuit that reports motor position.
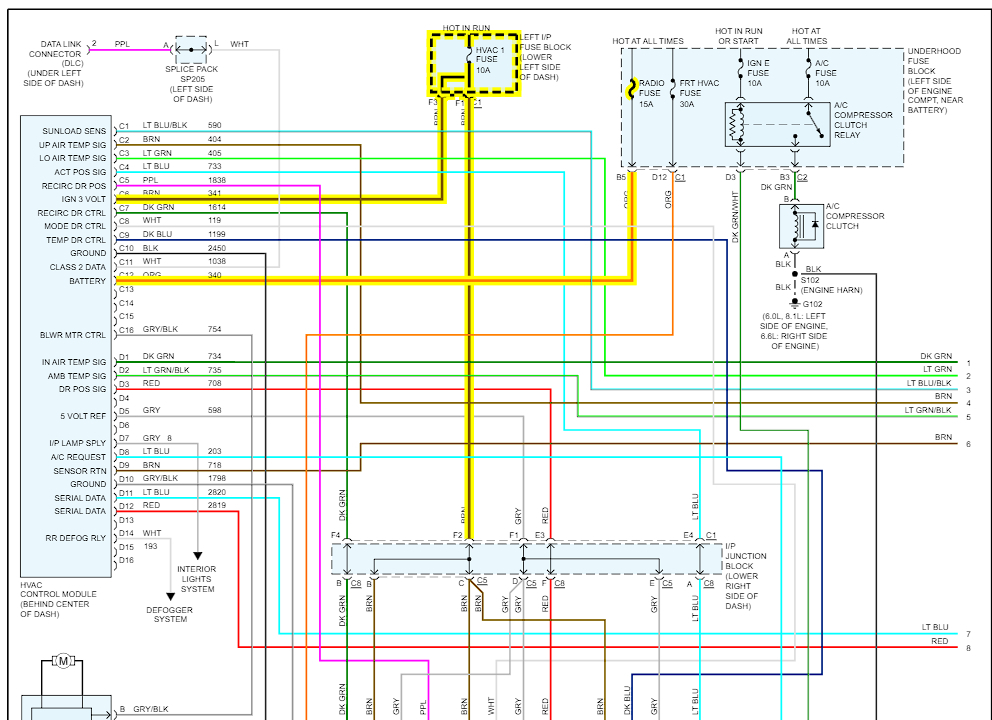
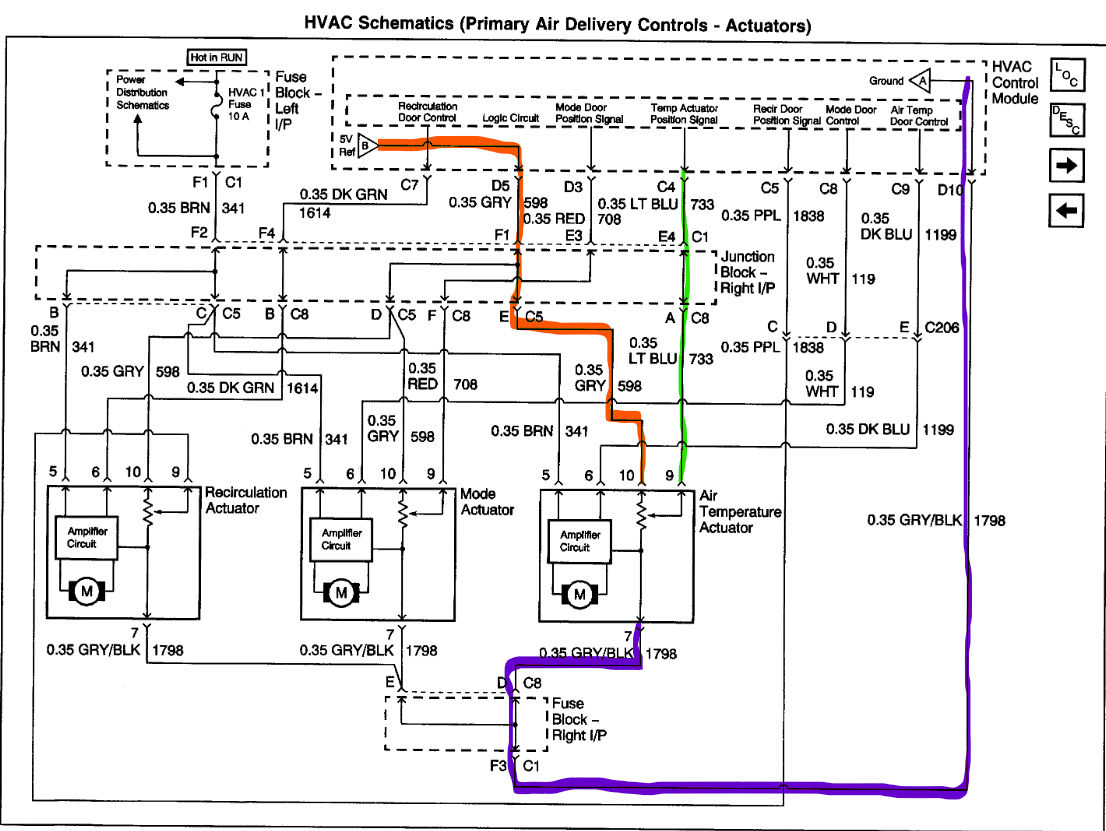
First, let's make sure we have a good 5.0v reference voltage at the actuator. I marked that circuit in red on the schematic and pinout. With the actuator connector unplugged, turn the ignition on. Then check voltage between pin 10 and ground. You should get about 5.0 volts.
Second, test the ground circuit, marked in purple. From pin 7 to ground, the resistance should be less than 10 ohms.
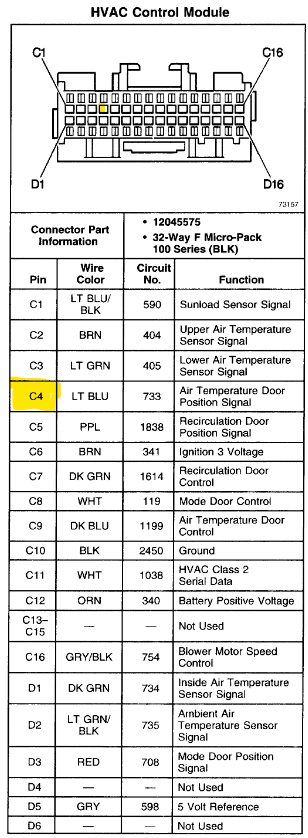
If both of those circuits test good, let's make sure the position signal circuit is ok. You will need to disconnect the plug from the HVAC module for this one. Test resistance from pin 9 of the actuator connector to pin C4 (marked in yellow) of the HVAC connector. A good reading will be less than 10 ohms.

If all the circuit tests prove to be good, I would remove the blend air motor and then try to operate the blend air door manually. Make sure it moves freely through the full range. Please let me know how it goes.
Was this
answer
helpful?
Yes
No
Saturday, July 1st, 2023 AT 1:29 PM
Tiny
BECCAH98740
  • MEMBER
  • 12 POSTS
Okay, I will as soon as I can get out there. The rain they've been calling for since Wednesday finally started.
Was this
answer
helpful?
Yes
No
Saturday, July 1st, 2023 AT 2:18 PM
Tiny
BECCAH98740
  • MEMBER
  • 12 POSTS
After looking at it you sent me the stuff for the air temperature actuator and I needed the mode actuator which using the schematics I was still able to test the mode actuator and everything tested correctly.
Was this
answer
helpful?
Yes
No
Monday, July 3rd, 2023 AT 12:20 PM
Tiny
MATHGEN
  • MECHANIC
  • 128 POSTS
My apologies, I have always known the blend door to be the temperature door. I'm out of town now, but I was able to see that the mode door and the temperature door are two different part numbers. Is it possible you were given the wrong part?

I will be back home tomorrow evening, and I could get access to more information as needed. Thanks, and I apologize again for my confusion.
Was this
answer
helpful?
Yes
No
Tuesday, July 4th, 2023 AT 5:46 AM
Tiny
BECCAH98740
  • MEMBER
  • 12 POSTS
That's okay, I was still able to use what you gave me. Enjoy your holiday and get back with me whenever. Thank you!
Was this
answer
helpful?
Yes
No
Tuesday, July 4th, 2023 AT 5:13 PM
Tiny
MATHGEN
  • MECHANIC
  • 128 POSTS
Thank you, I hope you had a happy 4th! I posted a parts diagram that lists 3 and 19 as temperature actuators and 14 as the mode door actuator. My catalog lists the mode door as GM p/n 52473356 and the blend air actuator as p/n 52474810. I did an image search, and they look very similar. So, I would like to verify that the correct part number was installed. That's the only other thing I can think of at this time.
Was this
answer
helpful?
Yes
No
Wednesday, July 5th, 2023 AT 8:43 AM
Tiny
BECCAH98740
  • MEMBER
  • 12 POSTS
I figured out a temporary fix for the problem. I forgot to take a picture before installing so I downloaded a picture, and the fingers are pointing to where I put a little stopper made from a craft paint brush handle, I cut up. I kept going just barely out of range and once I added the stopper so I could no longer go past that point it works perfect now. Does that help explain my problem and maybe give a better idea of what I need to fix it correctly?
Was this
answer
helpful?
Yes
No
Wednesday, July 5th, 2023 AT 8:07 PM
Tiny
BECCAH98740
  • MEMBER
  • 12 POSTS
I was prepared to have to do a trial and error to get it right but lucky for me I cut it the right size the first time.
Was this
answer
helpful?
Yes
No
Wednesday, July 5th, 2023 AT 8:08 PM
Tiny
MATHGEN
  • MECHANIC
  • 128 POSTS
I came across this video that I think perfectly describes your issue. It's a bit long, but if you jump to about the 20-minute mark I think you will agree.

https://youtu.be/_jTN0X2TYvU

So, I think you fixed it, unless you want to replace the mode doors or the entire HVAC assembly. Let me know what you think.
Was this
answer
helpful?
Yes
No
Thursday, July 6th, 2023 AT 5:17 AM

Please login or register to post a reply.

Sponsored links