Hi,
If you plan to replace the shock / coil (strut assembly), I would simply purchase a strut assembly. That will include the mounts. As far as the sway bar links, they will need to be removed to replace the strut assembly. I know a lot of people that purchase the entire strut assembly from Rockauto. Com. I guess the price is really good on the entire assemblies.
If you decide to replace the entire unit, here are the directions. I can tell you the rear seatback needs to be removed to access the top bolts.
Here are the directions. The attached pics correlate with the directions. Note: The directions include taking the strut assembly apart just to replace parts. If you get the entire assembly, you can skip that part.
_____________________________
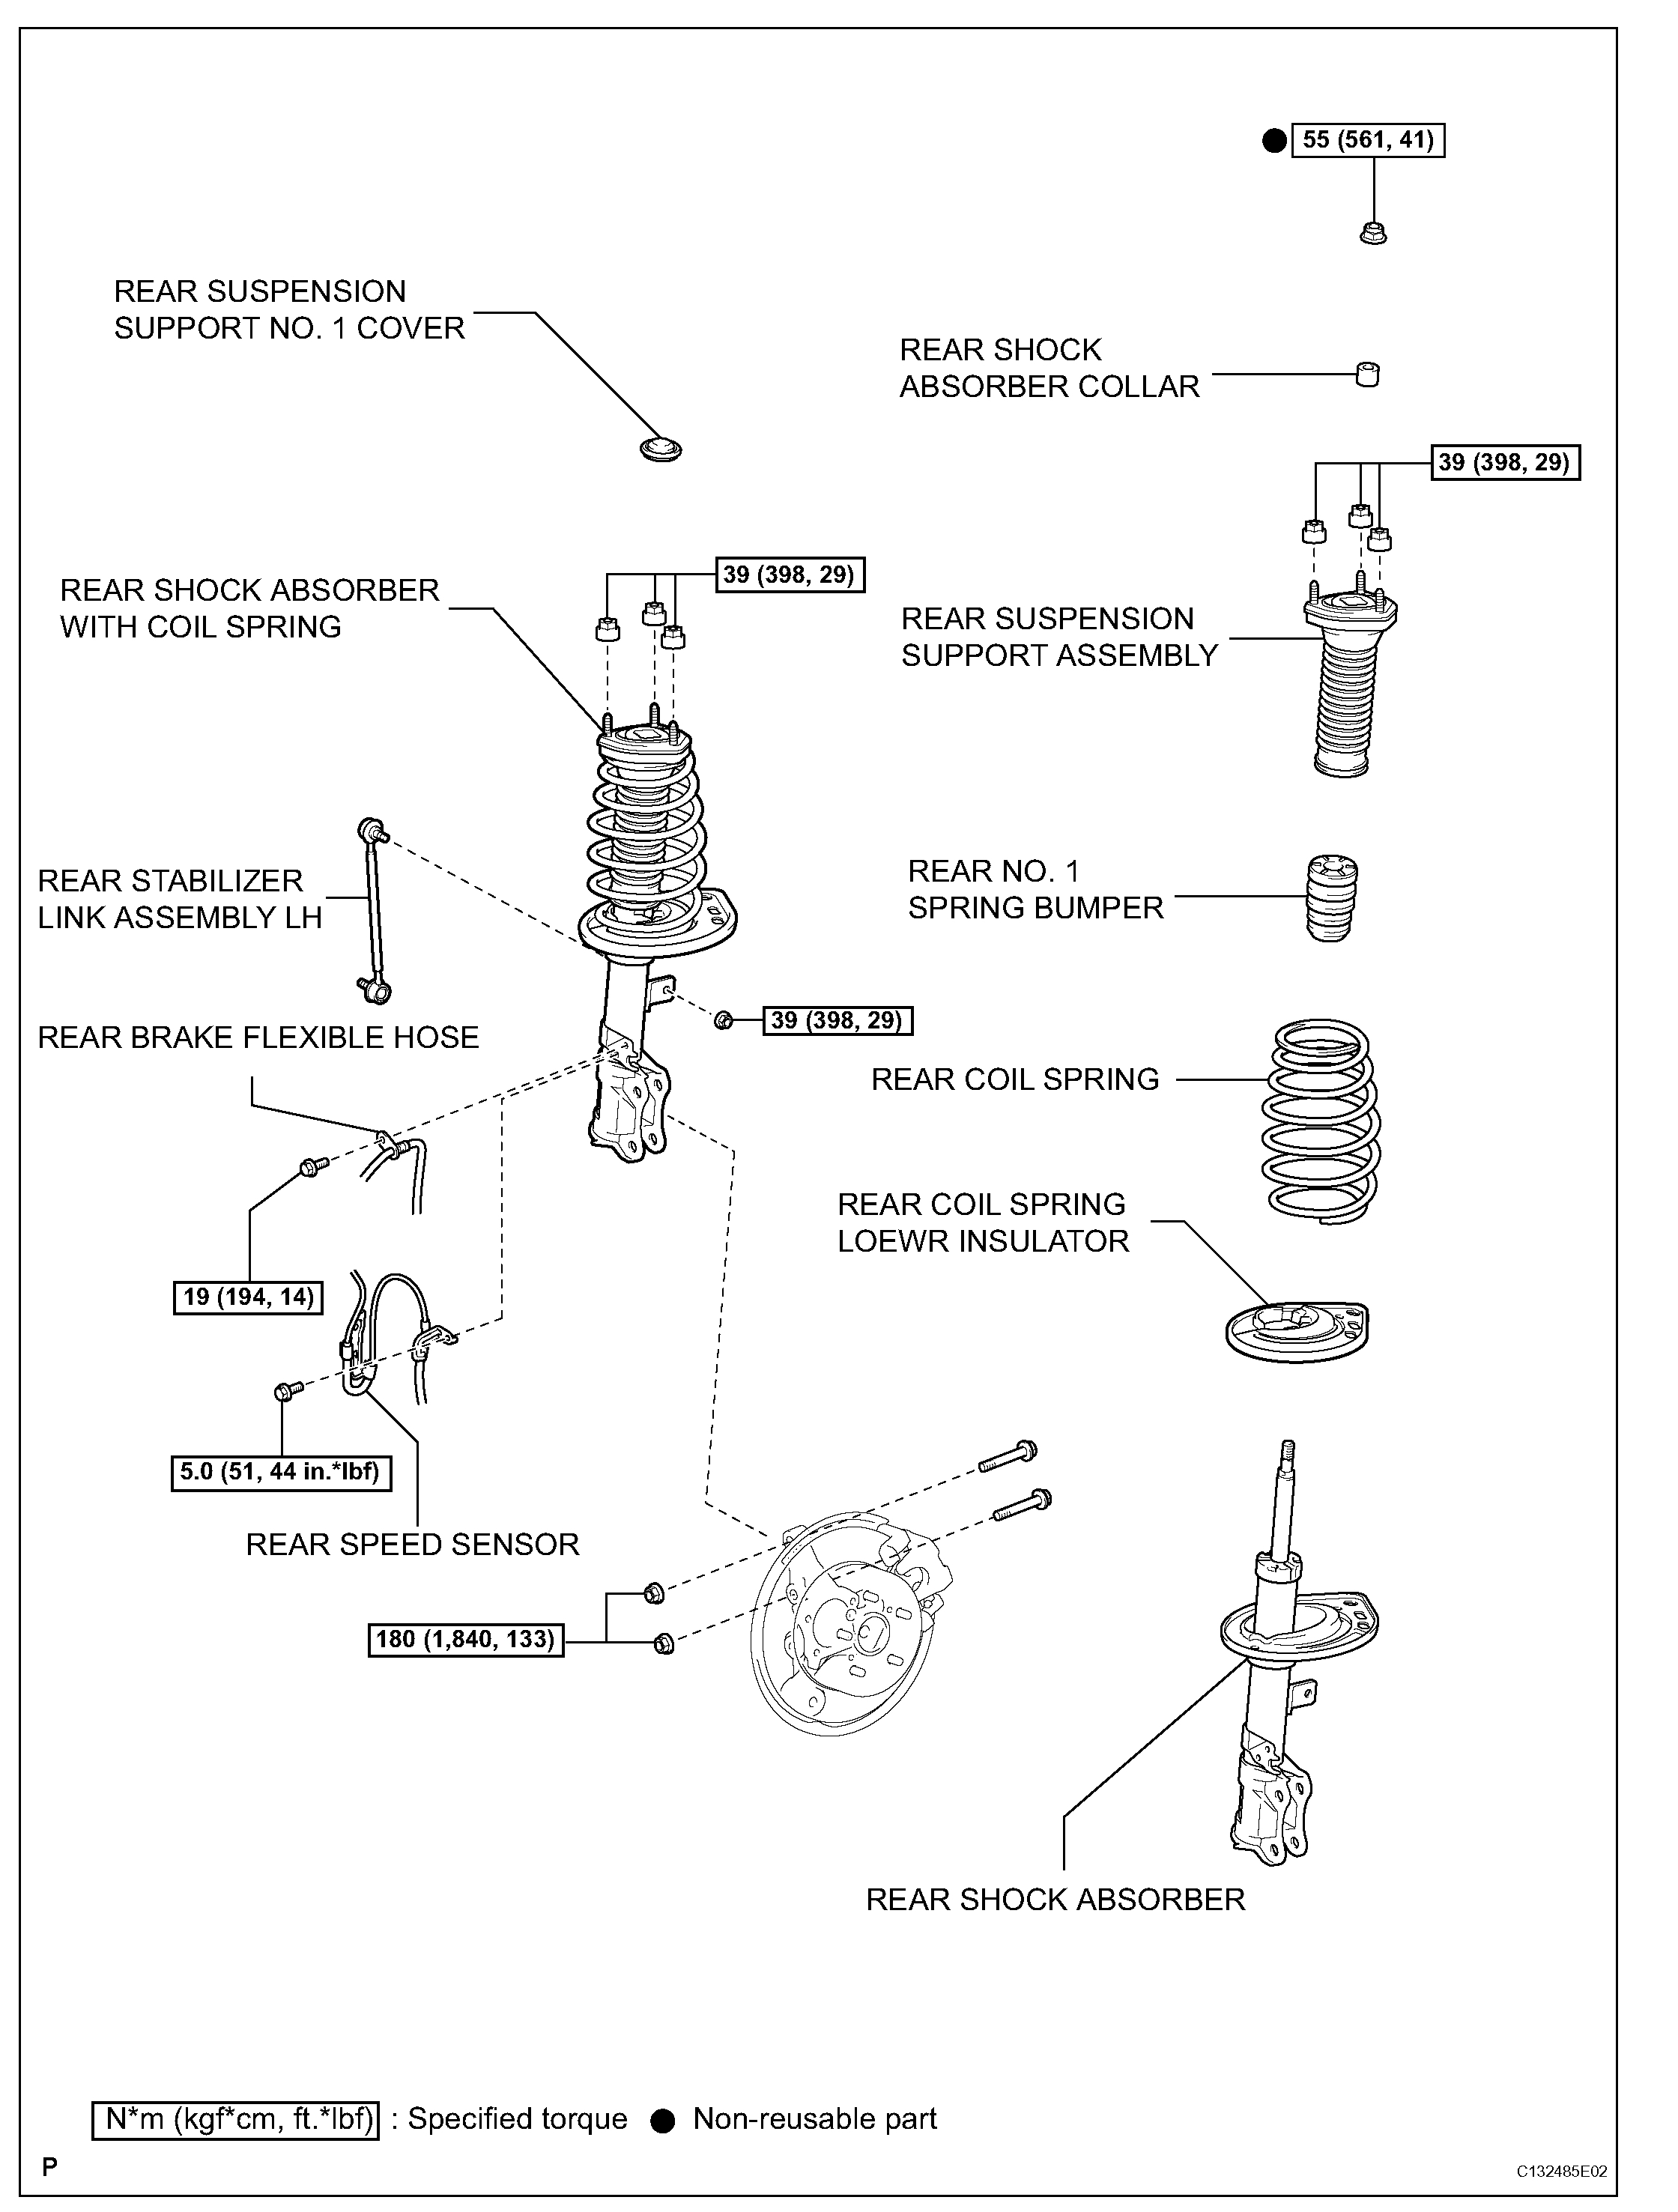
See pic 1
Removal
1. Remove rear seat cushion assembly (for fixed type)
2. Remove rear seat headrest assembly (for fixed type)
3. Remove rear center seat headrest assembly (for fixed type)
4. Remove rear seat back assembly (for fixed type)
5. Remove rear seat cushion assembly (for fold down seat type)
6. Remove rear seat headrest assembly (for fold down seat type)
7. Remove rear center seat headrest assembly (for fold down seat type)
8. Remove separate type rear seat back assembly lh (for fold down seat type)
9. Remove separate type rear seat back assembly rh (for fold down seat type)
10. Remove rear side seat back assembly lh (for fold down seat type)
11. Remove rear side seat back assembly rh (for fold down seat type)
12. Remove rear seat cushion assembly (for reclining seat type)
13. Remove rear seat headrest assembly (for reclining seat type)
14. Remove rear seat back cover (for reclining seat type)
15. Remove separate type rear seat back assembly lh (for reclining seat type)
16. Remove separate type rear seat back assembly rh (for reclining seat type)
17. Remove rear wheel
pic 2
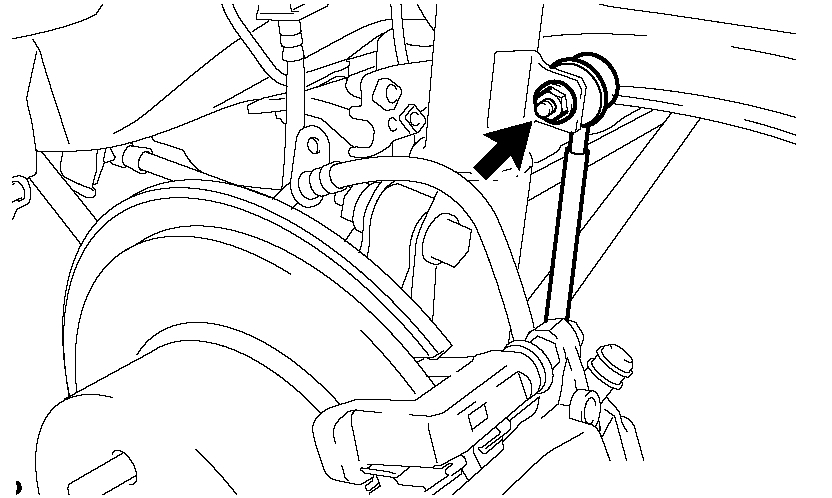
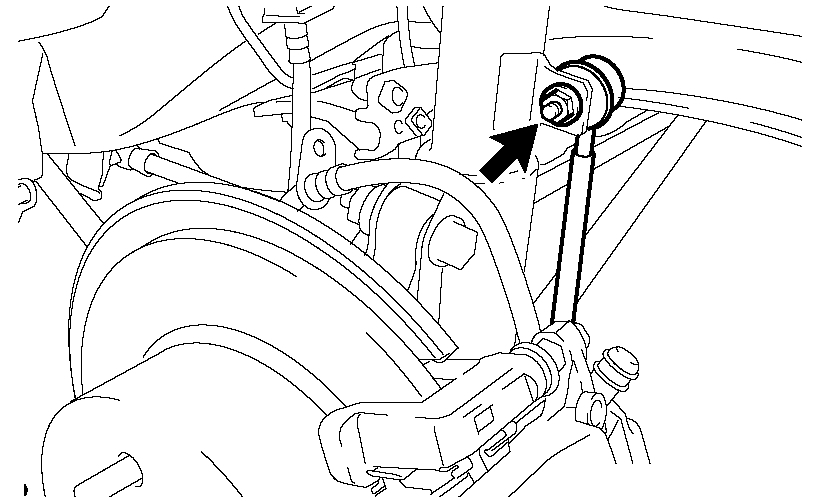
18. SEPARATE REAR STABILIZER LINK ASSEMBLY LH
(a) Remove the nut and separate the rear stabilizer link assembly from the front shock absorber LH.
HINT: If the ball joint turns together with the nut, use a hexagon wrench (5 mm) to hold the stud.
Pic 3
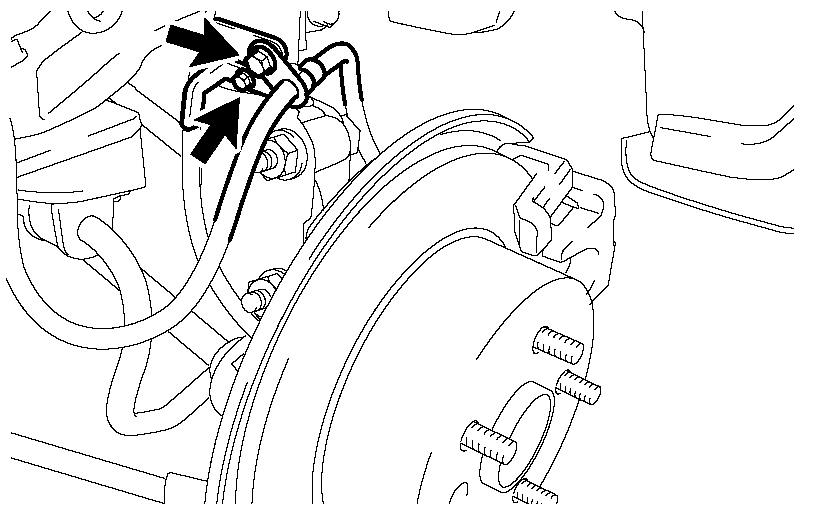
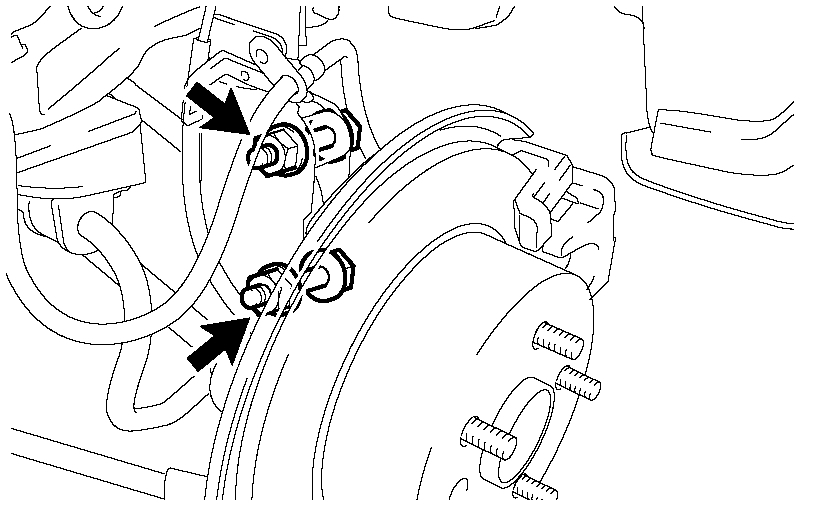
19. SEPARATE REAR SPEED SENSOR
(a) Remove the 2 bolts, and disconnect the rear brake flexible hose and rear speed sensor from the rear shock absorber with coil spring and rear axle carrier.
NOTICE: Be sure to remove the rear speed sensor from the rear shock absorber with coil spring.
Pic 4
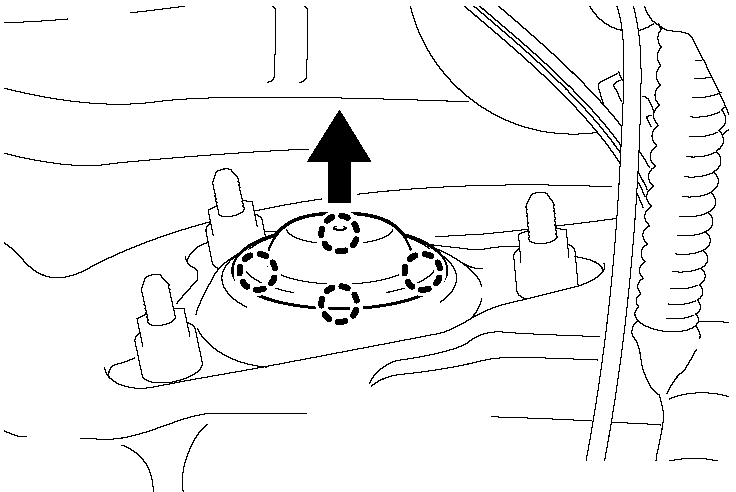
20. REMOVE REAR SUSPENSION SUPPORT NO. 1 COVER
(a) Remove the 4 claws and the rear suspension support No. 1 cover.
Pic 5
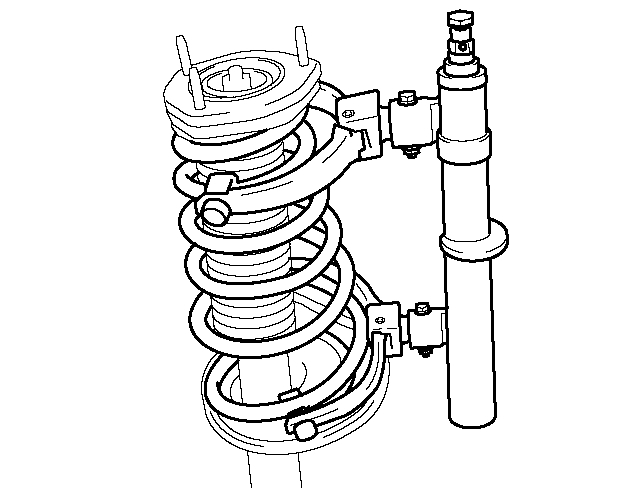
21. REMOVE REAR SHOCK ABSORBER WITH COIL SPRING
(a) Loosen the lock nut of the rear shock absorber with coil spring.
NOTICE:
Do not remove the lock nut.
Only loosen the nut when disassembling the rear shock absorber with coil spring.
Pic 6
(b) Remove the 2 nuts and 2 bolts on the lower side of the rear shock absorber with coil spring.
NOTICE:
When removing the nuts, keep the bolts from rotating.
Keep one bolt inserted to secure the hub and disc rotor.
Pic 7
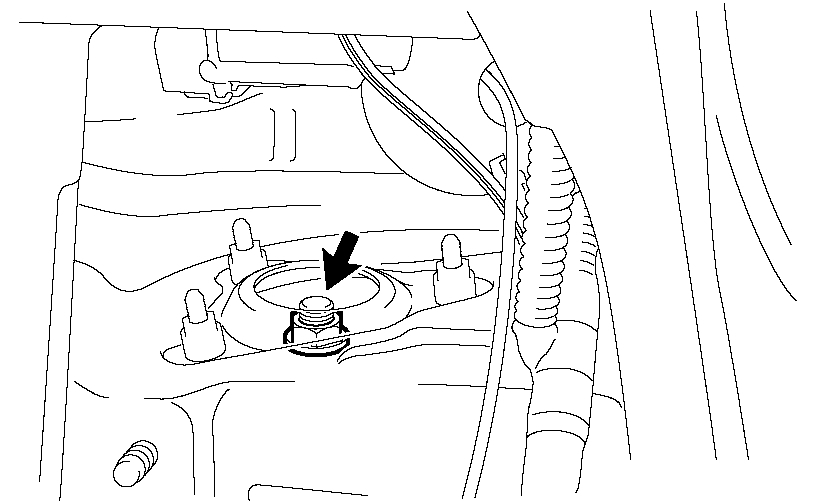
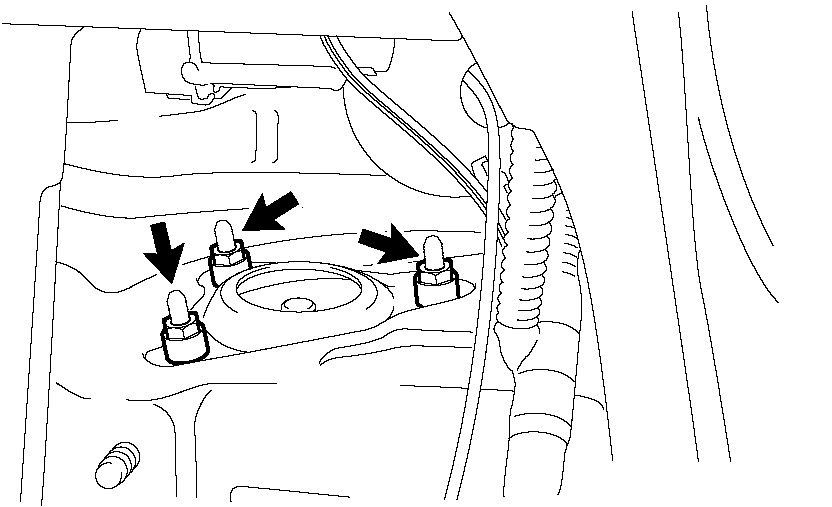
(c) Remove the 3 nuts on the upper side of the rear shock absorber with coil spring.
(d) Lower the rear axle carrier, and remove the 2 bolts on the lower side of the rear shock absorber with coil spring.
NOTICE: Make sure that the rear speed sensor is disconnected from the rear shock absorber with coil spring.
DISASSEMBLY
pic 8
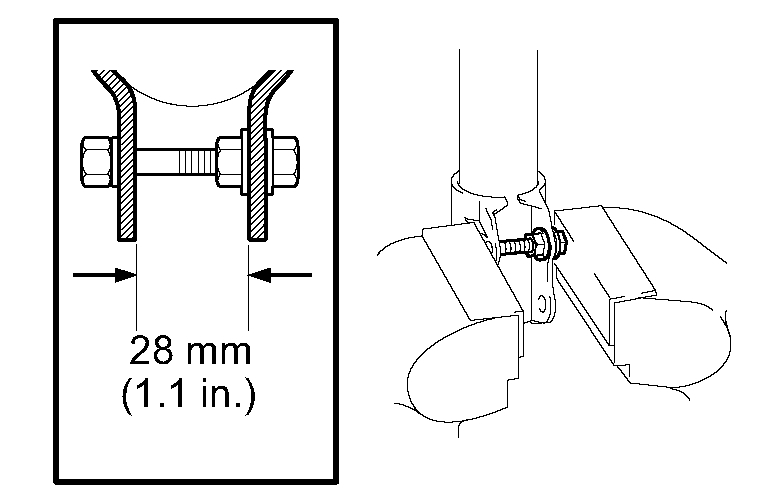
1. FIX REAR SHOCK ABSORBER WITH COIL SPRING
(a) As shown in the illustration, secure the rear shock absorber with coil spring in a vise using aluminum plates by closing the vise onto the double nutted bolt affixed to the bracket at the bottom of the absorber.
Pic 9
2. REMOVE REAR SHOCK ABSORBER
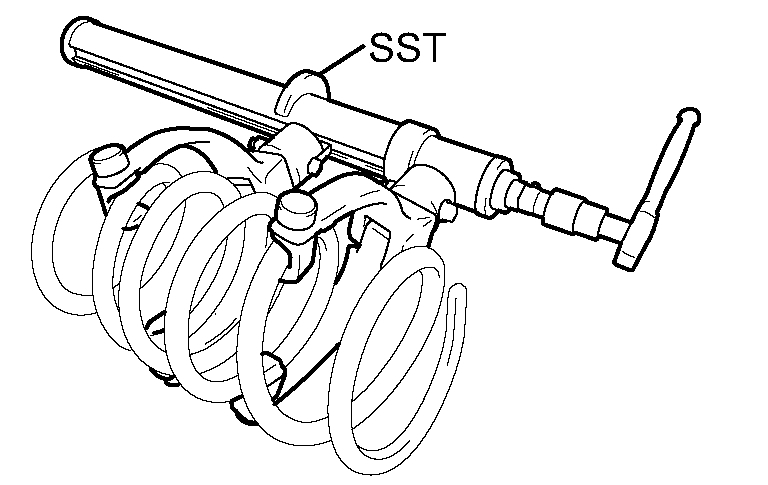
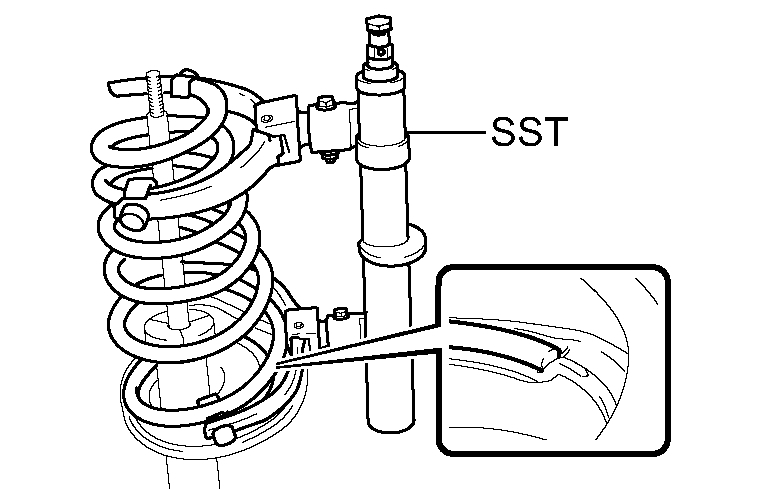
(a) Using SST, compress the rear coil spring.
SST 09727-30021 (09727-00010, 09727-00021, 09727-00031)
NOTICE: Do not use an impact wrench.
HINT: If the front coil spring is compressed at an angle, using 2 SST will make the work easier.
(b) Remove the nut, rear shock absorber collar and rear suspension support assembly.
(c) Remove the rear coil spring, rear No. 1 spring bumper, and rear coil spring lower insulator.
INSPECTION
pic 10
1. INSPECT REAR SHOCK ABSORBER
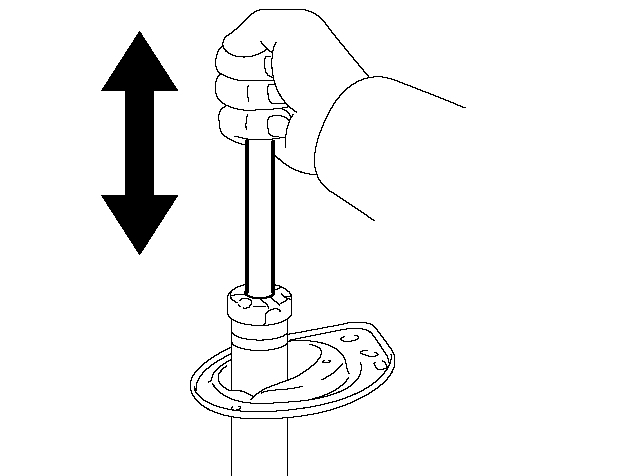
(a) Compress and extend the shock absorber rod 4 or more times.
Standard: There is no abnormal resistance or sound and operation resistance is normal.
HINT: If there is any abnormality, replace the rear shock absorber with a new one.
REASSEMBLY
1. INSTALL REAR SHOCK ABSORBER
(a) Install the rear No. 1 spring bumper to the piston rod.
Pic 11
(b) Install the rear coil spring lower insulator onto the rear shock absorber.
Pic 12
(c) Using SST, compress the rear coil spring.
SST 09727-30021 (09727-00010, 09727-00021, 09727-00031)
NOTICE: Do not use an impact wrench.
Pic 13
(d) Install the rear coil spring to the rear shock absorber.
NOTICE: The smaller diameter end must face upward.
HINT:
Fit the lower end of the rear coil spring into the gap of the lower seat.
If the front coil spring is compressed at an angle, using 2 SST will make the work easier.
Pic 14
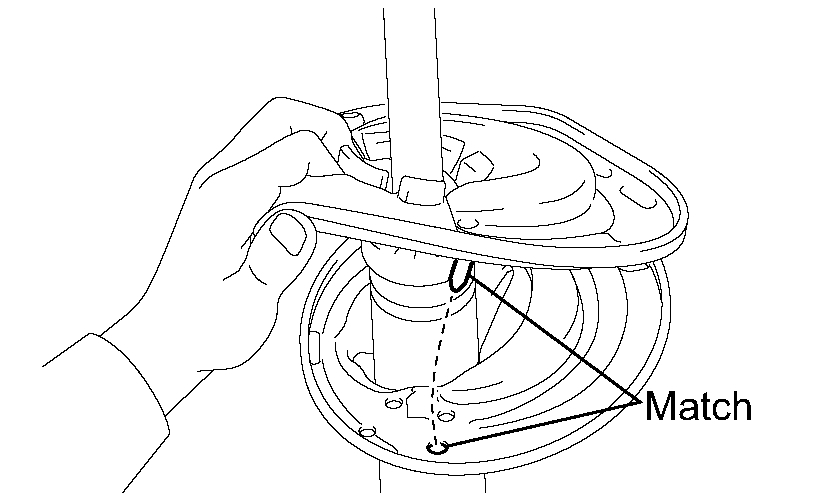
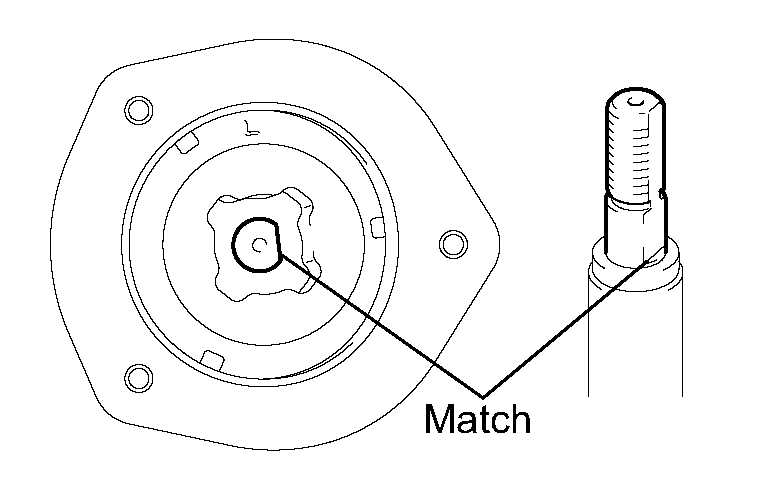
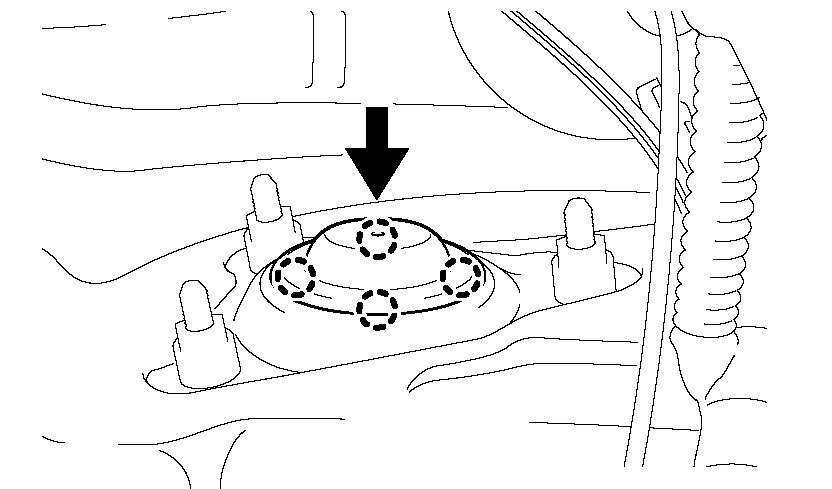
(e) Install the rear suspension support assembly.
NOTICE: Align the notches of the piston rod and the rear suspension support assembly as shown in the illustration before installing the rear suspension support assembly.
Pic 15
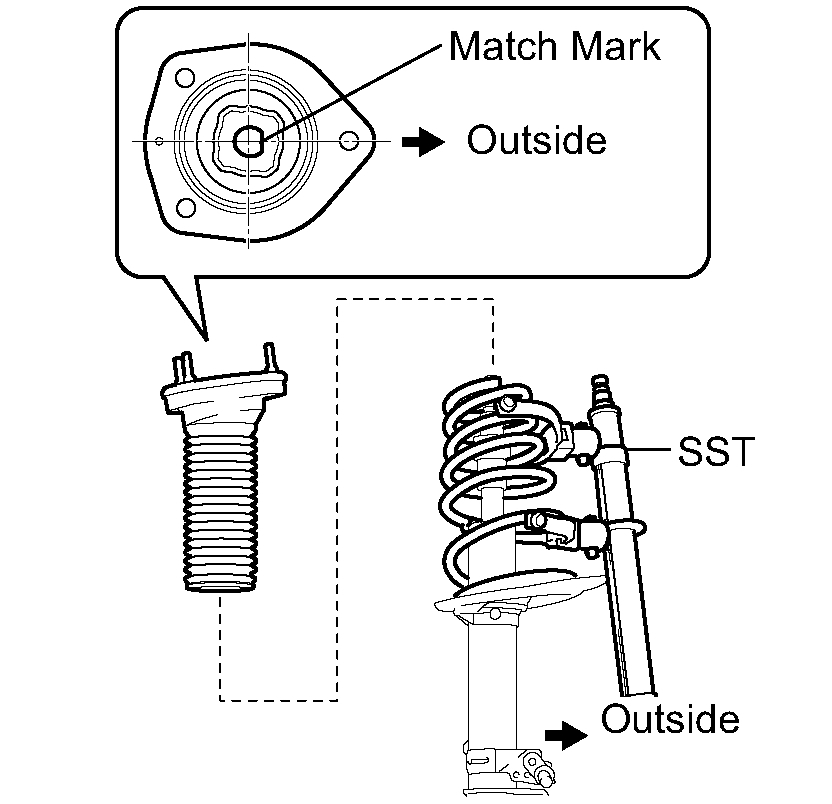
(f) Align the notches of the shock absorber with the notch of the rear suspension support assembly so that the notches face the outside of the vehicle.
(g) Install the rear shock absorber collar.
(h) Loosely tighten a new lock nut to the rear suspension piston rod.
Pic 16
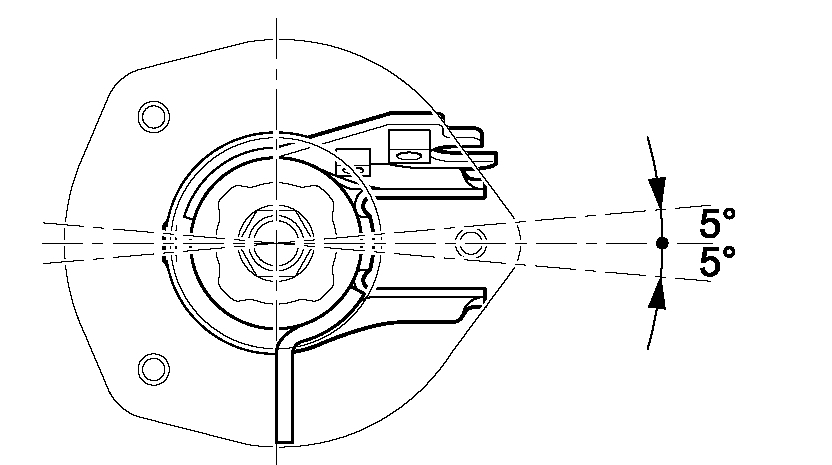
(i) Release the spring while adjusting the rear suspension support assembly to the position shown in the illustration, and remove the SST from the rear coil spring.
NOTICE: Do not use an impact wrench.
HINT: When lining up the rear suspension support assembly's stud bolts at the middle point between the two sides of the bracket, the maximum permissible degree of error is ± 5°.
INSTALLATION
1. INSTALL REAR SHOCK ABSORBER WITH COIL SPRING
(a) Install the rear shock absorber with coil spring to the rear axle carrier assembly and insert the 2 bolts from the rear of the vehicle.
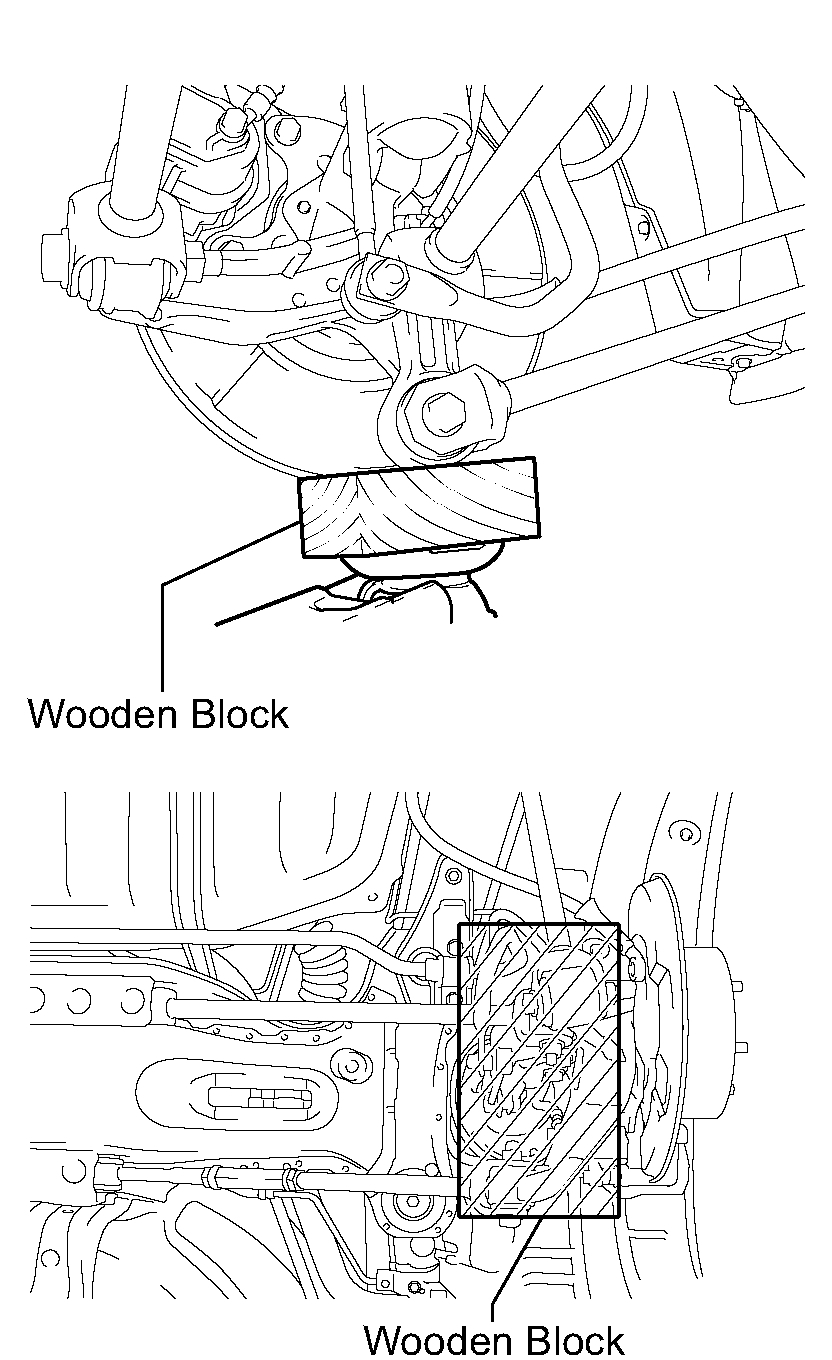
Pic 17
(b) Slowly jack up the vehicle using a wooden block and install the rear shock absorber with coil spring (upper side) to the vehicle.
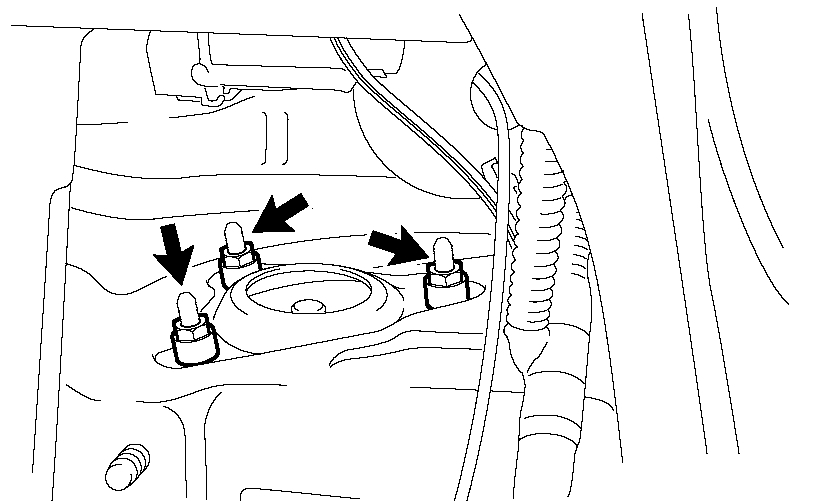
Pic 18
(c) Install the 3 nuts to the upper side of the rear shock absorber with coil spring.
Torque: 39 Nm (398 kgf-cm, 29 ft. Lbs.)
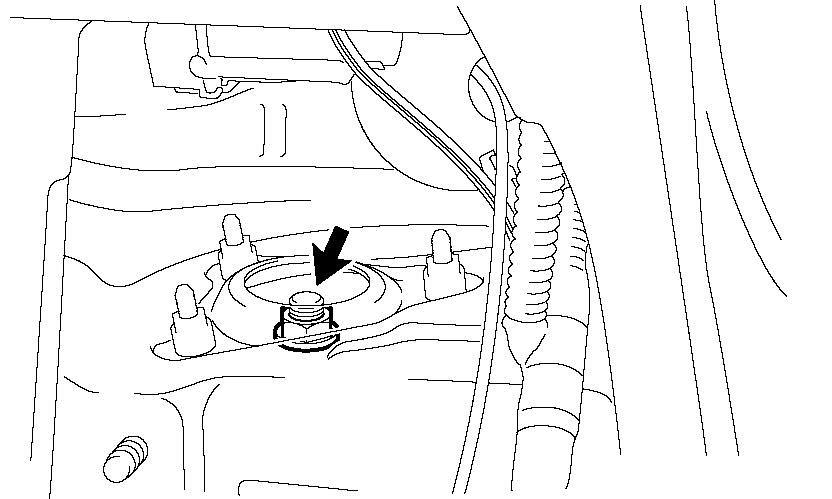
pic 19
(d) Install the 2 nuts and 2 bolts to the lower side of the rear shock absorber with coil spring.
Torque: 180 Nm (1,840 kgf-cm, 133 ft. Lbs.)
NOTICE: When installing the nuts, keep the bolts from rotating.
Pic 20
(e) Fully tighten the lock nut.
Torque: 55 Nm (561 kgf-cm, 41 ft. Lbs.)
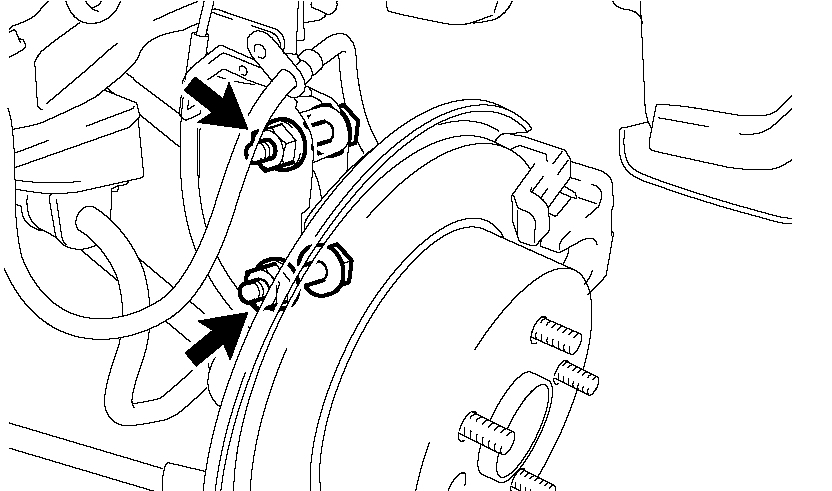
pic 21
2. CONNECT REAR SPEED SENSOR
(a) Install the rear brake flexible hose and rear speed sensor wire harness with the 2 bolts.
Torque:
5.0 Nm (51 kgf-cm, 44 inch lbs.) (Bolt A)
19 Nm (194 kgf-cm, 14 ft. Lbs.) (Bolt B)
pic 22
3. INSTALL REAR STABILIZER LINK ASSEMBLY LH
(a) Install the rear stabilizer link assembly LH to the rear shock absorber with the nut.
Torque: 39 Nm (398 kgf-cm, 29 ft. Lbs.)
HINT: If the ball joint turns together with the nut, use a hexagon wrench (5 mm) to hold the stud.
Pic 23
4. INSTALL REAR SUSPENSION SUPPORT NO. 1 COVER
(a) Engage the 4 claws and install the rear suspension support No. 1 cover.
5. INSTALL REAR WHEEL
Torque: 103 Nm (1,050 kgf-cm, 76 ft. Lbs.)
6. Install rear seat back assembly (for fixed type)
7. Install rear seat cushion assembly (for fixed type)
8. Install rear center seat headrest assembly (for fixed type)
9. Install rear seat headrest assembly (for fixed type)
10. Install rear side seat back assembly rh (for fold down seat type)
11. Install rear side seat back assembly lh (for fold down seat type)
12. Install separate type rear seat back assembly rh (for fold down seat type)
13. Install separate type rear seat back assembly lh (for fold down seat type)
14. Install rear seat cushion assembly (for fold down seat type)
15. Install rear center seat headrest assembly (for fold down seat type)
16. Install rear seat headrest assembly (for fold down seat type)
17. Install separate type rear seat back assembly rh (for reclining seat type)
18. Install separate type rear seat back assembly lh (for reclining seat type)
19. Install rear seat back cover (for reclining seat type)
20. Install rear seat cushion assembly (for reclining seat type)
21. Install rear seat headrest assembly (for reclining seat type)
22. Check abs speed sensor signal
23. Inspect and adjust rear wheel alignment
DISPOSAL
pic 24
1. DISPOSE OF REAR SHOCK ABSORBER
(a) Fully extend the shock absorber piston rod.
(b) Using a drill, make a hole in the cylinder between A and B as shown in the illustration to discharge the gas inside.
CAUTION:
Be careful when drilling because shards of metal may fly about. Always use the proper safety equipment.
The gas is colorless, odorless and nonpoisonous.
________________________________________-
I hope this helps. Let me know if you have other questions or need help.
Take care and God Bless,
Joe
Images (Click to make bigger)
Tuesday, February 2nd, 2021 AT 3:46 PM