Hi,
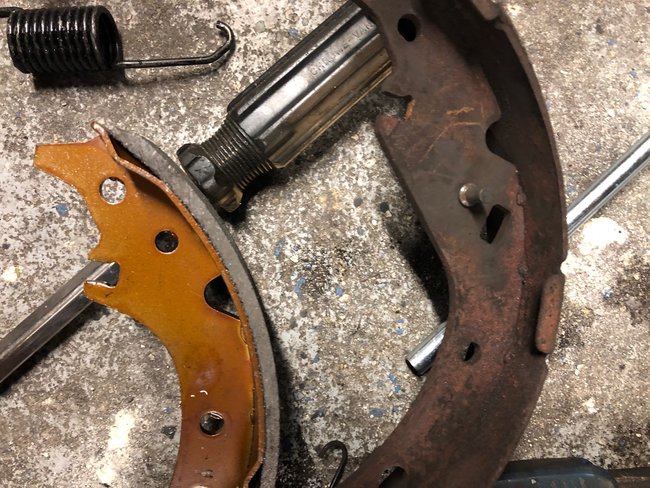
The shoe itself looks different. However, the pic I believe you are referring to is reused. You need to tap it out of the old shoe and then reinstall it in the new one. But the new one doesn't seem to have a location for it. There is usually a U shaped clip that holds it in.
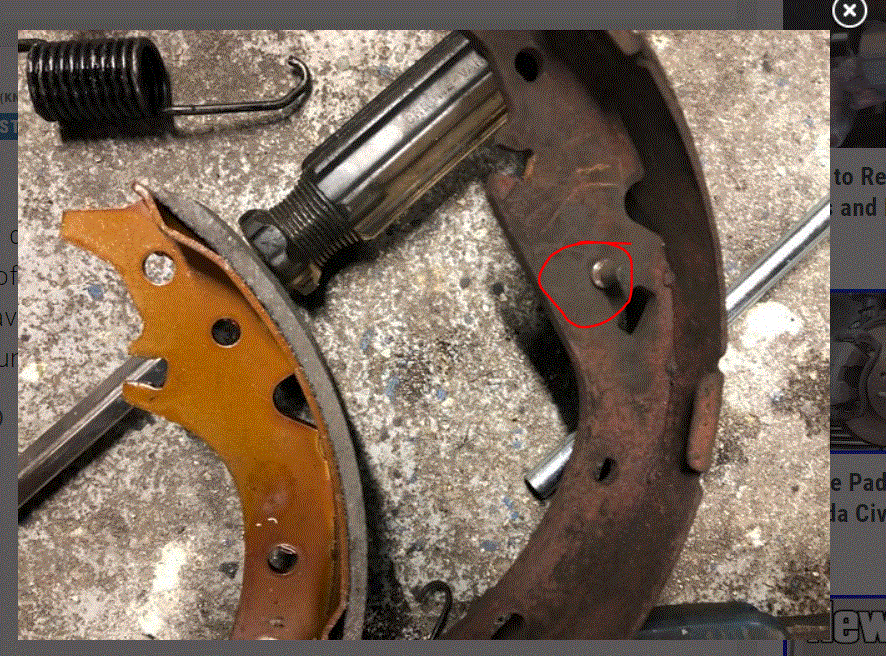
I copied your pic and circled what I believe you are referring to. Check to see if both of the new shoes are the same or if one has a location to reinstall that part. Pic 2 shows what I believe you are referring to as well.
________________________________________
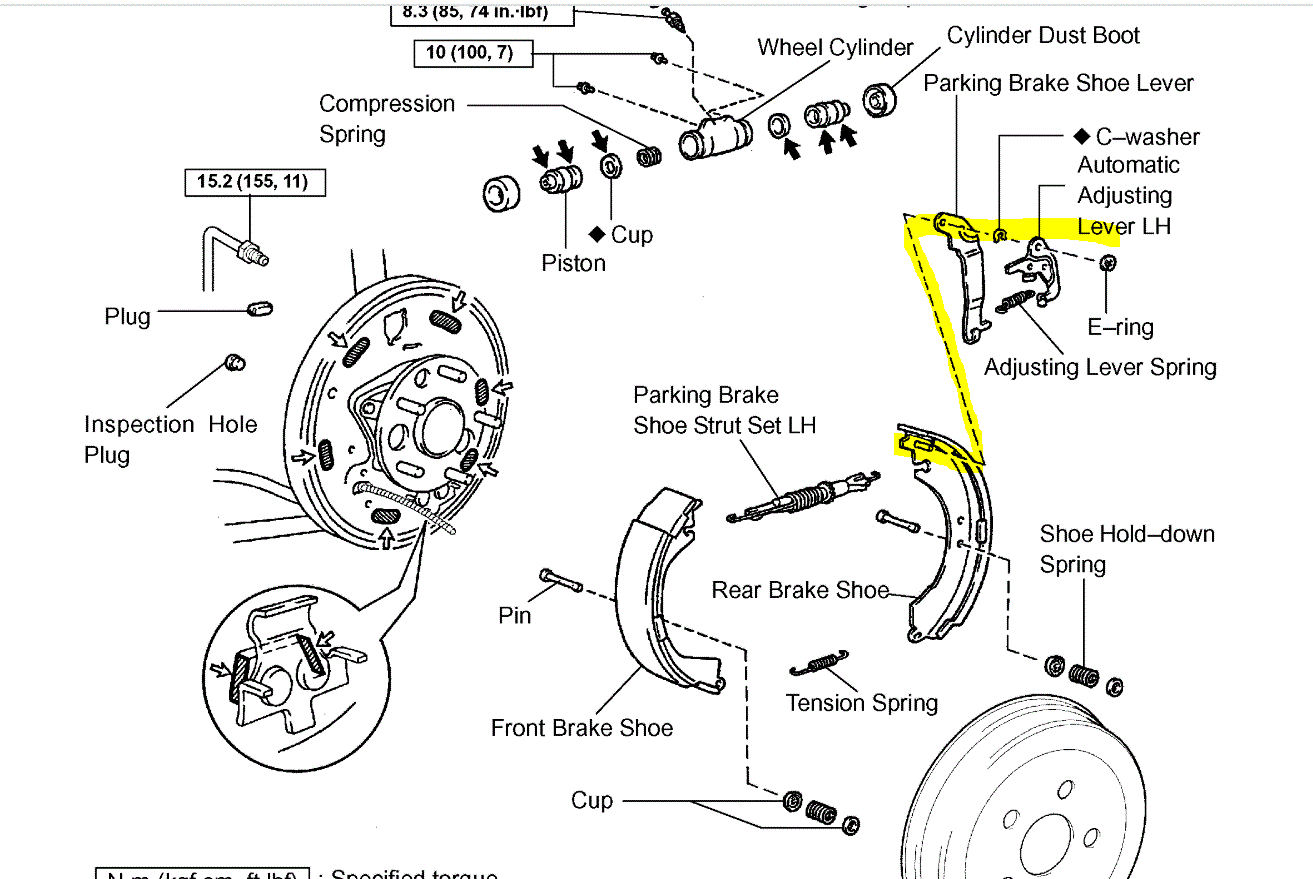
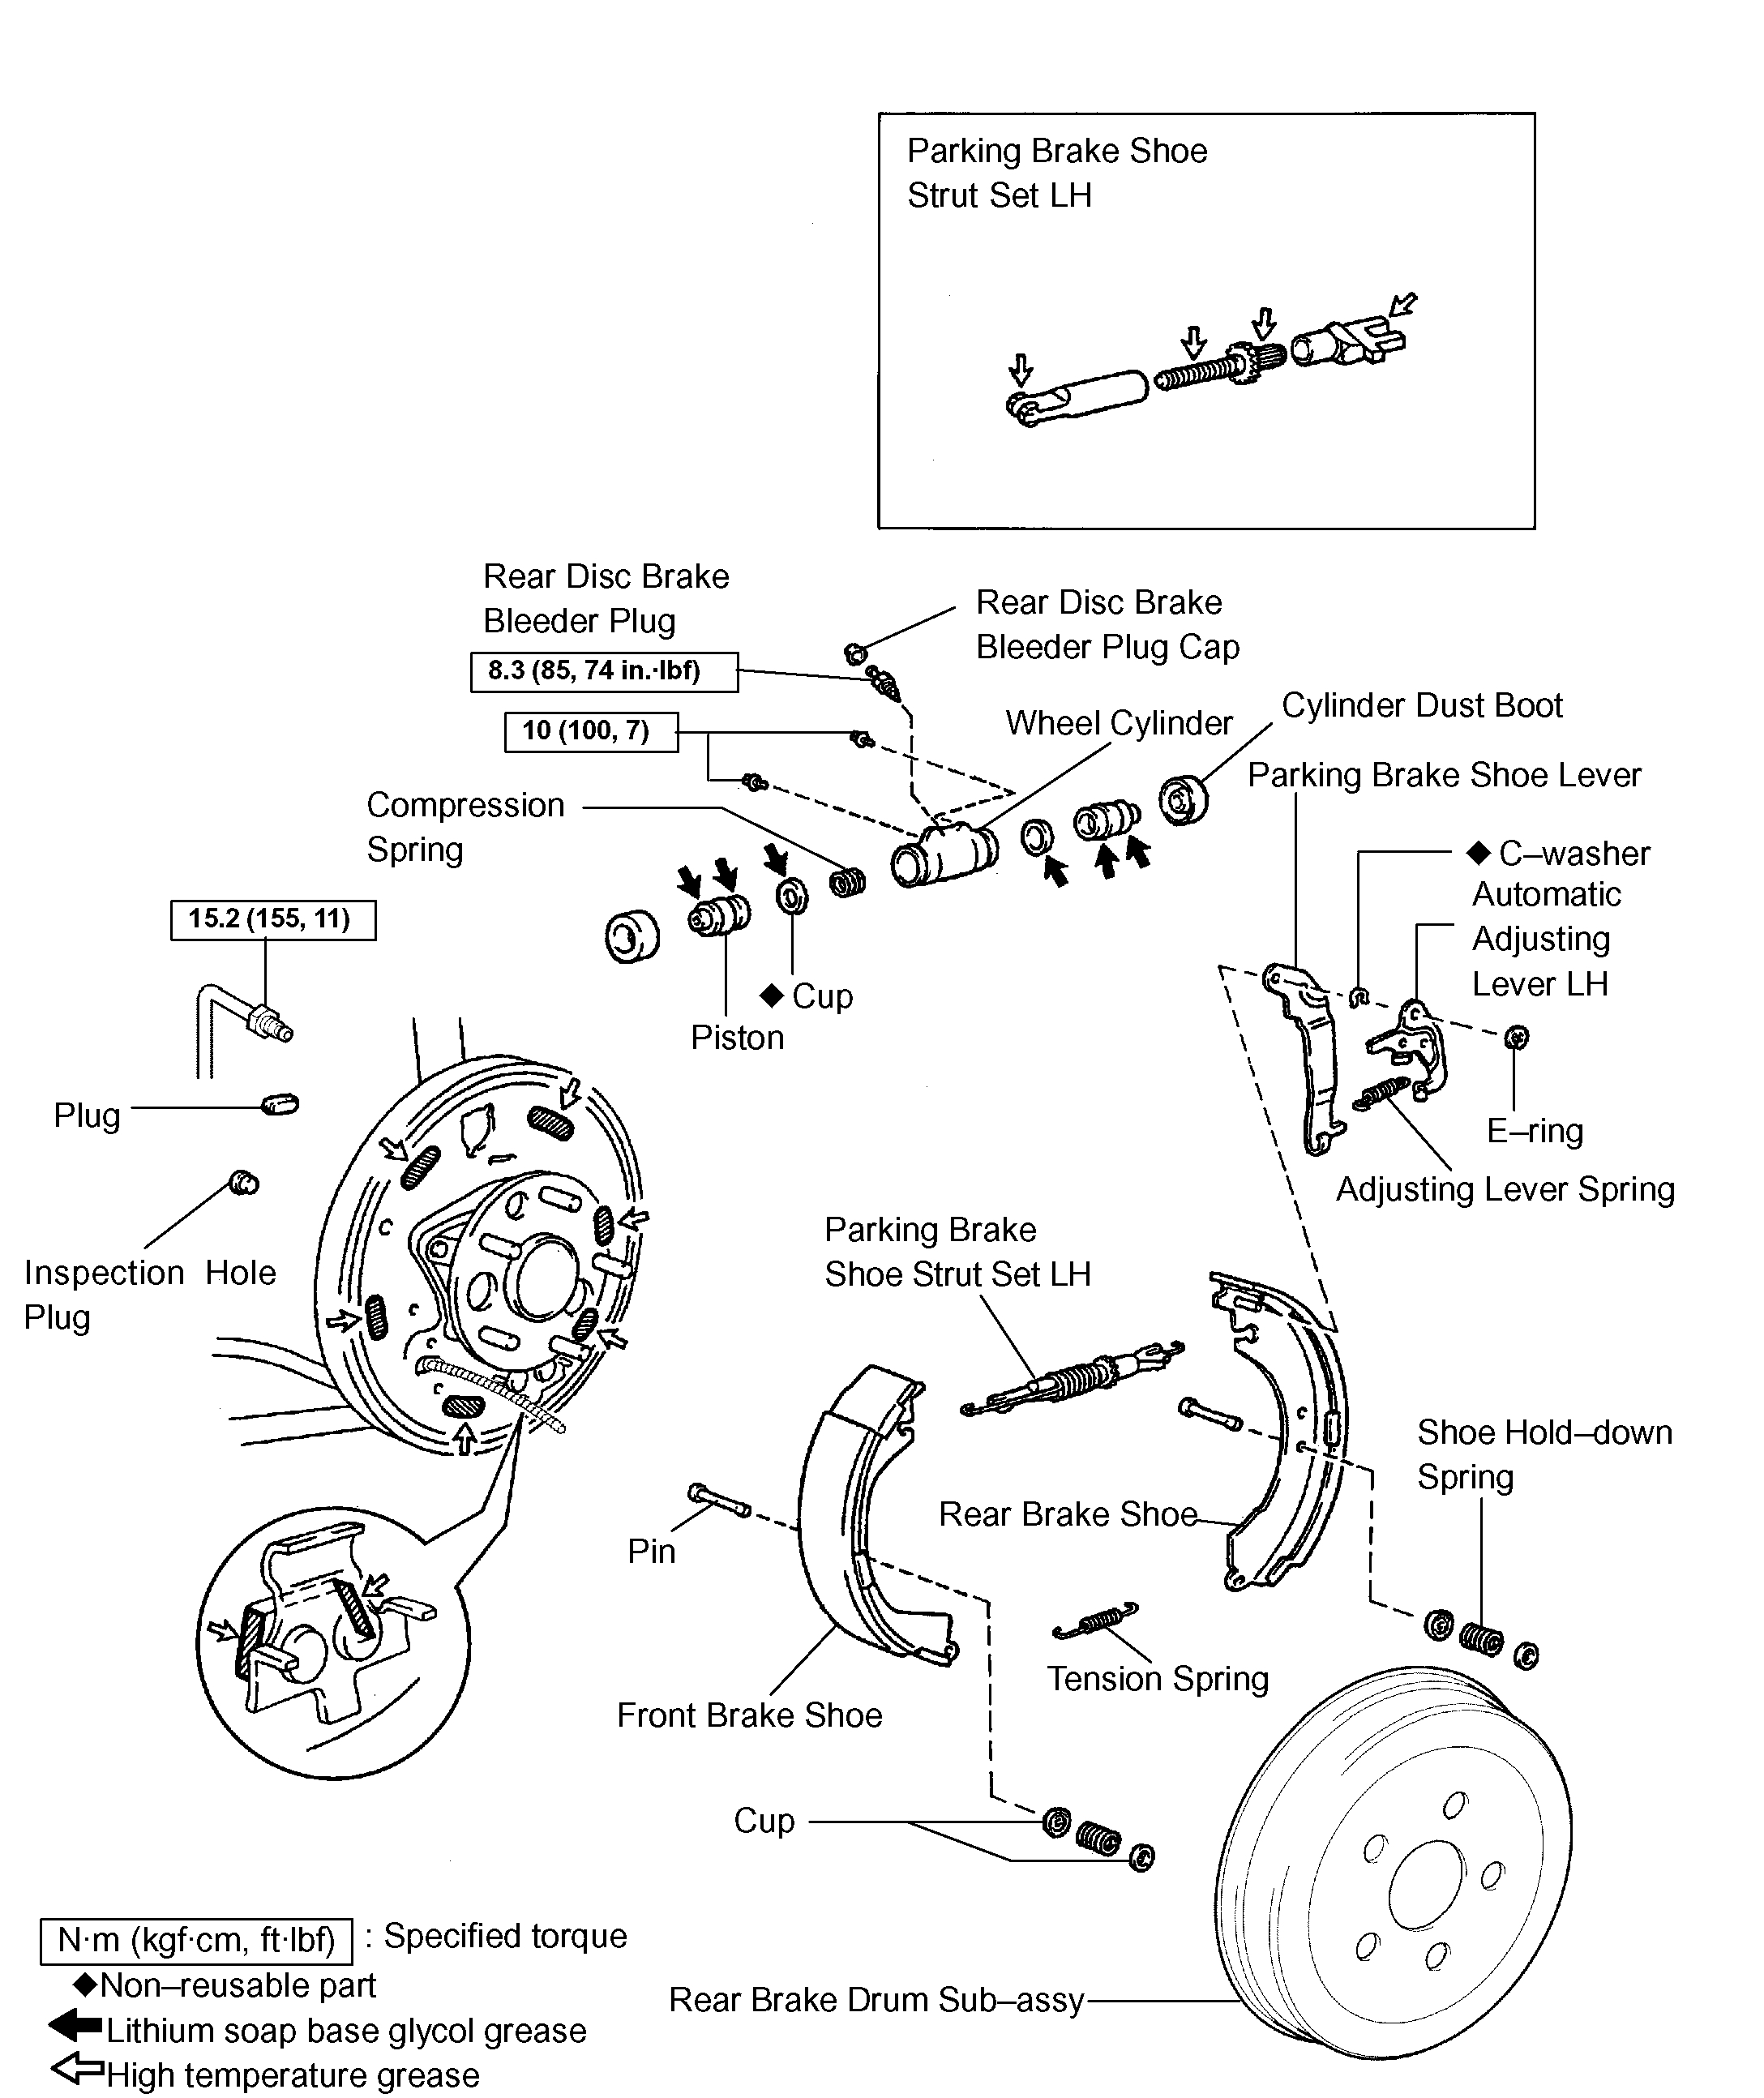
I don't know if you need them, but here are the directions right from Alldata specific to your vehicle for brake shoe replacement. The remaining pictures will correlate with these directions. If you go all the way to pics 15 and 16, you'll see what I am referring to.
Note: These directions are complete and include things you will likely not need.
________________________________________
2005 Toyota Camry L4-2.4L (2AZ-FE)
Procedures
Vehicle Brakes and Traction Control Drum Brake System Service and Repair Procedures
PROCEDURES
pic 3
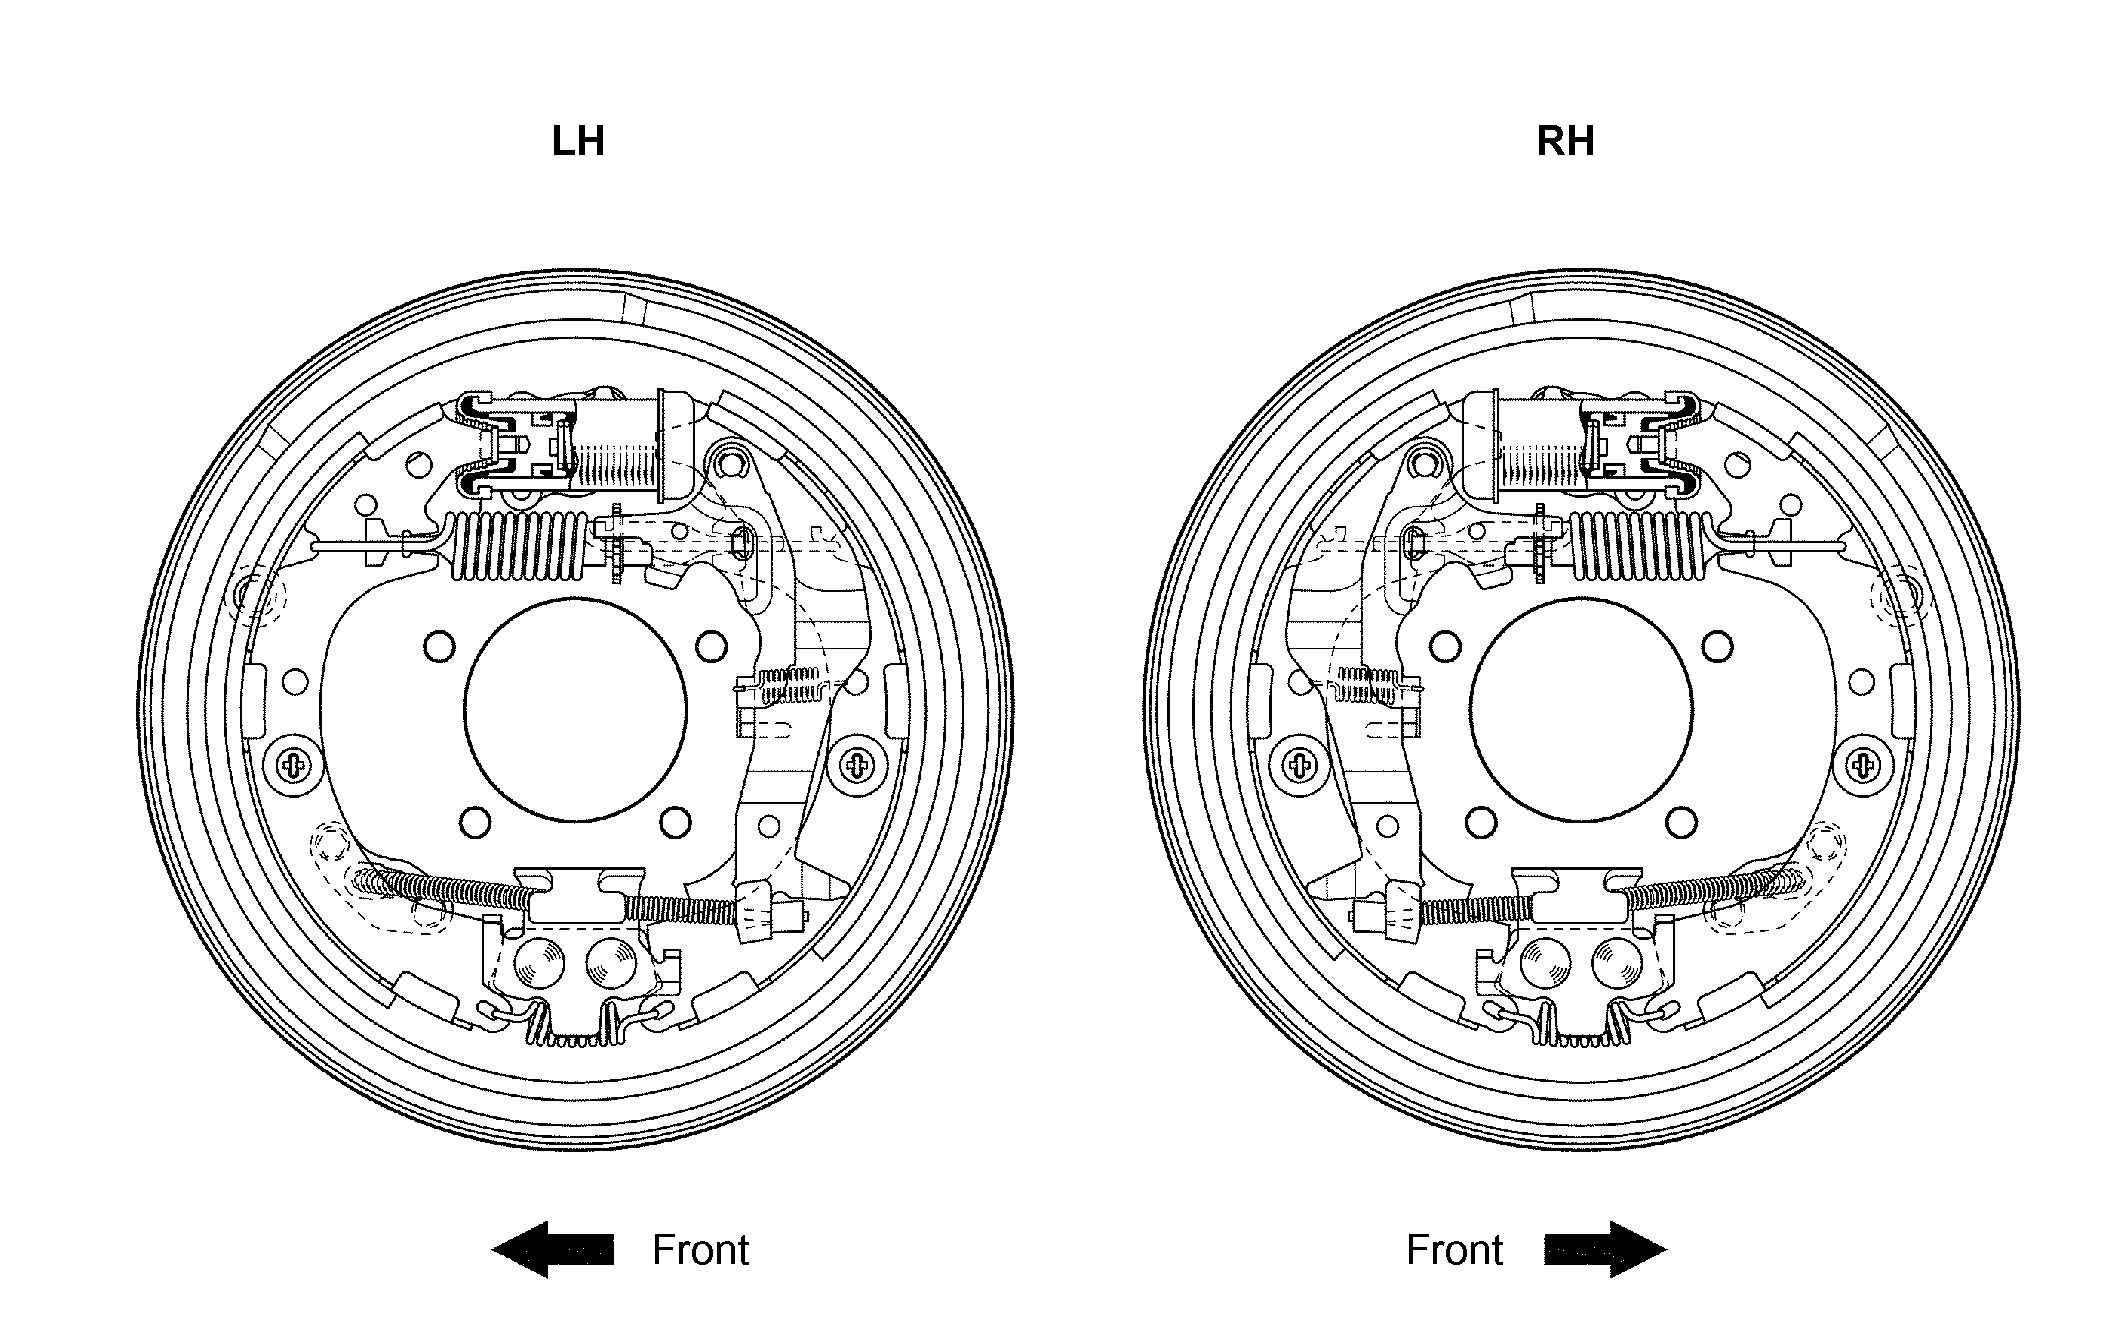
REAR DRUM BRAKE
OVERHAUL
HINT:
^ Overhaul the RH side by the same procedures with LH side.
1. REMOVE REAR WHEEL
2. DRAIN BRAKE FLUID
NOTICE: Wash off the brake fluid immediately if it comes into contact with a painted surface.
pic 4
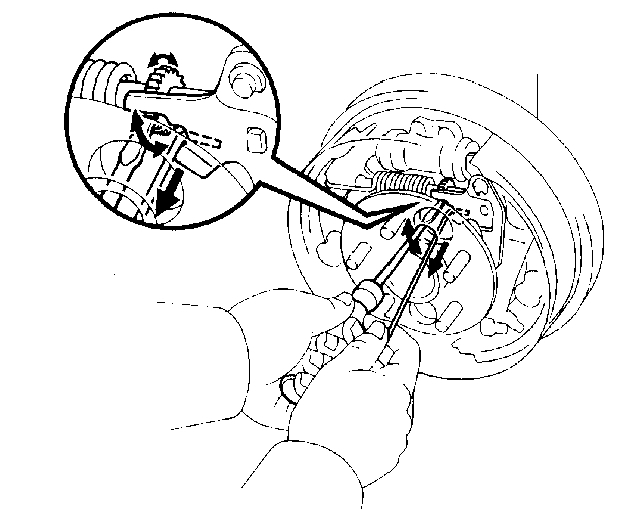
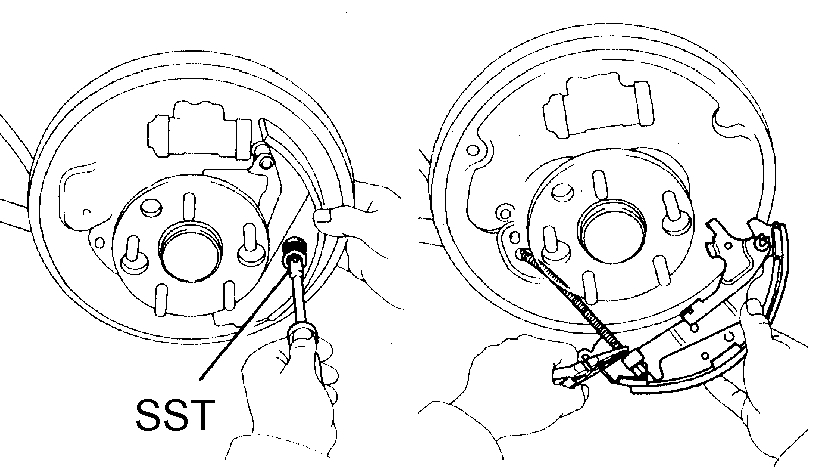
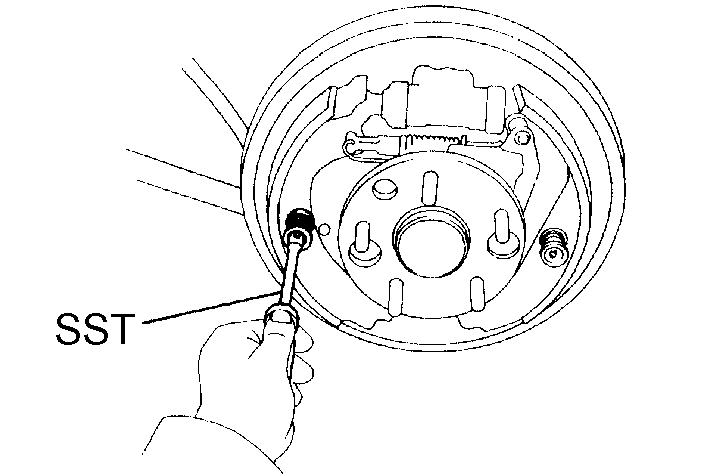
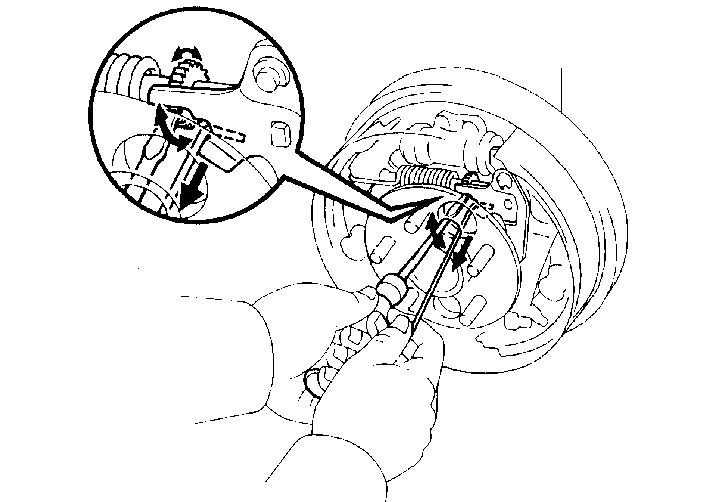
3. REMOVE REAR BRAKE DRUM SUB-ASSEMBLY
HINT: If the brake drum cannot be removed easily, do the following steps.
a. Insert a bent wire or equivalent through the hole in the brake drum, and hold the automatic adjusting lever away from the adjuster.
b. Using a screwdriver, reduce the brake shoe adjustment by turning the adjuster.
c. Remove the rear brake drum sub-assembly.
pic 5
4. INSPECT BRAKE DRUM INSIDE DIAMETER
a. Using a brake drum gauge or equivalent, measure the in side diameter of the drum.
Standard inside diameter: 228.0 mm (8.976 inch)
Maximum inside diameter: 230.6 mm (9.079 inch)
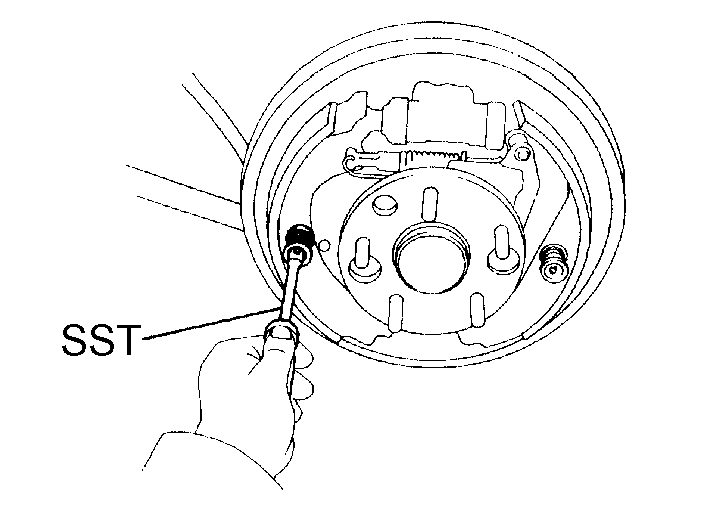
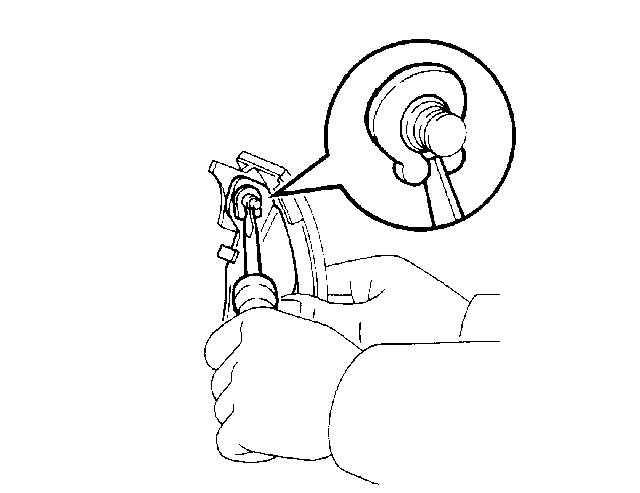
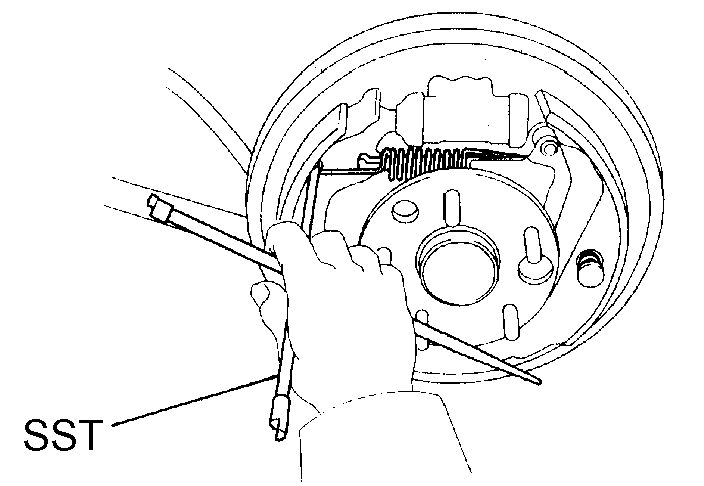
5. REMOVE TENSION SPRING
a. Remove the tension spring from the front brake shoe and rear brake shoe.
pic 6
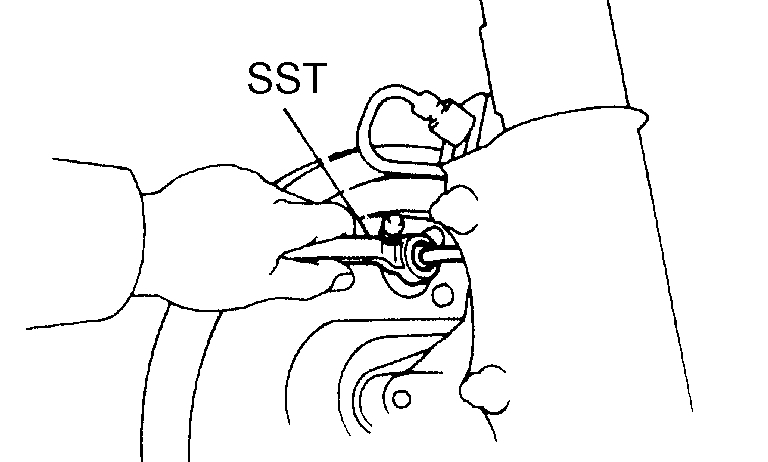
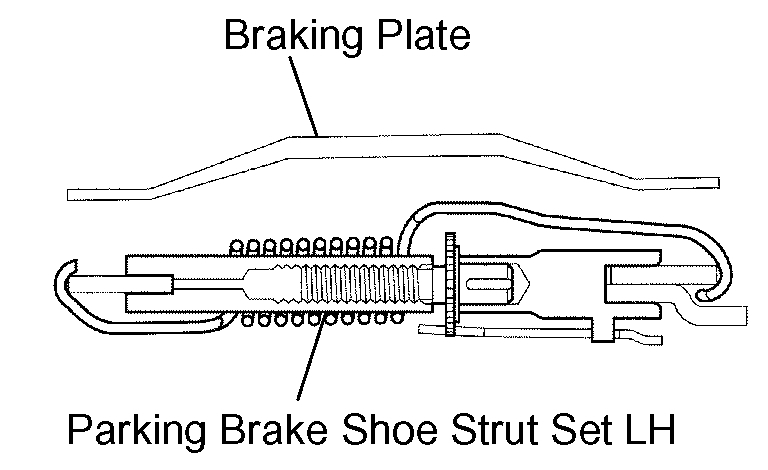
6. SEPARATE PARKING BRAKE SHOE STRUT SET LH
a. Using SST, disconnect the shoe return spring and separate the parking brake shoe strut set LH.
SST 09703-30010
NOTICE: Do not damage the wheel cylinder boot.
pic 7
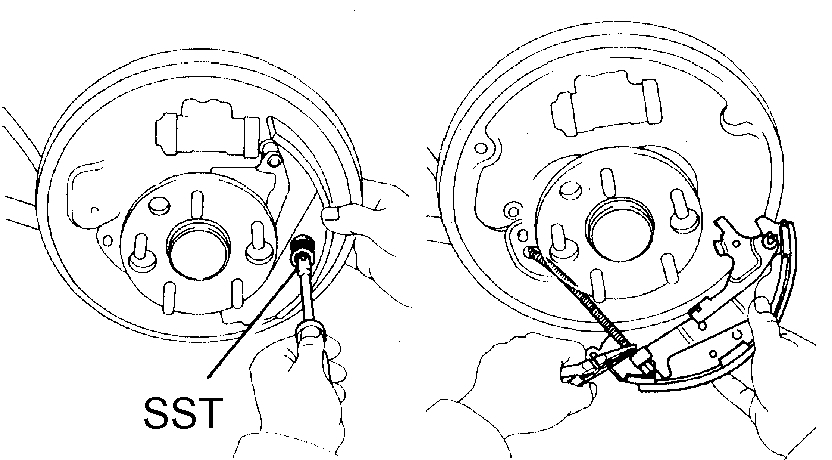
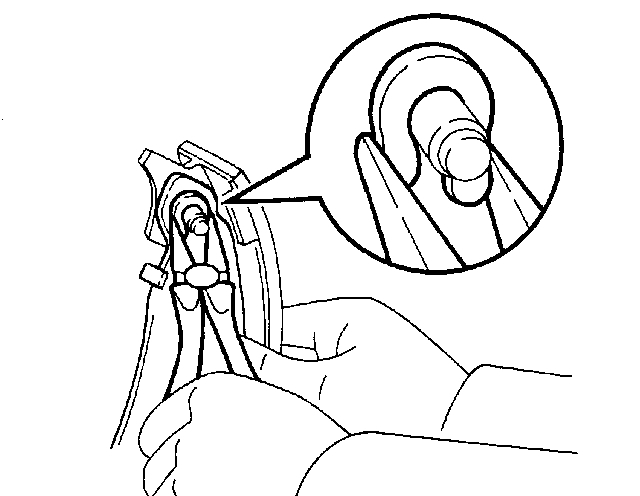
7. REMOVE FRONT BRAKE SHOE
a. Using SST, remove the 2 cups, shoe hold-down spring and pin.
SST 09718-00010
b. Remove the front brake shoe.
8. REMOVE PARKING BRAKE SHOE STRUT SET LH
pic 8
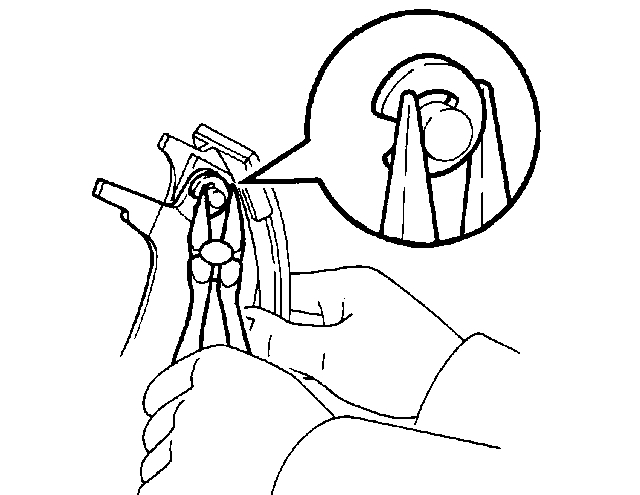
9. REMOVE REAR BRAKE SHOE
a. Using SST, remove the 2 cups, shoe hold-down spring and pin.
SST 09718-00010
b. Using a screwdriver, disconnect the parking brake cable from the anchor plate.
c. Using needle-nose pliers, disconnect the parking brake cable from the lever and remove the rear shoe.
NOTICE: Do not allow oil or grease on the rubbing face.
pic 9
10. REMOVE REAR BRAKE AUTOMATIC ADJUST LEVER LH
a. Remove the adjusting lever spring.
b. Remove the E-ring.
c. Remove the automatic adjusting lever.
pic 10
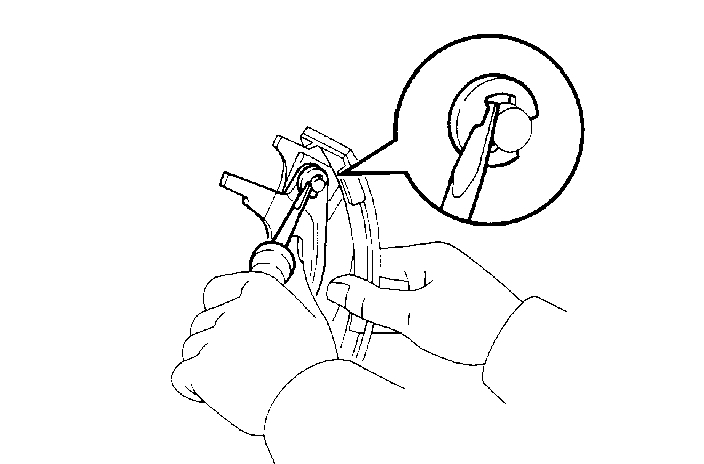
11. REMOVE PARKING BRAKE SHOE LEVER LH
a. Using screwdriver, remove the C-washer and parking brake shoe lever.
pic 11
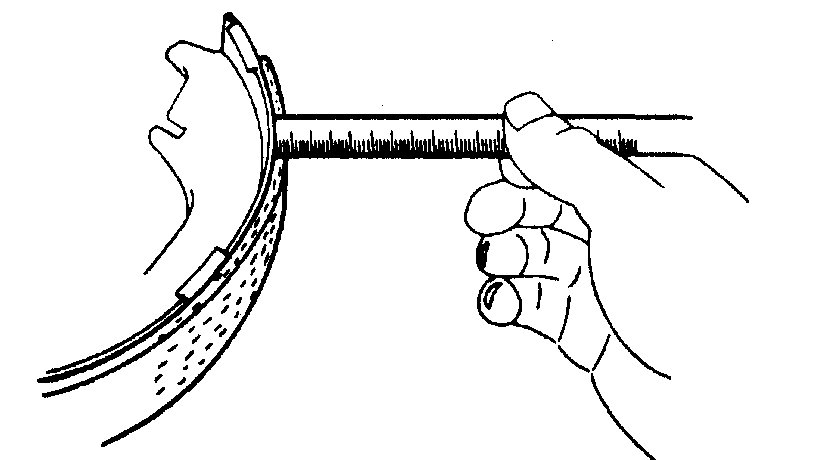
12. INSPECT REAR DRUM BRAKE SHOE LINING THICKNESS
a. Using a ruler, measure the shoe lining thickness.
Standard thickness: 5.0 mm (0.197 inch)
Minimum thickness: 1.0 mm (0.039 inch)
If the thickness is less than the minimum, or shows signs of uneven wear, replace the brake shoes.
HINT: If any of the brake shoes have to be replaced, replace all of the rear brake shoes in order to maintain even braking.
pic 12
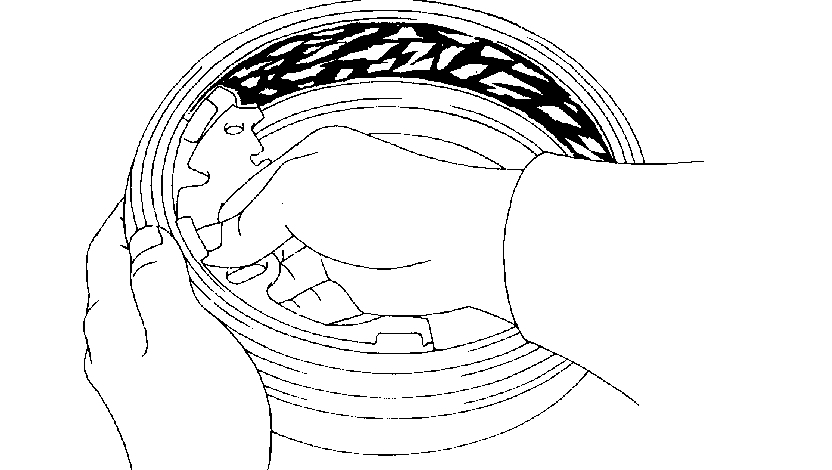
13. INSPECT BRAKE DRUM AND REAR DRUM BRAKE SHOE LINING FOR PROPER CONTACT
a. Apply chalk to the inside surface of the drum, then grind drum the brake shoe lining to fit.
If the contact between the drum and the shoe lining is improper, repair it using a brake shoe grinder or replace the brake shoe assembly.
pic 13
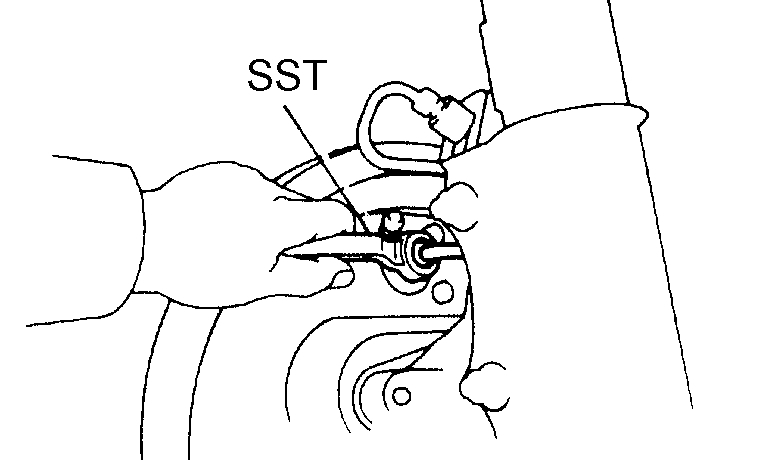
14. REMOVE LH, FRONT OR UPPER REAR WHEEL BRAKE CYLINDER ASSEMBLY
a. Using SST, disconnect the brake tube, use a container to catch brake fluid.
SST 09751-36011
b. Remove the 2 bolts and wheel cylinder.
15. REMOVE REAR WHEEL CYLINDER CUP KIT
a. Remove the 2 cylinder dust boots from the wheel cylinder.
b. Remove the 2 pistons and compression spring.
c. Remove the 2 cups from the each piston.
16. INSPECT BRAKE WHEEL CYLINDER
a. Check the cylinder bore and piston for rust or scoring.
17. REMOVE REAR DISC BRAKE BLEEDER PLUG CAP
18. REMOVE REAR DISC BRAKE BLEEDER PLUG
19. TEMPORARILY TIGHTEN REAR DISC BRAKE BLEEDER PLUG
20. INSTALL REAR DISC BRAKE BLEEDER PLUG CAP
21. INSTALL REAR WHEEL CYLINDER CUP KIT
a. Apply the lithium soap base glycol grease to the parts indicates by arrows.
b. Install the 2 wheel cylinder cups to each piston.
c. Install the compression spring and 2 pistons to the wheel cylinder.
d. Install are 2 new cylinder dust boots to the wheel cylinder.
pic 14
22. INSTALL LH, FRONT OR UPPER REAR WHEEL BRAKE CYLINDER ASSEMBLY
a. Install the wheel cylinder with the 2 bolts.
Torque: 10 Nm (100 kgf-cm, 7 ft. lbs.)
b. Using SST, connect the brake tube.
SST 09751-36011
Torque: 15 Nm (155 kgf-cm, 11 ft. lbs.)
23. APPLICATION HIGH TEMPERATURE GREASE
a. Apply the high temperature grease to the parts indicates by arrows.
pic 15
24. INSTALL PARKING BRAKE SHOE LEVER LH
a. Install the parking brake shoe lever with a new C-washer.
pic 16
25. INSTALL REAR BRAKE AUTOMATIC ADJUST LEVER LH
a. Install the automatic adjust lever and automatic adjust lever spring to the rear brake shoe with the E-ring.
pic 17
26. INSTALL REAR BRAKE SHOE
a. Using needle-nose pliers, connect the parking brake cable to the parking brake shoe lever.
b. Using a screwdriver, connect the paring brake cable to the anchor plate.
c. Using SST, install the rear brake shoe, pin, shoe hold down spring and 2 cups.
SST 09718-00010
27. INSTALL PARKING BRAKE SHOE STRUT SET LH
a. Apply the high temperature grease to the part indicated by arrow.
pic 18
b. Install the parking brake shoe strut set LH as shown in the installation.
c. Connect the shoe return spring to the rear shoe.
pic 19
28. INSTALL FRONT BRAKE SHOE
a. Using SST, install the front brake shoe, pin, shoe hold down spring and cup.
SST 09718-00010
pic 20
29. CONNECT PARKING BRAKE SHOE STRUT SET LH
a. Using SST, connect the tension spring to the front and rear brake shoe.
SST 09703-30010
30. INSTALL TENSION SPRING
a. Connect the tension spring to the front brake shoe.
pic 21
31. CHECK REAR DRUM BRAKE INSTALLATION
a. Check that each part is installed properly.
NOTICE: There should be no oil or grease adhering to the friction surfaces of the shoe lining and drum.
32. INSTALL REAR BRAKE DRUM SUB-ASSEMBLY
pic 22
33. ADJUST REAR DRUM BRAKE SHOE CLEARANCE
HINT: If the brake drum cannot be removed easily, do the following steps.
a. Insert a bent wire or equivalent through the hole in the brake drum, and hold the automatic adjusting lever away from the adjuster.
b. Using a screwdriver, reduce the brake shoe adjustment by turning the adjuster.
34. FILL RESERVOIR WITH BRAKE FLUID
35. BLEED MASTER CYLINDER
SST 09023-00101
36. BLEED BRAKE LINE
37. CHECK FLUID LEVEL IN RESERVOIR
38. CHECK BRAKE FLUID LEAKAGE
39. INSTALL REAR WHEEL
Torque: 103 Nm (1,050 kgf-cm, 76 ft. lbs.)
40. CHECK PARKING BRAKE LEVER TRAVEL (LEVER TYPE PARKING BRAKE)
41. CHECK PARKING BRAKE PEDAL TRAVEL (PEDAL TYPE PARKING BRAKE)
42. ADJUST PARKING BRAKE LEVER TRAVEL (LEVER TYPE PARKING BRAKE)
43. ADJUST PARKING BRAKE PEDAL TRAVEL (PEDAL TYPE PARKING BRAKE)
______________________________
Let me know if this helps.
Take care,
Joe
Images (Click to enlarge)
Mar 5, 2021 at 10:11 AM