Hello .. thanks for the donation .. much appreciated.
Hope this helps ..let me know
Removal (3.0L)
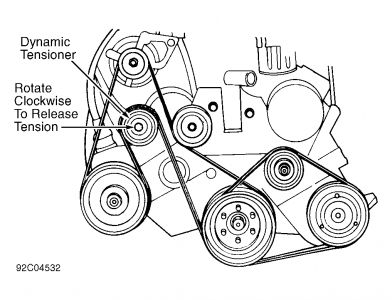
Disconnect and isolate negative battery cable. To release drive belt tension, rotate dynamic tensioner clockwise until belt is slack enough to allow pump removal. See Fig. 7 .
Fig. 7: Loosening Dynamic Tensioner (3.0L)
Courtesy of CHRYSLER MOTORS
Position drain pan under power steering pump. Remove filler tube and dipstick assembly from alternator bracket. Raise vehicle.
Remove 2 exhaust pipe-to-exhaust manifold nut, bolt and spring assemblies. Remove exhaust pipe to left of vehicle. Remove return hose from power steering gear. Remove pressure hose from pump.
Remove rear support bracket-to-pump nut. Remove 2 support bracket-to-engine bolts, and remove bracket from vehicle.
Using a deep-well socket to gain access through slots in pump pulley, remove 2 front pump-to-mounting plate bolts. Remove pump assembly through area between floor pan and crossmember at exhaust pipe tunnel.
With pump removed, inspect pulley and replace if needed. See PUMP PULLEY R & I under REMOVAL & INSTALLATION.
Installation
To install, reverse removal procedure. Tighten nuts and bolts to specification. See TORQUE SPECIFICATIONS table. Add power steering fluid. DO NOT use ATF. Bleed system. See HYDRAULIC SYSTEM BLEEDING under LUBRICATION.
Removal (3.3L)
Disconnect and isolate negative battery cable. Rotate belt tensioner clockwise to release tension on drive belt, and remove belt from vehicle.
Raise vehicle, and place drain pan under pump. Remove return line from pump. Remove remote reservoir clamp and hose from pump. Remove pressure line from pump.
Remove right front wheel. Remove 3 pump-to-alternator-to-tensioner bracket bolts.
Remove support strut-to-engine nut and bolt. Lay pump assembly on top of steering gear.
Remove tensioner-to-mounting bracket nut. Remove tensioner from bracket.
Remove alternator-to-pump support strut nut and bolt. See Fig. 9 . Lower vehicle.
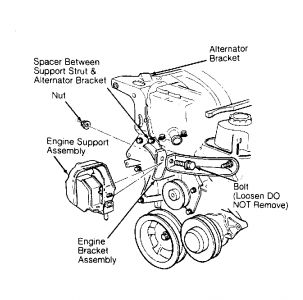
Remove 2 reservoir-to-alternator bracket bolts. Remove tube/hose-to-pump bracket mounting bolt. Remove tube/hose and reservoir as assembly. Remove engine wiring harness clip from alternator bracket. Loosen, but DO NOT remove, engine bracket assembly-to-engine support assembly bolt. See Fig. 10
Fig. 9: Identifying Support Strut Bracket (3.3L)
Courtesy of CHRYSLER MOTORS
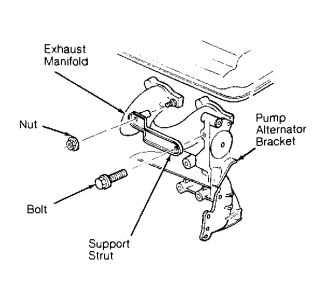
Fig. 10: Engine Bracket Assembly-To-Engine Support Assembly Id (3.3L)
Remove upper alternator-to-alternator bracket bolt. Rotate alternator back toward dash. Remove 4 alternator bracket-to-intake manifold bolts, and remove bracket.
Remove alternator-to-lower bracket bolt. Without removing wiring harness from alternator, remove alternator from bracket and lay alternator on intake manifold.
Remove pump through area vacated by alternator. With pump removed, inspect pulley and replace if needed. See PUMP PULLEY R & I under REMOVAL & INSTALLATION.
Feb 18, 2009 at 5:55 AM
