Hi,
Often times, it is related to a sensor in the seat that senses pressure. However, can you tell me the model? The Challenger wasn't offered in 2006.
If you meant a Charger, here are the directions for testing the seat weight sensor. It's a bit extensive and requires some testing. Let me know if I got the correct vehicle and if it is something you can do. It does require special tooling.
As a test only, attach the seat belt so the vehicle and see if it causes the light (SRS) to turn off. Do this once the light turns on.
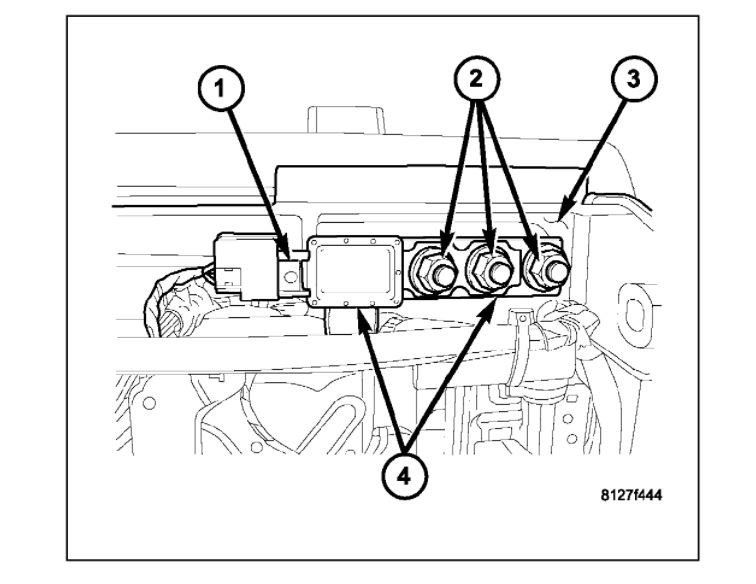
The attached pics correlate with the directions.
_____________________
2006 Dodge Charger V6-3.5L VIN G
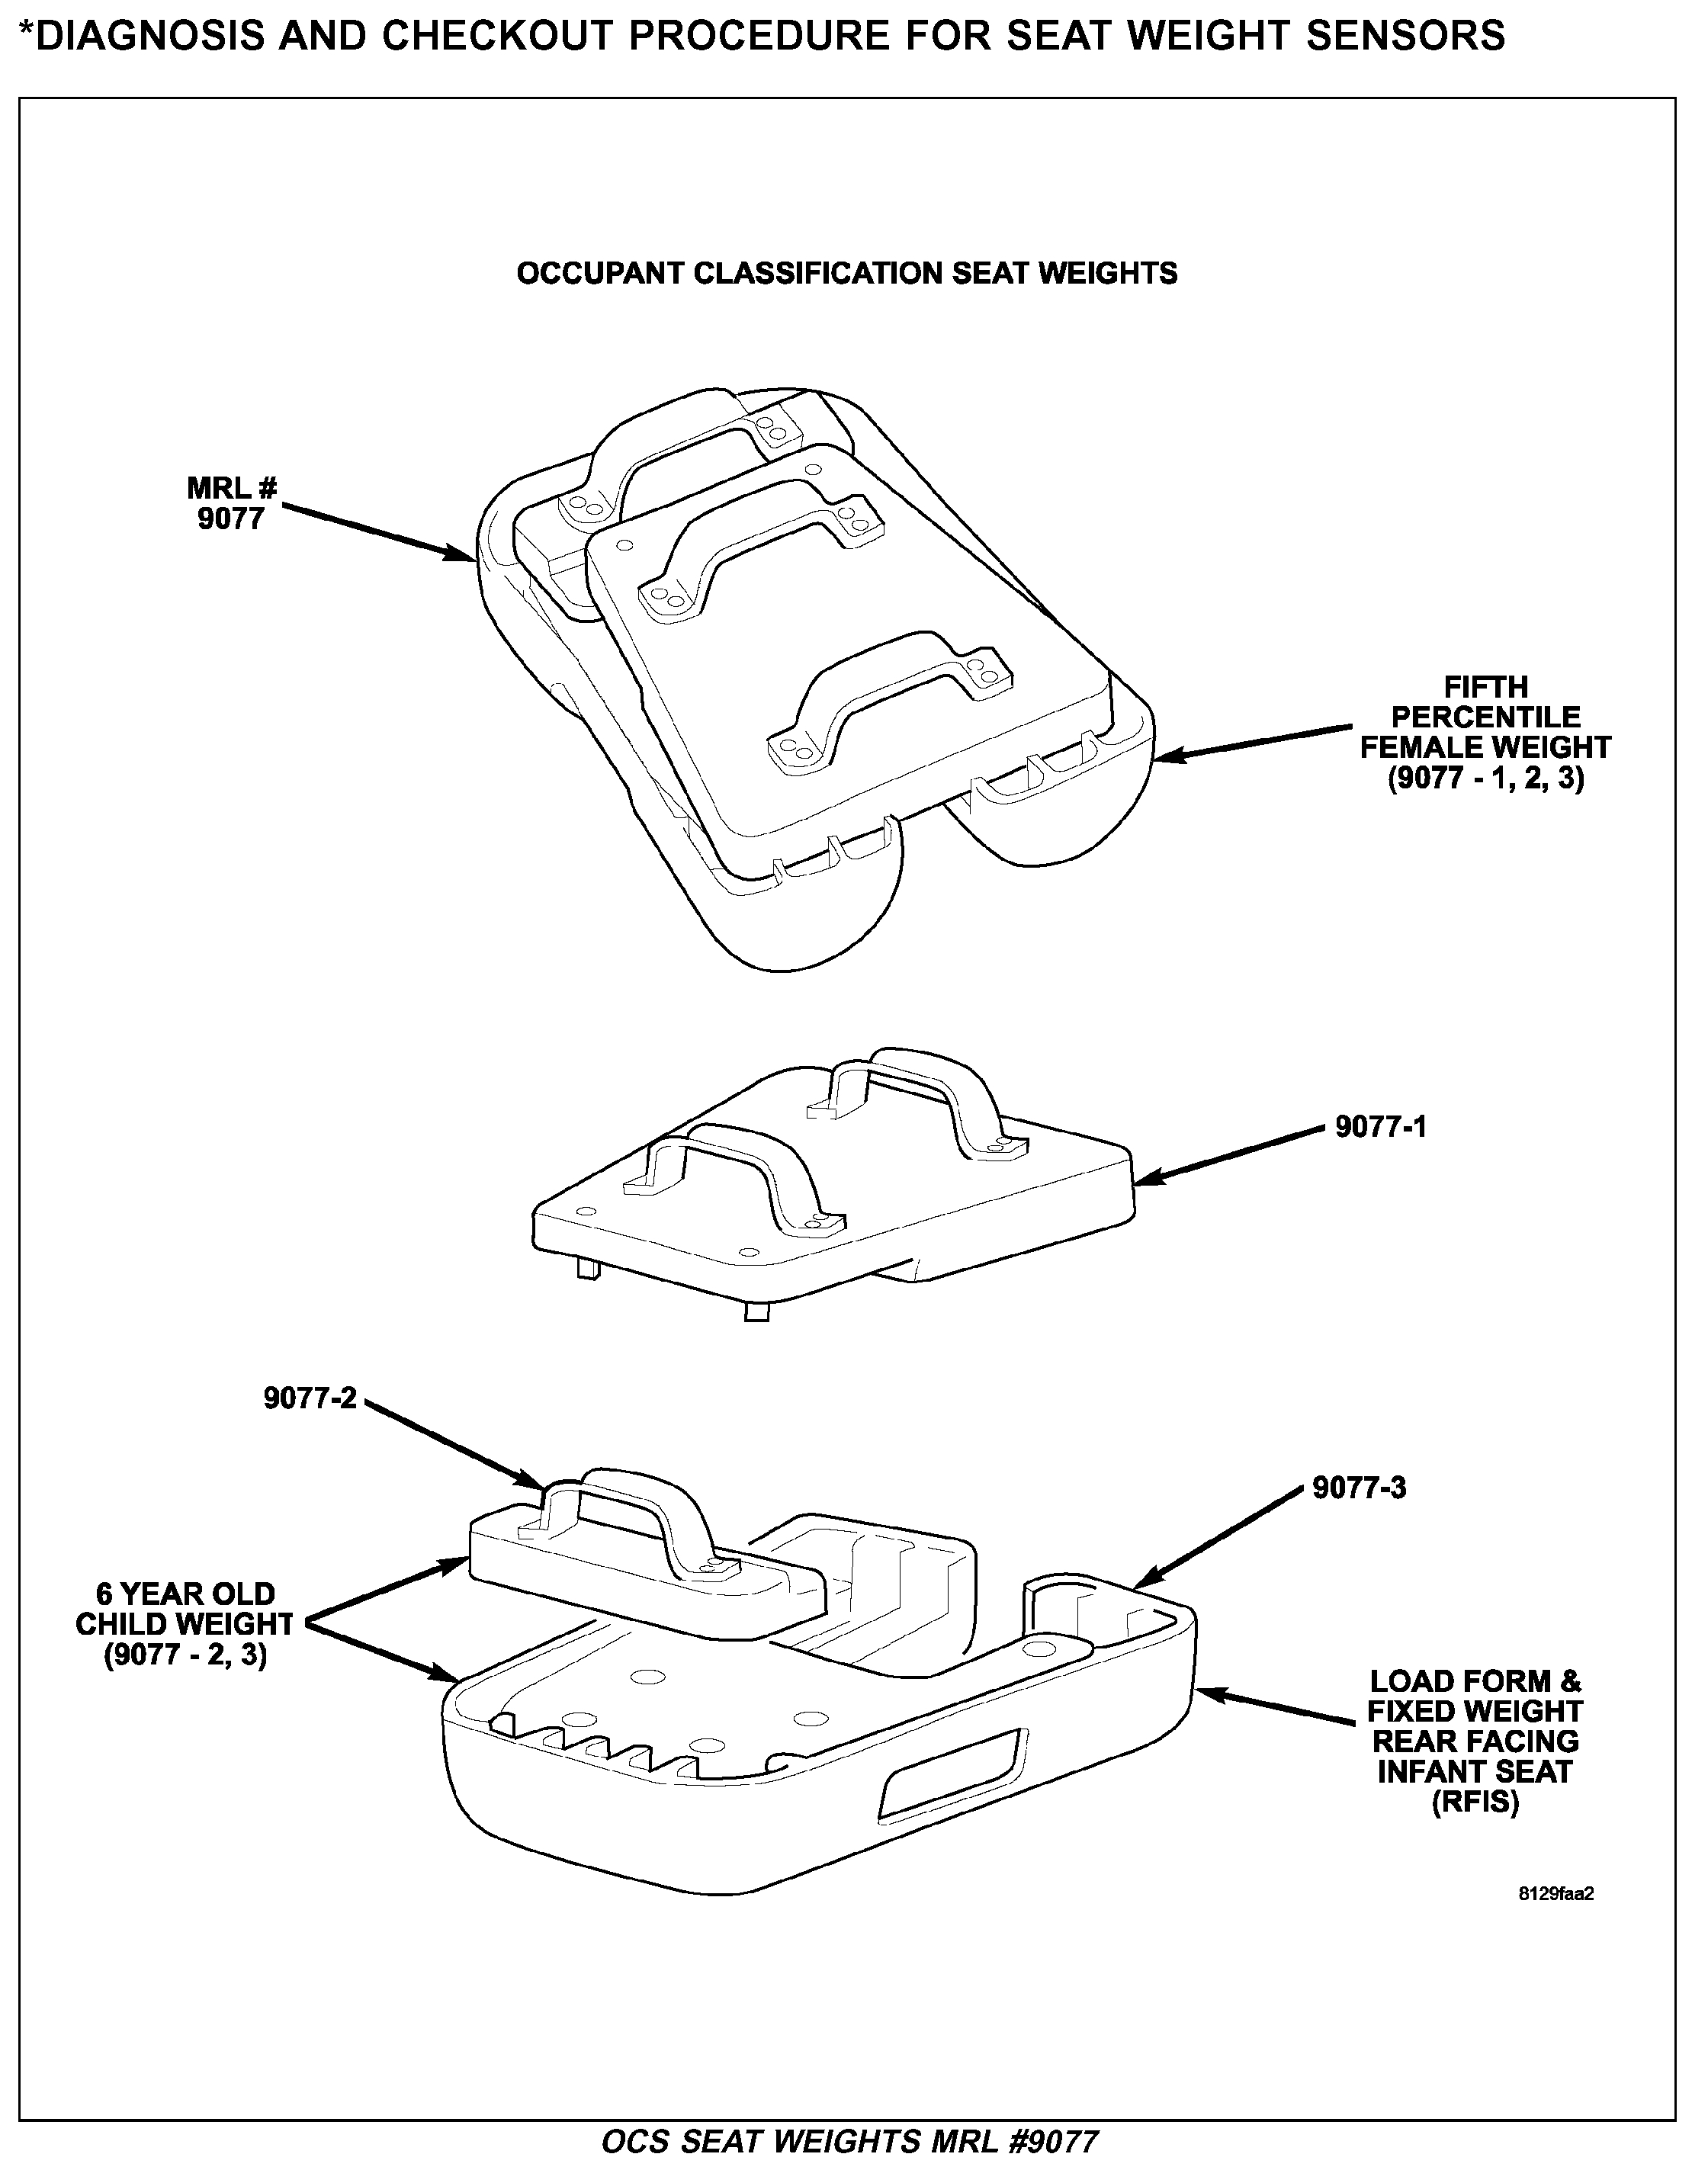
Diagnosis and Checkout Procedure For Seat Weight Sensors
Vehicle Restraints and Safety Systems Testing and Inspection Symptom Related Diagnostic Procedures Diagnosis By Symptom Diagnosis and Checkout Procedure For Seat Weight Sensors
DIAGNOSIS AND CHECKOUT PROCEDURE FOR SEAT WEIGHT SENSORS
DIAGNOSIS AND CHECKOUT PROCEDURE FOR SEAT WEIGHT SENSORS
Diagnosis And Checkout Procedure For Seat Weight Sensors
pic 1
1. VERIFY COMPLAINT
Turn the ignition off.
Move the front passenger seat to the full rear position. Verify that the seat is empty, the seat back is in the normal upright position, and that the seat is not interfering with any interior components.
Verify that all related connectors are properly seated and locked.
Turn the ignition on.
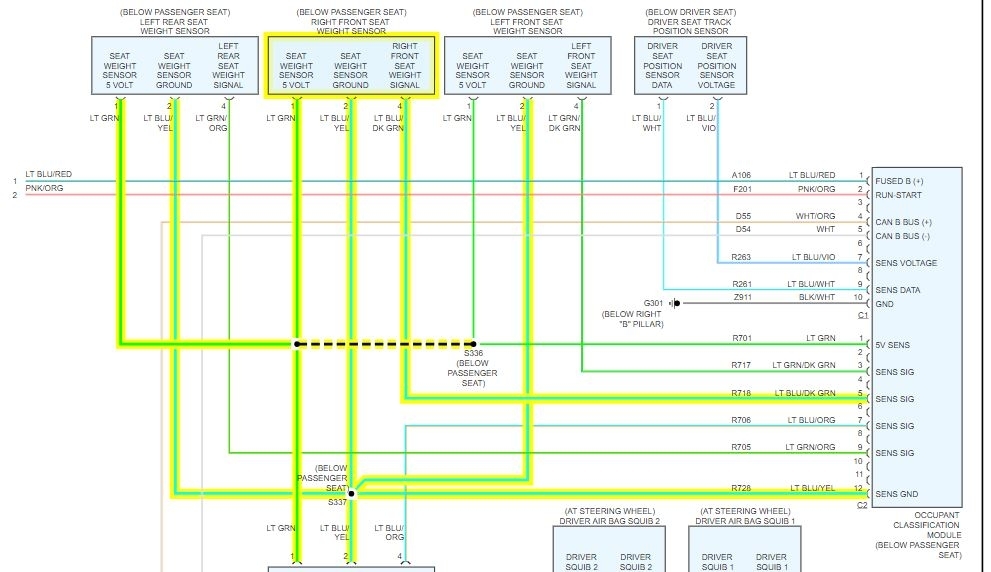
With the scan tool in OCM, select Data Display and note the Passenger Seat Weight Sensor voltage for all four sensors (Left Front, Right Front, Left Rear and Right Rear).
Move the front passenger seat to the mid track position.
Using the scan tool, note the Passenger Seat Weight Sensor voltage for all four sensors.
Move the front passenger seat to the full forward position.
Using the scan tool, note the Passenger Seat Weight Sensor voltage for all four sensors. The voltage should be from 1.4 to 3.6 volts for each sensor in each position (full rear, mid track, and full forward).
Q: Is any sensor's voltage reading out of the acceptable range in any position?
YES: Go To 2
NO: Perform test B1BA7 Occupant Classification System Verification Required. See: A L L Diagnostic Trouble Codes ( DTC ) > B Code Charts > B1BA7 If the test passes, the seat weight sensing system is working properly. Return to the procedure that directed you to this procedure.
2. CHECKING FOR BENT FLOOR PAN
Turn the ignition off.
Loosen all of the mounting screws retaining the front passenger seat to the vehicle crossmembers, but do not remove them. Verify that the seat is loose and that no binding exists between the seat and the crossmembers.
Move the front passenger seat to the full rear position and then to the full forward position.
Tighten all of the mounting screws to specification.
Move the front passenger seat to the full rear position.
Turn the ignition on.
Using the scan tool, note the Passenger Seat Weight Sensor voltage for all four sensors.
Move the front passenger seat to the mid track position.
Using the scan tool, note the Passenger Seat Weight Sensor voltage for all four sensors.
Move the front passenger seat to the full forward position.
Using the scan tool, note the Passenger Seat Weight Sensor voltage for all four sensors. The voltage should be from 1.4 to 3.6 volts for each sensor in each position.
Q: Is any sensor's voltage reading out of the acceptable range in any position?
YES: Go To 3
NO: Perform test B1BA7 Occupant Classification System Verification Required. See: A L L Diagnostic Trouble Codes ( DTC ) > B Code Charts > B1BA7 If the test passes, the seat weight sensing system is working properly Return to the procedure that directed you to this procedure.
3. CHECKING SEAT TO RISER STRESS
Turn the ignition off.
Loosen all of the mounting screws retaining the front passenger seat track to the riser, but do not remove them.
Verify that the seat track is loose and that no binding exists between the seat track and the risers.
Turn the ignition on.
Using the scan tool, note the Passenger Seat Weight Sensor voltage for all four sensors. The voltage should be from 1.5 to 3.5 volts for each sensor.
Q: Is any sensor's voltage reading out of the acceptable range?
YES: Go To 4
NO: Visually inspect for damaged or bent risers and crossmembers. Also, verify that the riser holes line up with the seat mounts in the crossmembers.
If riser damage is apparent, replace the risers. Then, reinstall the Seat Weight Sensors, and Go To 6.
NOTE: Failure to follow test instructions or aborting the test will cause faults to set when performing the Occupant Classification Module System Verification Test. To prevent faults due to process errors: Verify That All Tests Steps That Led You Here Were Performed As Directed; Verify That The Ignition Is In Run; Wait 30 Seconds After Changing The Seat Weight Before Proceeding To Allow The System To Stabilize; Only Press Scan Tool Buttons When Directed To Do So; & Perform The Occupant Classification Module System Verification Test To Completion.
If crossmember or floor pan damage is present, repair or replace the components as necessary. Reinstall the seat in the vehicle. Turn the ignition on. With the scan tool in OCM, select More Options, select System Tests, and select Occupant Classification Module System Verification Test. Run the test by following the directions displayed on the scan tool. When the test is complete, Go To 1.
4. TEST SEAT FRAME
Turn the ignition off.
Remove the front passenger seat from the risers. Return the risers to their normal mounting position.
Turn the ignition on.
Using the scan tool, note the Passenger Seat Weight Sensor voltage for all four sensors. The voltage should be from 1.4 to 3.6 volts for each sensor.
Q: Is any sensor's voltage reading out of the acceptable range?
YES: Go To 5
NO: Visually inspect for damaged or bent risers, a damaged or bent seat and seat structure, and damaged or bent seat tracks. Also, verify that the holes in the center of the sensors line up with the seat track holes and that the seat track position locating tabs are locked in the same parallel slots. If riser damage is apparent, replace the risers. Then, reinstall the Seat Weight Sensors, and Go To 6.
If seat or seat track damage is present, replace the components as necessary. Then, Go To 7
5. TEST SENSOR
Turn the ignition off.
Loosen the mounting screws of all of the Seat Weight Sensors, but do not remove them. Verify that the sensors are loose and that no binding exists between the sensors and the risers.
Turn the ignition on.
Using the scan tool, note the Passenger Seat Weight Sensor voltage for all four sensors. The voltage should be from 1.4 to 3.6 volts for each sensor.
Q: Is any sensor's voltage reading out of the acceptable range?
YES: Replace any Seat Weight Sensors that have an unacceptable voltage reading. Then, Go To 6.
NO: Replace the risers. Then, reinstall the Seat Weight Sensors, and Go To 6
6. CHECKING FOR IMPROPER SEAT WEIGHT SENSOR TORQUE
Turn the ignition off.
Tighten all of the Seat Weight Sensor mounting screws to specification.
Turn the ignition on.
Using the scan tool, note the Passenger Seat Weight Sensor voltage for all four sensors. The voltage should be from 1.4 to 3.6 volts for each sensor.
Q: Is any sensor's voltage reading out of the acceptable range?
YES: Loosen the mounting screws of all Seat Weight Sensors with an unacceptable voltage reading, and repeat Steps 5 and 6.
NO: Go To 7
7. TEST SEAT TRACKS
Turn the ignition off.
Mount the front passenger seat on the risers.
Turn the ignition on.
Using the scan tool, note the Passenger Seat Weight Sensor voltage for all four sensors. The voltage should be from 1.4 to 3.6 volts for each sensor.
Q: Is any sensor's voltage reading out of the acceptable range?
YES: Replace the seat track. Verify that no binding exists between the seat and risers. Then, repeat Steps 6 and 7.
NO:
NOTE: Failure to follow test instructions or aborting the test will cause faults to set when performing the Occupant Classification Module System Verification Test. To prevent faults due to process errors: Verify That All Tests Steps That Led You Here Were Performed As Directed; Verify That The Ignition Is In Run; Wait 30 Seconds After Changing The Seat Weight Before Proceeding To Allow The System To Stabilize; Only Press Scan Tool Buttons When Directed To Do So; & Perform The Occupant Classification Module System Verification Test To Completion.
Reinstall the seat in the vehicle. Turn the ignition on. With the scan tool in OCM, select More Options, select System Tests, and select Occupant Classification Module System Verification Test. Run the test by following the instructions displayed by the scan tool. When the test is complete, Go To 1
_____________________________
Note: There are a total of 4 weight sensors. One is in each corner. If you determine one is bad, I will need to know if the seat is power or manual control.
Let me know if this helps or if you have other questions.
Take care,
Joe
Oct 27, 2020 at 1:53 PM