Passenger A/C not as cold as driver side

Tiny
MANOSTEEL
  • MEMBER
  • 2012 FORD FUSION
  • 4 CYL
  • 2WD
  • AUTOMATIC
  • 95,000 MILES
When the AC is on, the passenger side will not get as cold as the driver side. I can change the temperature making it hot or cold. I have a dual zone, but will still not get as cold as the driver side.
Sunday, April 7th, 2019 AT 4:42 PM

9 Replies

Tiny
JACOBANDNICKOLAS
  • MECHANIC
  • 108,192 POSTS
Welcome to 2CarPros.

Since the air temperature actuator is working on both sides, what I need you to do is calibrate them. Here are the directions. I omitted the first 6 steps because they discuss removal and replacement of the actuator. You only need the calibration info. You will need to remove fuse 15 in the under hood smart junction box. I attached a picture of the box and what fuse 15 is for.

____________________________________

7. NOTE: The purpose of the module actuator position calibration is to allow the HVAC module to reinitialize and calibrate the actuator stop points. To carry out calibration, carry out the following steps.

Remove the Smart Junction Box (SJB) fuse 15 for at least one minute.

8. NOTE: When the ignition switch is switched to the ON position, the HVAC module will initialize and calibrate the actuators. Calibration of the actuators will take approximately 30 seconds.

Reinstall SJB (Smart Junction Box) fuse 15. Turn the ignition switch to the ON position and wait 30 seconds before verifying function.
_________________________________

Let me know if this helps. If it doesn't, you may need to replace the blend air door actuator on the right side.

Take care,
Joe
Was this
answer
helpful?
Yes
No
Sunday, April 7th, 2019 AT 8:03 PM
Tiny
MANOSTEEL
  • MEMBER
  • 6 POSTS
I tried the reset to no avail. The passenger side is "cold", but def not the arctic like the driver side. I had to replace the EVAP temperature sensor which required moving the dash out. Is there a possibility that when I put the dash back that something is holding the passenger door open not allowing the actuator to fully close or open it? I tried to find the actuator, looks like it's behind the glove box on its side. Not sure if it's something I can pull out by just dropping the glove box.
Was this
answer
helpful?
Yes
No
Monday, April 8th, 2019 AT 4:54 AM
Tiny
JACOBANDNICKOLAS
  • MECHANIC
  • 108,192 POSTS
Welcome back:

You know, just about anything is possible with all of the things they stuff into these vehicles anymore. Also, you are correct about location. If you want to remove it to inspect, here are the directions for the RH actuator. The attached pictures correlate with the directions.

_________________________________

Removal and Installation

1. Remove the passenger air bag module.

2. Disconnect the RH temperature blend door actuator electrical connector.

3. Remove the 2 RH temperature blend door actuator bracket screws.

4. Detach the wire harness from the RH temperature blend door actuator bracket.

5. Remove the RH temperature blend door actuator.

6. To install, reverse the removal procedure.

7. NOTE: The purpose of the module actuator position calibration is to allow the HVAC module to reinitialize and calibrate the actuator stop points. To carry out calibration, carry out the following steps.

Remove the Smart Junction Box (SJB) fuse 15 for at least one minute.

8. NOTE: When the ignition switch is switched to the ON position, the HVAC module will initialize and calibrate the actuators. Calibration of the actuators will take approximately 30 seconds.

Reinstall SJB (Smart Junction Box) fuse 15. Turn the ignition switch to the ON position and wait 30 seconds before verifying correct DEFROST/PANEL/FLOOR operation.

Let me know what you find.

Joe
Was this
answer
helpful?
Yes
No
Monday, April 8th, 2019 AT 6:49 PM
Tiny
MANOSTEEL
  • MEMBER
  • 6 POSTS
Do you have instructions for taking out the airbag module? I want to be sure I don't mess anything up with it.
Was this
answer
helpful?
Yes
No
Monday, April 8th, 2019 AT 7:14 PM
Tiny
JACOBANDNICKOLAS
  • MECHANIC
  • 108,192 POSTS
Welcome back:

Here are the directions. The attached pictures correlate with these directions.

_______________________

PASSENGER AIRBAG
Passenger Airbag

NOTE: Fusion shown, MKZ similar.

Picture 1

Picture 2

Removal
WARNING: Always carry a live airbag with the deployment door, trim cover or tear seam pointed away from the body. Do not place a live airbag down with the deployment door, trim cover or tear seam facing down. Failure to follow these instructions may result in serious personal injury in the event of an accidental deployment.
WARNING: Never probe the electrical connectors on airbag, Safety Canopy or side air curtain assemblies. Failure to follow this instruction may result in the accidental deployment of these assemblies, which increases the risk of serious personal injury or death.
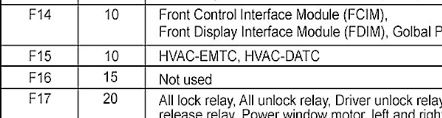
NOTE: The air bag warning indicator illuminates when the correct Restraints Control Module (RCM) fuse is removed and the ignition is ON.
NOTE: The Supplemental Restraint System (SRS) must be fully operational and free of faults before releasing the vehicle to the customer.

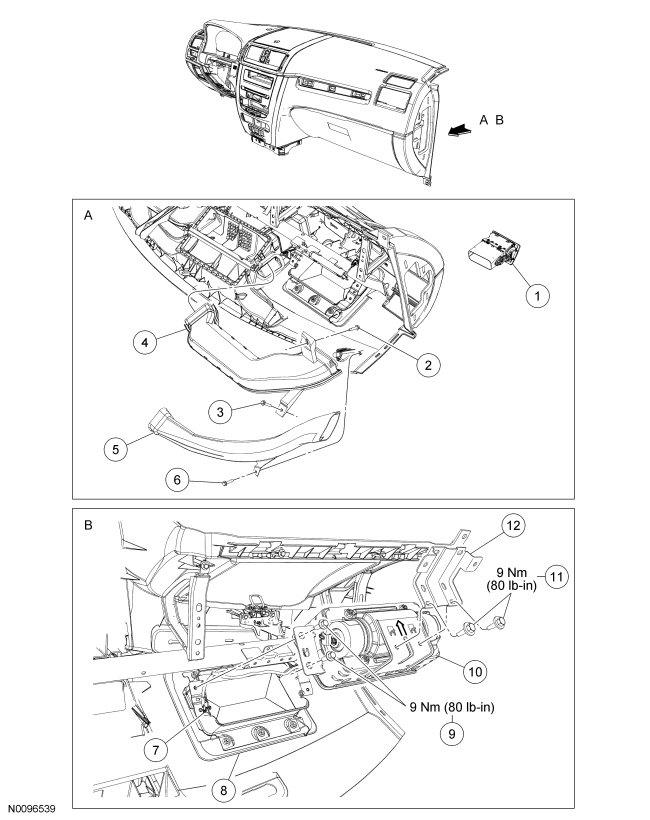
1. Remove the instrument panel.

2. Remove the RH instrument panel register.

3. Remove the screw and RH ventilation duct.

4. Remove the screw and RH defroster duct.

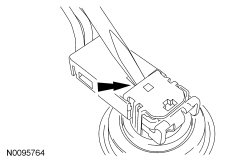
5. NOTICE: Do not pull the electrical connectors out by the Connector Position Assurance (CPA) clip. DTCs can be set in the Restraints Control Module (RCM).
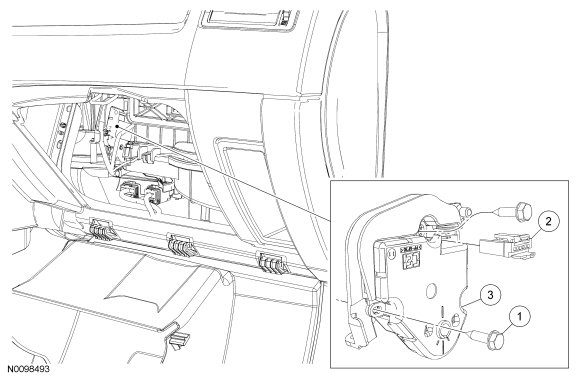
Using an appropriate tool, lift up and release the Connector Position Assurance (CPA) clips and disconnect the passenger air bag module electrical connectors.

Picture 3

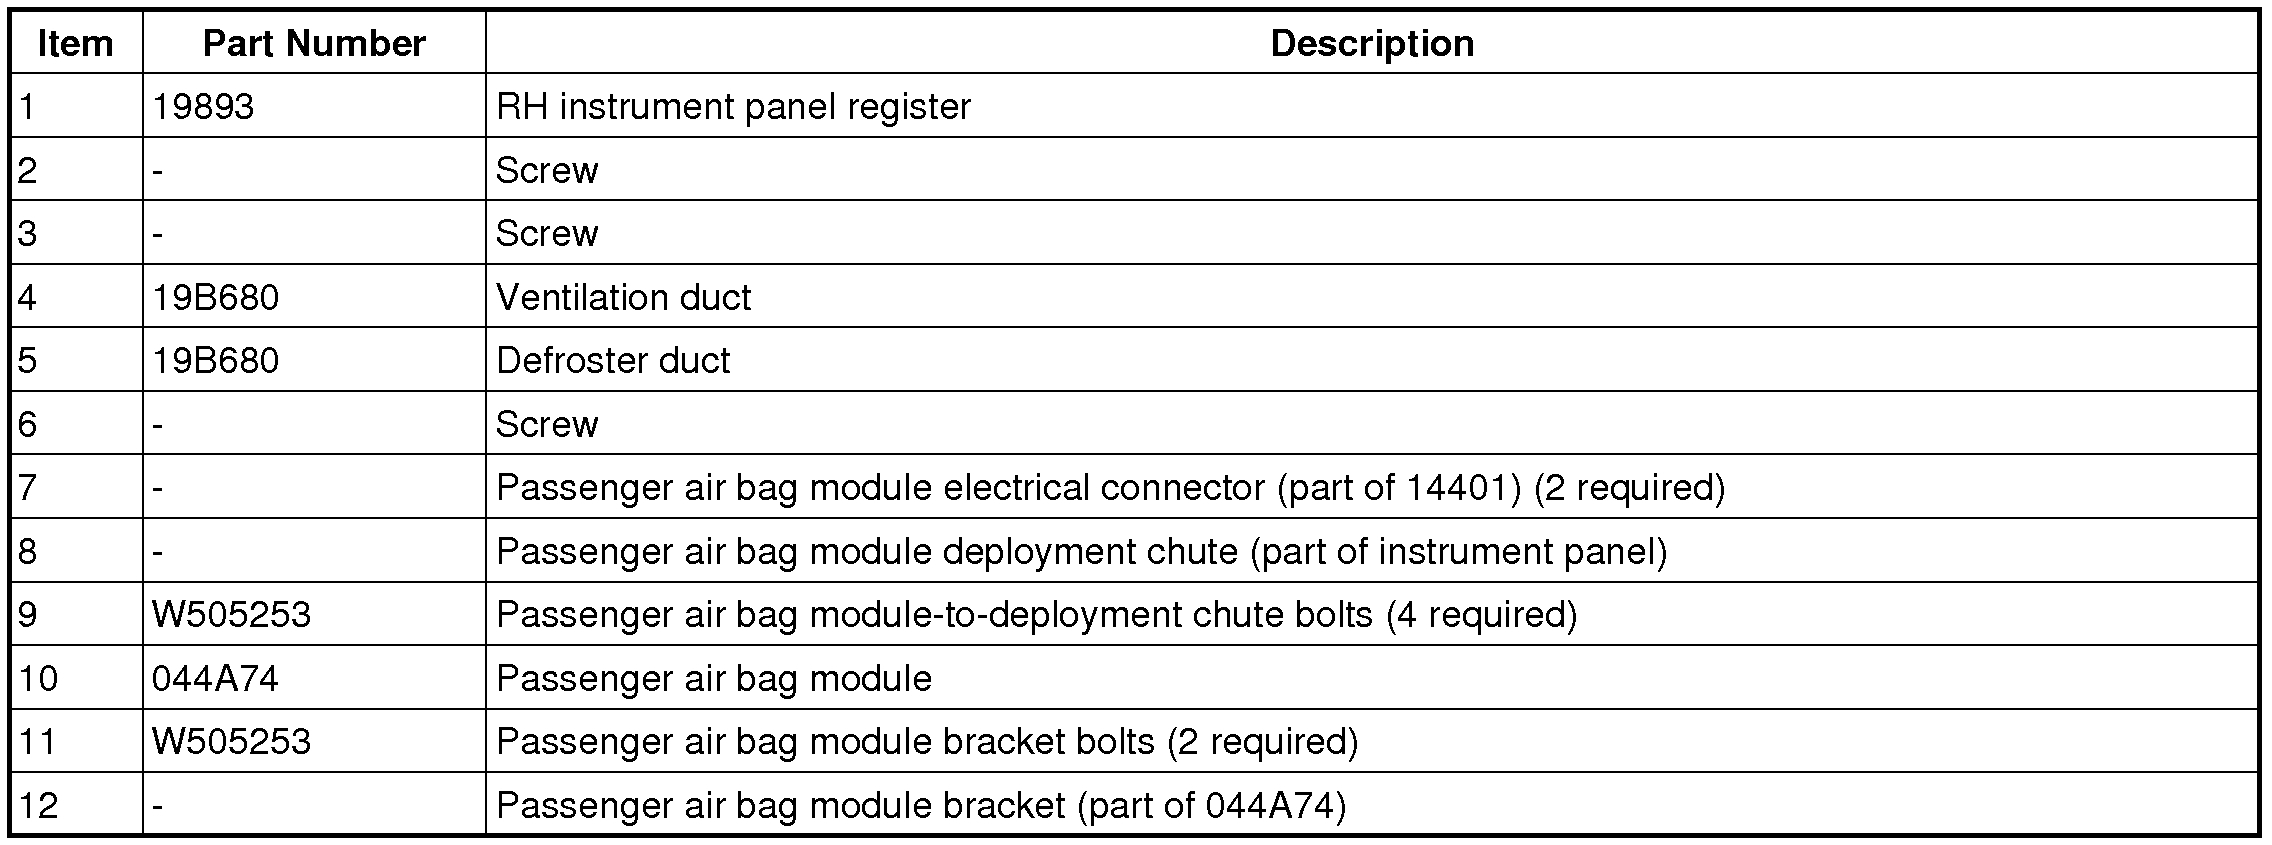
6. Remove the 4 passenger air bag module-to-deployment chute bolts.

7. Remove the passenger air bag module from the deployment chute.

8. Remove the 2 bolts and passenger air bag module bracket.

Installation

1. Install the passenger air bag module in the instrument panel.

2. Install the 4 passenger air bag module-to-deployment chute bolts.
- Tighten to 9 Nm (80 lb-in).

3. Install the passenger air bag module bracket and 2 bolts.
- Tighten to 9 Nm (80 lb-in).

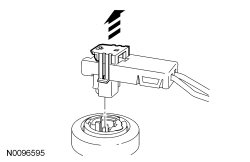
4. NOTICE: The Connector Position Assurance (CPA) clip must be in the released position before installing the connector. Failure to have the CPA (Connector Position Assurance) clip in the released position may break the tabs causing Diagnostic Trouble Codes (DTCs) to set in the Restraints Control Module (RCM).

Connect the passenger air bag module electrical connectors.

- Lift up the CPA (Connector Position Assurance) clip and install the electrical connector fully and lock the clip.

Picture 4

5. Install the RH instrument panel register.

6. Install the RH defroster duct and screw.

7. Install the RH ventilation duct and screw.

8. Install the instrument panel.

Let me know if this helps.

Take care,
Joe
Was this
answer
helpful?
Yes
No
Monday, April 8th, 2019 AT 8:26 PM
Tiny
MANOSTEEL
  • MEMBER
  • 6 POSTS
Thank you, this helps. I did want to make one nkte with what is going on. It seems as though the passenger side runs warmer on all settings. For example if I turn the heat on so say 70 degrees, the passenger side will be warmer than the driver side. Makes me think calibration is the issue even though I've already done the re-calibration steps provided.
Was this
answer
helpful?
Yes
No
Tuesday, April 9th, 2019 AT 2:02 AM
Tiny
JACOBANDNICKOLAS
  • MECHANIC
  • 108,192 POSTS
Welcome back:

Calibration would make sense, but if it's done, it should be fine. The only other things I can think of is if the blend door is hanging up a bit or if the actuator is faulty.

I wish I had a better answer, but it has to be one of them unless the duct work is leaking somewhere and allowing air to be drawn into the system.

Let me know what you find.

Joe
Was this
answer
helpful?
Yes
No
Tuesday, April 9th, 2019 AT 8:36 PM
Tiny
MANOSTEEL
  • MEMBER
  • 6 POSTS
Replaced the actuator and I am still having the same issues with the passenger air. If I close the driver vents it does make the passenger side colder.
Was this
answer
helpful?
Yes
No
Tuesday, April 23rd, 2019 AT 11:52 AM
Tiny
JACOBANDNICKOLAS
  • MECHANIC
  • 108,192 POSTS
Welcome back:

When you close the one vent, it increases the pressure to the other side. Are you sure that isn't what is happening? In and of itself, that shouldn't make a temperature difference.

Let me know.

Joe
Was this
answer
helpful?
Yes
No
Tuesday, April 23rd, 2019 AT 7:22 PM

Please login or register to post a reply.

Sponsored links