Hi and thanks for using 2CarPros.com. That is a tough call not actually seeing the rust. Can it begin to leak? Yes, it can. Tap on the rusted locations to determine if they are weak. If you find they are, I would replace the pan. You do not want to lose the oil while driving.
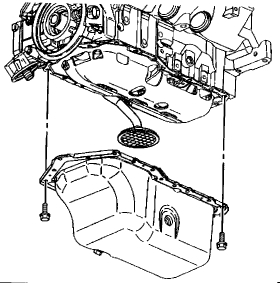
If you decide to replace the pan, here are directions and pictures to help. I a'm not sure which engine you have so I will provide both. The first is for the 3.4L. The first six pictures correlate with these directions.
SERVICE AND REPAIR
Oil Pan Replacement
Tools Required
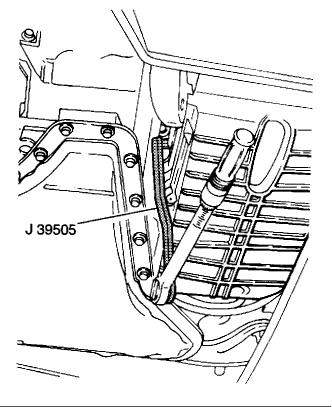
J 39505 Torque Wrench Adapter
Removal Procedure
Disconnect the negative battery cable.
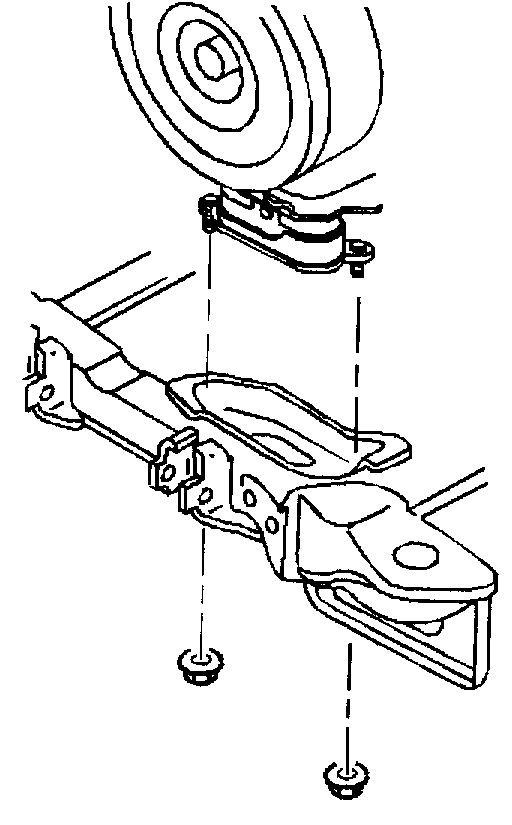
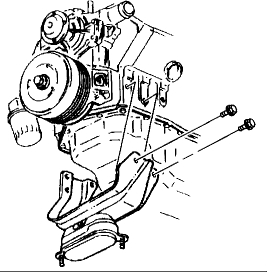
Remove the engine mount struts.
Install the engine support fixture.
Raise and support the vehicle.
Remove the A/C compressor and reposition the A/C compressor.
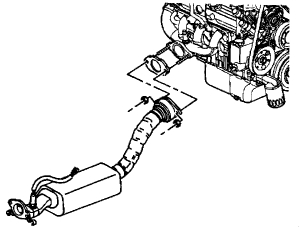
Remove the catalytic converter pipe from the right exhaust manifold.
Drain the engine oil.
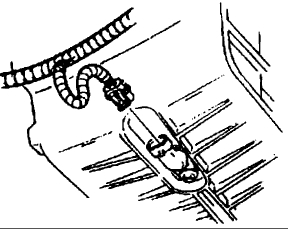
Disconnect the oil level sensor electrical connector.
Remove the starter motor.
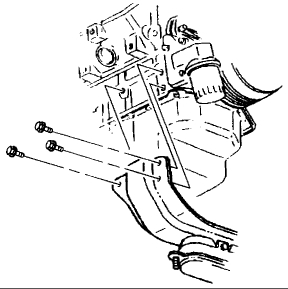
Remove the transaxle brace from the oil pan.
Loosen the transaxle mount lower nuts.
Remove the engine mount lower nuts.
Lower the vehicle.
Use the engine support fixture to raise the engine.
Raise the vehicle.
Remove the steering shaft intermediate pinch bolt.
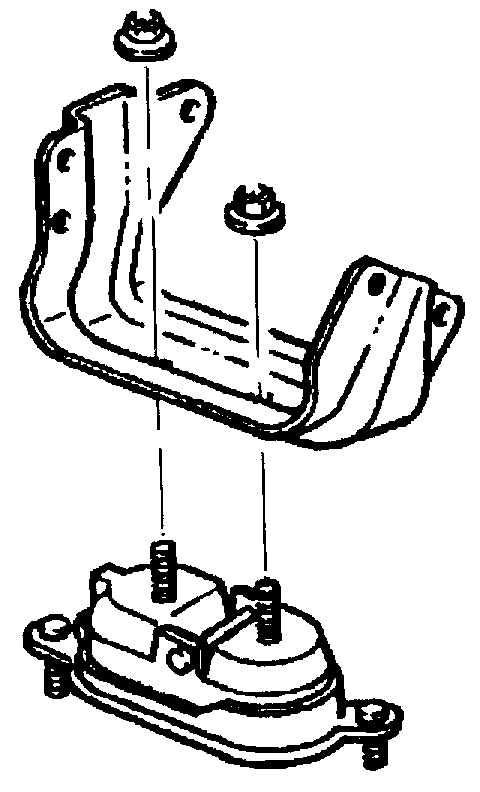
Remove the engine mount bracket with the engine mount from the oil pan.
Remove the right side lower ball joint from the steering knuckle.
Remove the right side outer tie rod from the steering knuckle.
Remove the right side stabilizer link.
Install the jackstands to the frame assembly.
Remove the right side frame bolts and loosen the left side frame bolts.
Using the jackstands lower the right side of the frame assembly.
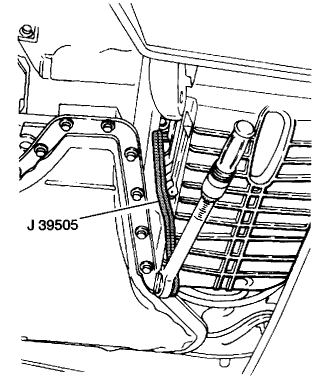
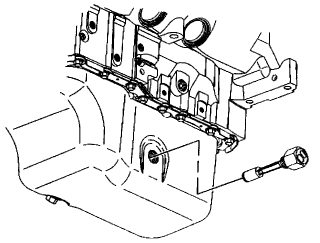
Use the J 39505 to remove the right oil pan side bolts.
Remove the left oil pan side bolts.
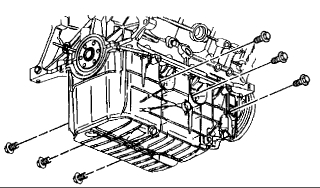
Remove the oil pan bolts.
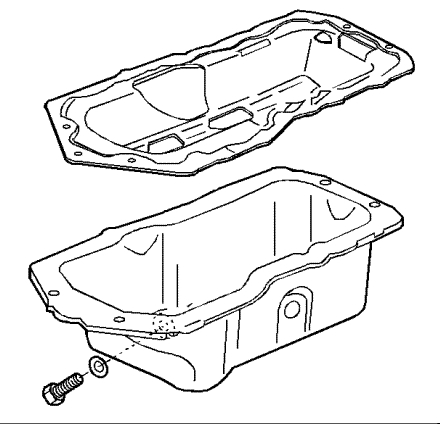
Remove the oil pan.
Remove the oil pan gasket.
Clean and inspect the oil pan and the engine block gasket mating surfaces.
Installation Procedure
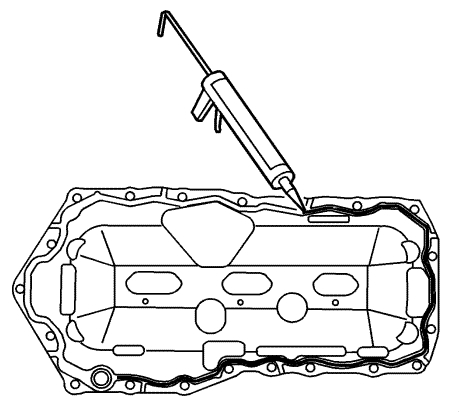
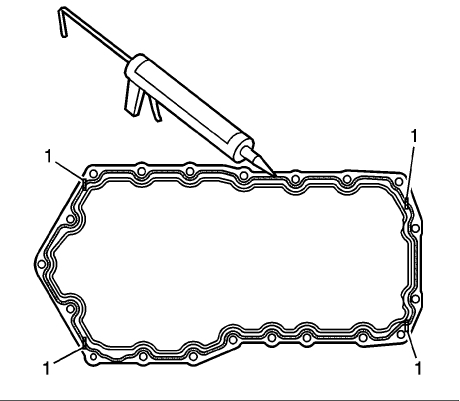
Apply sealant GM P/N 12345739 (Canadian P/N 10953541) at the rear main bearing cap and the engine block (1).
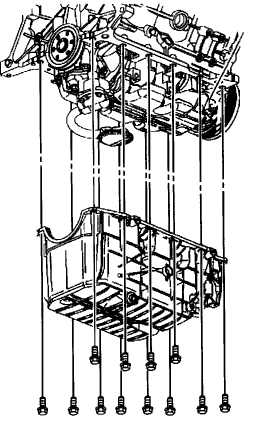
Install the oil pan gasket.
Install the oil pan.
Notice: Refer to Fastener Notice in Service Precautions.
Install the oil pan bolts.
Tighten the bolts to 25 Nm (18 lb ft) .
Install the left oil pan side bolts.
Install the right side oil pan bolts.
Use the J 39505 to tighten the right side oil pan bolts to 50 Nm (37 lb ft) .
Tighten the left side oil pan bolts to 50 Nm (37 lb ft) .
Using the jackstands raise the frame assembly to the original position.
Install the right side and tighten the left side frame bolts.
Remove the jackstands from the frame assembly.
Install the right side stabilizer link.
Install the right side outer tie rod to the steering knuckle.
Install the right side lower ball joint to the steering knuckle.
Install the engine mount bracket with the engine mount to oil pan.
Install the steering shaft intermediate pinch bolt.
Lower the vehicle.
Use the engine support fixture to lower the engine to the original position.
Raise the vehicle.
Install the transaxle mount lower nuts.
Install the engine mount lower nuts.
Install the transaxle brace to the oil pan.
Install the starter motor.
Connect the oil level sensor electrical connector.
Install the catalytic converter pipe to the right exhaust manifold.
Install the A/C compressor.
Lower the vehicle.
Remove engine support fixture.
Install the engine mount struts to the engine.
Fill the crankcase with new engine oil.
Connect the negative battery cable.
_____________________________________________________________________
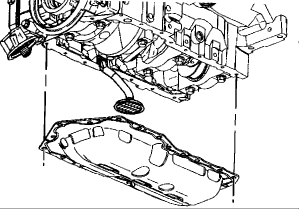
These directions are for the 3.8L engine and are quite extensive. The remaining pics starting at number 7 correlate with these directions.
SERVICE AND REPAIR
Oil Pan Replacement
Removal Procedure
Disconnect the negative battery cable.
Remove the fuel injector sight shield.
Remove the air cleaner intake duct.
Install the engine support fixture.
Raise and support the vehicle.
Remove the right exhaust manifold pipe stud nuts from the catalytic converter.
Drain the engine oil and remove the oil filter.
Disconnect the oil level sensor electrical connector.
Remove the oil level sensor wiring harness bolt and reposition the oil level sensor wiring harness.
Remove the engine mount lower nuts from the engine mount.
Lower the vehicle.
Use the engine support fixture to raise the engine.
Raise the vehicle.
Remove the left engine mount bracket bolts from the engine.
Remove the right engine mount bracket bolts from the engine.
Remove the engine mount upper nuts.
Remove the engine mount and the bracket from the frame.
Remove the torque converter covers.
Notice: Remove the oil level sensor, located in the oil pan, before the oil pan is removed. The sensor may be damaged if the oil pan is removed first.
Remove the oil level sensor.
Remove the oil pan bolts.
Remove the oil pan.
Remove the oil pump pipe screen assembly and the oil pan gasket.
Clean the following parts:
Oil pump screen mating surfaces
Oil pan flanges
Oil pan rail
Front cover
Rear main bearing cap
Threaded holes
Installation Procedure
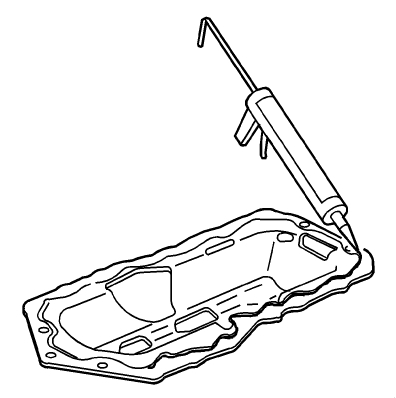
Important: For aluminum oil pans, begin with step 4. For steel oil pans, skip steps 4 and 5.
For steel oil pans, apply a continuous bead 6.35 mm (0.25 in) thick of RTV sealer GM
P/12378521 (Canadian P/N 88901148) to the topside of the new windage tray gasket. Apply the RTV sealant directly over the sealing bead.
Install the NEW windage tray gasket onto the engine
Apply a continuous bead 6.35 mm (0.25 in) thick of RTV sealer GM P/N 12378521 (Canadian P/N 88901148) to the topside of the new windage tray gasket. Apply the RTV sealant directly over the sealing bead.
For aluminum oil pans, apply a continuous bead 6.35 mm (0.25 in) thick of RTV sealer GM P/N 12378521 (Canadian P/N 88901148), ensuring that the sealer also completely fills the groove in the oil pan.
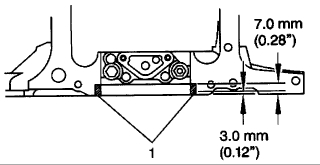
To ensure proper sealing, apply additional sealer at the four points called out in the illustration (1).
Install the oil pan and oil pan windage tray gasket - if applicable.
Install the oil pump pipe screen assembly.
Notice: Refer to Fastener Notice in Service Precautions.
Install the oil pump pipe screen bolts.
Tighten
Tighten the bolts to 15 Nm (11 lb ft).
Install the oil pan.
Clean the oil pan bolts and apply one drop of thread lock compound GM P/N 12345382 (Canadian P/N 10953489) or equivalent to the oil pan bolt threads.
Important: DO NOT overtighten bolts or damage to the oil pan may occur, resulting in an oil leak.
Install the oil pan bolts.
Tighten
Tighten the oil pan bolts to 14 Nm (125 lb in).
Install the oil level sensor.
Tighten
Tighten the sensor to 20 Nm (15 lb ft).
Install the torque converter covers.
Install the engine mount and the bracket to the frame.
Install the engine mount upper nuts.
Tighten
Tighten the nuts to 43 Nm (32 lb ft).
Install the engine mount bracket to the engine.
Loosely install the right engine mount bracket bolts to the engine.
Loosely install the left engine mount bracket bolts to the engine.
Tighten
Tighten the bolts to 102 Nm (75 lb ft).
Lower the vehicle.
Using the engine support fixture lower the engine.
Raise the vehicle.
Install the engine mount lower nuts.
Tighten
Tighten the nuts to 43 Nm (32 lb ft).
Install the oil level sensor wiring harness and the oil level sensor wiring harness bolt to the engine.
Tighten
Tighten the bolt to 10 Nm (89 lb in).
Connect the oil level sensor electrical connector.
Install right exhaust manifold pipe stud nuts.
Tighten
Tighten the nuts to 30 Nm (22 lb ft).
Install the engine oil filter.
Lower the vehicle.
Remove the engine support fixture.
Install the right and left engine mount struts.
Install the air cleaner intake duct.
Fill the crankcase with engine oil.
Install the fuel injector sight shield.
Connect the negative battery cable.
Inspect for leaks.
I hope this helps and does not discourage. The 3.8L is not an easy job.
If you have other questions of need help, let me know.
Cheers,
Joe
Images (Click to enlarge)
Jun 3, 2018 at 6:09 PM