Welcome to 2carPros.
I think you are on the right track. The code is for the coolant temp sensor. For this code to set, there is no change in the reading from the sensor between a cold engine and a warm engine. With that, either you have a bad connection, damaged wire, or the sensor is bad.
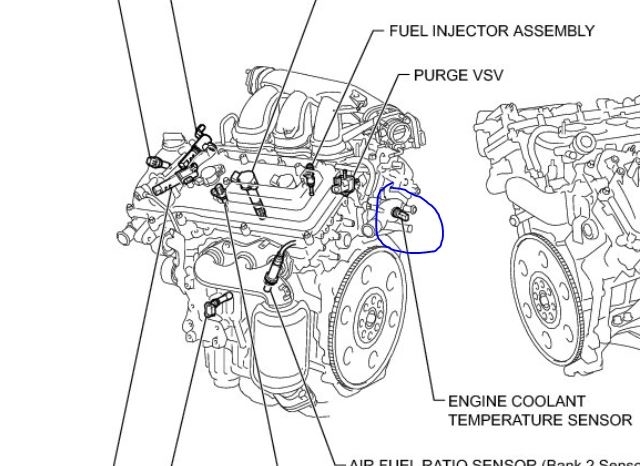
Since this controls the fan operation, most likely it is causing the AC issue as well. The first two pictures I attached show location. I circled the sensor.
____________________________________________
Here is a link that explains in general how one is replaced:
https://www.2carpros.com/articles/coolant-temperature-sensor-cts-replacement
____________________________________________
Here are the directions specific to your vehicle for replacement. They didn't make this easy.
Removal
Vehicle Powertrain Management Sensors and Switches - Powertrain Management Sensors and Switches - Computers and Control Systems Coolant Temperature Sensor/Switch (For Computer) Service and Repair Removal and Replacement Removal
REMOVAL
2GR-FE ENGINE CONTROL: ENGINE COOLANT TEMPERATURE SENSOR: REMOVAL; 2013 MY Sienna [08/2012 -]
1. REMOVE V-BANK COVER SUB-ASSEMBLY See: Engine > Removal and Replacement > Removal
2. REMOVE NO. 1 ENGINE UNDER COVER See: Exhaust Manifold > Removal and Replacement > Removal
3. DRAIN ENGINE COOLANT See: Coolant > Removal and Replacement > Replacement
4. REMOVE WINDSHIELD WIPER MOTOR AND LINK ASSEMBLY
See: Wiper Motor > Removal and Replacement > Removal
5. REMOVE FRONT OUTER COWL TOP PANEL SUB-ASSEMBLY See: Suspension Strut / Shock Absorber > Removal and Replacement > Removal
6. REMOVE AIR CLEANER INLET COVER ASSEMBLY SEAL See: Throttle Body > Removal and Replacement > Removal
7. REMOVE AIR CLEANER AND HOSE See: Throttle Body > Removal and Replacement > Removal
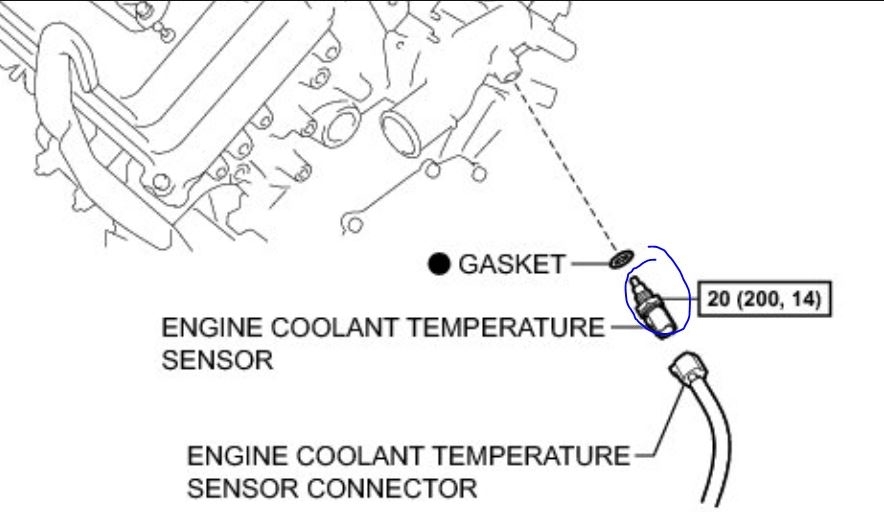
8. REMOVE ENGINE COOLANT TEMPERATURE SENSOR
(a)Disconnect the engine coolant temperature sensor connector.
pic 3
(b)Using a 19 mm deep socket wrench, remove the engine coolant temperature sensor.
pic 4
Text in Illustration
pic 5
(c)Remove the gasket from the sensor.
_______________________________________________________________________________
INSTALLATION
2GR-FE ENGINE CONTROL: ENGINE COOLANT TEMPERATURE SENSOR: INSTALLATION; 2013 MY Sienna [08/2012 -]
1. INSTALL ENGINE COOLANT TEMPERATURE SENSOR
(a)Install a new gasket onto the engine coolant temperature sensor.
pic 6
Text in Illustration
pic 7
(b)Using a 19 mm deep socket wrench, install the engine coolant temperature sensor.
Torque : 20 Nm (200 kgf-cm, 14 ft-lbf)
(c)Connect the engine coolant temperature sensor connector.
2. ADD ENGINE COOLANT See: Coolant > Removal and Replacement > Replacement
3. INSPECT FOR COOLANT LEAK See: Cooling System > Initial Inspection and Diagnostic Overview > On-Vehicle Inspection
4. INSTALL AIR CLEANER AND HOSE See: Throttle Body > Removal and Replacement > Installation
5. INSTALL AIR CLEANER INLET COVER ASSEMBLY SEAL See: Throttle Body > Removal and Replacement > Installation
6. INSTALL FRONT OUTER COWL TOP PANEL SUB-ASSEMBLY See: Suspension Strut / Shock Absorber > Removal and Replacement > Installation
7. INSTALL WINDSHIELD WIPER MOTOR AND LINK ASSEMBLY
See: Wiper Motor > Removal and Replacement > Installation
8. INSTALL NO. 1 ENGINE UNDER COVER See: Exhaust Manifold > Removal and Replacement > Installation
9. INSTALL V-BANK COVER SUB-ASSEMBLY See: Engine > Removal and Replacement > Installation
_______________________________________________________
Let me know if this takes care of it. Also, if you need additional information for the removal process, let me know.
Take care,
Joe
Images (Click to make bigger)
Saturday, May 18th, 2019 AT 10:47 PM