Hi and thanks for using 2CarPros.
If there is no -0- psi compression, either you have open valves or there are holes in the tops of the pistons. If the pistons weren't moving because of damage, you would hear it.
A bad head gasket isn't going to cause no compression. The wet compression test is to check for piston ring condition. Even of there were no piston rings left, you would have some compression. That leaves the valves.
Now, many engines today are called interference engines. What the means is this. If the timing belt or chain breaks or jumps time, most times valve or piston damage is done. However, and this is good news, this engine is not an interference engine. That leads me to my next suspect.
The engine has a timing chain which usually will last the life of the vehicle. However, if a tensioner failed and the chain jumped, the engine will be out of time. In that event, it is possible that a valve is opening when the piston is coming up on a compression stroke. That would render the compression you found, 0.
If this problem happened all at once, that if my first suspect. If a valve failed, the chances of it happening in two cylinders at the same time is really slim.
Before taking the engine apart, I would first check the timing chain and confirm the timing is correct.
_____________________________________________
Here are directions for replacing timing chain components. The attached pictures correlate with these directions.
TIMING DRIVE COMPONENTS
Timing Drive Components
Removal
NOTICE: Do not loosen or remove the crankshaft pulley bolt without first installing the special tools as instructed in this procedure. The crankshaft pulley and the crankshaft timing sprocket are not keyed to the crankshaft. The crankshaft, the crankshaft sprocket and the pulley are fitted together by friction, using diamond washers between the flange faces on each part. For that reason, the crankshaft sprocket is also unfastened if the pulley bolt is loosened. Before any repair requiring loosening or removal of the crankshaft pulley bolt, the crankshaft and camshafts must be locked in place by the special service tools, otherwise severe engine damage can occur.
NOTICE: During engine repair procedures, cleanliness is extremely important. Any foreign material, including any material created while cleaning gasket surfaces, that enters the oil passages, coolant passages or the oil pan can cause engine failure.
1. With the vehicle in NEUTRAL, position it on a hoist. For additional information, refer to Vehicle Jacking and Lifting.
2. Remove the engine front cover. For additional information, refer to Engine Front Cover See: Timing Cover > Removal and Replacement > Engine Front Cover.
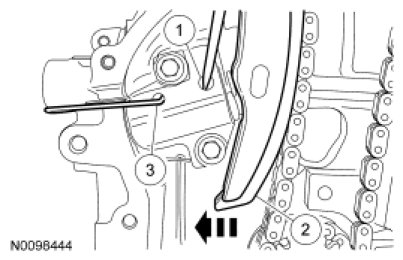
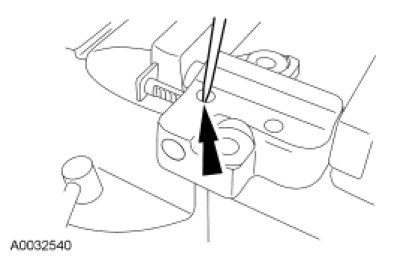
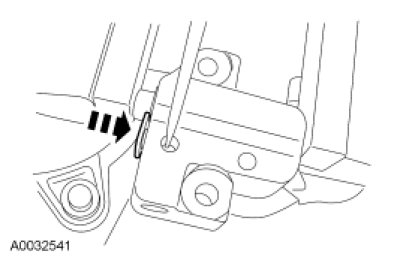
3. Compress the timing chain tensioner in the following sequence.
1. Using a small pick, release and hold the ratchet mechanism.
2. While holding the ratchet mechanism in the released position, compress the tensioner by pushing the timing chain arm toward the tensioner.
3. Insert the paper clip into the hole to retain the tensioner.
Picture 1
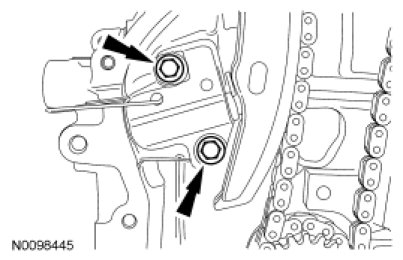
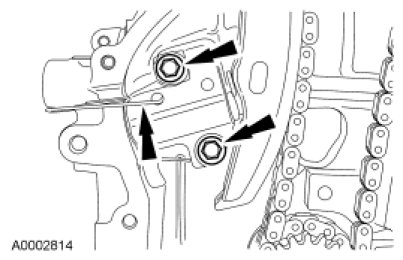
4. Remove the 2 bolts and timing chain tensioner.
Picture 2
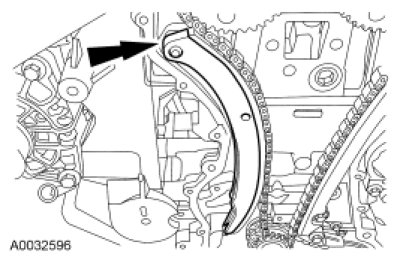
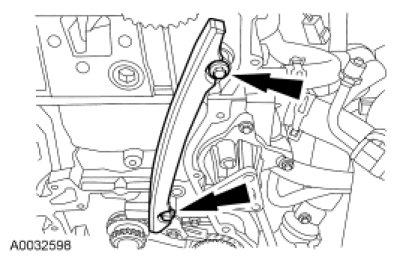
5. Remove the timing chain tensioner arm.
Picture 3
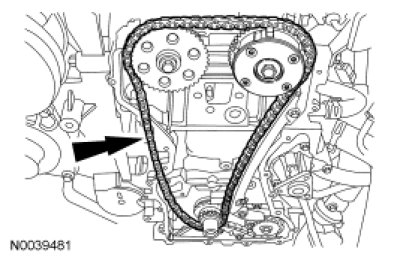
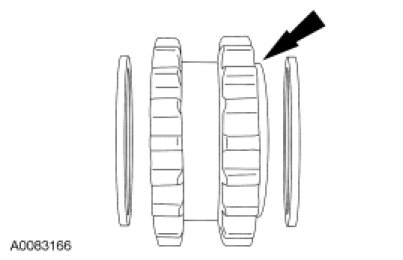
6. Remove the timing chain.
Picture 4
7. Remove the 2 bolts and the timing chain guide.
Picture 5
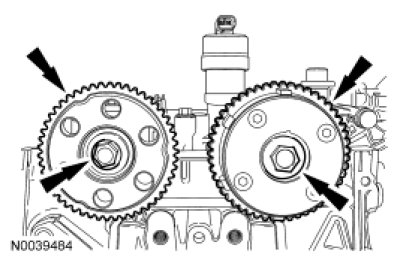
8. NOTICE: The Camshaft Alignment Plate is for camshaft alignment only. Using this tool to prevent engine rotation can result in engine damage.
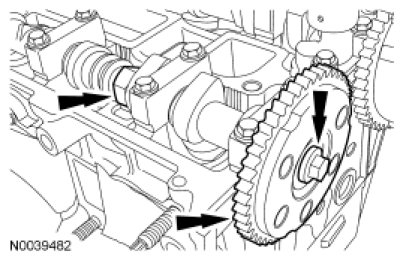
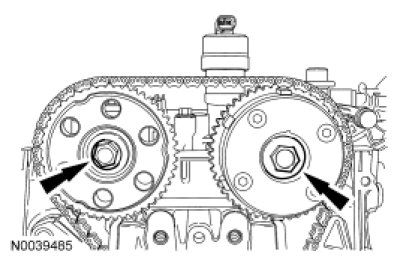
Using the flats on the camshaft to prevent camshaft rotation, remove the bolt and the exhaust camshaft sprocket.
Picture 6
9. NOTICE: The Camshaft Alignment Plate is for camshaft alignment only. Using this tool to prevent engine rotation can result in engine damage.
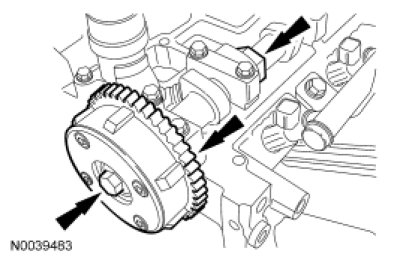
Using the flats on the camshaft to prevent camshaft rotation, remove the bolt and the camshaft phaser and sprocket.
Picture 7
Installation
1. Install the camshaft sprockets and the bolts. Do not tighten the bolts at this time.
Picture 8
2. Install the timing chain guide and the 2 bolts.
- To install, tighten to 10 Nm (89 lb-in).
Picture 9
3. Install the timing chain.
Picture 10
4. Install the timing chain tensioner arm.
Picture 11
NOTE: If the timing chain plunger and ratchet assembly are not pinned in the compressed position, follow the next 4 steps.
5. NOTICE: Do not compress the ratchet assembly. This will damage the ratchet assembly.
Using the edge of a vise, compress the timing chain tensioner plunger.
Picture 12
6. Using a small pick, push back and hold the ratchet mechanism.
Picture 13
7. While holding the ratchet mechanism, push the ratchet arm back into the tensioner housing.
Picture 14
8. Install a paper clip into the hole in the tensioner housing to hold the ratchet assembly and the plunger in during installation.
Picture 15
9. Install the timing chain tensioner and the 2 bolts. Remove the paper clip to release the piston.
- Tighten to 10 Nm (89 lb-in).
Picture 16
10. NOTICE: The Camshaft Alignment Plate is for camshaft alignment only. Using this tool to prevent engine rotation can result in engine damage.
Using the flats on the camshafts to prevent camshaft rotation, tighten the bolts.
- Tighten to 72 Nm (53 lb-ft).
Picture 17
11. Install the engine front cover. For additional information, refer to Engine Front Cover See: Timing Cover > Removal and Replacement > Engine Front Cover.
__________________________________________
Here are directions for checking timing marks and how to set them.
ALIGNMENT MARKS
Timing Chain Alignment
NOTICE: Do not loosen or remove the crankshaft pulley bolt without first installing the special tools as instructed in the procedure. The crankshaft pulley and the crankshaft timing sprocket are not keyed to the crankshaft. The crankshaft, the crankshaft sprocket and the pulley are fitted together by friction, using diamond washers between the flange faces on each part. For that reason, the crankshaft sprocket is also unfastened if the pulley bolt is loosened. Before any repair requiring loosening or removal of the crankshaft pulley bolt, the crankshaft and camshafts must be locked in place by the special service tools, otherwise severe engine damage can occur.
NOTICE: During engine repair procedures, cleanliness is extremely important. Any foreign material, including any material created while cleaning gasket surfaces, that enters the oil passages, coolant passages or the oil pan can cause engine failure.
NOTE: Install a new crankshaft sprocket diamond washer on both sides of the crankshaft sprocket.
Install the crankshaft sprocket, new crankshaft sprocket diamond washers, oil pump chain and oil pump sprocket.
- The crankshaft sprocket flange must be facing away from the engine block.
Picture 18
NOTICE: The Camshaft Alignment Plate is for camshaft alignment only. Using this tool to prevent engine rotation can result in engine damage.
Install the camshaft sprockets and the bolts. Do not tighten the bolts at this time.
Picture 19
Install the timing chain.
Picture 21
NOTICE: The Camshaft Alignment Plate is for camshaft alignment only. Using this tool to prevent engine rotation can result in engine damage.
Using the flats on the camshafts to prevent camshaft rotation, tighten the bolts.
Picture 22
_________________________________________________________________________________
With all of that being said, I don't feel that the problem is too major. If a cam shaft would have broken (there are two) you would hear it, so I really feel it jumped time.
Let me know if this helps or if you have other questions.
Take care,
Joe
Images (Click to enlarge)
Jan 30, 2019 at 7:25 PM