Hi carlbrandon,
Here you are.
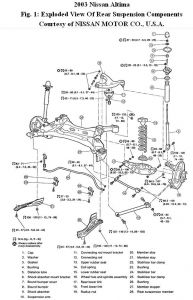
SHOCK ABSORBER
Removal & Inspection
NOTE:
Refer to Fig. 1 while performing the following procedure.
1. Raise and support vehicle. Remove wheel.
2. Set a jack on the rear lower link to remove the fitting bolt and nut in the lower side of shock absorber. Remove fixing bolt in lower side of shock absorber assembly.
3. Lower jack from rear lower link. Remove mounting seal bracket fixing nuts of shock absorber upper side and remove shock absorber assembly from vehicle.
4. Inspect shock absorber. Check shock absorber for deformation, cracks or damage, and replace if necessary. Check piston rod for damage, uneven wear or distortion, and replace if necessary. Check welded and sealed areas for oil leakage, and replace if necessary. Check seal of mount seal bracket. If any crack, deformation or deterioration is found, replace the
mount seal bracket as assembly.
Disassembly & Assembly
CAUTION:Make sure piston rod on shock absorber is not damaged when removing components from shock absorber.
CAUTION:Do not set the cylindrical part of shock absorber in vise.
1. Wrap a shop cloth around lower side of shock absorber and fix it in a vise.
2. Secure piston rod tip so that piston rod does not turn, and remove piston rod lock nut.
3. Remove outer washer, bushing, distance tube, mounting seal bracket, bushing and bound bumper cover from shock absorber.
4.Remove bound bumper from bound bumper cover.
5.Check bound bumper and bushing for cracks, deformation or other damage. Replace if necessary.
CAUTION:Refer to component parts location and do not reuse non-reusable parts. Make sure piston rod on shock absorber is not damaged when assembling components to shock absorber.
6. To assemble, reverse diassembly procedure.
Installation
NOTE:
Perform final tightening of shock absorber lower side (rubber bushing) under unladen conditions with tires on level ground.
1. To install, reverse removal procedure. Tighten all nuts/bolts to specification.
2. Check wheel alignment.
Sep 1, 2010 at 11:33 AM
