Hi,
If you are getting exhaust gasses in the coolant, it sounds like a bad head gasket. I will provide the directions. They are extensive. The attached pics correlate with the directions. Note: The directions show one side at a time. The install directions are last.
_______________________________________________________
2016 Audi S6 Quattro Sedan (4GC) V8-4.0L Turbo (CTGE)
Cylinder Head Bank 1 (Right), Removing
Procedure
Remove the lock carrier. Refer to 50 - Body Exterior - Lock Carrier; Lock Carrier, Removing and Installing.
Remove the right turbocharger. Refer to Turbocharger, Removing and Installing.
Remove the right camshafts. Refer to Camshaft, Removing and Installing.
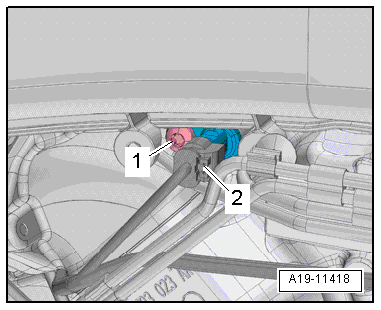
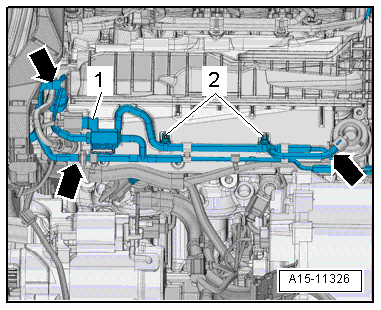
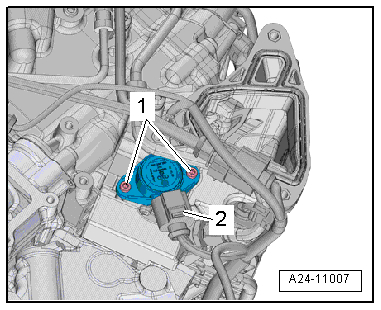
Disconnect the connector -2-.
Pic 1
Ignore item -1-.
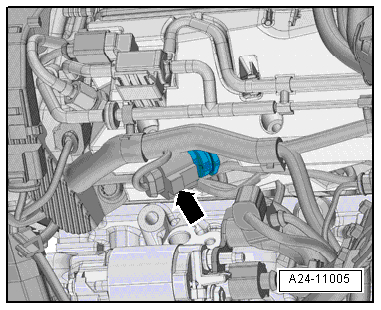
Remove the Cylinder Head Coolant Valve -N489- -arrow- from the bracket and push it forward.
Pic 2
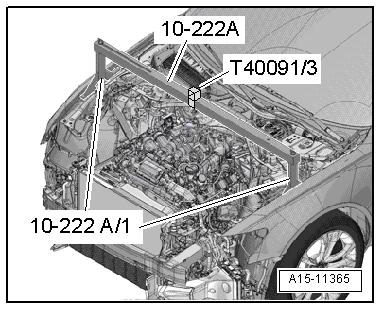
Bring the impact member into the installation position and secure it. Refer to 63 - Body Exterior - Front Bumper; Overview - Impact Member.
Position the -10-222A- on the left and right suspension strut towers as illustrated.
Pic 3
Mount the assembly appliance as illustrated.
Pic 4
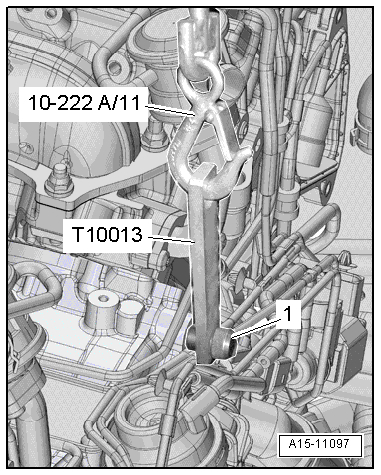
Tighten the -T10013- with the threaded pin -1- of the -T10338- in the left front threaded hole in the cylinder block as shown in the illustration.
Pic 5
Engage the carabiner hook of the -10-222A/11- on the -T10013- and pretension the engine slightly.
Remove the generator. Refer to 27 - Electrical Equipment - Generator; Generator, Removing and Installing.
Remove the right engine mount. Refer to Right Engine Mount, Removing and Installing.
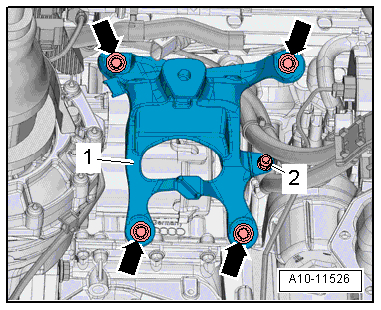
Remove the nut -2- and free up the ground wire.
Pic 6
Remove the bolts -arrows- and remove the right engine support -1-.
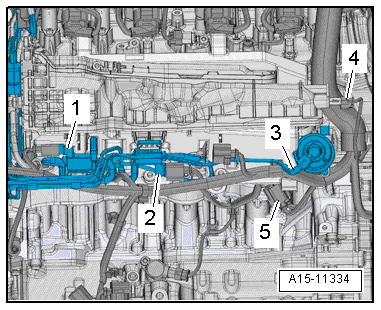
Disconnect the vacuum hoses -arrows-.
Pic 7
Remove the -N316- -1- from the bracket and free up the wires at the right intake manifold -2-.
Disconnect the connector -arrow- for the -G247-.
Pic 8
Ignore item -1-.
Disconnect the connector -2- for the -G336-.
Pic 9
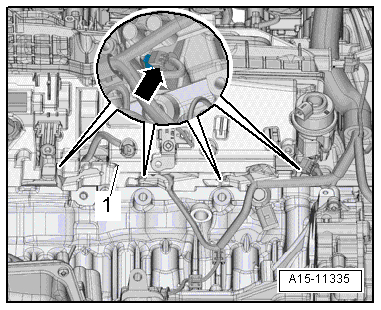
Move the noise insulation -1- to the side.
Pic 10
Disconnect electrical connector -arrow- from the fuel injectors.
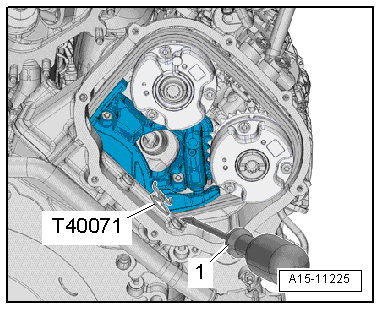
Remove the -T40071-.
Pic 11
The procedure is illustrated with the camshaft installed.
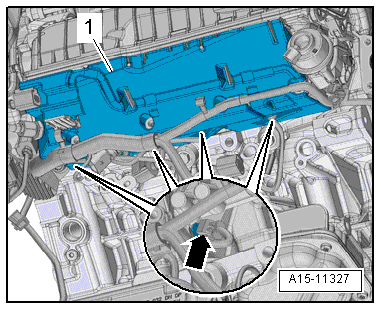
Remove the bolts -arrows-.
Pic 12
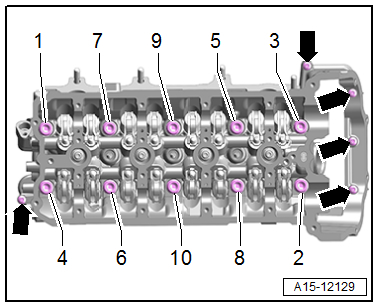
Loosen the cylinder head bolts in the sequence -1 to 10-.
Remove the bolts and the cylinder head carefully.
Lay the cylinder head on a soft surface, such as foam.
__________________________________________
2016 Audi S6 Quattro Sedan (4GC) V8-4.0L Turbo (CTGE)
Cylinder Head Bank 2 (Left), Removing
Procedure
Remove the lock carrier. Refer to 50 - Body Exterior - Lock Carrier; Lock Carrier, Removing and Installing.
Remove the left turbocharger. Refer to Turbocharger, Removing and Installing.
Remove the left camshaft. Refer to Camshaft, Removing and Installing.
Remove the Cylinder Head Coolant Valve -N489- -arrow- from the bracket and push it forward.
Pic 13
Bring the impact member into the installation position and secure it. Refer to 63 - Body Exterior - Front Bumper; Overview - Impact Member.
Position the -10-222A- on the left and right suspension strut towers as illustrated.
Pic 14
Mount the assembly appliance as illustrated.
Image
Tighten the -T10013- with the threaded pin -1- of the -T10338- in the left front threaded hole in the cylinder block as shown in the illustration.
Pic 15
Engage the carabiner hook of the -10-222A/11- on the -T10013- and pretension the engine slightly.
Remove the left front Knock Sensor 3 -G198-. Refer to Knock Sensor 3 G198, Removing and Installing.
Disconnect the vacuum hose -3- and free it up.
Pic 16
Remove the secondary air injection solenoid valve from the mount and set it aside.
1 - Secondary Air Injection Solenoid Valve 2 -N320-
2 - Secondary Air Injection Solenoid Valve -N112-
pic 17
Ignore item -1-.
Disconnect the connector -4 and 5- and then free up the wiring harness from the intake manifold.
Disconnect the connector -2- for the Intake Manifold Runner Position Sensor 2 -G512- -1-.
Pic 18
Disconnect electrical connector -arrow- from the fuel injectors.
Pic 19
Bring the subframe into the installed position and tighten the bolts by hand.
Remove the -T40071-.
Image
pic 20
The procedure is illustrated with the camshaft installed.
Remove the bolts -arrows-.
Pic 21
Loosen the cylinder head bolts in the sequence -1 to 10-.
Remove the bolts and the cylinder head carefully.
Lay the cylinder head on a soft surface, such as foam.
______________________________
Install
2016 Audi S6 Quattro Sedan (4GC) V8-4.0L Turbo (CTGE)
Cylinder Head, Installing
Replace any bolts that were tightened with an additional turn.
Replace seals, gaskets and O-rings.
When installing a replacement cylinder head, coat the contact surfaces between the hydraulic adjusting elements, the roller rocker levers and the cam running surfaces with oil.
Secure all hose connections with hose clamps appropriate for the model. Refer to Parts Catalog.
It is necessary to replace all the coolant and engine oil whenever the cylinder head or the cylinder head gasket are replaced.
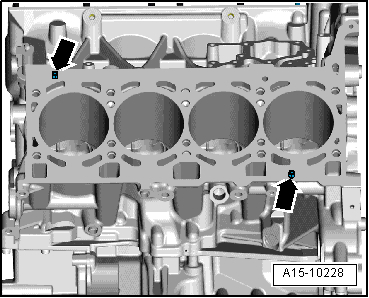
The cylinder head for cylinder bank 2 (left) is shown in the illustration.
Pic 22
If there are no alignment bushings -arrows- at the locations marked in the cylinder block, insert them.
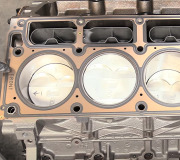
Install the cylinder head gasket on the alignment bushings in the cylinder block.
Cylinder head seal installation position: Identification "oben" (top) or the cylinder head part number.
Set cylinder head in place.
Install the cylinder bolts by all the way in by hand.
Tighten the cylinder head bolts. Refer to Cylinder Head - Tightening Specification and Sequence.
Image
There is no requirement to tighten the cylinder head bolts after repairs.
Cylinder Bank 1 (Right):
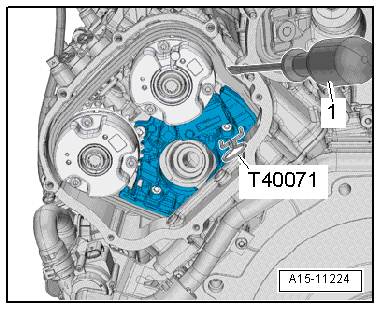
pic 23
Press the right camshaft timing chain tensioner guide rails in as far as the stop using a screwdriver -1- and secure the chain tensioner with a -T40071-.
Image
The chain tensioner is lubricated with oil and can only be pushed back slowly by applying constant pressure.
The procedure is illustrated with the camshaft installed.
Cylinder Bank 2 (Left):
pic 24
Press the left camshaft timing chain tensioner guide rails in as far as the stop using a screwdriver -1- and secure the chain tensioner with a -T40071-.
The chain tensioner is lubricated with oil and can only be pushed back slowly by applying constant pressure.
The procedure is illustrated with the camshaft installed.
Continued for Both Sides
Installation is performed in reverse order of removal, while noting the following:
Install the engine support and the right engine mount. Refer to Right Engine Mount, Removing and Installing.
Install the wires. Refer to 97 - Electrical Equipment - Relay Carriers, Fuse Panels and E-Boxes; Overview - Relay Carriers, Fuse Panels and E-Boxes and Wiring diagrams, Troubleshooting & Component locations;.
Install the front bumper cover. Refer to 63 - Body Exterior - Front Bumper; Bumper Cover, Removing and Installing.
Install the left front Knock Sensor 3 -G198-. Refer to Knock Sensor 3 G198, Removing and Installing.
Install the camshafts. Refer to Camshaft, Removing and Installing.
Install the turbocharger. Refer to Turbocharger, Removing and Installing.
Change the engine oil. Refer to Maintenance Booklet 411
Replace the coolant. Refer to Filling.
Tightening Specifications
Refer to Overview - Cylinder Head
Refer to Cylinder Head - Tightening Specification and Sequence
Refer to 27 - Electrical Equipment - Generator Overview - Generator.
Refer to 50 - Body Exterior - Lock Carrier Overview - Lock Carrier.
__________________________________
Let me know if this helps.
Take care,
Joe
Images (Click to make bigger)
Friday, September 18th, 2020 AT 10:28 PM