1993 Mercury Villager got a bushing missing

Tiny
STEPKAJAM
  • MEMBER
  • 1993 MERCURY VILLAGER
  • 6 CYL
  • 2WD
  • AUTOMATIC
  • 155,000 MILES
I think its the lower control arm on the front passenger side. Its the triangle thing that hooks to the ball joint at the tire. Is thier somthing I need to know when replacing these bushings(not at the tire side). It seems as easy as sliding them in and bolting it back up. Do I need to remove the whole controle arm? Or what?

Please Help, desperatly need to gwet work vheicle back on the road.

Thanks
Benjamin
Tuesday, February 17th, 2009 AT 5:21 PM

6 Replies

Tiny
IMPALASS
  • MECHANIC
  • 3,112 POSTS
Hello -

To better assist you please tell me if your model is a GS or LS. Also your engine size in liter and the 8th digit of your VIN.
Was this
answer
helpful?
Yes
No
Tuesday, February 17th, 2009 AT 8:34 PM
Tiny
STEPKAJAM
  • MEMBER
  • 3 POSTS
I dont have that info off hand right now I will have to check is thier a way I can get back to you directly.

Thanx B
Benjamin
Was this
answer
helpful?
Yes
No
Tuesday, February 17th, 2009 AT 8:43 PM
Tiny
IMPALASS
  • MECHANIC
  • 3,112 POSTS
You bet Benjamin

Just reply right back like you did for this.

I will be waiting.......
Was this
answer
helpful?
Yes
No
Tuesday, February 17th, 2009 AT 9:24 PM
Tiny
STEPKAJAM
  • MEMBER
  • 3 POSTS
I beleve this is the right info.1993: GS; 6Cyl 3.0L GAS, FI, VIN "W";

Thank you for your help
Benjamin
Was this
answer
helpful?
Yes
No
Tuesday, February 17th, 2009 AT 9:58 PM
Tiny
IMPALASS
  • MECHANIC
  • 3,112 POSTS
Hello -

I have attached the information you have requested.

You need to remove the control arm to replace the bushings. They need to be pressed in and out.

You might check the cost of the entire control arm and see what that is compared to the purchase of both bushings and the cost of a machine shop pressing them in just to see.

Please ensure you properly brace the frame and suspension.
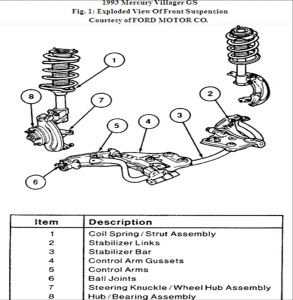

https://www.2carpros.com/forum/automotive_pictures/248015_1_170.jpg


CONTROL ARM

Removal & Installation

1. Raise and support the vehicle.
2. Remove the tire and wheel assembly.
3. Remove the ball joint. BALL JOINT .
4. Remove the stabilizer link-to-control arm nut and remove the stabilizer link shaft from the control arm.
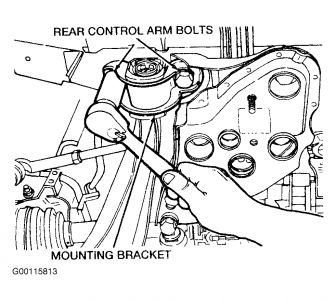
5. Remove the two rear control arm bolts and the mounting bracket. See Fig. 20 .


https://www.2carpros.com/forum/automotive_pictures/248015_2_113.jpg


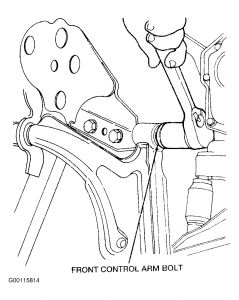
6. Remove the front control arm bolt. See Fig. 21 .


https://www.2carpros.com/forum/automotive_pictures/248015_3_78.jpg


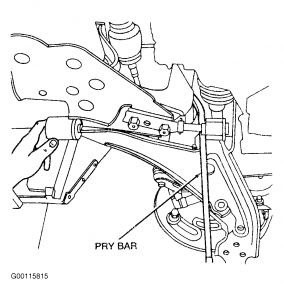
7. Pull the rear of the control arm down and gently pry the control arm forward and off of the control arm gusset. See Fig. 22 .


https://www.2carpros.com/forum/automotive_pictures/248015_F22_1.jpg


8. To install, reverse the removal procedure.

See TORQUE SPECIFICATIONS .

CONTROL ARM BUSHING - FRONT

Removal

1. Remove the control arm. See CONTROL ARM .

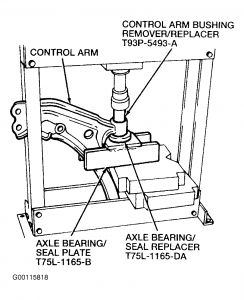
2. Position the control arm on Axle Bearing/Seal Plate T75L-1165-B and Axle Bearing/Seal Replacer T75L-1165-DA. Position Control Arm Bushing Remover/Replacer T93P-5493-A on the front control arm bushing. See Fig. 23 .


https://www.2carpros.com/forum/automotive_pictures/248015_f23_1.jpg


3. Press the front control arm bushing out of the control arm.

Installation

1. Position the control arm on Axle Bearing/Seal Plate T75L-1165-B and Axle Bearing/Seal Replacer T75L-1165-DA. Position the front control arm bushing on the control arm. Position Control Arm Bushing Remover/Replacer T93P-5493-A on the front control arm bushing. See Fig. 23 .


https://www.2carpros.com/forum/automotive_pictures/248015_f23_2.jpg


2. Press the front control arm bushing into the control arm.
3. Install the control arm. See CONTROL ARM .

CONTROL ARM BUSHINGS - REAR

Removal

1. Remove the control arm. See CONTROL ARM .
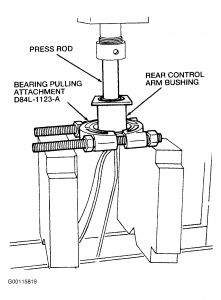
2. Position Bearing Pulling Attachment D84L-1123-A, or equivalent, between the rear control arm bushing and control arm flange. Position a press rod or suitable tool on the control arm. See Fig. 24 .


https://www.2carpros.com/forum/automotive_pictures/248015_f24_1.jpg


3. Press the rear control arm bushing from the control arm.

Installation

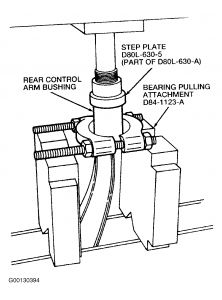
1. Position Bearing Pulling Attachment D84L-1123-A, or equivalent, under the control arm flange. Position the rear control arm bushing on the control arm. Position Step Plate D80L-630-5 (part of D80L-630-A), or equivalent, on the rear control arm bushing. See Fig. 25 .


https://www.2carpros.com/forum/automotive_pictures/248015_f25_1.jpg


2. Press the rear control arm bushing onto the control arm.
3. Install the control arm. See CONTROL ARM .
Was this
answer
helpful?
Yes
No
Tuesday, February 17th, 2009 AT 10:47 PM
Tiny
IMPALASS
  • MECHANIC
  • 3,112 POSTS
Hello -

Also, it looks like you may have some recalls on your vehicle. The dealer may fix these for free. Please contact the dealer service department, give them the VIN number of your car and have them check on these to see if they apply to you.


https://www.2carpros.com/forum/automotive_pictures/248015_Recalls_1.jpg

Was this
answer
helpful?
Yes
No
Wednesday, February 18th, 2009 AT 9:16 AM

Please login or register to post a reply.

Sponsored links