Hi,
That sounds like an internal engine knock. Is the oil clean, full and the correct viscosity? Is this something that started all at once? If you rev the engine does it speed up with the increase of rpm's and does it change in pitch?
Take a look through this link and see if anything seems to mirror what you are experiencing. I'm not saying it is internal, but listening to it (over a computer), it sounds like it. I will tell you that with a rod bearing, cam bearing, or even a lifter, the sound should change in pitch with engine load.
https://www.2carpros.com/articles/engine-noises
Also, have you tried removing the serpentine belt to see if the noise goes away? It could even be a belt driven accessory. Here are the directions for removal and replacement of the serpentine belt. Remove the belt and start it for a few seconds to see if the sound is gone. Only run it for a few seconds to see if the noise still exists. If it does, then it is most likely internal. If it goes away, check the belt driven accessories such as the alternator, power steering pump and so on.
Here are the directions. The attached pics correlate with the directions.
_____________________________________________________________________________
2010 Toyota Truck Highlander 2WD V6-3.5L (2GR-FE)
Removal
Vehicle Engine, Cooling and Exhaust Engine Drive Belts, Mounts, Brackets and Accessories Drive Belt Service and Repair Removal and Replacement Removal
REMOVAL
2GR-FE ENGINE MECHANICAL: DRIVE BELT: REMOVAL
1. REMOVE FRONT WHEEL RH
2. REMOVE ENGINE UNDER COVER ASSEMBLY See: Engine > Removal and Replacement > Removal
3. REMOVE NO. 1 ENGINE UNDER COVER See: Engine > Removal and Replacement > Removal
4. REMOVE FRONT FENDER MOULDING SUB-ASSEMBLY RH
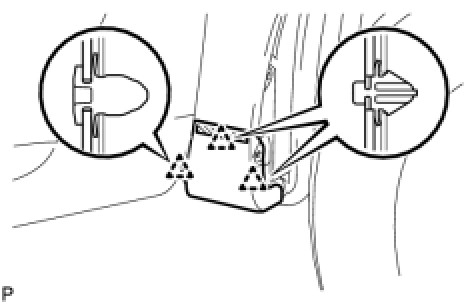
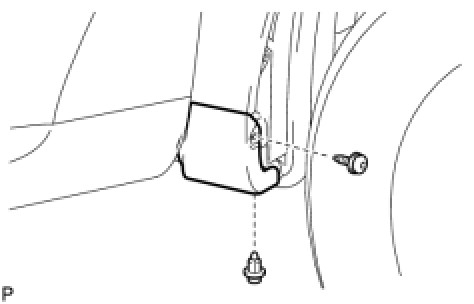
(a)Remove the clip.
pic 1
(b)Using a 4 mm hexagon wrench, remove the screw.
(c)Peel off the front fender side protector and disengage the 3 clips, and then remove the front fender moulding sub-assembly RH.
pic 2
(d)Remove the pad from the front fender moulding sub-assembly RH.
(e)Remove the 2 clips No. 4 from the front fender moulding sub-assembly RH.
(f)Remove the front fender side protector from the front fender moulding sub-assembly RH.
pic 3
5. REMOVE FRONT FENDER LINER RH See: Front Fender Liner > Removal and Replacement > Removal
6. REMOVE FRONT FENDER APRON SEAL RH See: Engine > Removal and Replacement > Removal
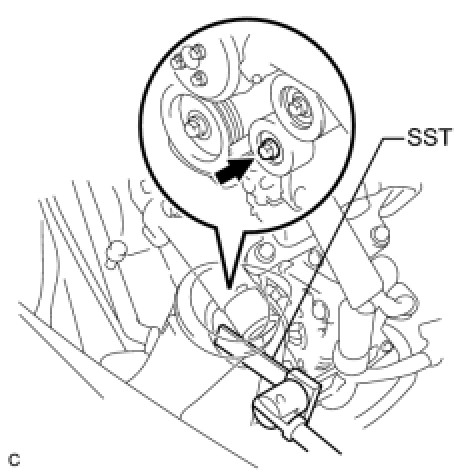
7. REMOVE V-RIBBED BELT
(a)Using SST, release the V-ribbed belt tension by turning the V-ribbed belt tensioner assembly counterclockwise, and remove the V-ribbed belt from the V-ribbed belt tensioner assembly.
pic 4
SST : 09961-00950
(b)While turning the V-ribbed belt tensioner assembly counterclockwise, align with its holes, and then insert the 5 mm bi-hexagon wrench into the holes to fix the V-ribbed belt tensioner assembly.
pic 5
__________________
Here are the directions to reinstall the belt.
2010 Toyota Truck Highlander 2WD V6-3.5L (2GR-FE)
Installation
Vehicle Engine, Cooling and Exhaust Engine Drive Belts, Mounts, Brackets and Accessories Drive Belt Service and Repair Removal and Replacement Installation
INSTALLATION
2GR-FE ENGINE MECHANICAL: DRIVE BELT: INSTALLATION
1. INSTALL V-RIBBED BELT
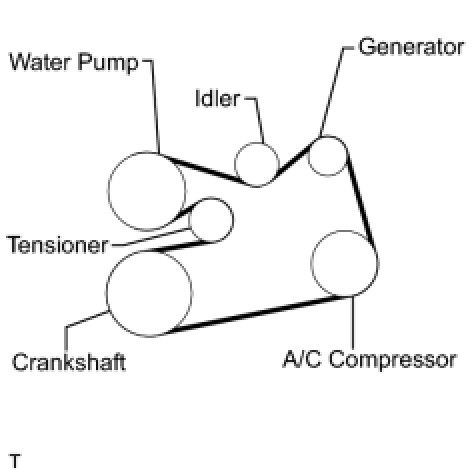
(a)Install the V-ribbed belt.
pic 6
(b)Using SST, turn the V-ribbed belt tensioner assembly counterclockwise and remove the bar.
SST : 09961-00950
(c)If it is difficult to install the V-ribbed belt, perform the following procedure:
pic 7
(1)Put the V-ribbed belt on every pulley except the tensioner pulley as shown in the illustration.
(2)Release the V-ribbed belt tension by turning the V-ribbed belt tensioner assembly counterclockwise, and put the V-ribbed belt on the V-ribbed tensioner assembly pulley.
NOTICE:
* Put the backside of the V-ribbed belt on the V-ribbed belt tensioner assembly pulley and No. 2 idler pulley sub-assembly.
* Check that the V-ribbed belt is properly set to each pulley.
(3)After installing the V-ribbed belt, check that it fits properly in the ribbed grooves. Confirm that the belt has not slipped out of the grooves on the bottom of the crankshaft pulley by hand.
2. INSTALL FRONT FENDER APRON SEAL RH See: Engine > Removal and Replacement > Installation
3. INSTALL FRONT FENDER LINER RH See: Front Fender Liner > Removal and Replacement > Installation
4. INSTALL FRONT FENDER MOULDING SUB-ASSEMBLY RH
(a)Clean the vehicle body surface.
(1)Using a heat light, heat the vehicle body surface.
(2)Remove the front fender side protector from the vehicle body.
(3)Wipe off any tape adhesive residue with cleaner.
(b)Clean the front fender moulding sub-assembly RH. (If reusing the front fender moulding sub-assembly RH)
pic 8
(1)Using a heat light, heat the front fender moulding sub-assembly RH.
(2)Remove the front fender side protector from the front fender moulding sub-assembly RH.
(3)Wipe off any tape adhesive residue with cleaner.
(4)Install a new front fender side protector to the the front fender moulding sub-assembly RH.
(c)Install the front fender moulding sub-assembly RH.
pic 9
(1)Using a heat light, heat the vehicle body and the front fender moulding sub-assembly.
(2)Remove the release paper from the front fender moulding sub-assembly.
HINT
After removing the release paper, keep the exposed adhesive free from foreign matter.
(3)Engage the 3 clips and install the front fender moulding sub-assembly RH.
(d)Using a 4 mm hexagon wrench, install the screw.
pic 10
(e)Install the clip.
5. INSTALL NO. 1 ENGINE UNDER COVER See: Engine > Removal and Replacement > Installation
6. INSTALL ENGINE UNDER COVER ASSEMBLY See: Engine > Removal and Replacement > Installation
7. INSTALL FRONT WHEEL RH
Torque : 103 Nm (1050 kgf-cm, 76 ft-lbf)
_______________________________
Try this and let me know what you find. Also, please feel free to let me know if you have other questions.
Take care,
Joe
Images (Click to enlarge)
Mar 27, 2020 at 7:44 PM