Continental And town cars use the same system
How the air suspension works.
The system consists of:
A compressor with built in vent solenoid and air drier
Compressor relay
Two air springs and spring solenoids
A height sensor
An on/off switch and a control module
The control module also receives inputs from the courtesy light switches and vehicle speed sensor. If the speed sensor isn't working then the air suspension will not function correctly.
When the car is started the air suspension module will immediately raise the vehicle to trim height if needed. No venting is allowed for 45 seconds after starting, so if the vehicle is high it will remain high for at least 45 seconds. Venting is also not allowed when a door is open. When the car is moving the module uses a 45 second averaging procedure to control trim height. This means that unless the module receives a high or low signal continuously for 45 seconds no adjustments are made. If the car is stopped and a door is opened and closed an immediate trim height adjustment will be made.
If during a lowering or raising procedure trim height cannot be achieved in the "time out" period, the "Check Suspension" light will illuminate and the air suspension module will turn off. When the ignition is turned off and back on the air suspension module will return to normal operation and try to maintain trim height. The "Check Suspension" light is also illuminated when the air suspension is switched off using the on/off switch.
After switching the car off the air suspension remains active for one hour. From 0 - 59 minutes only venting is allowed providing all doors are closed. At 60 minutes, if trim height is low, the module will raise the car to trim height or run the compressor for 23 seconds if this is not achieved. At 61 minutes the air suspension system is switched off.
TOOLS FOR THE JOB
Digital multi-meter and/or analog multi-meter
Some jumper wires
Small tool kit with assorted screwdrivers, wrenches and pliers
Garden sprayer or spray bottle filled with soapy water
Also an assistant can be useful at times
COMPONENT LOCATIONS
Compressor: under the hood, left front corner under the air cleaner
Compressor relay/fuses A, C and U: under hood in power distribution box
Other fuses: in instrument panel fuse board
Control module '90 - '94: Right side of trunk behind trim panel
Control module '95 - '97: Behind the glovebox
On/Off switch: right side of trunk
Height sensor: under the car from suspension to frame
Air springs: one each side on rear axle to frame
Air spring vent solenoids: one on the top of each air spring
Diagnostic plug: right side of trunk behind trim panel
AIR SUSPENSION TESTING
Your "Check Suspension" light has come on, what do you do next? Well the first thing to check is the fuses and that the on/off switch is "on".
Model Year I/P Fuses Under Hood Fuses
90 - 91 1 and 4 A (50amp) and U
92 - 93 1 and 8 A (50amp) and U
1, 4 and 8 A (50amp) and U
95 - 97 7 C (50amp) and U
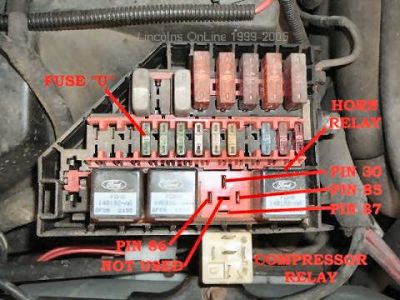
The picture above shows the power distribution box of a '92 Town Car with the compressor relay removed and placed to one side, fuse "U" and the compressor relay pins labeled.
TESTING THE MODULE POWER FEEDS AND ON/OFF SWITCH>
Switch the air suspension off and disconnect the control module connector.
Switch testing
'90 - '94 Town Cars
Connect a voltmeter or test light to the Dark Green/Yellow wire and ground. You should get twelve volts when the air suspension switch in turned on, if not check fuse 1 or service switch/wiring to fuse 1.
'95 Town Cars
Connect a voltmeter or test light to the Dark Green/Yellow wire and ground. You should get twelve volts when the air suspension switch is turned on, if not check fuse U or service switch/wiring to fuse U. NOTE: There are two terminals with Dark Green/Yellow wires, both should test the same.
'96 - '97 Town Cars
Connect a continuity meter (ohms) between the Dark Green/Yellow wire and the Purple/Light Green wire; you should have 0 ohms with the switch closed and infinity with the switch open.
Other power feeds
'90 - '91 Town Cars
Check the Light Blue/Pink wire for battery voltage when the ignition is switched on, if no voltage check fuse 4 and wiring.
'92 - '94 Town Cars
Check the Red/Yellow wire for battery voltage when the ignition is switched on, if no voltage check fuse 8 and wiring.
'95 Town Car
Check the Light Blue/Pink wire for battery voltage when the ignition is switched on, if no voltage check fuse 7 and wiring.
'96 - '97 Town Cars
There are three Light Blue/Pink wires. The ones on pin 1 and 15 will have battery voltage all the time, if no voltage check fuse U and wiring. The one on pin 16 will have battery voltage when the ignition is switched on, if no voltage check fuse 7 and wiring.
TESTING THE COMPRESSOR AND RELAY
If the compressor appears to not be working, first check the fuses. Then check that the compressor actually works: the simplest way to do this is to remove the compressor relay and with a jumper wire bridge the terminals in the power distribution box for pins 30 & 87. You may get a small spark and the compressor should start.
If the compressor doesn't start, remove the jumper wire and check for battery voltage on pin 30. If you have no battery voltage on pin 30 then there is a fault in the power distribution box or with fuse U. If you have battery voltage on pin 30 then gain access to the compressor and disconnect the compressor harness, reinstall the jumper wire to pins 30 & 87, and check for battery voltage on the Purple/Orange wire ('90 - '95) or Grey/Red wire ('96 - '97). If you have battery voltage then check for continuity to ground through the black wire, if you have continuity to ground and the compressor connector is in good condition then the compressor is bad. NOTE: The wires on the compressor side of the connector are different colors.
If the compressor started when pins 30 & 87 were jumped then the next check is the relay. The easiest way to do this is fit it in the horn relay slot next to the compressor relay slot (first check the horn sounds), and then sound the horn - if the horn doesn't sound the relay is bad. To check the relay is functioning and wiring to the control module, first remove the compressor relay and check for battery voltage on pin 86. If there is no battery voltage then a fault exists in the power distribution box. If you do have voltage refit the relay and gain access to the control module and switch off the air suspension and disconnect the module connector. Now with a jumper wire ground the Dark Blue/Yellow wire (all years) and the compressor should start; if not then there is a fault with the wiring to the module from the power distribution box. If the compressor does start then the module may not be giving the signal to start the compressor, maybe the module, maybe the height sensor.
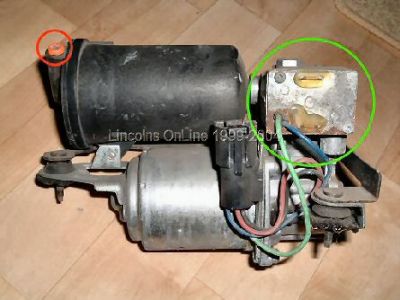
The picture above shows a Town Car compressor with the airline connection circled in red and the vent solenoid circled in green.
TESTING THE DOOR INPUTS
The air suspension will not vent if a door is open, the module may be receiving a false "Door open" signal from a faulty courtesy light switch. To test the door open signal switch the air suspension off and disconnect the control module connector.
'90 - '94 Town Cars
Connect a voltmeter between the Dark Blue/Orange wire and ground, you should have 0 volts, now open and close each door, you should get 12 volts each time a door is opened.
'95 - '97 Town Cars
The door open signal comes from the LCM (Lighting Control Module), I am not sure what type of signal is used but from studying the wiring diagrams I believe it to be low voltage, probably 5 volts. The door open signal wire is Black/Yellow; it may be possible to test using a voltmeter as for the '90 - '94 Town Cars.
TESTING THE AIR SPRING AND VENT SOLENOIDS
Venting test '90 - '94 Town Cars
Switch off the air suspension and disconnect the control module connector, then simultaneously ground the Purple/Light Green, Light Blue/Black and Pink wires. The rear of the car should lower. If not then check fuse U and try again if blown. Next, gain access to the compressor assembly and disconnect the air line from the drier. Then once again ground the Purple/Light Green wire and the left side should lower - ground the Light Blue/Black wire and the right side should lower.
From these tests you will know if both spring solenoids are working and if they are, whether or not the vent solenoid is working.
Venting test '95 - '97 Town Cars
Switch off air suspension and disconnect control module connector, then simultaneously ground the Brown/Pink, and Tan/White and Pink wires. The rear of the car should lower. If not then check fuse U and try again if blown. Next, gain access to the compressor assembly and disconnect the air line from the drier. Once again ground the Brown/Pink wire and the left side should lower; ground the Tan/White the right side should lower.
From these tests you will know if both spring solenoids are working and if they are, whether or not the vent solenoid is working. If this test shows both spring solenoids and the vent solenoid are venting, then it could be the control module is not sending the signals to vent. This may be a bad control module, height sensor or false door open signal.
Spring solenoid testing '90 - '94 Town Cars
Switch the air suspension off and disconnect the control module connector. Next, gain access to the spring solenoids and disconnect the solenoid connectors. Now ground the Purple/Light Green and Light Blue/Black wires on the module connector. Next, using a voltmeter or test light bridge the two terminals of each spring solenoid connector and you should have battery voltage (test light lit). If not then connect your voltmeter to the Orange/Red wire of the solenoid connector and to a good chassis ground and you should have battery voltage. If not, check fuse U. If fuse U is okay then you have a wiring fault between the power distribution box and the spring solenoid. If you have battery voltage on the Orange/Red wire and when the two-solenoid connectors were previously bridged you did not get battery voltage then you have a wiring fault on the wire (Purple/Light Green or Light Blue/Black) between the control module and spring solenoid. Finally, remove the jumper wires from the control module connector and with your voltmeter or test light bridge the spring solenoid connectors - if you get battery voltage then the wire (Purple/Light Green or Light Blue/Black) between the control module and spring solenoid is shorted to ground.
From these tests you will know if the wiring is okay. If during the previous venting test one or both air springs didn't vent and the wiring is okay, then it would be safe to assume that you have a bad spring solenoid(s).
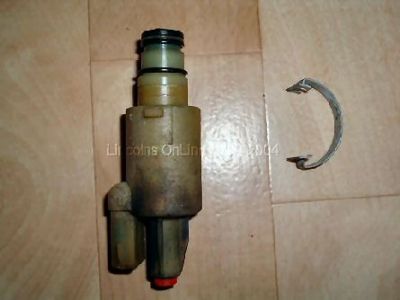
The picture above shows a spring solenoid and retaining clip.
Spring solenoid testing '95 - '97 Town Cars
Switch air suspension off and disconnect the control module connector. Next, gain access to the spring solenoids and disconnect the solenoid connectors. Now ground the Brown/Pink and Tan/White wires on the module connector and using a voltmeter or test light bridge the two terminals of each spring solenoid connector. You should have battery voltage (test light lit), but if not then connect your voltmeter to the Light Blue/Pink wire of the solenoid connector and to a good chassis ground. You should have battery voltage but if not check fuse U, If fuse U is okay then you have a wiring fault between the power distribution box and the spring solenoid. If you have battery voltage on the Light Blue/Pink wire and when the two-solenoid connectors were previously bridged you did not get battery voltage, then you have a wiring fault on the wire (Brown/Pink or Tan/White) between the control module and spring solenoid. Finally, remove the jumper wires from the control module connector and with your voltmeter or test light bridge the spring solenoid connectors if you get battery voltage then the wire (Brown/Pink or Tan/White) between the control module and spring solenoid is shorted to ground.
From these tests you will know if the wiring is okay. If during the previous venting test one or both air springs didn't vent and the wiring is okay, then it would be safe to assume that you have a bad spring solenoid(s).
Vent solenoid testing '90 - '95 Town Cars
Switch air suspension off and disconnect the control module connector, next disconnect the compressor connector, then check for battery voltage on the Orange/red wire, if no voltage check fuse U, if fuse U is okay then you have a wiring fault between the power distribution box and compressor connector.
If you had battery voltage, ground the Pink wire on the control module connector and bridge the Orange/Red and Pink wire of the compressor connector with your voltmeter. You should have battery voltage, but if not then there is a fault on the wire between the compressor connector and the control module connector.
Next, with the voltmeter still bridging the compressor connector, remove the ground from the control module connector. If you still have battery voltage indicated then the Pink wire from the compressor connector to the control module is shorted to ground. NOTE: the wires colors are different on the compressor side of the connector.
If the wiring is okay and the previous venting test showed the vent solenoid wasn't venting then you have a bad vent solenoid.
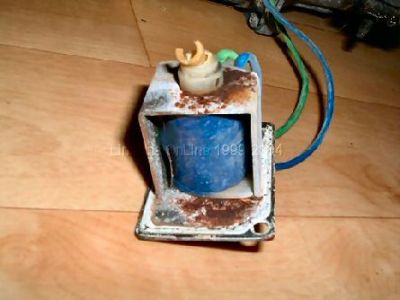
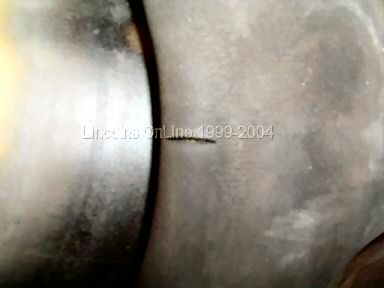
The picture above shows a Town Car vent solenoid removed from the compressor. Notice the corrosion - this is the usual cause of vent solenoid failure. Also notice the broken sealing tip - this occurred when I removed the vent solenoid as it was old and fragile.
Vent solenoid testing '96 - '97 Town Cars
Switch air suspension off and disconnect the control module connector, next disconnect the compressor connector, then check for battery voltage on the Light Blue/Pink wire, if no voltage check fuse U, if fuse U is okay then you have a wiring fault between the power distribution box and compressor connector.
If you had battery voltage, ground the Pink wire on the control module connector, then bridge the Light Blue/Pink and Pink wire of the compressor connector with your voltmeter, you should have battery voltage, if not then there is a fault on the wire between the compressor connector and the control module connector.
Next, with the voltmeter still bridging the compressor connector remove the ground from the control module connector, if you still have battery voltage indicated then the Pink wire from the compressor connector to the control module is shorted to ground. NOTE: the wires colors are different on the compressor side of the connector.
If the wiring is okay and the previous venting test showed the vent solenoid wasn't venting then you have a bad vent solenoid.
TESTING THE HEIGHT SENSOR
Wiring colors 1990 - 1994
Pink/White = Power
Black/Pink = Ground
Orange/Black = Low height input
Pink/Black = High height input
Wiring colors 1995 - 1997
Purple/Light Green = Power
Black/Pink = Ground
Orange/Black = Low height input
Pink/Black = High height input
It is very important to follow these instructions exactly as damage to the height sensor may occur.
You will need a REGULATED 3.3volt (+/- 0.3 volts) power supply and a digital ohmmeter (multi-meter) as follows.
Connect the positive of the regulated 3.3volt power supply to the Pink/White ('90 - '94) Purple/Light Green ('95 - '97) wire, and the negative to the Black/Pink wire.
Connect the RED lead of the ohmmeter (multi-meter on ohms range) onto the Pink/Black OR the Orange/Black wire.
Connect the BLACK lead of the ohmmeter (multi-meter on ohms range) onto the negative of the power supply.
Observe the reading on the ohmmeter (multi-meter on ohms range) and compare with the table below.
AIR LEAKS
The most common place for an air leak is the air springs, closely followed by the drier/compressor joint and on early 90s Town Cars on the air line just where the frame goes up over the rear axle. Other suspect places are on the spring solenoids and any place there is an air line joint. To test for an air leak, fill a garden sprayer or spray bottle with a strong soap solution and spray the air springs, air line joints, air lines, or anywhere there is a leak suspected or probable and watch for bubbles. To check if an air spring is leaking, allow the compressor to inflate the air springs to trim height, switch off the air suspension and go for a drive or let sit overnight - if the rear of the cars drops significantly then you can be sure there is an air leak.
The picture above shows a Town Car air spring with a crack in it that was almost certainly leaking.
SOME COMMON FAILURES AND POSSIBLE REASONS
Check Suspension light comes on after driving a while: You have an air leak on an air spring that the compressor cannot keep up with.
Fuse U keeps blowing: The compressor is being overworked because you have an air leak or the compressor is badly worn and drawing too much current.
Rear of car too high: Vent solenoid seized closed so no venting is possible
Check Suspension light comes on but the rear height looks okay: The vent solenoid is seized closed so no venting is possible.
Moisture is the enemy of the air suspension system and does the most damage to the compressor and vent solenoid usually seizing the vent solenoid closed. The only cure for excess moisture in the system is to replace the compressor/drier assembly, both rear air springs/spring solenoids, and blow through the air lines with compressed air.
NOTES ABOUT SAFETY
Please observe all proper safety procedures when working on your air suspension. The air suspension on/off switch (in the trunk) should always be turned off before testing or repairing the air suspension, however during certain tests it may be necessary to turn it back on.
If you need to gain access to the underside of your car:
Only lift your car on firm level ground
Only jack on approved jacking points or frame
Always engage the parking brake
Always put the gear shift into park (or in 1st gear for stick shift)
Chock the wheels remaining on the ground
Always use jack stands
Finally switch off the air suspension
If you are working under the hood:
Park on firm level ground
Always engage the parking brake
Always put the gear shift into park (or1st gear if manual)
Switch off the air suspension
Do not work on an engine that is running
Beware of hot components if recently run
If you are working on electrical components:
Beware of accidental short to ground
Beware of accidental short between pins of an harness connector
Disconnect the battery during component replacement
SUMMARY
If you have made it this far you should have tested the fuses, the power feeds, the door open inputs, the compressor, the compressor relay, the vent solenoid, the spring solenoids, the height sensor, all wiring for the previous and for air leaks, so by a process of elimination if a fault still exists it should be with the control module.
Feb 20, 2009 at 9:16 PM