Left rear door switch does not turn on overhead lights

Tiny
JIM SUTTERLIN
  • MEMBER
  • 2006 HONDA RIDGELINE
  • 3.5L
  • V6
  • 4WD
  • AUTOMATIC
  • 180,000 MILES
Troubleshot the problem to the point where I am at a loss. Removed switch and swapped it with the right rear door switch problem. Did not follow switch so with the switch removed I checked the voltage at the switch connector I am only getting 5.1 volts at this wire (green with yellow stripe). Removed right rear switch again and tested for voltage I have 12 volts at this connection apparently the left rear switch is not getting the proper voltage to function. Where do I go from here? Could the problem be in the MICU? How do I pinpoint and confirm and fix the problem if it is in the MICU? Do not have a whole lot of money to throw at this.
Friday, May 18th, 2018 AT 5:31 PM

6 Replies

Tiny
CARADIODOC
  • MECHANIC
  • 33,738 POSTS
Here is the diagram that shows four identical switch circuits. Since the insane engineers do not know how to turn a few lights on with a few switches, they needed to use a computer module, as you already know. I cannot find a circuit operation description, but I can share that very often the switches will ground out a different voltage sent to it, and by seeing the voltage that goes away, the computer interprets which switch is being activated. In this case that would not make sense unless each switch is supposed to turn on a different group of lights. Even if that were the case, the computer uses four different lines connected to the four switches, so I suspect all of them are supposed to have twelve volts supplied to them.

You already did what I would have recommended first. That is to swap two switches. Next, I would suggest measuring the voltage at one of the front switches. If that is also twelve volts, it would make sense there's high resistance in the wire to the left rear switch.

This does not always work in computer-controlled circuits, but you can try measuring the voltage on the right rear with a test light. If you find that causes the interior lights to turn on, the computer will not supply enough current for this to be valid, and the test light is just acting like a switch. However, if the test light turns on, try that at the left rear wire. Here I will bet it does not glow at all. That means the undesirable resistance in that wire will not let enough current through to run the light even a little.

Another way to do this that is more effective with computer controls is to measure the voltage with your digital voltmeter. You will find that 5.1 volts. Now, keep the voltmeter on there, and add the test light in parallel with it. If there is a high-resistance splice or connection, the test light will draw plenty of current to drop even more voltage across that resistance. You will end up with the voltmeter seeing as little as 0.0 volts. If that is what you find, leave the test light in place, then measure the voltage on the green/yellow wire at the computer. If you find twelve volts at the computer, that wire has a break in it or corrosion at a connector terminal. If you find close to zero volts at the computer, the rest of the circuit is doing what it is supposed to do, that is ground that wire, and the computer is not responding appropriately.
Was this
answer
helpful?
Yes
No
+1
Friday, May 18th, 2018 AT 7:45 PM
Tiny
JIM SUTTERLIN
  • MEMBER
  • 4 POSTS
Kind of getting ahead of myself here. I am aware that certain CPU's have the ability to deliver various voltages to different outputs, five volts is a common voltage that can be found at various points on a PLC. If the micu is only putting out five volts then I assume that the micu is at fault and needs to be replaced. Yes? Assuming that twelve volts is required to turn the lights on. I hear what you are saying about the current. If I supply enough current at five volts I should illuminate the lights at the cost of some heat. The electrical drawing does not show any other connection points between the switch and the MICU. Looking at the drawing I see that P7 is the constant voltage input at twelve volts, therefore P13, 14, 15, 16, and 17 outputs should be seeing twelve volts.
Was this
answer
helpful?
Yes
No
Saturday, May 19th, 2018 AT 3:41 AM
Tiny
CARADIODOC
  • MECHANIC
  • 33,738 POSTS
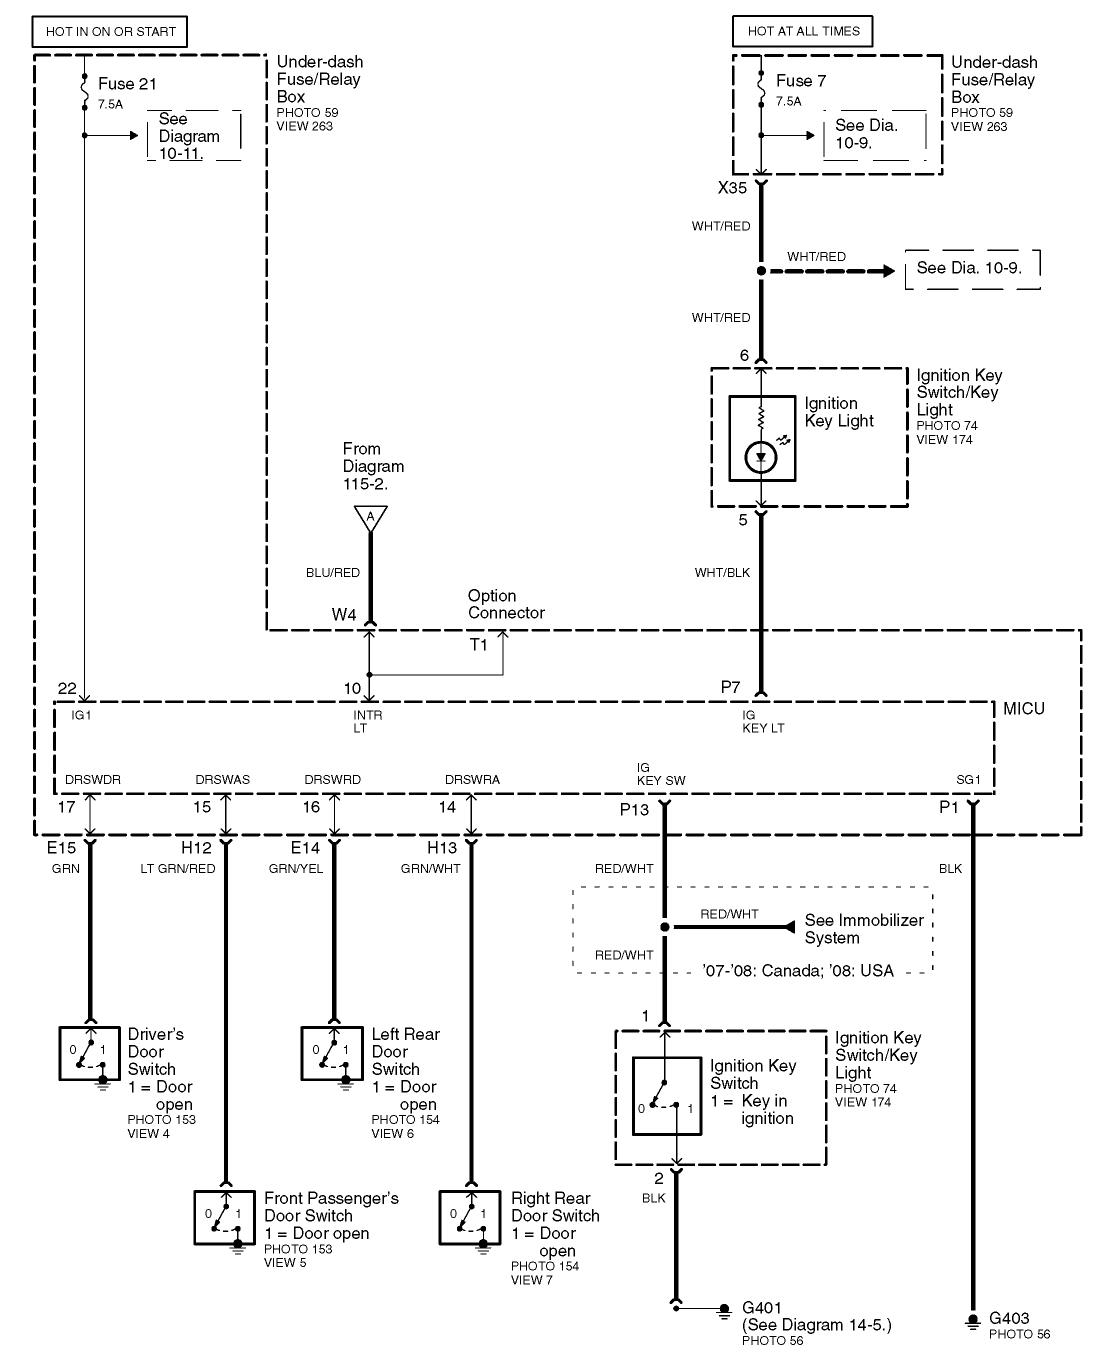
Not exactly. You are looking at it as the computer is simply full of switching circuits that turn the twelve volts on and off, or that supply that input twelve volts to the door switch circuits. That would make too much sense, and is why the insane engineers feel the need to do something different. When the circuit calls for 5.0 volts, that is developed by a regulator circuit inside the computer module. Eight and ten volts have been used too on some car brands.

Before we get ourselves all wrapped around the axle with complexity that likely is not even a factor here, measure the voltage on at least one of the front switches. I am betting you are going to find twelve volts there too. That would prove the computer is not interpreting different voltages for different doors. It is just looking at the zero volts or twelve volts on the individual circuits to know which door is open.

I am not sure if you understood my less-than-ideal explanation about the 5.1 volts at the switch and at the computer. To clarify it, if you are seeing 5.1 volts at the left rear switch because of corrosion somewhere in that wire, you must have current flow through that corrosion for it to cause a voltage drop. For all practical purposes, a digital voltmeter does not draw any current. It just measures electrical pressure, just as a pressure gauge on a compressed air line measures pressure, but no air actually flows through it. If you start with twelve volts inside the computer, then drop next to nothing across the corrosion, you will end up with twelve volts at the switch. But, if you test that with a test light, those do draw current to work, and that current will cause a voltage drop across the corrosion. You will be left with something substantially less at the end of that wire, and will be too low to make the light's filament glow.

To say that a different way, if corrosion is the cause of the problem, you measure twelve volts with the voltmeter, that reading will drop a lot when you touch the test light to the wire. This is where, if you leave the test light connected, you would find perhaps that 5.1 volts at the switch, and twelve volts at the computer.

I think you are already expecting to find 5.1 volts at both places, the switch and at the computer, which would point to corrosion inside the computer, or more likely, a defect in the switching/sensing circuit for that wire. We never approve of throwing random parts at a problem as a means to diagnose it, but in this case, if you are lucky enough to have a spare computer in your back pocket, this would be the time to plug it in and see if it solves the problem.

Also, if you have a scanner that can access this computer, you can look at the live data screen for "Inputs/Outputs" and see what the computer is seeing. Typically, if it wants to see a slightly different voltage for a given function, (such as with a dozen steering wheel switches all sending their voltages down just one pair of wires), the scanner will display the exact voltage seen that is being interpreted by the computer. When the circuit is simply grounding out a voltage as opposed to leaving it alone, meaning zero volts or twelve volts, it is more common for the scanner to list "LR Door" as "On" or "Off", or "Pressed" or "Released".

With zero volts and twelve volts being the only two acceptable input values, what does the computer interpret 5.1 volts as? It is likely to think since it is not zero volts, do not turn on the lights. And if it is seeing that 5.1 volts because of internal corrosion or a defect, grounding that wire will get you zero volts at the connector, but not inside where it is being watched. A good clue would be if the computer continues to see 5.1 volts when you have the wire grounded at the computer's connector. If it still does not switch the lights on, you have just eliminated the LR switch and that entire wire as the suspects.
Was this
answer
helpful?
Yes
No
+1
Saturday, May 19th, 2018 AT 8:53 PM
Tiny
JIM SUTTERLIN
  • MEMBER
  • 4 POSTS
Thank you for the lengthy explanation. It really helps. As my mechanical expertise is in hydraulics and plc controls not in the automotive world. You have given me some sort of direction If I understand you correctly and in my realm of knowledge. Here is my conclusion of where I am going. For that function to happen the twelve volts that is supposed to be in that wire needs to sink to zero volts to tell the computer to turn on the blasted light. So with that said it would not matter where along that wire it sees the ground. If I ground it out at the connector at the MICU and the light comes on then I have my answer. Somewhere along the path is an unwanted resistance that needs to be found and eliminated. Thanks again for your help. I dislike electrical problems! Here is my edit. As I fear of causing more damage with a direct short to ground. I would be better off to use a test light or resistor to reduce the voltage at the pin on the connector. Thanks again for the education.
Was this
answer
helpful?
Yes
No
Sunday, May 20th, 2018 AT 2:29 AM
Tiny
JIM SUTTERLIN
  • MEMBER
  • 4 POSTS
Here is the latest; I am not trusting what I am seeing. There is one bundle of wire running along the door molding on the drivers side. We determined that the wire going to the left rear door is the green/yellow wire. Taking the kick panel off from the drivers side in front of the fuse panel to better see the wire bundle. Removed both front door switches and verified that they have twelve volts at their connections leaving the driver side switch connection exposed and rigging in a test lamp, with the connection at twelve volts grounding the test lamp I saw no illumination of the test lamp bulb, not even a faint glow, the twelve volts sank to 1.7 volts and the map lights brightened. So far so good learning curve here. Move the equipment to the left rear switch. With different results. We already determined that this connection was only getting 5.1 volts upon grounding the voltage sank to 0.0 volts. So far this is making sense. I dug through the wires in the bundle to locate the green/yellow wire to see where it went. Had no luck locating its termination point. I penetrated the wire jacket with a needle and found the voltage to be 0.0. With the opposite end ungrounded. Uh oh not what I expected. Dug deeper in the wire bundle and found another green/yellow wire. Tapped into this wire and found 11.8 volts. Unfortunately as long as there is voltage at this point, I cannot run a continuity test to show it is the same wire as the left switch wire. When I ground it out nothing happens with the map lights. I looked at the voltage and seem to recall that it was lower than hat I saw on the left front switch. Will go back later and look for a third green/yellow wire
Was this
answer
helpful?
Yes
No
Sunday, May 20th, 2018 AT 8:42 AM
Tiny
CARADIODOC
  • MECHANIC
  • 33,738 POSTS
We are getting there. Put a ground jumper on the wire at the LR door to bring it to 0.0 volts, then measure what you have on that wire at the computer. If it is 0.0 volts at the computer, that wire is okay and the ground jumper has the entire wire grounded, as it should. If you find any higher voltage only at the computer, there is excessive resistance in that wire somewhere. To verify that, grounding that wire at the computer should turn the interior lights on.
Was this
answer
helpful?
Yes
No
+1
Sunday, May 20th, 2018 AT 11:01 AM

Please login or register to post a reply.

Sponsored links