Timing belt replacement

Tiny
MCAUTODOC
  • MEMBER
  • 2004 KIA RIO
Four cylinder two wheel drive manual 124, 00 miles.

VIN #KNADC125X46331403 / 1.6L.

I need to know the specific timing belt replacement procedure for this vehicle, including all pertinent torque specs, as soon as possible. Thanks.
Do you
have the same problem?
Yes
No
Monday, February 2nd, 2009 AT 5:42 AM

32 Replies

Tiny
BMRFIXIT
  • MECHANIC
  • 19,053 POSTS
Timing belt replacement - 1.5L & 1.6L - DOHC -2004 Kia Rio

Torque specifications: Ft. Lbs. (N.m)
Crankshaft Pulley Bolt 9-13 (12-17)
Crankshaft Sprocket Bolt 80-87 (108-118)
Timing Belt Guide Plate Bolt 9-13 (12-17)
Timing Belt Tensioner Pulley 28-38 (38-51)
Lock Bolt Water Pump Pulley Bolt 9-13 (12-17)

Timing Belt Cover Bolts
INCH Lbs. (N.m) 70-97 (8-11)

Timing belt replacement- 1.5L & 1.6L - DOHC -2004 Kia Rio

Removal and installation
Timing belt:

CAUTION:This application is an interference engine. Do not rotate camshaft or crankshaft when timing belt is removed, or engine damage may occur.

Removal:
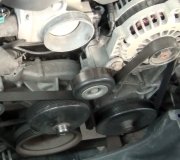
1.Disconnect negative battery cable. Loosen power steering lock bolts and nuts, and remove tension from power steering and air conditioning compressor drive belt. Remove power steering and air conditioning drive belt.

2.Loosen and remove generator bolts. Remove water pump pulley. Remove crankshaft pulley and timing belt guide plate. Remove upper and lower timing belt covers.

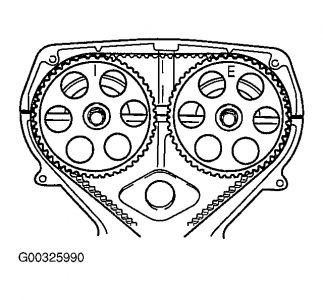
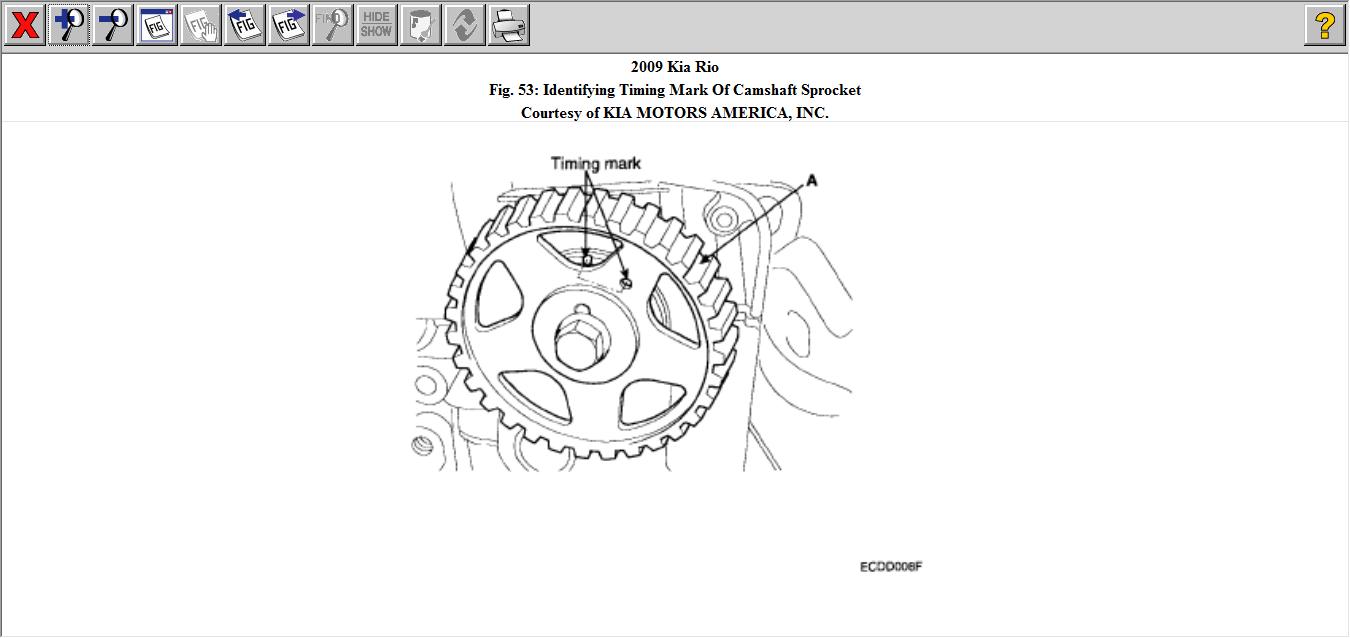
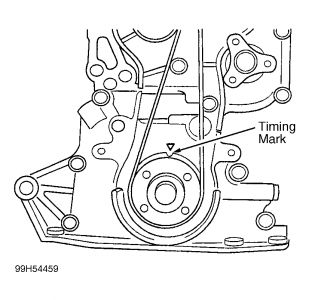
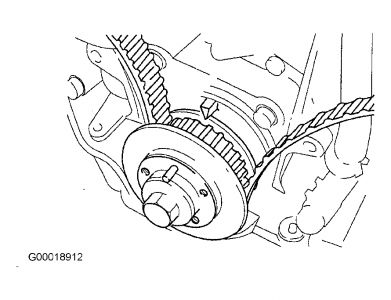
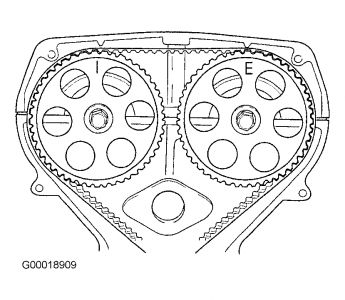
3.Turn crankshaft so that timing mark on crankshaft sprocket is aligned with timing mark on engine. Ensure "I" mark on intake camshaft sprocket is aligned with mark on cylinder head cover, and "E" mark on exhaust camshaft sprocket is aligned with mark on cylinder head cover.

CAUTION:DO NOT move camshaft or crankshaft once timing marks have been correctly positioned.

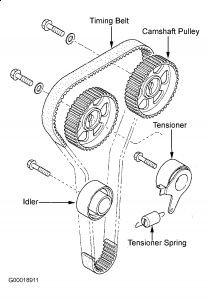
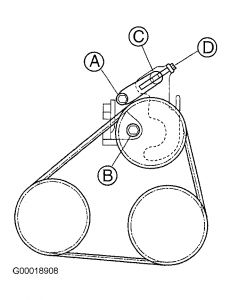
4.Loosen tension-er pulley lock bolt. While protecting timing belt with a rag, remove tension-er pulley. If belt is to be reused, mark direction of timing belt rotation for proper re-installation. Remove timing belt.

Inspection
Replace timing belt if it is contaminated with oil or grease. Check belt for wear, fraying or other damage. Inspect idler pulley and tension-er pulley for uneven wear and smooth bearing operation. Inspect
camshaft sprockets and crankshaft sprocket for broken teeth or damage.
NOTE: Replace tension-er spring whenever timing belt is replaced. Replace any component that shows damage or excessive wear.

Installation
1.Install tension-er pulley. Pull tension-er pulley to its furthest point, and tighten lock bolt. Check that timing mark on crankshaft sprocket is aligned with timing mark on engine.Ensure that camshaft sprockets are aligned with marks on cylinder head cover.

2.Install timing belt onto crankshaft sprocket first, then idler pulley, exhaust camshaft sprocket, intake camshaft sprocket, and finally, tension-er pulley. Ensure there is no looseness in belt between idler pulley and exhaust camshaft sprocket, or between intake and exhaust camshaft sprockets.

3.Loosen tension-er pulley lock bolt, and allow tension-er spring to apply tension to timing belt. Do not add additional tension. Tighten tension-er pulley lock bolt to specification..

4.Rotate crankshaft two full turns (clockwise only), and align timing mark on crankshaft sprocket with timing mark on engine block. Ensure that marks on camshaft sprockets align with marks on cylinder head cover.If marks do not align, remove timing belt and repeat process from tension-er installation.

5.Measure timing belt deflection by applying moderate pressure midway between camshaft sprockets. If deflection is not 0.39-0.50" (11-13 mm) with 22 lbs. (10 kg) of force applied, repeat installation process from tension-er installation. 6.Install lower and upper timing belt covers, timing belt guide plate and crankshaft pulley. Install water pump pulley. Tighten all bolts to specification.

7.Install generator belt and adjust tension. Install power steering and air conditioning drive belt, and adjust tension. Connect negative battery cable.


https://www.2carpros.com/forum/automotive_pictures/99387_Graphic1_181.jpg


https://www.2carpros.com/forum/automotive_pictures/99387_Graphic2_87.jpg


https://www.2carpros.com/forum/automotive_pictures/99387_Graphic3_42.jpg


https://www.2carpros.com/forum/automotive_pictures/99387_Graphic4_21.jpg


https://www.2carpros.com/forum/automotive_pictures/99387_Graphic5_11.jpg

Was this
answer
helpful?
Yes
No
+13
Monday, February 2nd, 2009 AT 6:17 AM
Tiny
OHIO28
  • MEMBER
  • 16 POSTS
  • 2004 KIA RIO
The information I'm looking for is which way does the pulleys actually go back on each cam? When looking at pictures 100_1377, 1378, and 1379, the pins on each cam and the "I" and "E" on the pulleys. The pulleys can either go on the cam facing the "I" or the "E".

I understand how to align the pulleys with the timing mark after the pulleys are on. But attaching the pulleys to the cam, do I also do the same for each pulley with the cam pins? Meaning, while putting pulley on the back cam or Intake cam, do I also put the cam pin facing the "I"? And the same for Exhaust "E" on the right cam?

Hey man thanks again.

OHIO28
Was this
answer
helpful?
Yes
No
+1
Monday, October 29th, 2018 AT 6:56 PM (Merged)
Tiny
RACEFAN966
  • MECHANIC
  • 5,029 POSTS
Ok here is a pic of what it should look like when they are installed. Hope this helps. Thanks.


https://www.2carpros.com/forum/automotive_pictures/249564_Graphic_60.jpg

Was this
answer
helpful?
Yes
No
+1
Monday, October 29th, 2018 AT 6:56 PM (Merged)
Tiny
OHIO28
  • MEMBER
  • 16 POSTS
Racefan966---Sorry this is not what I'm asking. The picture 2CARPROs keep showing is the timing mark allignment after the pulleys are installed. I need information for installing the pulleys on the cams. See the pulleys can either go on at 12 or 6 o'clock. Which would effect the timing mark (the picture you attached).

I need the picture for putting on the pulleys on each cam. I wrote, "The information I'm looking for is which way does the pulleys actually go back on each cam? When looking at pictures 100_1377, 1378, and 1379, the pins on each cam and the "I" and "E" on the pulleys. The pulleys can either go on the cam facing the "I" or the "E".

I understand how to allign the pulleys with the timing mark after the pulleys are on. But attaching the pulleys to the cam, do I also do the same for eah pulley with the cam pins? Meaning, while putting pulley on the back cam or Intake cam, do I also put the cam pin facing the "I"? And the same for Ehaust "E" on the right cam?"

Please re-read the above question, yal have been great help in the past. Thank you

OHIO28.
Was this
answer
helpful?
Yes
No
Monday, October 29th, 2018 AT 6:56 PM (Merged)
Tiny
RACEFAN966
  • MECHANIC
  • 5,029 POSTS
The guide slots are pointed down best I can tell. Here is the only other pic I can find.


https://www.2carpros.com/forum/automotive_pictures/249564_Graphic_62.jpg

Was this
answer
helpful?
Yes
No
Monday, October 29th, 2018 AT 6:56 PM (Merged)
Tiny
OHIO28
  • MEMBER
  • 16 POSTS
  • 2004 KIA RIO
Engine Mechanical problem
2004 Kia Rio 4 cyl Front Wheel Drive Automatic

HELP! Understanding if the timeing belt breaks, I probally have some bent valves to also change. What other damage to the engine may occur in this case? Thanks for your time and help.

Ohio28.
Was this
answer
helpful?
Yes
No
Monday, October 29th, 2018 AT 6:56 PM (Merged)
Tiny
DAVE H
  • MECHANIC
  • 13,383 POSTS
Generally the valves is the worst ! Check the piston tops and also after replacing the valves have the head pressure tested before replacement in vehicle !
Was this
answer
helpful?
Yes
No
Monday, October 29th, 2018 AT 6:56 PM (Merged)
Tiny
TINAD72
  • MEMBER
  • 1 POST
  • 2004 KIA RIO
  • 4 CYL
  • 2WD
  • AUTOMATIC
  • 70,000 MILES
HOW TO.
Was this
answer
helpful?
Yes
No
Monday, October 29th, 2018 AT 6:56 PM (Merged)
Tiny
BMRFIXIT
  • MECHANIC
  • 19,053 POSTS
TIMING BELT
Removal
Disconnect negative battery cable. Loosen power steering lock bolts and nuts, and remove tension from power steering and air conditioning compressor drive belt. Remove power steering and air conditioning drive belt.
Loosen and remove generator bolts. Remove water pump pulley. Remove crankshaft pulley and timing belt guide plate. Remove upper and lower timing belt covers.
Turn crankshaft so that timing mark on crankshaft sprocket is aligned with timing mark on engine.
Ensure "I" mark on intake camshaft sprocket is aligned with mark on cylinder head cover, and "E" mark on exhaust camshaft sprocket is aligned with mark on cylinder head cover. See Fig. 4.
CAUTION:DO NOT move camshaft or crankshaft once timing marks have been correctly positioned.

Loosen tensioner pulley lock bolt.

While protecting timing belt with a rag, remove tensioner pulley. If belt is to be reused, mark direction of timing belt rotation for proper reinstallation. Remove timing belt.

Installation
Install tensioner pulley. Pull tensioner pulley to its furthest point, and tighten lock bolt. Check that timing mark on crankshaft sprocket is aligned with timing mark on engine.
Ensure that camshaft sprockets are aligned with marks on cylinder head cover.
Install timing belt onto crankshaft sprocket first, then idler pulley, exhaust camshaft sprocket, intake camshaft sprocket, and finally, tensioner pulley.
Ensure there is no looseness in belt between idler pulley and exhaust camshaft sprocket, or between intake and exhaust camshaft sprockets.
Loosen tensioner pulley lock bolt, and allow tensioner spring to apply tension to timing belt. DO NOT add additional tension. Tighten tensioner pulley lock bolt to specification.

Rotate crankshaft two full turns (clockwise only), and align timing mark on crankshaft sprocket with timing mark on engine block.
Ensure that marks on camshaft sprockets align with marks on cylinder head cover.
If marks do not align, remove timing belt and repeat process from tensioner installation.
Measure timing belt deflection by applying moderate pressure midway between camshaft sprockets. If deflection is not 0.39-0.50" (11-13 mm) with 22 lbs. (10 kg) of force applied, repeat installation process from tensioner installation.
Install lower and upper timing belt covers, timing belt guide plate and crankshaft pulley. Install water pump pulley. Tighten all bolts to specification.

Install generator belt and adjust tension. Install power steering and air conditioning drive belt, and adjust tension. Connect negative battery cable.
Let me know
Was this
answer
helpful?
Yes
No
Monday, October 29th, 2018 AT 6:56 PM (Merged)
Tiny
NE14YAH
  • MEMBER
  • 1 POST
  • 2004 KIA RIO
  • 4 CYL
  • FWD
  • AUTOMATIC
  • 74,000 MILES
My 2004 Kia Rio with 74k broke the timing belt and broke piston and valves in #4 cylinder. Sent head to maching shop for repairs and we replaced piston and rod assembly. We are now assembling and head is on the block. My question is, the cam pulleys were removed from the cams previously for the head repairs and now we have no idea how the cam pulleys orient to the cam shafts since the pins on the cam shafts can install one of two different ways being the pulleys have a slot across the center rather than just one hole. The head was installed with all pistons level in the cylinders, 90 degrees after TDC. How do we install and time properly? Are there some detailed diagrams and pictures with instructions that you can direct me to? I have tried kiatechinfo with no help in this area and have been unsuccessful with locating information on the net about this subject. I think if I had some indications on what I should look for concerning the orientation of the cam lobes for the #1 cylinder in relation to TDC I will be able to proceed with com confidence, but I certainly don't want to destroy the valves being it is an interference engine. Any help that you can give in this area would be much appreciated.
Was this
answer
helpful?
Yes
No
Monday, October 29th, 2018 AT 6:56 PM (Merged)
Tiny
JACOBANDNICKOLAS
  • MECHANIC
  • 107,922 POSTS
Refer to the belt routing diagrams site on this page. As far as TDC, when the #1 pistion is at TDC, the cam should be the farthest away from opening any valves as it can.
Was this
answer
helpful?
Yes
No
Monday, October 29th, 2018 AT 6:56 PM (Merged)
Tiny
JESSER007
  • MEMBER
  • 1 POST
  • 2004 KIA RIO
  • 4 CYL
  • 2WD
  • AUTOMATIC
  • 74,000 MILES
Timing marks on 2004 kia rio on cam shaft
Was this
answer
helpful?
Yes
No
Monday, October 29th, 2018 AT 6:56 PM (Merged)
Tiny
WRENCHTECH
  • MECHANIC
  • 20,758 POSTS
https://www.2carpros.com/images/external/110792094.gif
Was this
answer
helpful?
Yes
No
Monday, October 29th, 2018 AT 6:56 PM (Merged)
Tiny
KG6TZE
  • MEMBER
  • 2 POSTS
  • 2009 KIA RIO
  • 67,885 MILES
Im wondering if the timing belt diagram and instructions for my 2009 Kia Rio is the same as all the other diagrams and instructions from differentit years, for changing it.
Was this
answer
helpful?
Yes
No
Monday, October 29th, 2018 AT 6:56 PM (Merged)
Tiny
RASMATAZ
  • MECHANIC
  • 75,992 POSTS
For what liter engine?
Was this
answer
helpful?
Yes
No
Monday, October 29th, 2018 AT 6:56 PM (Merged)
Tiny
KG6TZE
  • MEMBER
  • 2 POSTS
1.6 dohc
Was this
answer
helpful?
Yes
No
Monday, October 29th, 2018 AT 6:56 PM (Merged)
Tiny
RASMATAZ
  • MECHANIC
  • 75,992 POSTS
Put piston no.1 on its compression stroke/TDC then align cam and crank sprockets markings indicated it the repair manual-
Was this
answer
helpful?
Yes
No
+2
Monday, October 29th, 2018 AT 6:56 PM (Merged)
Tiny
TMYERS1
  • MEMBER
  • 1 POST
  • 2003 KIA RIO
Engine Mechanical problem
2003 Kia Rio 4 cyl Front Wheel Drive Automatic

Which cam timing marks do I use? Intake or exhaust Do I use the same timing mark on each cam and where do they point to? Thank you
Was this
answer
helpful?
Yes
No
Monday, October 29th, 2018 AT 6:56 PM (Merged)
Tiny
JACOBANDNICKOLAS
  • MECHANIC
  • 107,922 POSTS
Refer to the belt routing guides listed on this site.
Was this
answer
helpful?
Yes
No
-1
Monday, October 29th, 2018 AT 6:56 PM (Merged)
Tiny
RICKYSAWYER
  • MEMBER
  • 1 POST
  • 2001 KIA RIO
Engine Mechanical problem
2001 Kia Rio 4 cyl Front Wheel Drive Automatic

Where can I find a diagram for a ignition timing belt replacement indicating timing belt marks?

Thank you.
Was this
answer
helpful?
Yes
No
Monday, October 29th, 2018 AT 6:56 PM (Merged)

Please login or register to post a reply.

Sponsored links