Hi and thanks for using 2CarPros. Com.
I attached the directions for replacing the timing belt. The idler pulley information is included in the directions. If this is not what you needed, please let me know specifically what idler you are referring to.
_______________________________
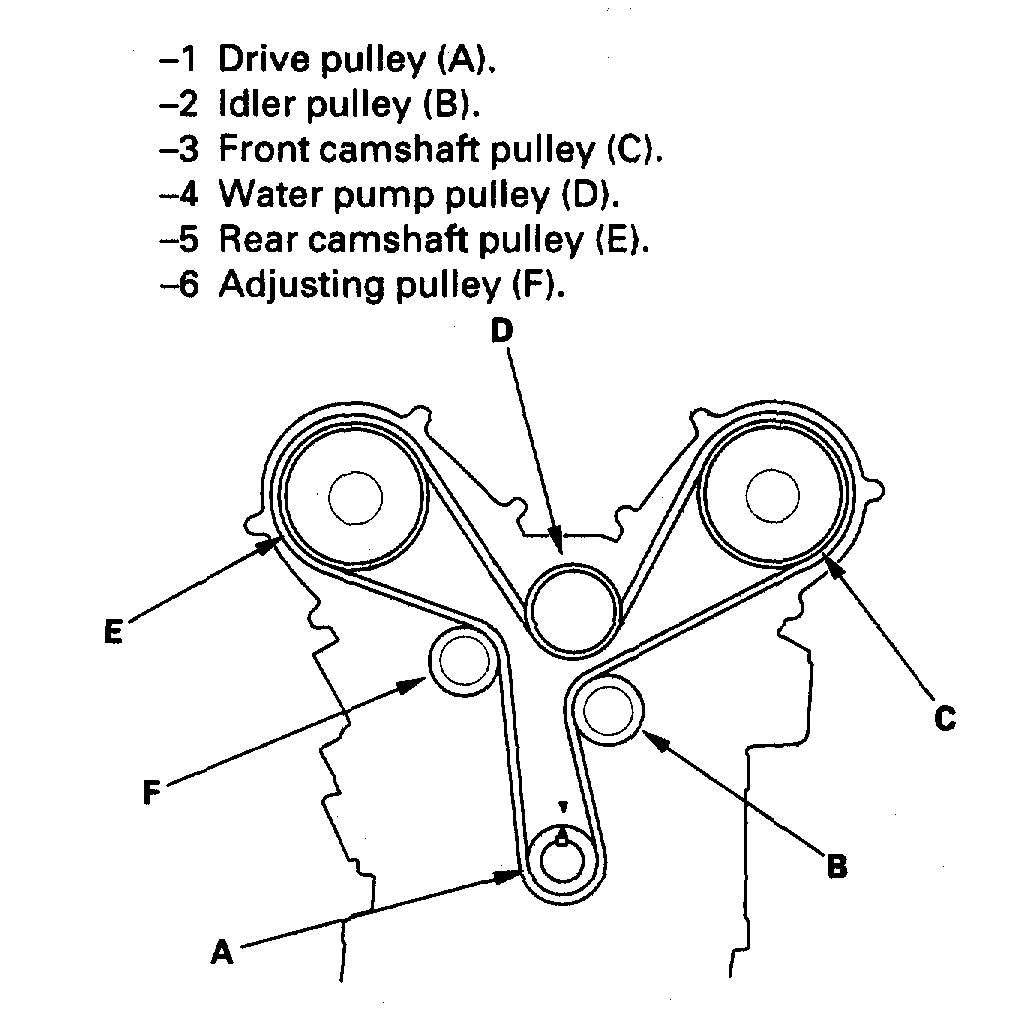
Timing Belt Removal
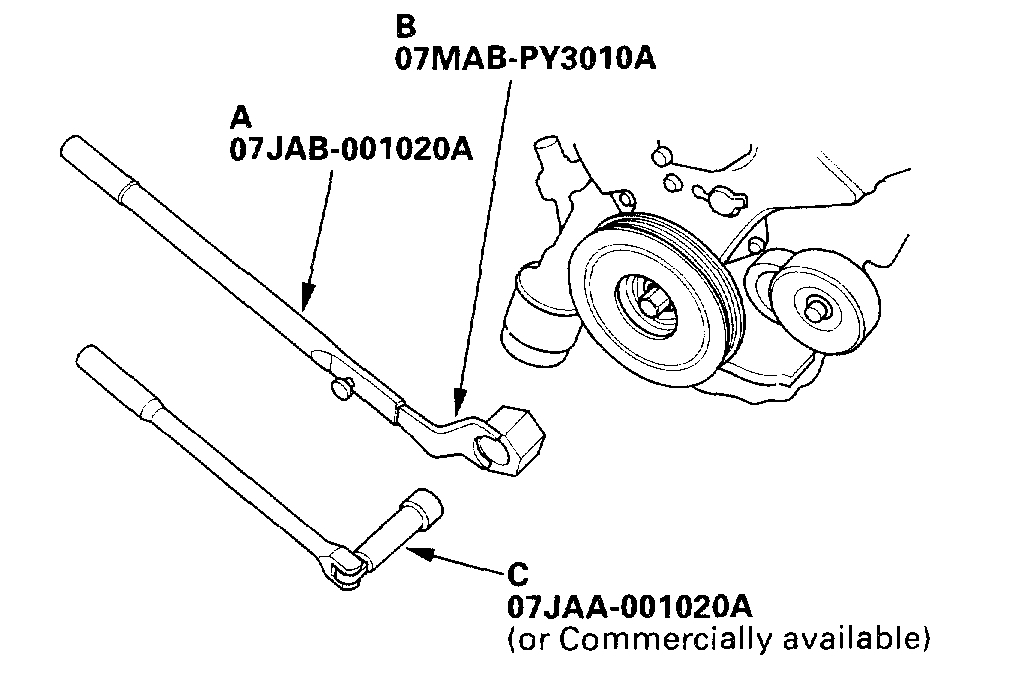
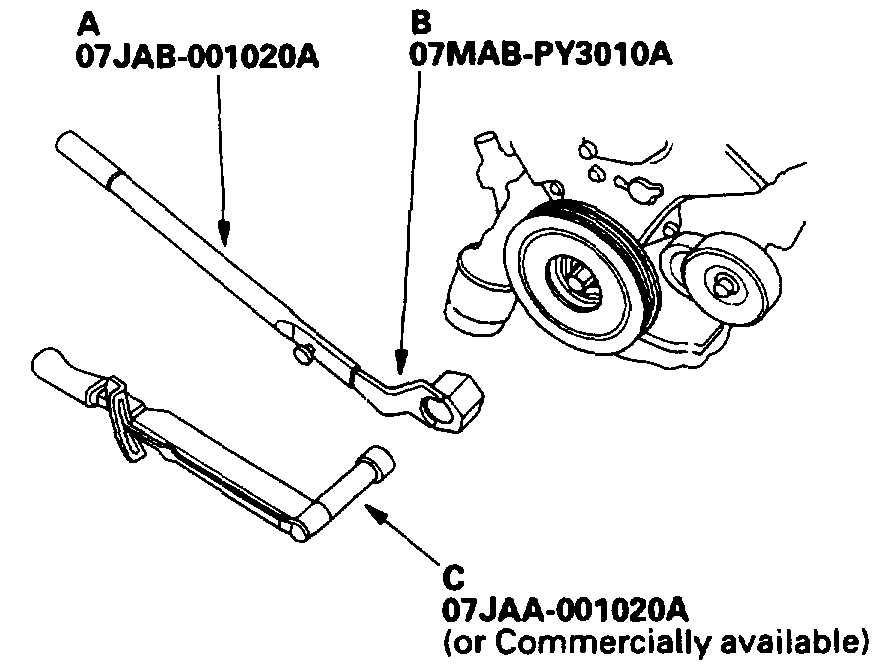
Special Tools Required
- Holder handle 07JAB-001020A
- Holder attachment, 50 mm, offset 07MAB-PY3010A
- Socket, 19 mm 07JAA-001020A or a commercially available 19 mm socket
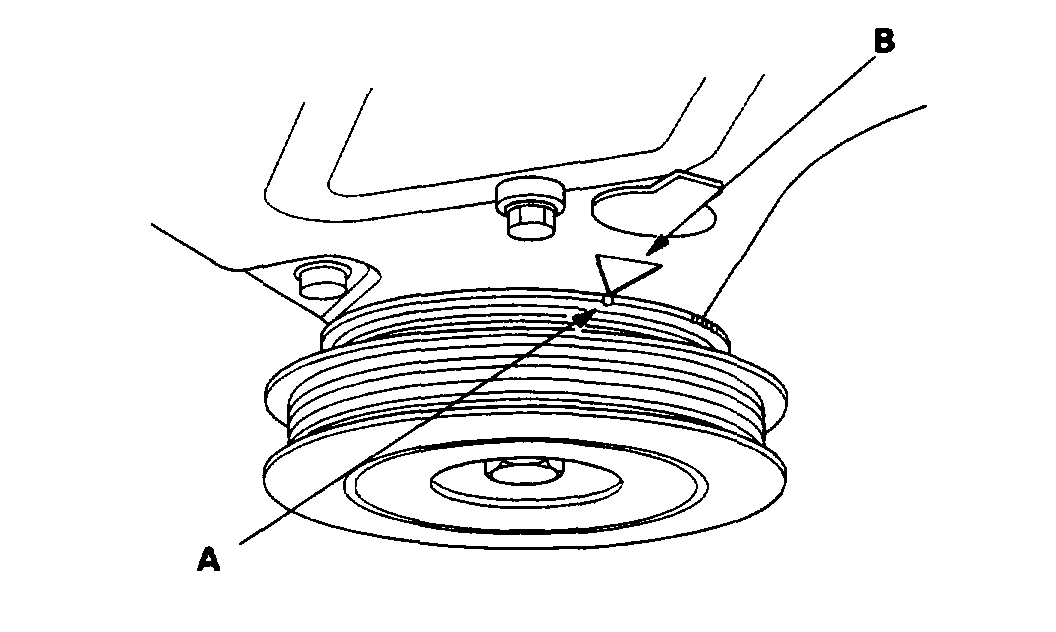
1. Turn the crankshaft so its white mark (A), lines up with the pointer (B).
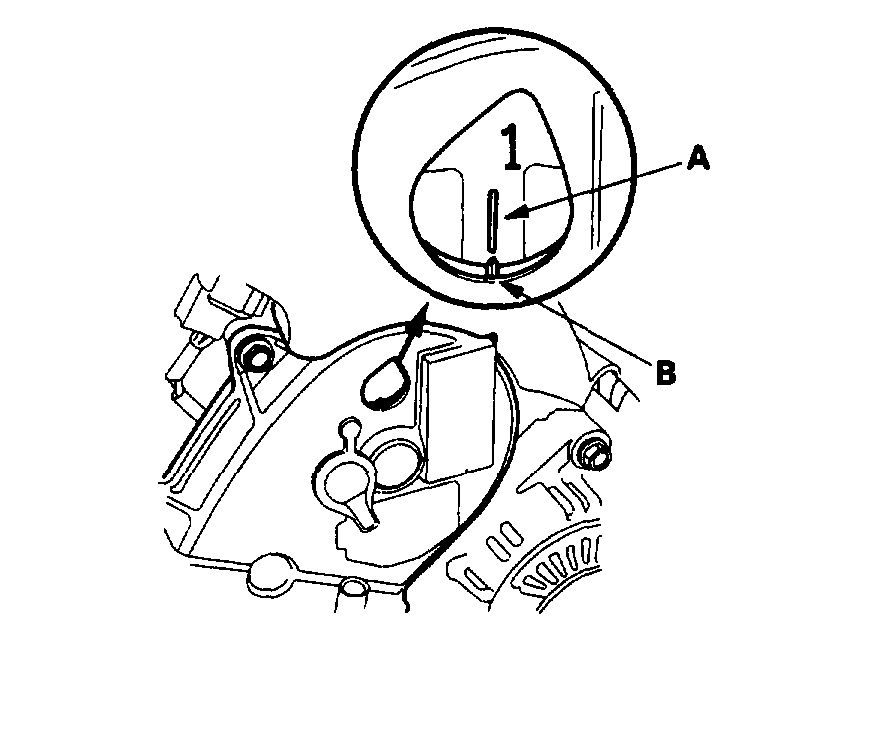
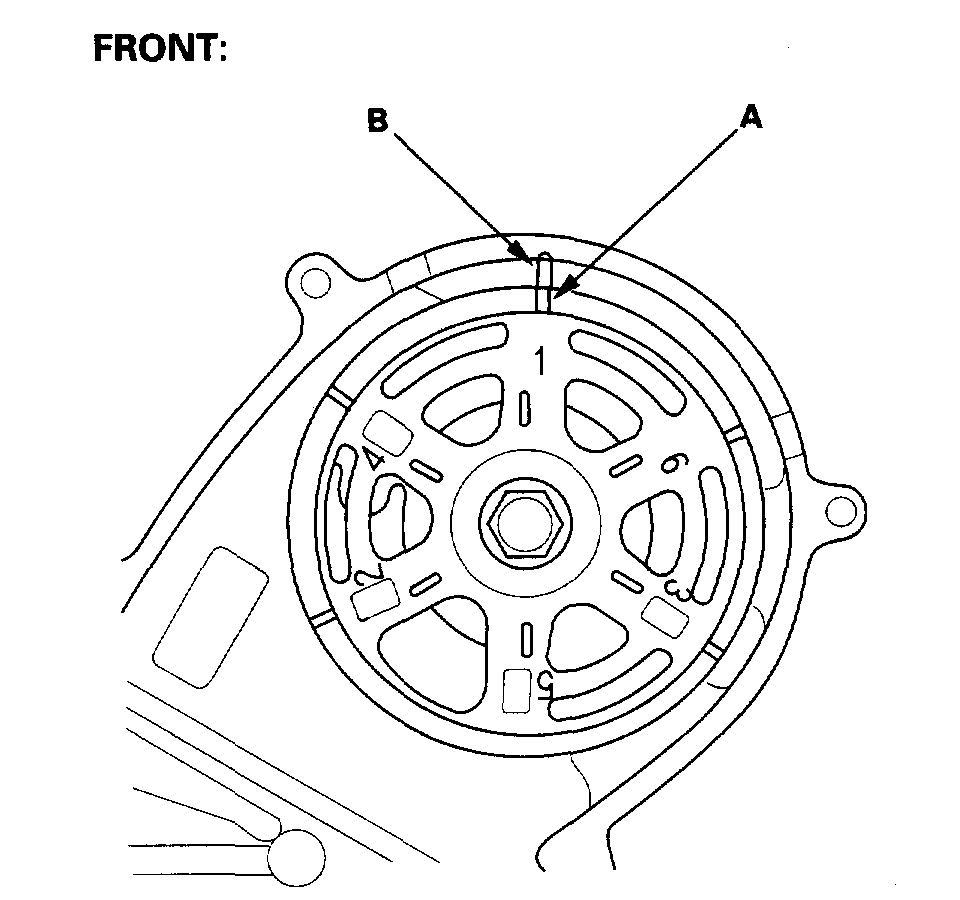
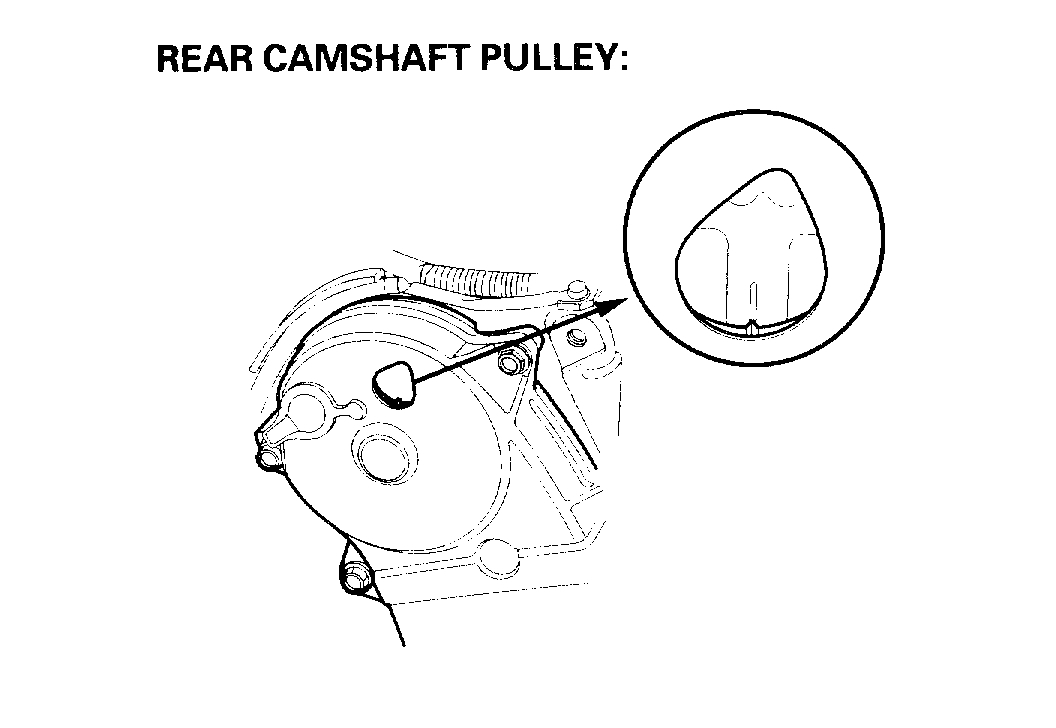
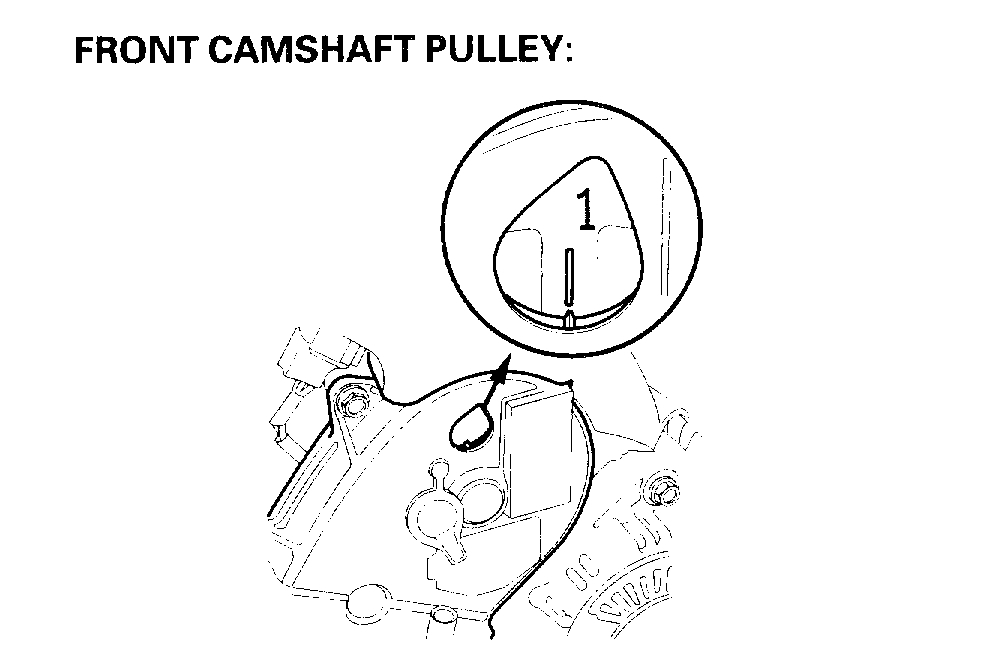
2. Check that the No. 1 piston TDC mark (A) on the front camshaft pulley and the pointer (B) on the front upper cover are aligned.
3. Remove the front tires/wheels.
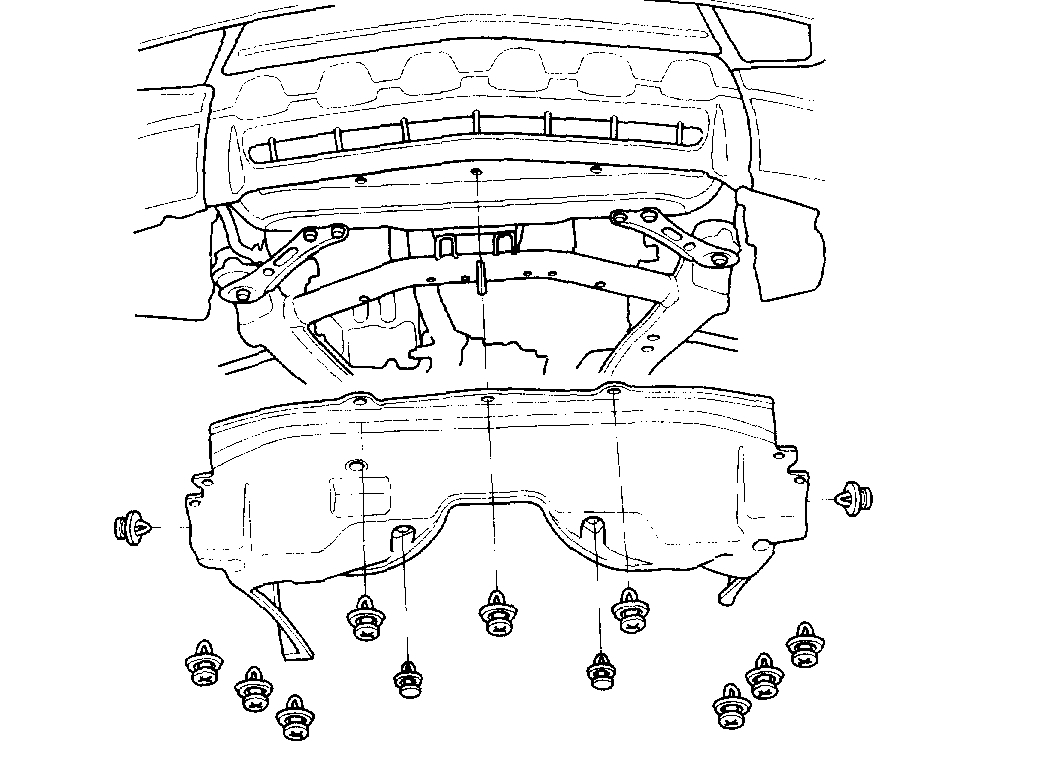
4. Remove the splash shield.
5. Use the belt tension release arm (A) to move the auto-tensioner (B), then remove the alternator belt (C).
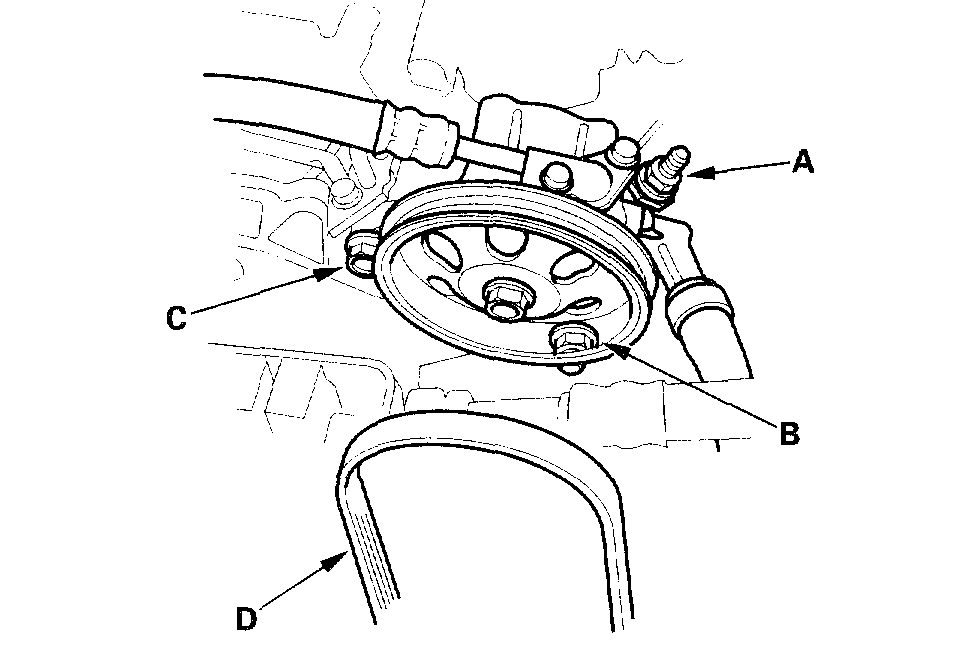
6. Loosen the adjusting nut (A), locknut (B), and mounting bolt (C), then remove the Power Steering (P/S) pump belt (D).
7. Support the engine with a jack and wood block under the oil pan.
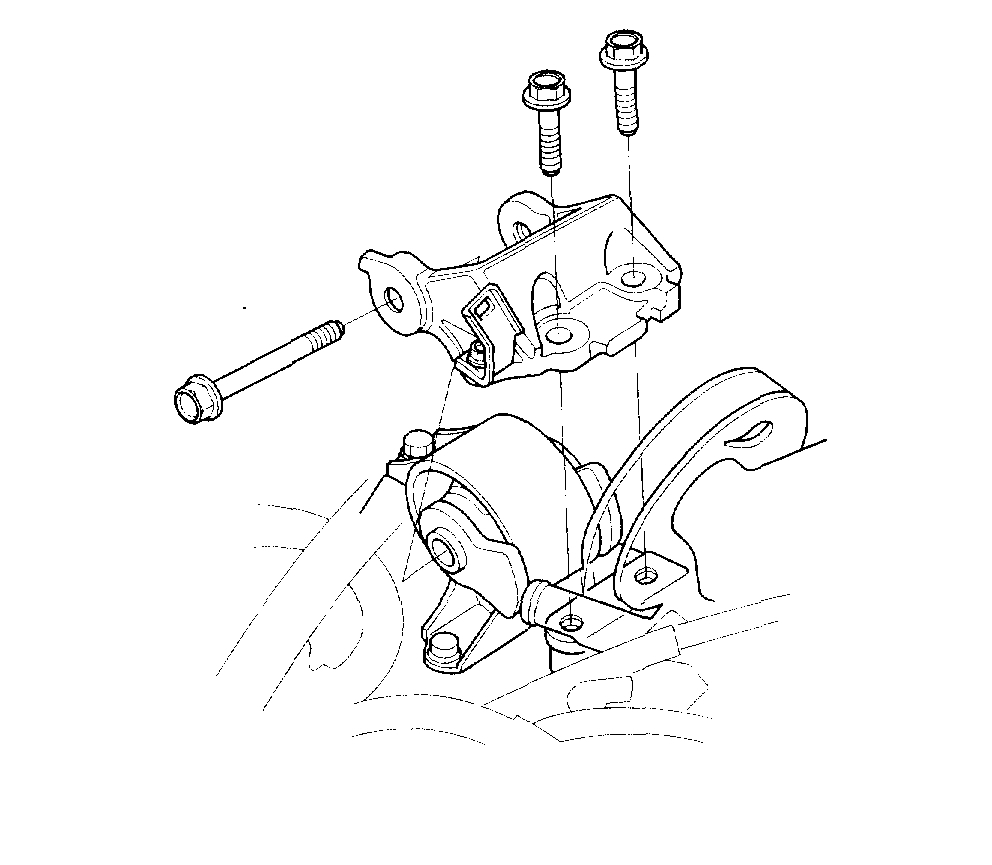
8. Remove the side engine mount bracket.
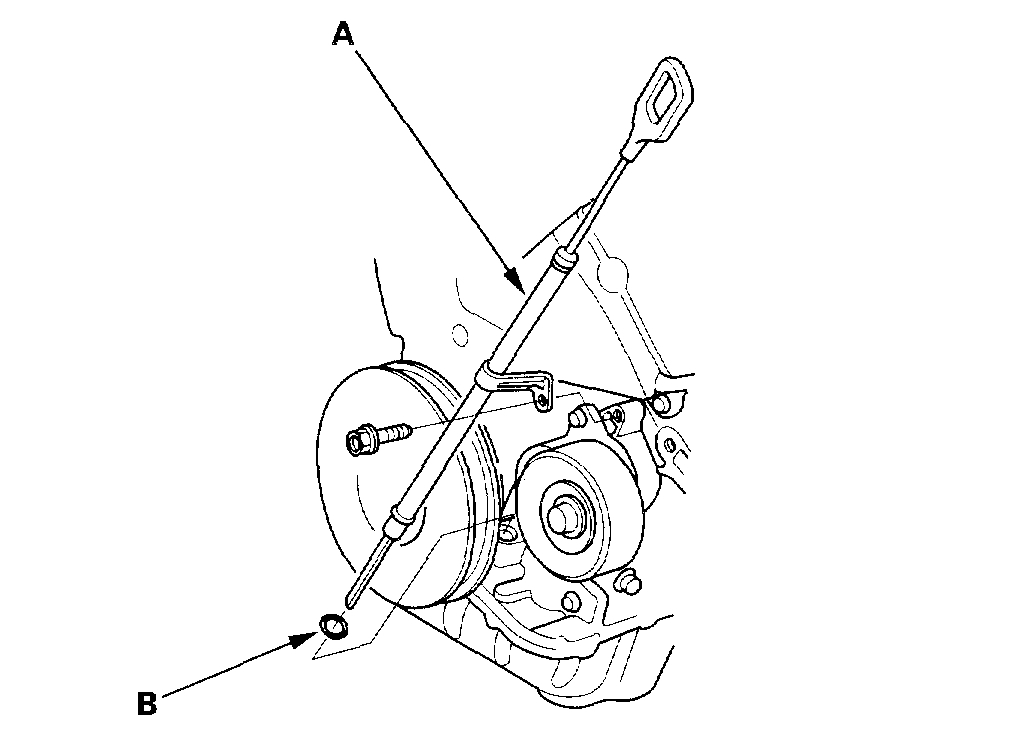
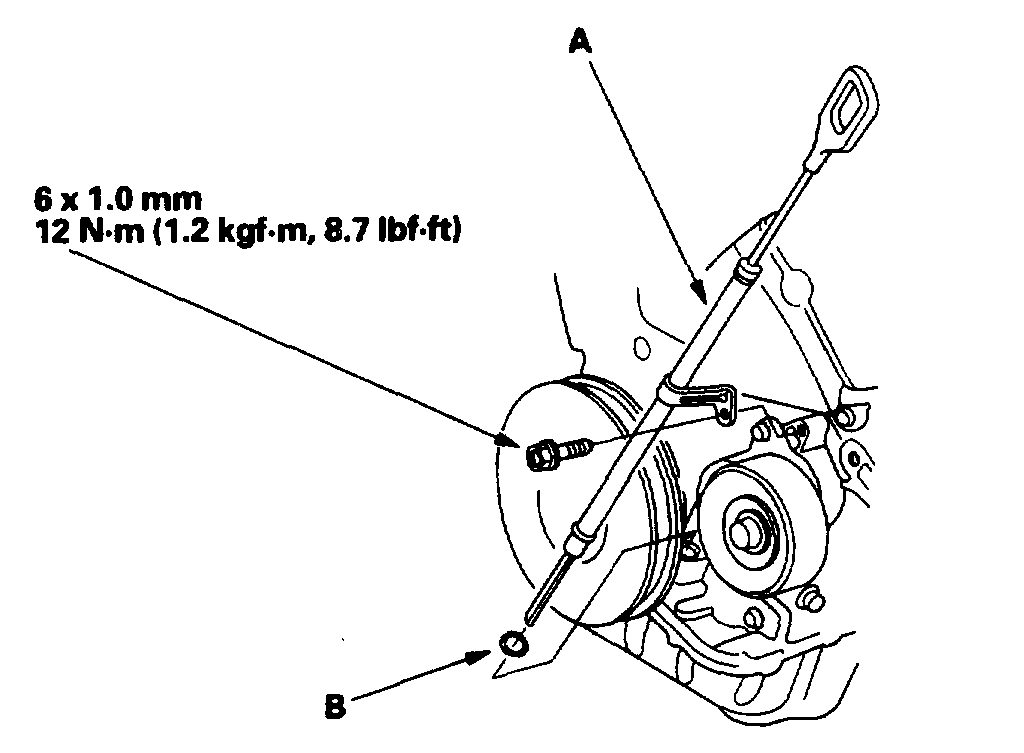
9. Remove the dipstick and tube (A); discard the O-ring (B).
10. Hold the pulley with the holder handle (A) and holder attachment (B).
11. Remove the bolt with a heavy duty 19 mm socket (C) and breaker bar.
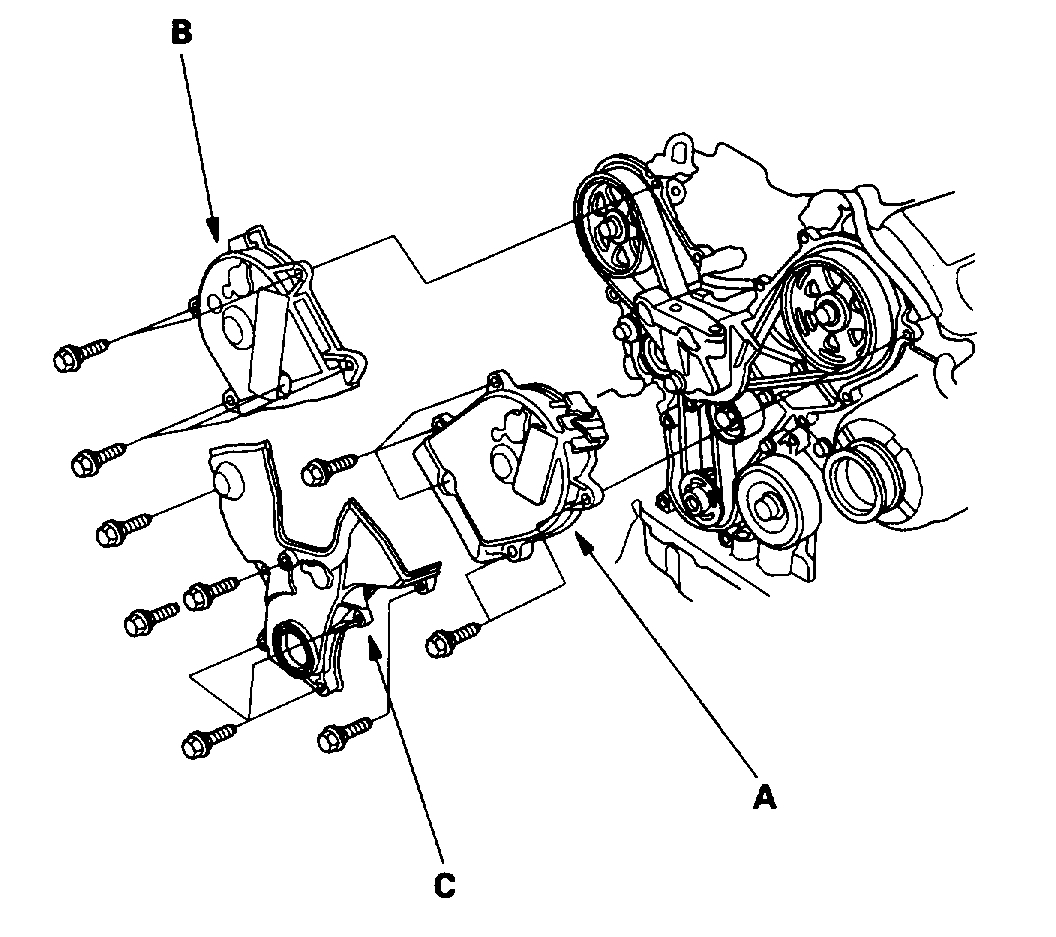
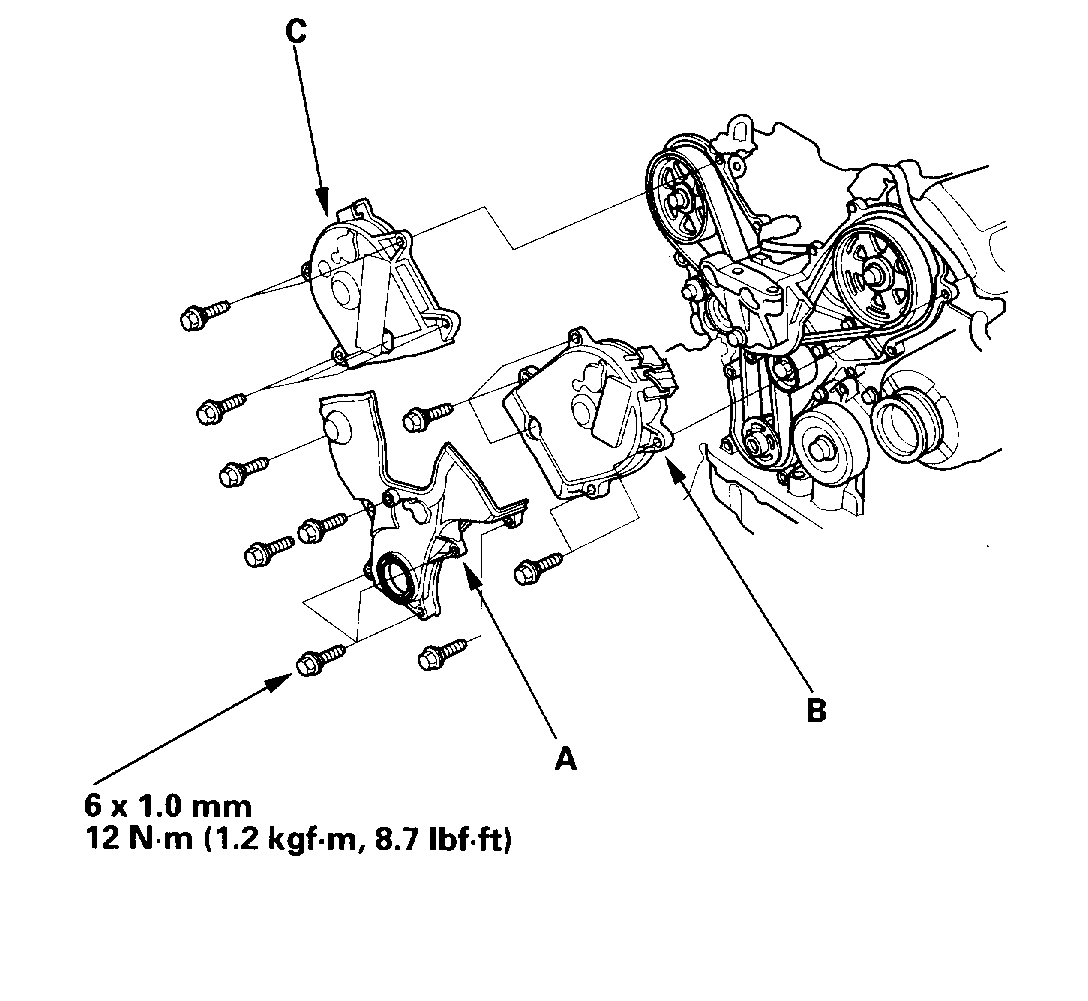
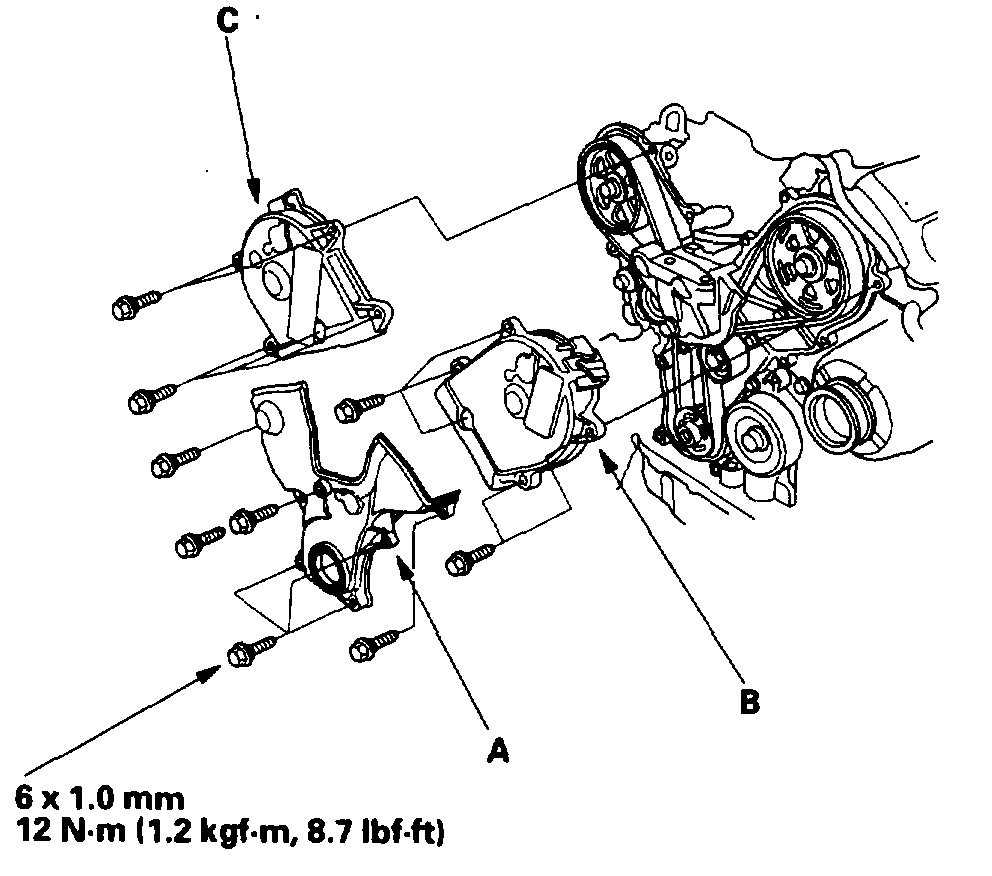
12. Remove the front upper cover (A), rear upper cover (B), and lower cover (C).
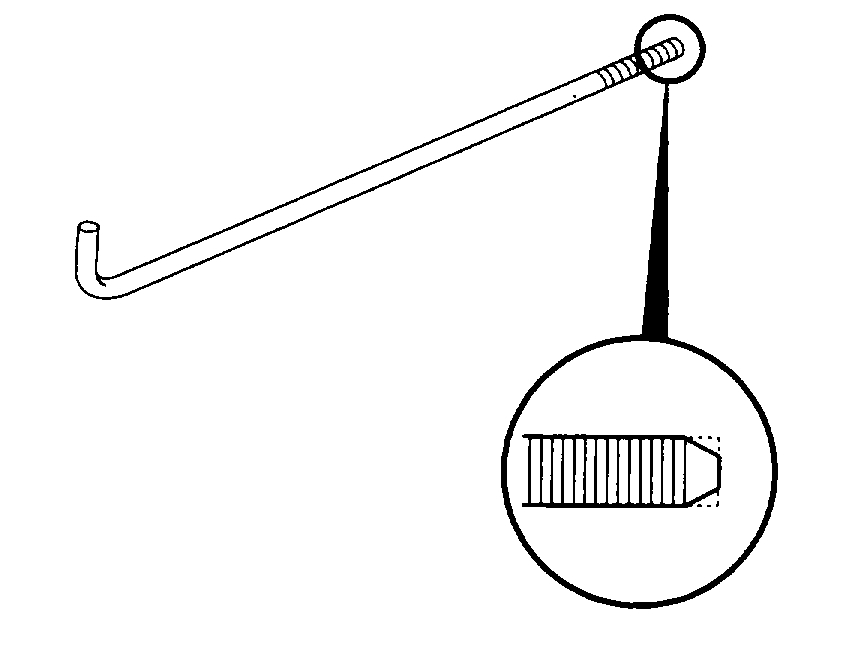
13. Remove one of the battery clamp bolts from the battery tray, and grind the end of it.
14. Screw the battery clamp bolt in to hold the timing belt adjuster in its current position. Tighten it by hand, do not use a wrench.
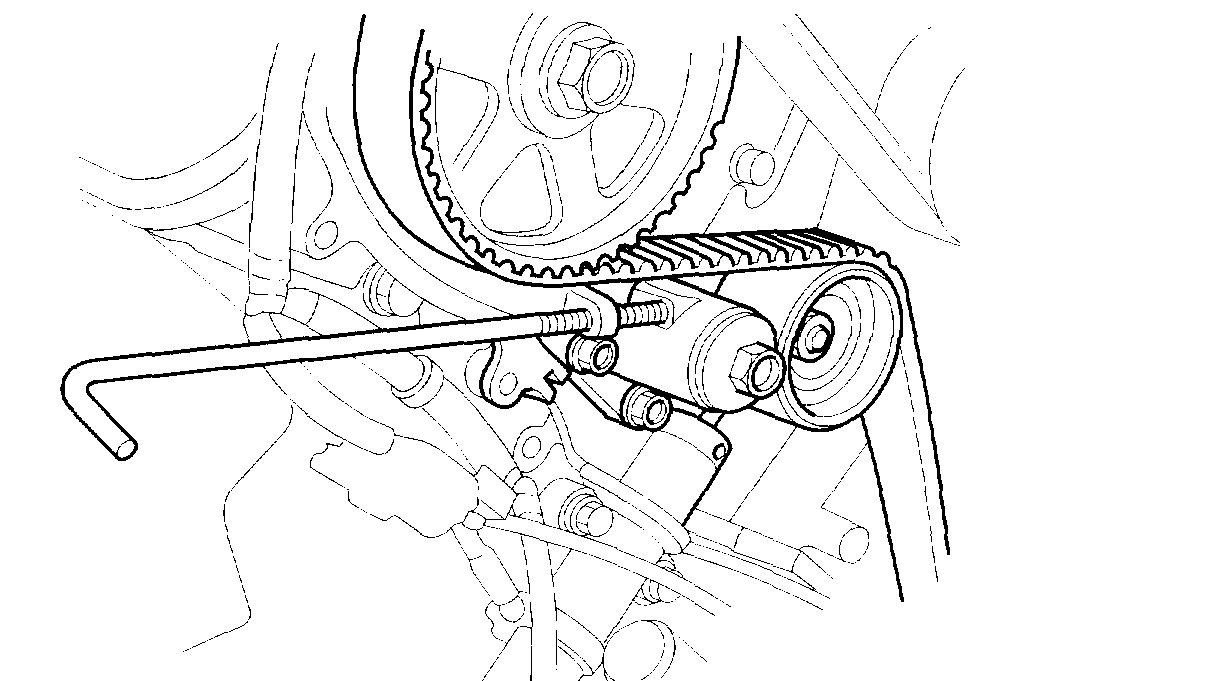
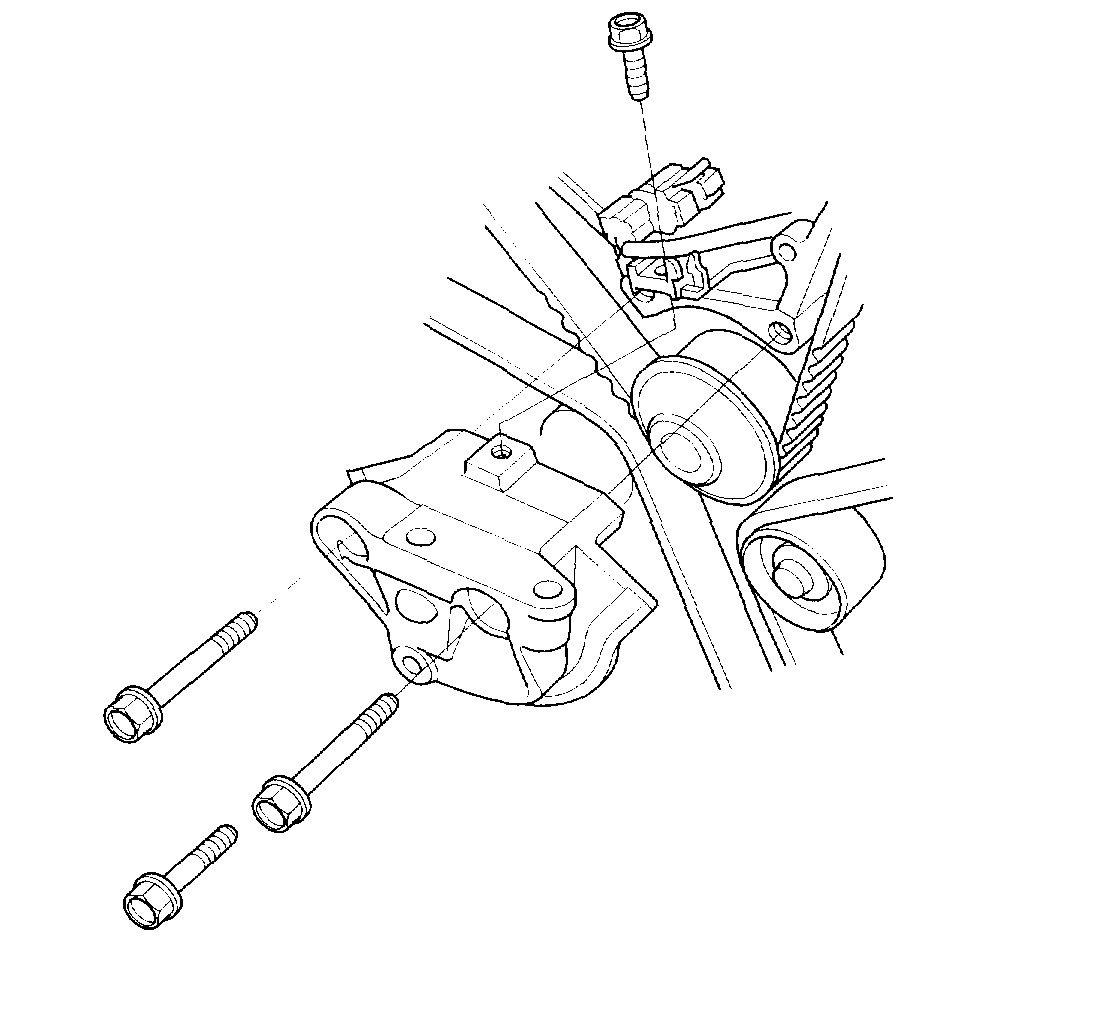
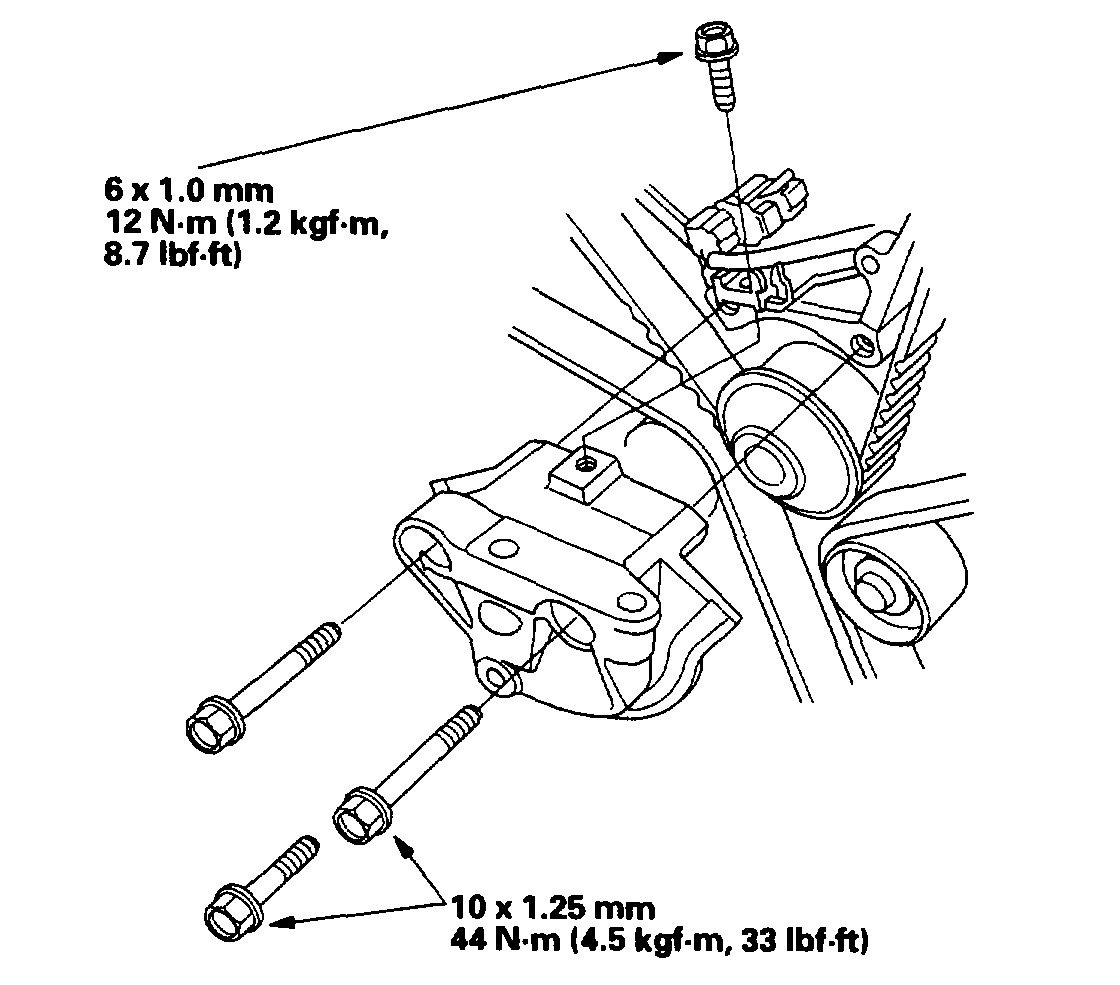
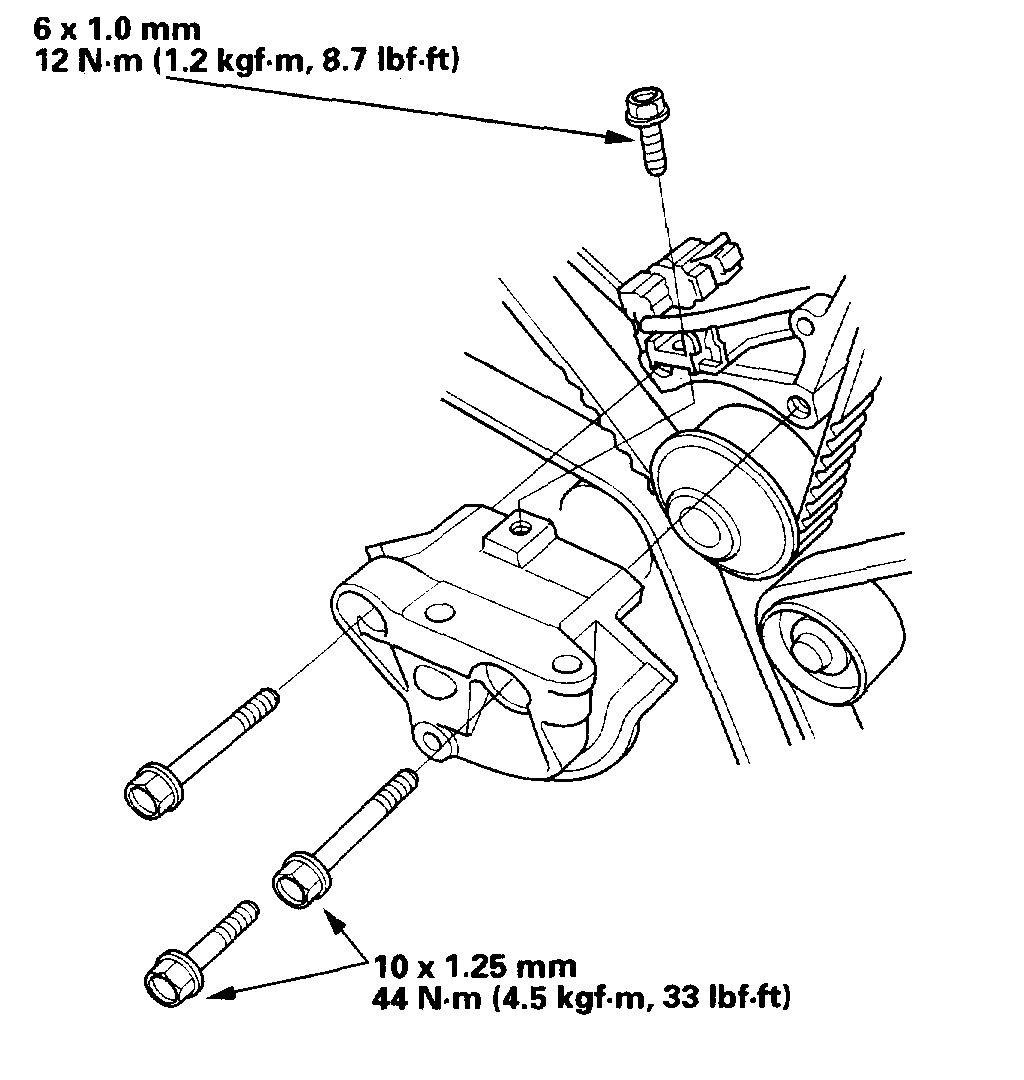
15. Remove the engine mount bracket.
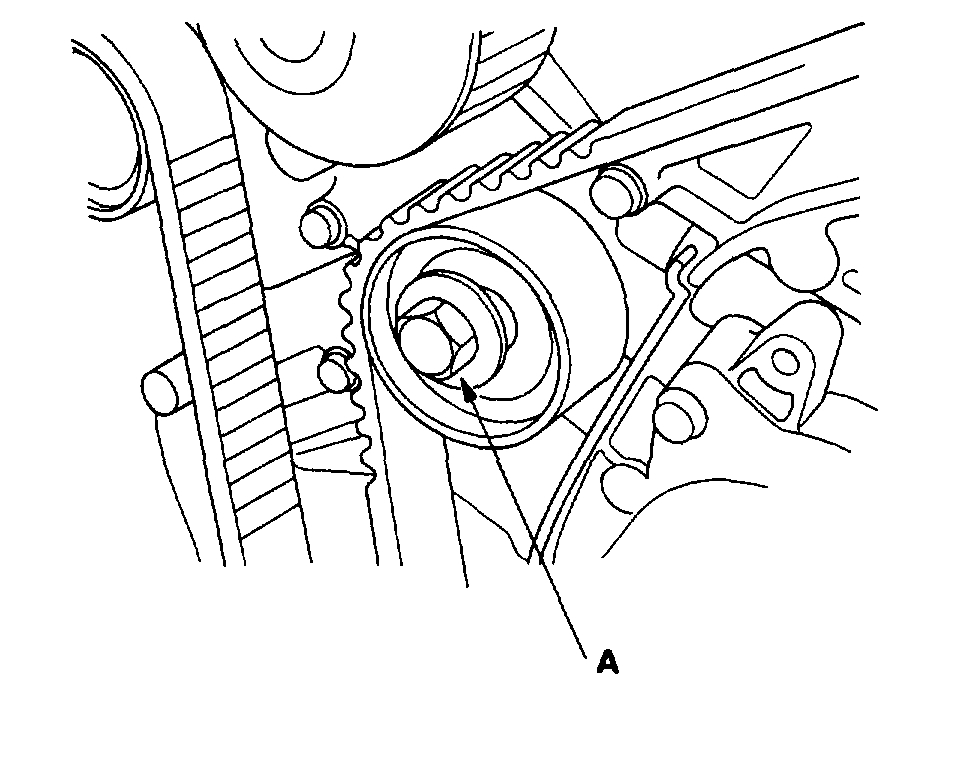
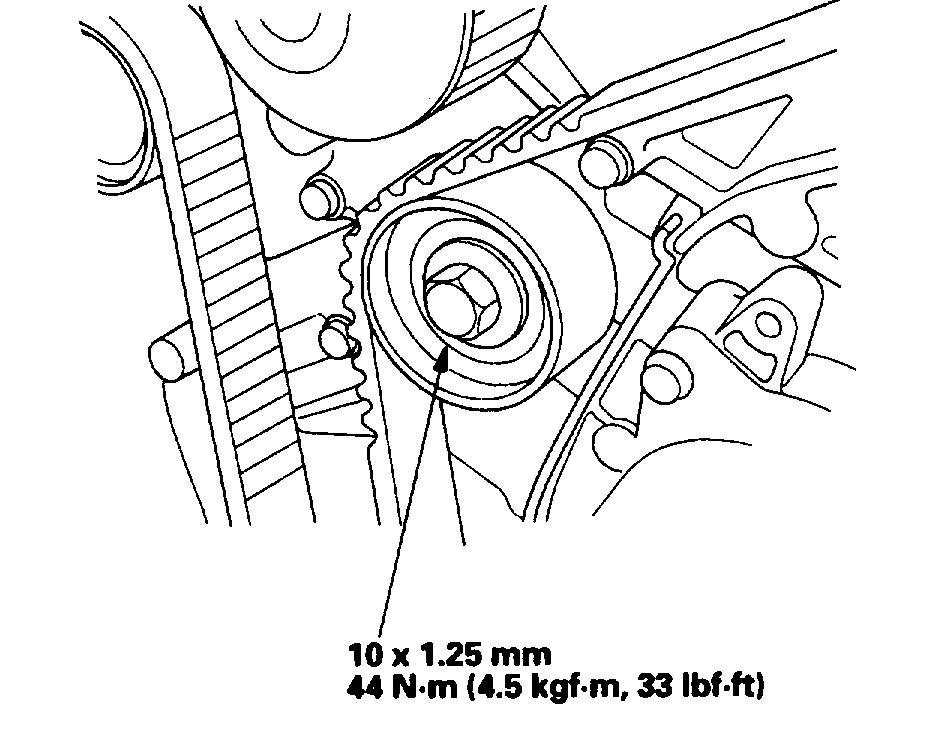
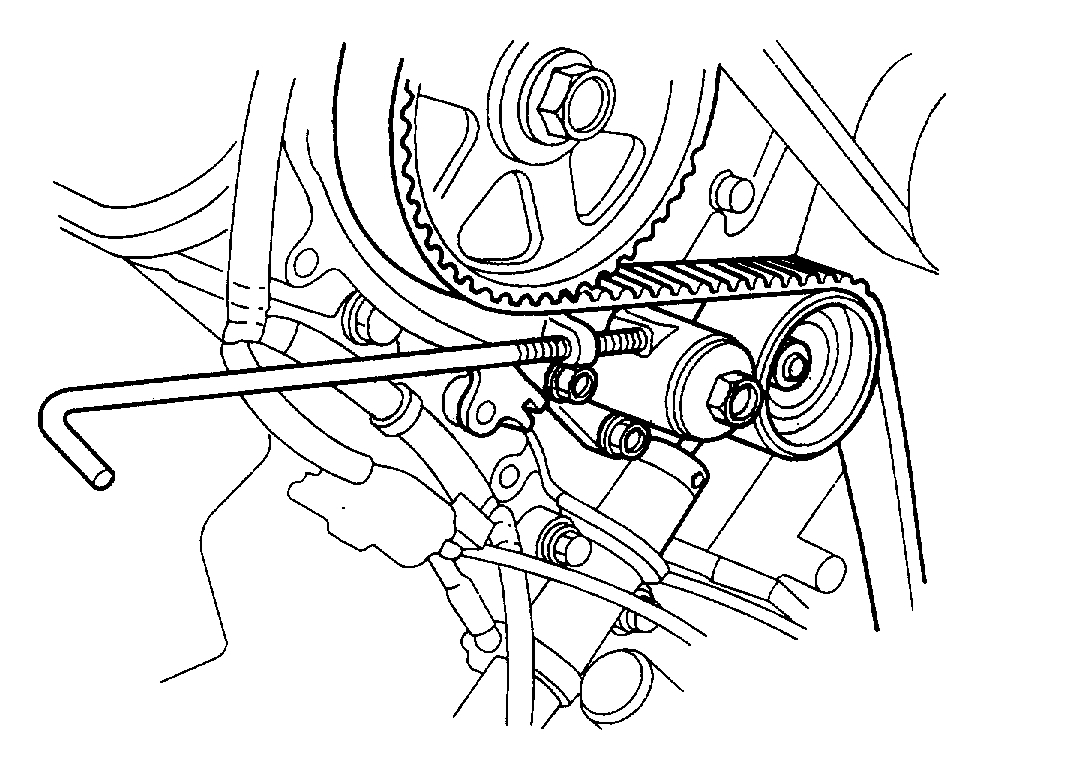
16. Loosen the idler pulley bolt (A) about five or six turns, then remove the timing belt.
Timing Belt Installation
NOTE: The following procedure is for installing a new timing belt. If you are installing a used timing belt, refer to the next procedure.
New Belt
1. Clean the timing belt pulleys, and the upper and lower covers.
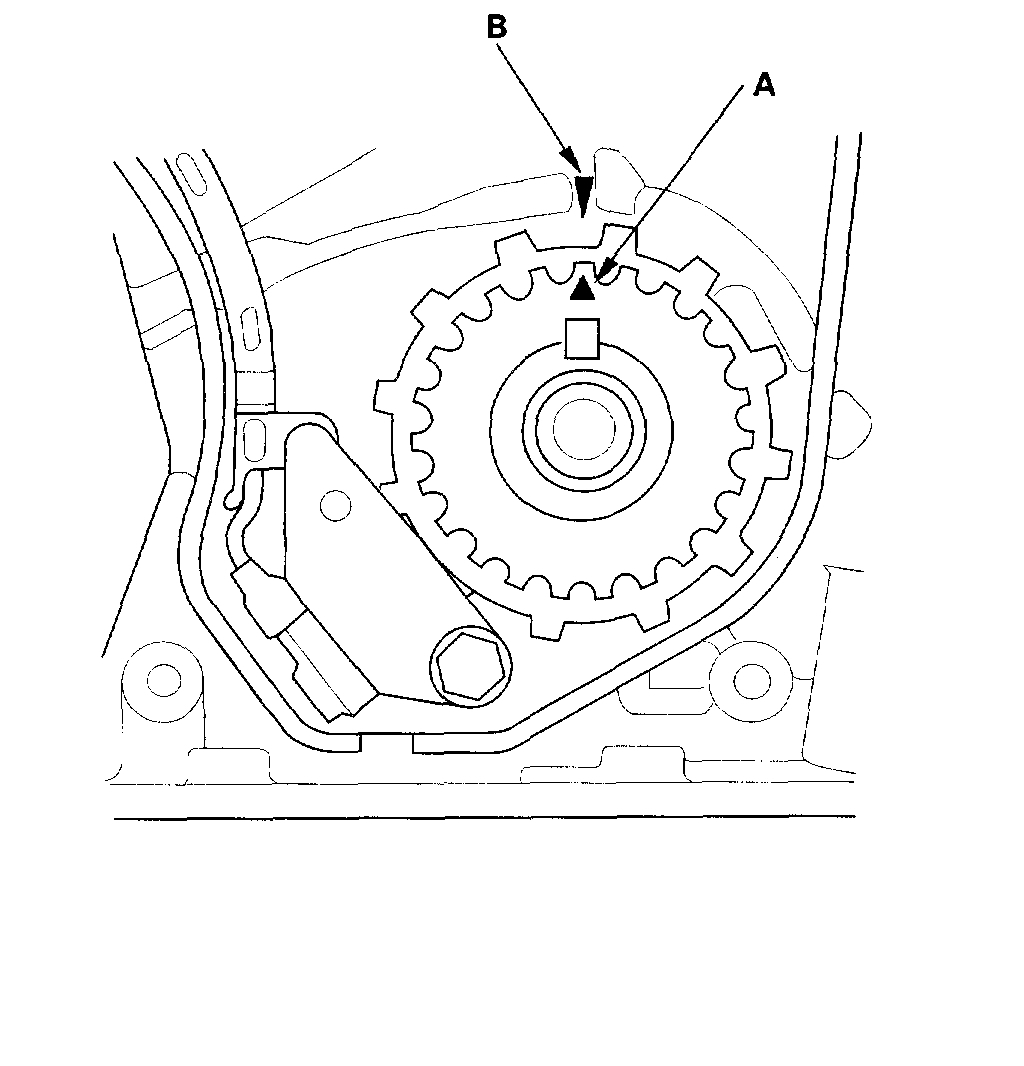
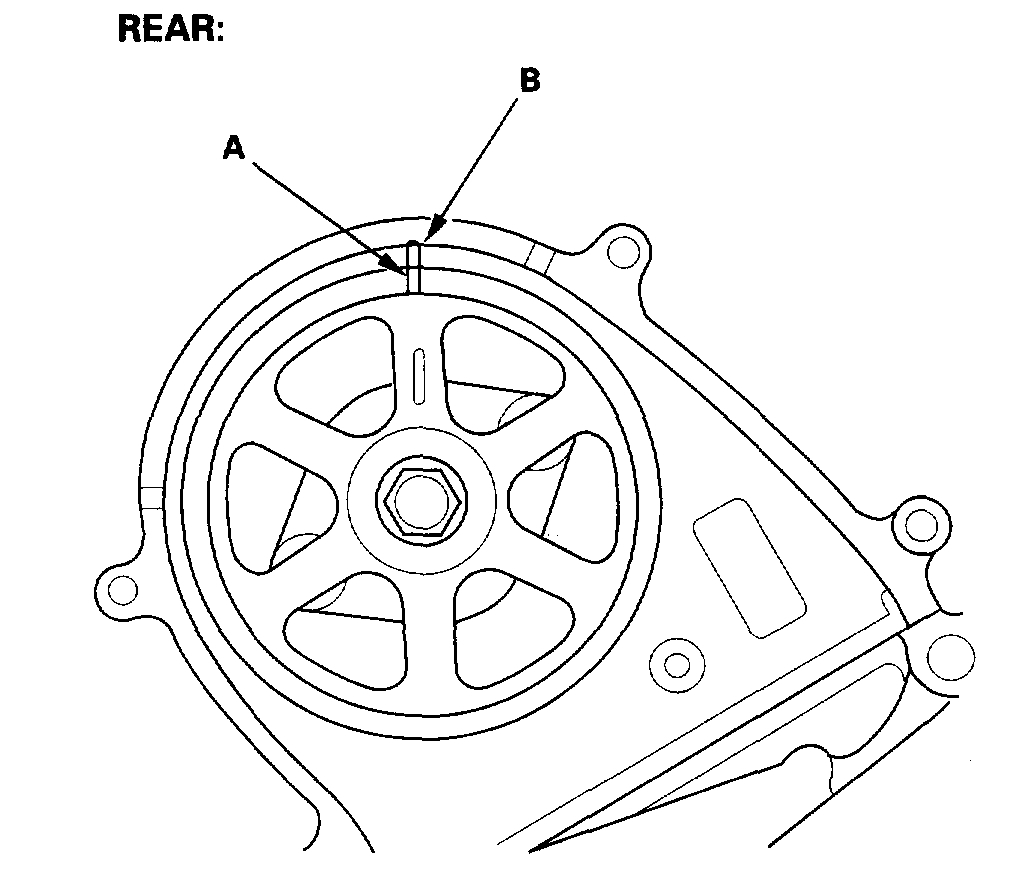
2. Set the timing belt drive pulley to TDC by aligning the TDC mark (A) on the tooth of the timing belt drive pulley with the pointer (B) on the oil pump.
3. Set the camshaft pulleys to TDC by aligning the TDC marks (A) on the camshaft pulleys with the pointers (B) on the back covers.
4. Remove the battery clamp bolt from the back cover.
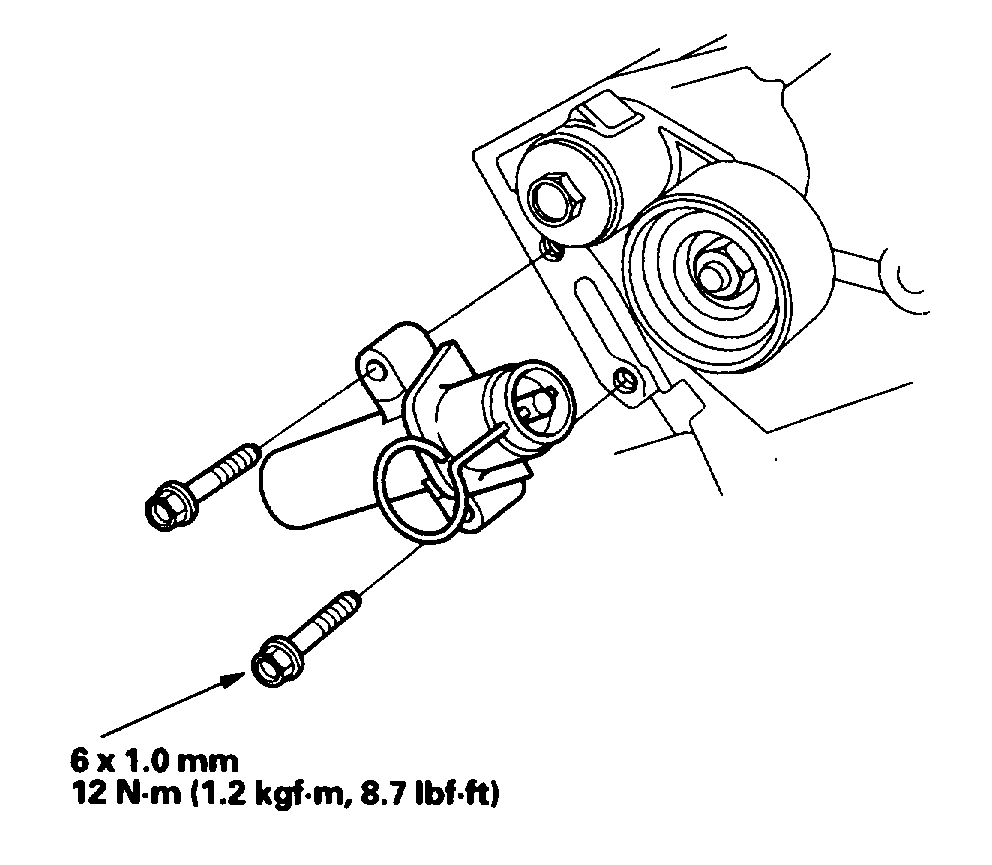
5. Remove the auto-tensioner.
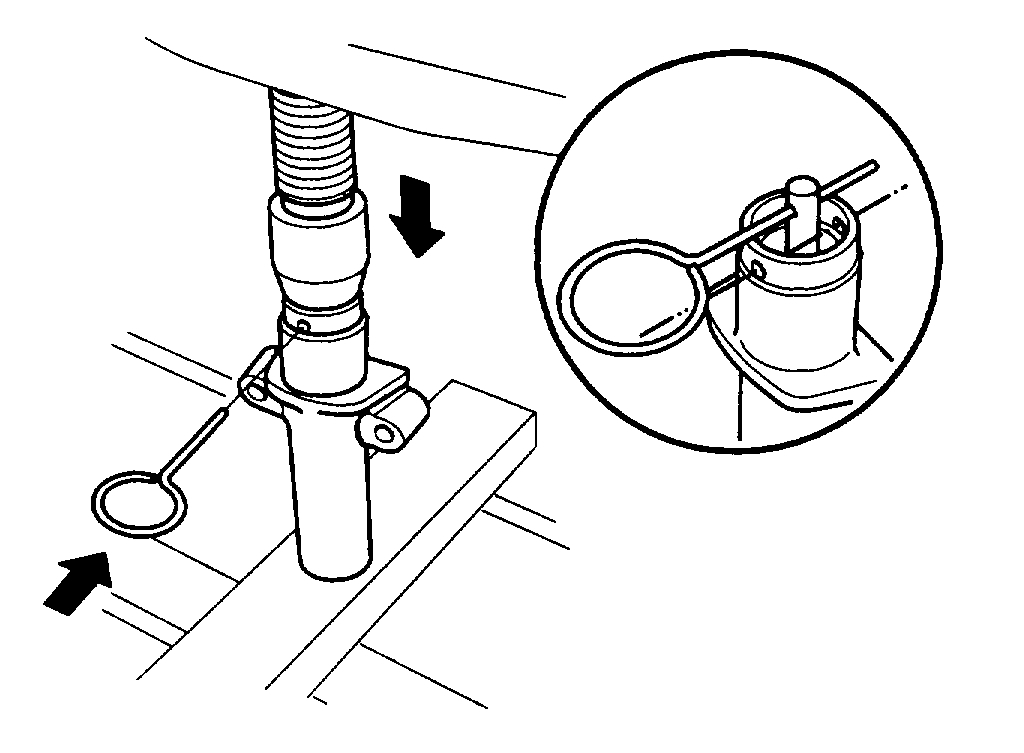
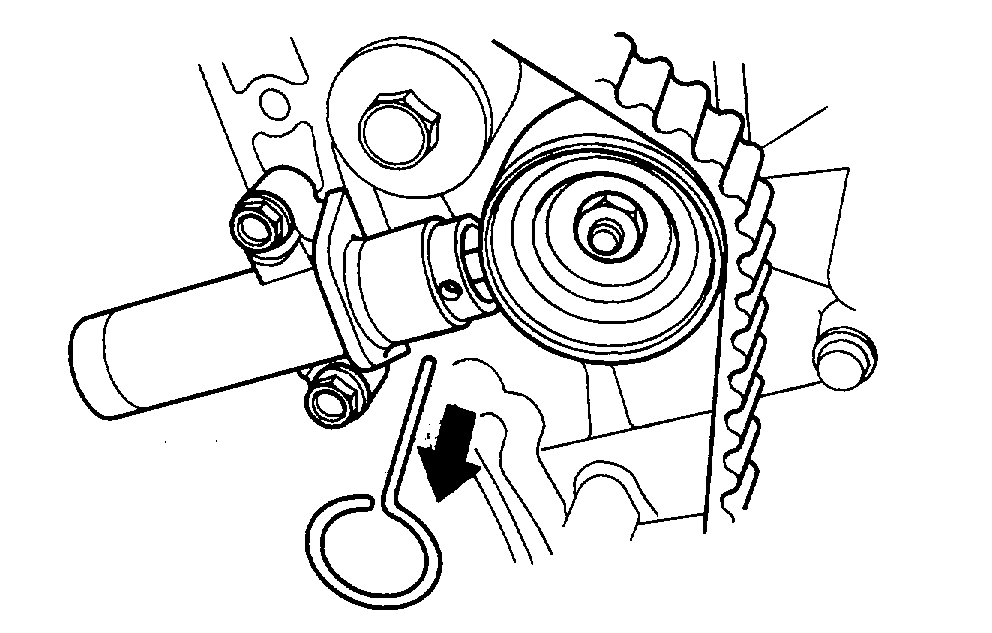
6. Align the holes on the rod and housing of the auto-tensioner.
7. Use a hydraulic press to slowly compress the auto tensioner. Insert a 2.0 mm (0.08 inch) pin through the housing and the rod.
NOTE: The compression pressure should not exceed 9,800 N (1,000 kgf, 2,200 lbs).
8. Install the auto-tensioner.
NOTE: Make sure the pin stays in place.
9. Install the timing belt in a counterclockwise sequence starting with the drive pulley.
10. Tighten the idler pulley bolt.
11. Remove the pin from the auto-tensioner.
12. Install the engine mount bracket.
13. Install the lower cover (A), front upper cover (B), and rear upper cover (C).
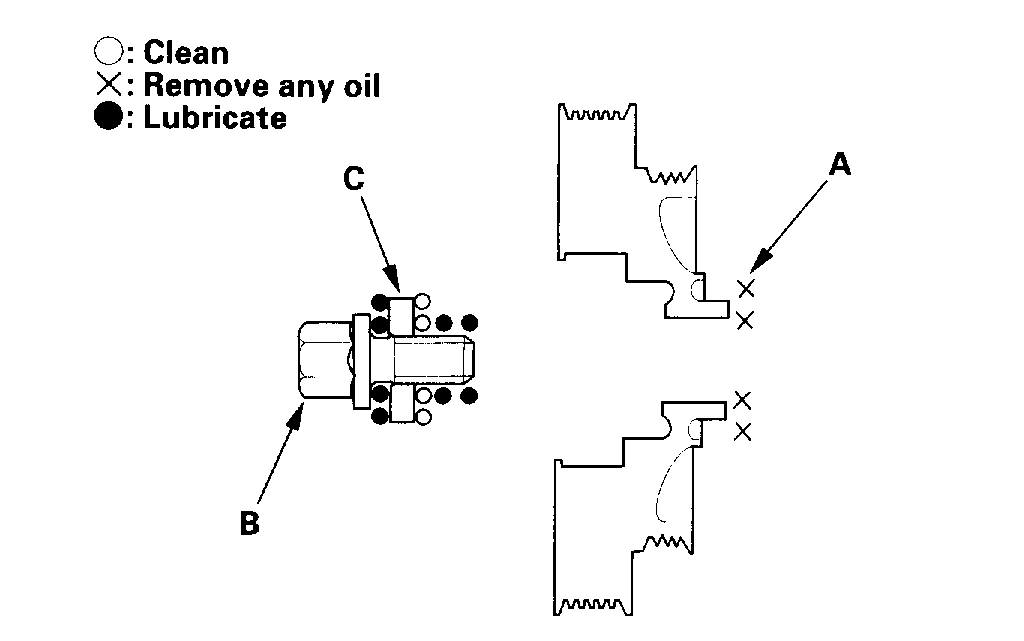
14. Clean all oil off the inside face (A) of the crankshaft pulley, and apply lubricant to the pulley bolt (B) and washer (C).
15. Install the crankshaft pulley, and tighten the bolt to 245 Nm (25.0 kgf/cm, 181 ft. Lbs.). Do not use an impact wrench.
-1 Hold the pulley with the holder handle (A) and holder attachment (B).
-2 Tighten the bolt with a torque wrench and 19 mm socket (C).
16. Rotate the crankshaft pulley about five or six turns clockwise so the timing belt positions on the pulleys.
17. Turn the crankshaft pulley so its white mark (A) lines up with the pointer (B).
18. Check the camshaft pulley marks.
- If the camshaft pulley marks are at TDC, go to step 19.
- If the camshaft pulley marks are not at TDC, remove the timing belt and repeat steps 2 through 15.
19. Install the dipstick and tube (A) with a new O-ring (B).
20. Install and adjust the P/S pump belt.
21. Install the alternator belt.
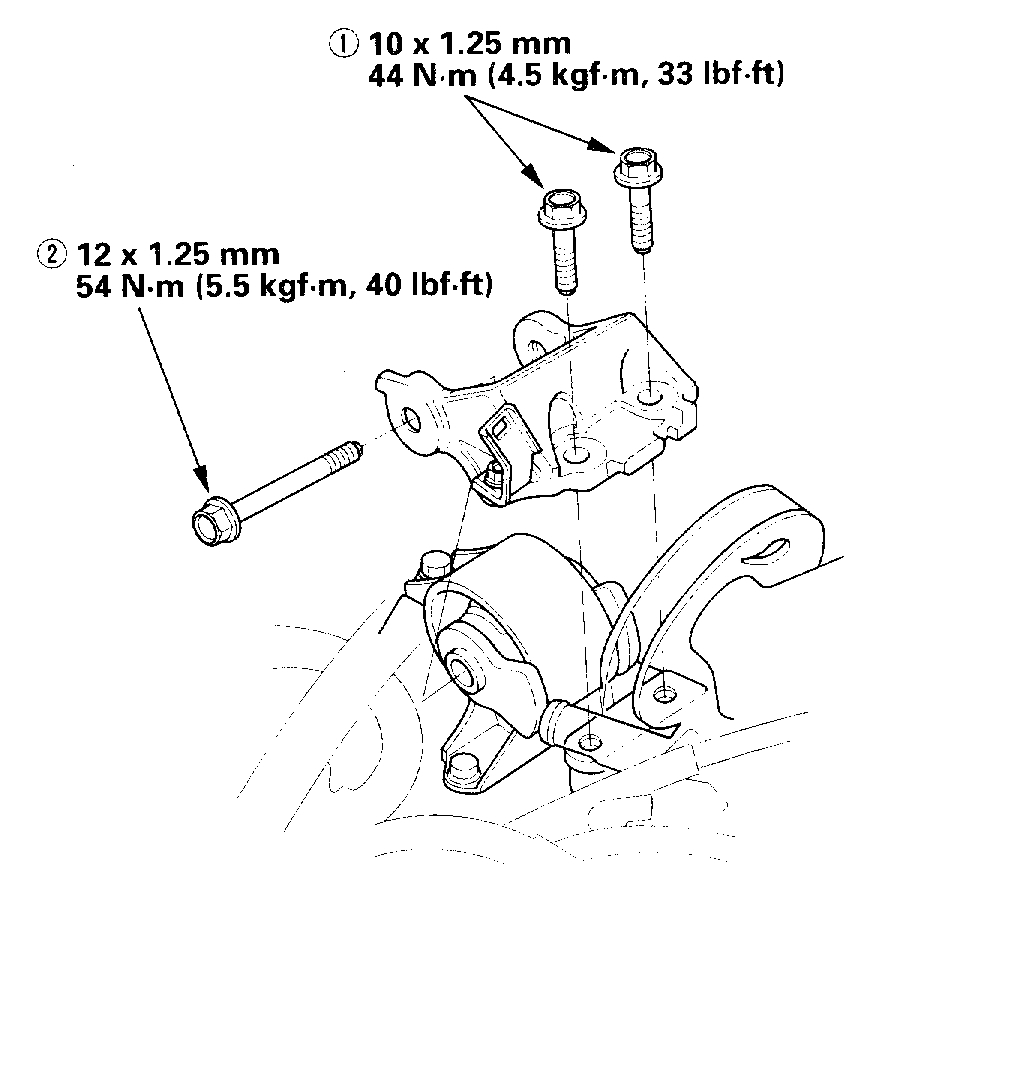
22. Install the side engine mount bracket, then tighten the mounting bolts in the numbered sequence.
Used Belt
Follow this procedure when installing a used timing belt.
1. Clean the timing belt pulleys, and the upper and lower covers.
2. Set the timing belt drive pulley to TDC by aligning the TDC mark (A) on the tooth of the timing belt drive pulley with the pointer (B) on the oil pump.
3. Set the camshaft pulleys to TDC by aligning the TDC marks (A) on the camshaft pulleys with the pointers (B) on the back covers.
4. If the auto-tensioner has extended and the timing belt cannot be installed, remove and compress the auto-tensioner.
5. Install the timing belt in a counterclockwise sequence starting with the drive pulley. Take care not to damage the timing belt when installing it.
6. Tighten the idler pulley bolt.
7. Remove the battery clamp bolt from the back cover.
8. Install the engine mount bracket.
9. Install the lower cover (A), front upper cover (B), and rear upper cover (C).
10. Clean any oil off the inside face (A) of the crankshaft pulley, and apply lubricant to the pulley bolt (B) and washer (C).
11. Install the crankshaft pulley, and tighten the bolt to 245 Nm (25.0 kgf/cm, 181 ft. Lbs.). Do not use an impact wrench.
-1 Hold the pulley with the holder handle (A) and holder attachment (B).
-2 Tighten the bolt with a torque wrench and 19 mm socket (C).
12. Rotate the crankshaft pulley about five or six turns clockwise so the timing belt positions on the pulleys.
13. Turn the crankshaft pulley so its white mark (A) lines up with the pointer (B).
14. Check the camshaft pulley marks.
- If the camshaft pulley marks are at TDC, go to step 15.
- If the camshaft pulley marks are not at TDC, remove the timing belt and repeat steps 2 through 11.
15. Install the dipstick and tube (A) with a new O-ring (B).
16. Install and adjust the P/S pump belt.
17. Install the alternator belt.
18. Install the side engine mount bracket, then tighten the mounting bolts in the numbered sequence.
___________________________________
I hope I got the right component. If not, please let me know specifically what "idler pulley" you are referring to. I hope these directions help.
Take care,
Joe
Images (Click to make bigger)
Sunday, September 23rd, 2018 AT 8:13 PM