The P0015 is the OBD-II generic code indicating the engine control module (ECM) has determined that the exhaust camshaft timing for bank 1 is more retarded than what the ECM has commanded it to be. The over-retarded timing condition can be during the advancing or retarding phase. This is caused by a bad camshaft actuator which is common here is how you can change it out. Also the stalling can be caused by a dirty throttle bore. here is a guide on how to fix that as well:
https://www.2carpros.com/articles/throttle-actuator-service
Camshaft and timing chain replacement instructions.
Remove
DANGER:
- Risk of explosion from hydrogen gas. Risk of poisoning and caustic burns from swallowing battery electrolyte. Risk of injury to eyes and skin suffering caustic burns from battery electrolyte or from contact with damaged lead acid batteries.
- No fire, sparks, open flames or smoking.
- Wear acid-resistant gloves, clothing and glasses. Pour battery electrolyte only into suitable and appropriately marked containers.
1 Disconnect ground cable of battery
CAUTION:
- Do not connect quiescent current retention device otherwise this may cause damage to the control module.
2 Remove spark plugs
NOTE: To ensure that the engine can be easily cranked when drawing in the timing chain, and to avoid the timing chain jumping across. Remove only once spark plug of each cylinder.
3 Remove cylinder head covers
- Air cleaner mounted on vehicle
- Air cleaner positioned at engine side
4.1 Remove fan shroud
NOTE: Not Model 211.061/065/070, 230.475
4.2 Remove electric fan
5 Position engine to 40 degrees after TDC of first cylinder.
NOTE:
- Engine must not be cranked backwards.
- The notches of the camshafts must point toward the inner V.
- It must be possible to easily insert the two locking plates. If this is not possible, Set the basic position of camshafts.
- The copper plates of the timing chain must be aligned with the scribe marks on the camshaft sprockets.
- Owing to the unevenly long paths of the timing chain it may be necessary to crank the engine as many as 14 times till the copper plates get aligned with the scribe marks on the camshaft sprockets.
- On vehicles equipped with an air pump, the combination valve must be unbolted before the right locking plate is inserted.
- Installation: Replace Gasket of combination valve.
6 Remove chain tensioner
7 Remove camshaft position sensor
8 Crank engine in direction of rotation until the link for separating the timing chain is easily accessible
NOTE: Timing chain is separated one chain link next to the copper plate (on right). See new timing chain.
9 Remove camshaft bearing bridge on right
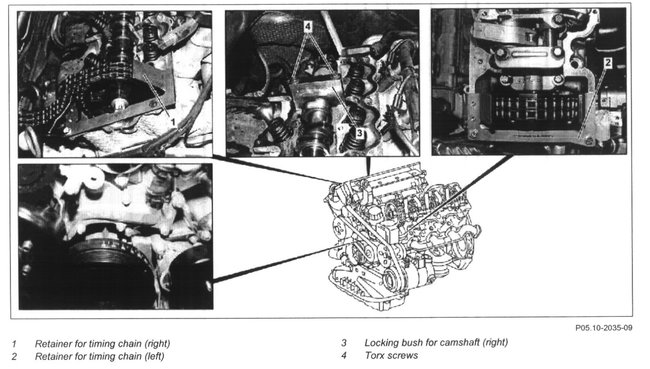
10 Install holding bush (3) onto camshaft on right
NOTE: Screw in bolts (4) only until they touch.
11 Attach retaining devices (1, 2) for timing chain to right and left cylinder head
12 Separate timing chain
CAUTION: Cover over timing case recess with a clean cloth. Parts which have dropped into the timing case recess, must be removed.
NOTE: To pull out the old timing chain, connect the old chain to the new timing chain.
Install
13 Draw in new timing chain
NOTE: To draw in the new timing chain, crank engine in direction of rotation at the crankshaft.
14 Remove retaining devices (1, 2) for timing chain at right and left cylinder head
15 Rivet new timing chain
16 Crank engine in direction of rotation
17 Check timing of engine
18 Take off holding bush (3) on right camshaft
19 Install camshaft bearing bridge on right
20 Install camshaft position sensor
21 Installing chain tensioner
22.1Install fan shroud
NOTE: Not Model 211.061/065/070, 230.475.
22.2Install electric fan
23 Install cylinder head covers
- Air cleaner mounted on vehicle.
- Air cleaner positioned at engine side.
24 Install spark plugs
25 Connect ground cable
DANGER:
- Risk of accident from vehicle starting off by itself when engine running. Risk of injury as working around the engine during startup or while running may result in contusions and burns
- Secure vehicle to prevent it from moving.
- Wear closed and tight-fitting work clothes.
- Do not grasp hot or rotating parts.
26 Run engine and inspect for leaks.
Check out the diagrams (below). Please let us know what happens.
Images (Click to enlarge)
Jul 7, 2020 at 12:29 PM