Plastic trim on passenger side (left hand side, UK) seat lever removal

Tiny
CHRISTOPHER SA
  • MEMBER
  • 2006 SAAB 9-5
  • 2WD
  • MANUAL
  • 150,000 MILES
I am in the UK at the moment and I am trying to change the front leather seat covers on my sister's Saab 9-5 Estate.

The passenger seat has a lever on the left side and I am not sure what it does.

To remove the plastic trim at the base of the seat I have to take the plastic trim off of this lever. It seems that I need a magic wand as it does not want to budge. Do you know what I need to do to get this plastic trim off? I will post a picture from my iPad after I have posted this question (am on my Laptop at the moment).
Wednesday, July 31st, 2019 AT 6:05 AM

13 Replies

Tiny
CHRISTOPHER SA
  • MEMBER
  • 209 POSTS
I have actually been able to remove this piece from the lever. There was a small tab holding the plastic in place and one had to pry it away from the lever and then pull the handle off. I will post some images shortly.
Was this
answer
helpful?
Yes
No
Wednesday, July 31st, 2019 AT 6:34 AM
Tiny
JACOBANDNICKOLAS
  • MECHANIC
  • 108,300 POSTS
Welcome to 2CarPros.

Here are the directions for replacing the front seat fabric. It includes removal of the seat and components including the levers and so on. Additionally, it shows how the seat cover is attached and so on.

All attached pictures correlate with the directions.

________________________________

2006 Saab 9-5 (9600) L4-2.3L Turbo (2.3 T)
Upholstery Fabric, Seat Cushion
Vehicle Body and Frame Seats Service and Repair Removal and Replacement Front Seat Upholstery Fabric, Seat Cushion
UPHOLSTERY FABRIC, SEAT CUSHION
Upholstery Fabric, Seat Cushion

To remove

1. Remove the front set.
2. Manual front seat: Remove the height adjustment lever and the backrest adjustment knob.

NOTE: When removing the adjustment knob the backrest rake axle can come out with the knob.

Pic 1

3. Remove the upper seat cowl, 2 covers and 3 screws.
Electrically adjustable seat: There is a protective cap on the tip of the front screw. Keep this cap safe and refit it to the screw to prevent damage to the electrical cables.
Pull the cowl backwards and bend up the rear edge, then pull it forwards.

4. Electrically adjustable front seat: unplug the connector for the switch and memory buttons, if any.

Pic 2

5. Remove the lower seat cowl, 2 screws.

Pic 3

6. Remove the seatbelt mounting, 1 bolt.
7. Remove the plastic cover on each side of the backrest joint.
These plastic covers are for holes used to reach the bolts securing the rear edge of the seat.

8. Undo the seat cushion at the rear, 2 screws.
9. Undo the seat cushion at the front, 2 screws.

Pic 4

10. Undo the straps holding the backrest upholstery at the bottom.

NOTE: The front of the seat cushion on ventilated seats must be lifted up so that the fan motor goes free from the seat frame.

11. Cut off any cable ties. Unplug and mark the connectors.
Remove the seat cushion.

12. Release the upholstery strip at the rear of the seat base.

Pic 5

13. Release the upholstery strip along the edges of the seat base.
14. Lift the seat base away from the foam cushion.
15. Cut the staples securing the seat upholstery to the foam cushion.
16. Remove the seat upholstery.

To fit

pic 6

1. Fit the seat upholstery over the foam cushion.
2. Fit the staples using the pliers in fitting kit, upholstery staples, 84 71 062.
3. Lay the seat base on the foam cushion.
4. Replace the strip along the edge of the seat base.
Check that the upholstery fits correctly.

5. Position the seat and insert the screws in the front without tightening them.

Pic 7

6. Fit the screws in the back of the seat cushion, 2 screws.
7. Tighten the screws in the front of the seat cushion.
8. Refit the plastic cover on each side of the backrest joint.
9. Plug in the connector and fit new cable ties.

Pic 8

10. Fasten the straps on the bottom of the backrest upholstery under the seat cushion.
11. Fit the seatbelt mounting, 1 bolt.

Pic 9

Tightening torque 33 Nm (24.4 lbf ft)

12. Fit the lower seat cowl, 2 screws.
13. On electrically adjustable front seats, first plug in the connector to the switch and to the memory buttons, if any, on the upper seat cowl.

Pic 10

Refit the upper seat cowl by slipping this into the track provided and pressing the cowl down at the back.
Fasten the seat cowl, 3 screws and 2 covers.

IMPORTANT: Electrically adjustable seat: Fit the protection on the front bolt.

14. Manual front seat: Mount the height adjustment lever and backrest adjustment knob.

NOTE: If required, removing the backrest upholstery can make it easier to position the backrest rake axle. Check that the backrest upholstery is not pinched between the cowl and the backrest. The upholstery should lie over the axle.

15. Fit the front seat.

_____________________________________

Let me know if this helps.

Take care,
Joe
Was this
answer
helpful?
Yes
No
Wednesday, July 31st, 2019 AT 7:02 AM
Tiny
CHRISTOPHER SA
  • MEMBER
  • 209 POSTS
Hi Joe,

Thanks for that information. Very good. I do have a slight niggle with the lever directions though. It doesn't say how to take that plastic off! There seems to be always some small detail missing with factory directions. As to the staples and pliers, I had no idea that there was a fitting kit. I might have to get those otherwise it will be put back with cable ties! If there is a reason why I should not use cable ties, please let me know.

As a matter of interest where did you get those directions from? The Haynes manual I am using is useless when it comes to these types of directions.
Was this
answer
helpful?
Yes
No
Wednesday, July 31st, 2019 AT 7:25 AM
Tiny
JACOBANDNICKOLAS
  • MECHANIC
  • 108,300 POSTS
Welcome back:

The directions came from Alldata. It is a website. The two best ones are Alldata and ProDemand. At least in my opinion they are.

Let me know how you make out or if you have other questions. As far as the plastic cable ties, they may end up breaking on you at some point. That is the only thing I can think of.

Take care,

Joe
Was this
answer
helpful?
Yes
No
Wednesday, July 31st, 2019 AT 12:38 PM
Tiny
CHRISTOPHER SA
  • MEMBER
  • 209 POSTS
Hi Joe,

The instructions were very good and I was able to re-use the staples because they were very thick and by using two needle nosed pliers I was able to open them up a little, remove the old cover, put the new cover on and close the staples up again (they go around metal rods in the seat cover itself). The passenger seat is now done and is back in the car. Tomorrow I will post pictures of the problem I was experiencing as those who do not do this for a living may have a hard time understanding how to remove the plastic cover for the seat adjustment lever.
Was this
answer
helpful?
Yes
No
Wednesday, July 31st, 2019 AT 1:16 PM
Tiny
JACOBANDNICKOLAS
  • MECHANIC
  • 108,300 POSTS
Welcome back:

That is great. They actually make special pliers for those clips. Regardless, I can't wait to see the final product. I bet it looks great. And thanks for sharing it with us. I know it will help others.

Take care of yourself,
Joe
Was this
answer
helpful?
Yes
No
Wednesday, July 31st, 2019 AT 6:13 PM
Tiny
CHRISTOPHER SA
  • MEMBER
  • 209 POSTS
Hi Joe,

I didn't take a video of the seat covers before and after but I will take some photos of the old seat covers and a video of the new covers. But here is the lever video that prompted me to write this question. By the way, the driver's seat took less than half the time than the passenger seat, because I knew what to do this time around. :)
Was this
answer
helpful?
Yes
No
Thursday, August 1st, 2019 AT 10:45 AM
Tiny
JACOBANDNICKOLAS
  • MECHANIC
  • 108,300 POSTS
Welcome back:

Excellent video. I guarantee you it will help others. Now I need you to recover the seat in my truck. It's falling apart. LOL

Listen, thanks for getting back to me and thanks a ton for the video. If you do end up getting the pics of the final product, that would be great.

Take care,

Joe
Was this
answer
helpful?
Yes
No
Thursday, August 1st, 2019 AT 7:55 PM
Tiny
CHRISTOPHER SA
  • MEMBER
  • 209 POSTS
Hi Joe,

Here are the videos of the old and new seat covers. The old covers are on the left and the new ones on the right.

As a matter of interest I actually separated the seat backs from the rest of the seat. This made it much, much easier to fit the back of the seat cover over the metal frame of the seat as it is a very tight fit in the extreme corners (the seat cover needs to be stretched over the metal frame, which is impossible to do with the seat back attached). The torx bolts that attach the seat back to the seat are T50's. The torx bolts that hold the seat to the car chassis are T40's.
Was this
answer
helpful?
Yes
No
Wednesday, August 7th, 2019 AT 6:19 AM
Tiny
CHRISTOPHER SA
  • MEMBER
  • 209 POSTS
I am going to post the steps I did to replace the seat covers as the steps are slightly different to what you posted Joe.

Work on one seat at a time (non-electric seats):

1. Remove a seat by unscrewing the four T40 torx bolts that hold the seat to the chassis, and the seat belt bolt (17mm) on the side.

This is done by getting the seat as far forward as possible by using the lever at the front of the seat to slide the seat forward, as well as getting the seat back angled as far forward as possible by turning the knob at the side of the seat until the seat back is angled as far forward as it will go. Working from the area where the rear seats are (rear doors), undo the two torx bolts near the end of the seat rails that are located inside the seat rails. This is also a good time to remove the seat belt bolt.

Moving to the front door area in front of the seats move the seat back as far as it will go by using the lever at the front of the seat to release the seats and push them back. This will reveal the two torx bolts at the end and inside the rails. Undo both.

2. Lift up the front of the seat so that the underside is accessible. You can rest the back of the seat on the rear seats if necessary.

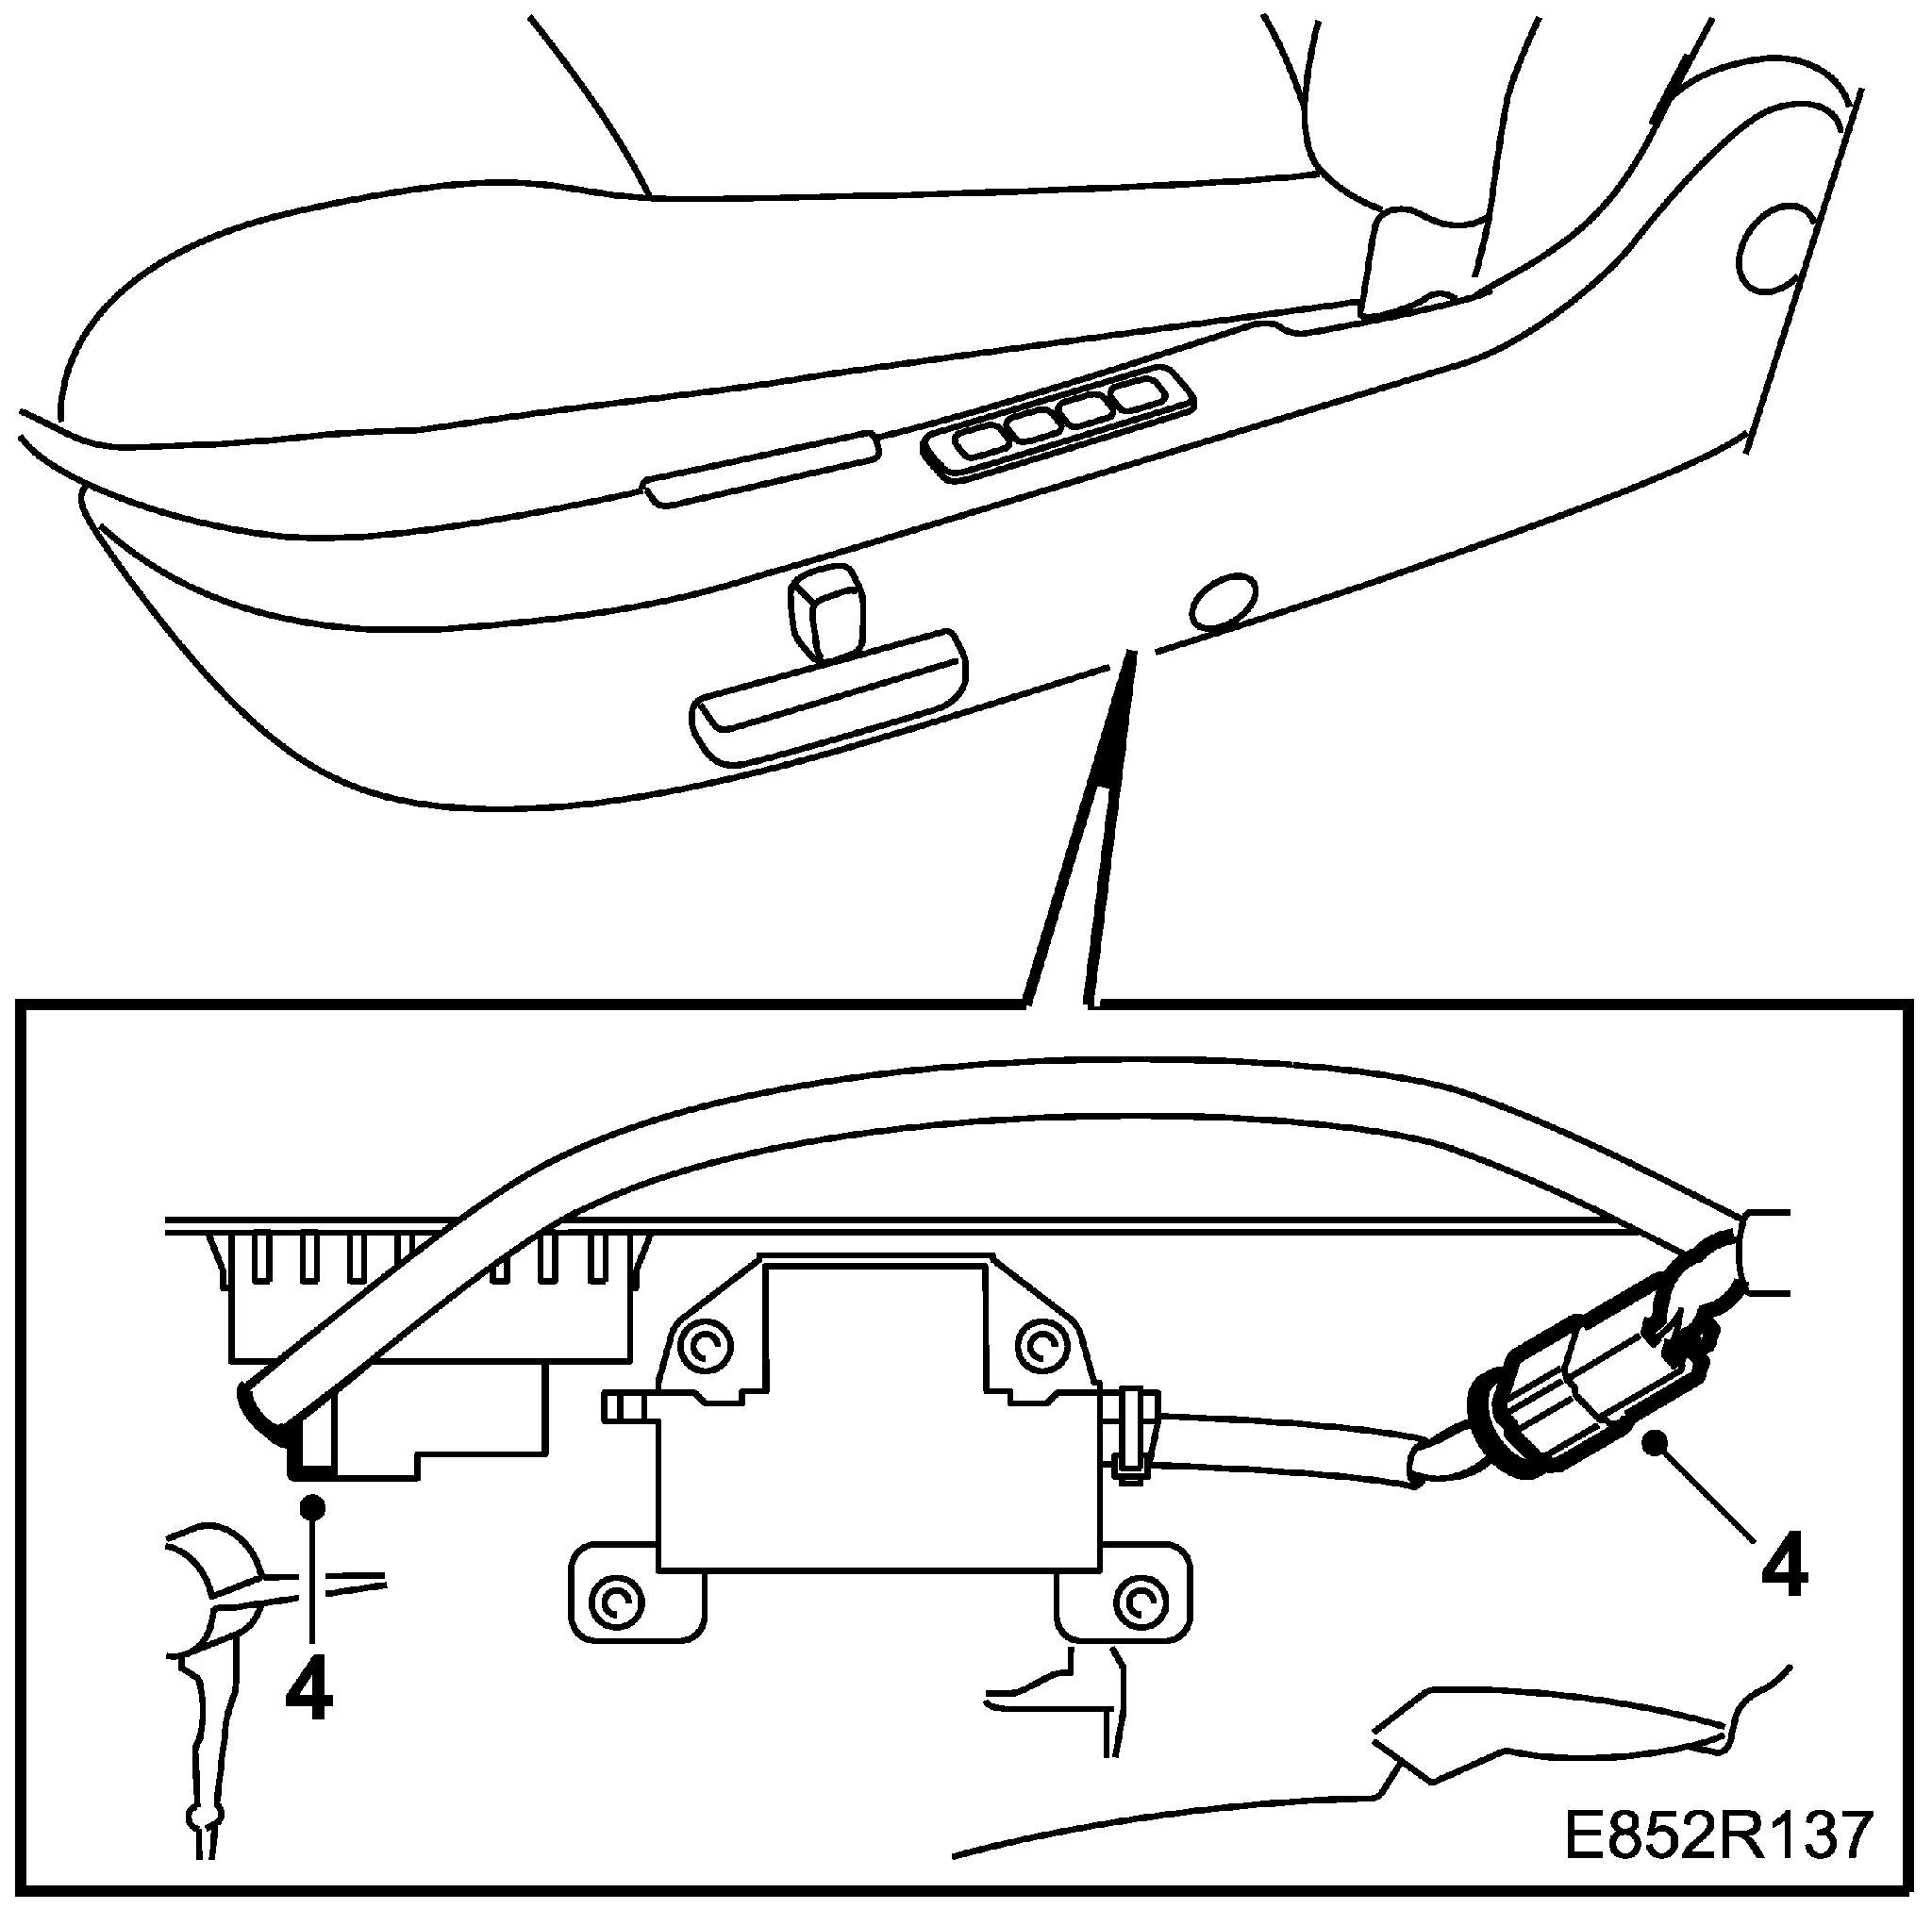
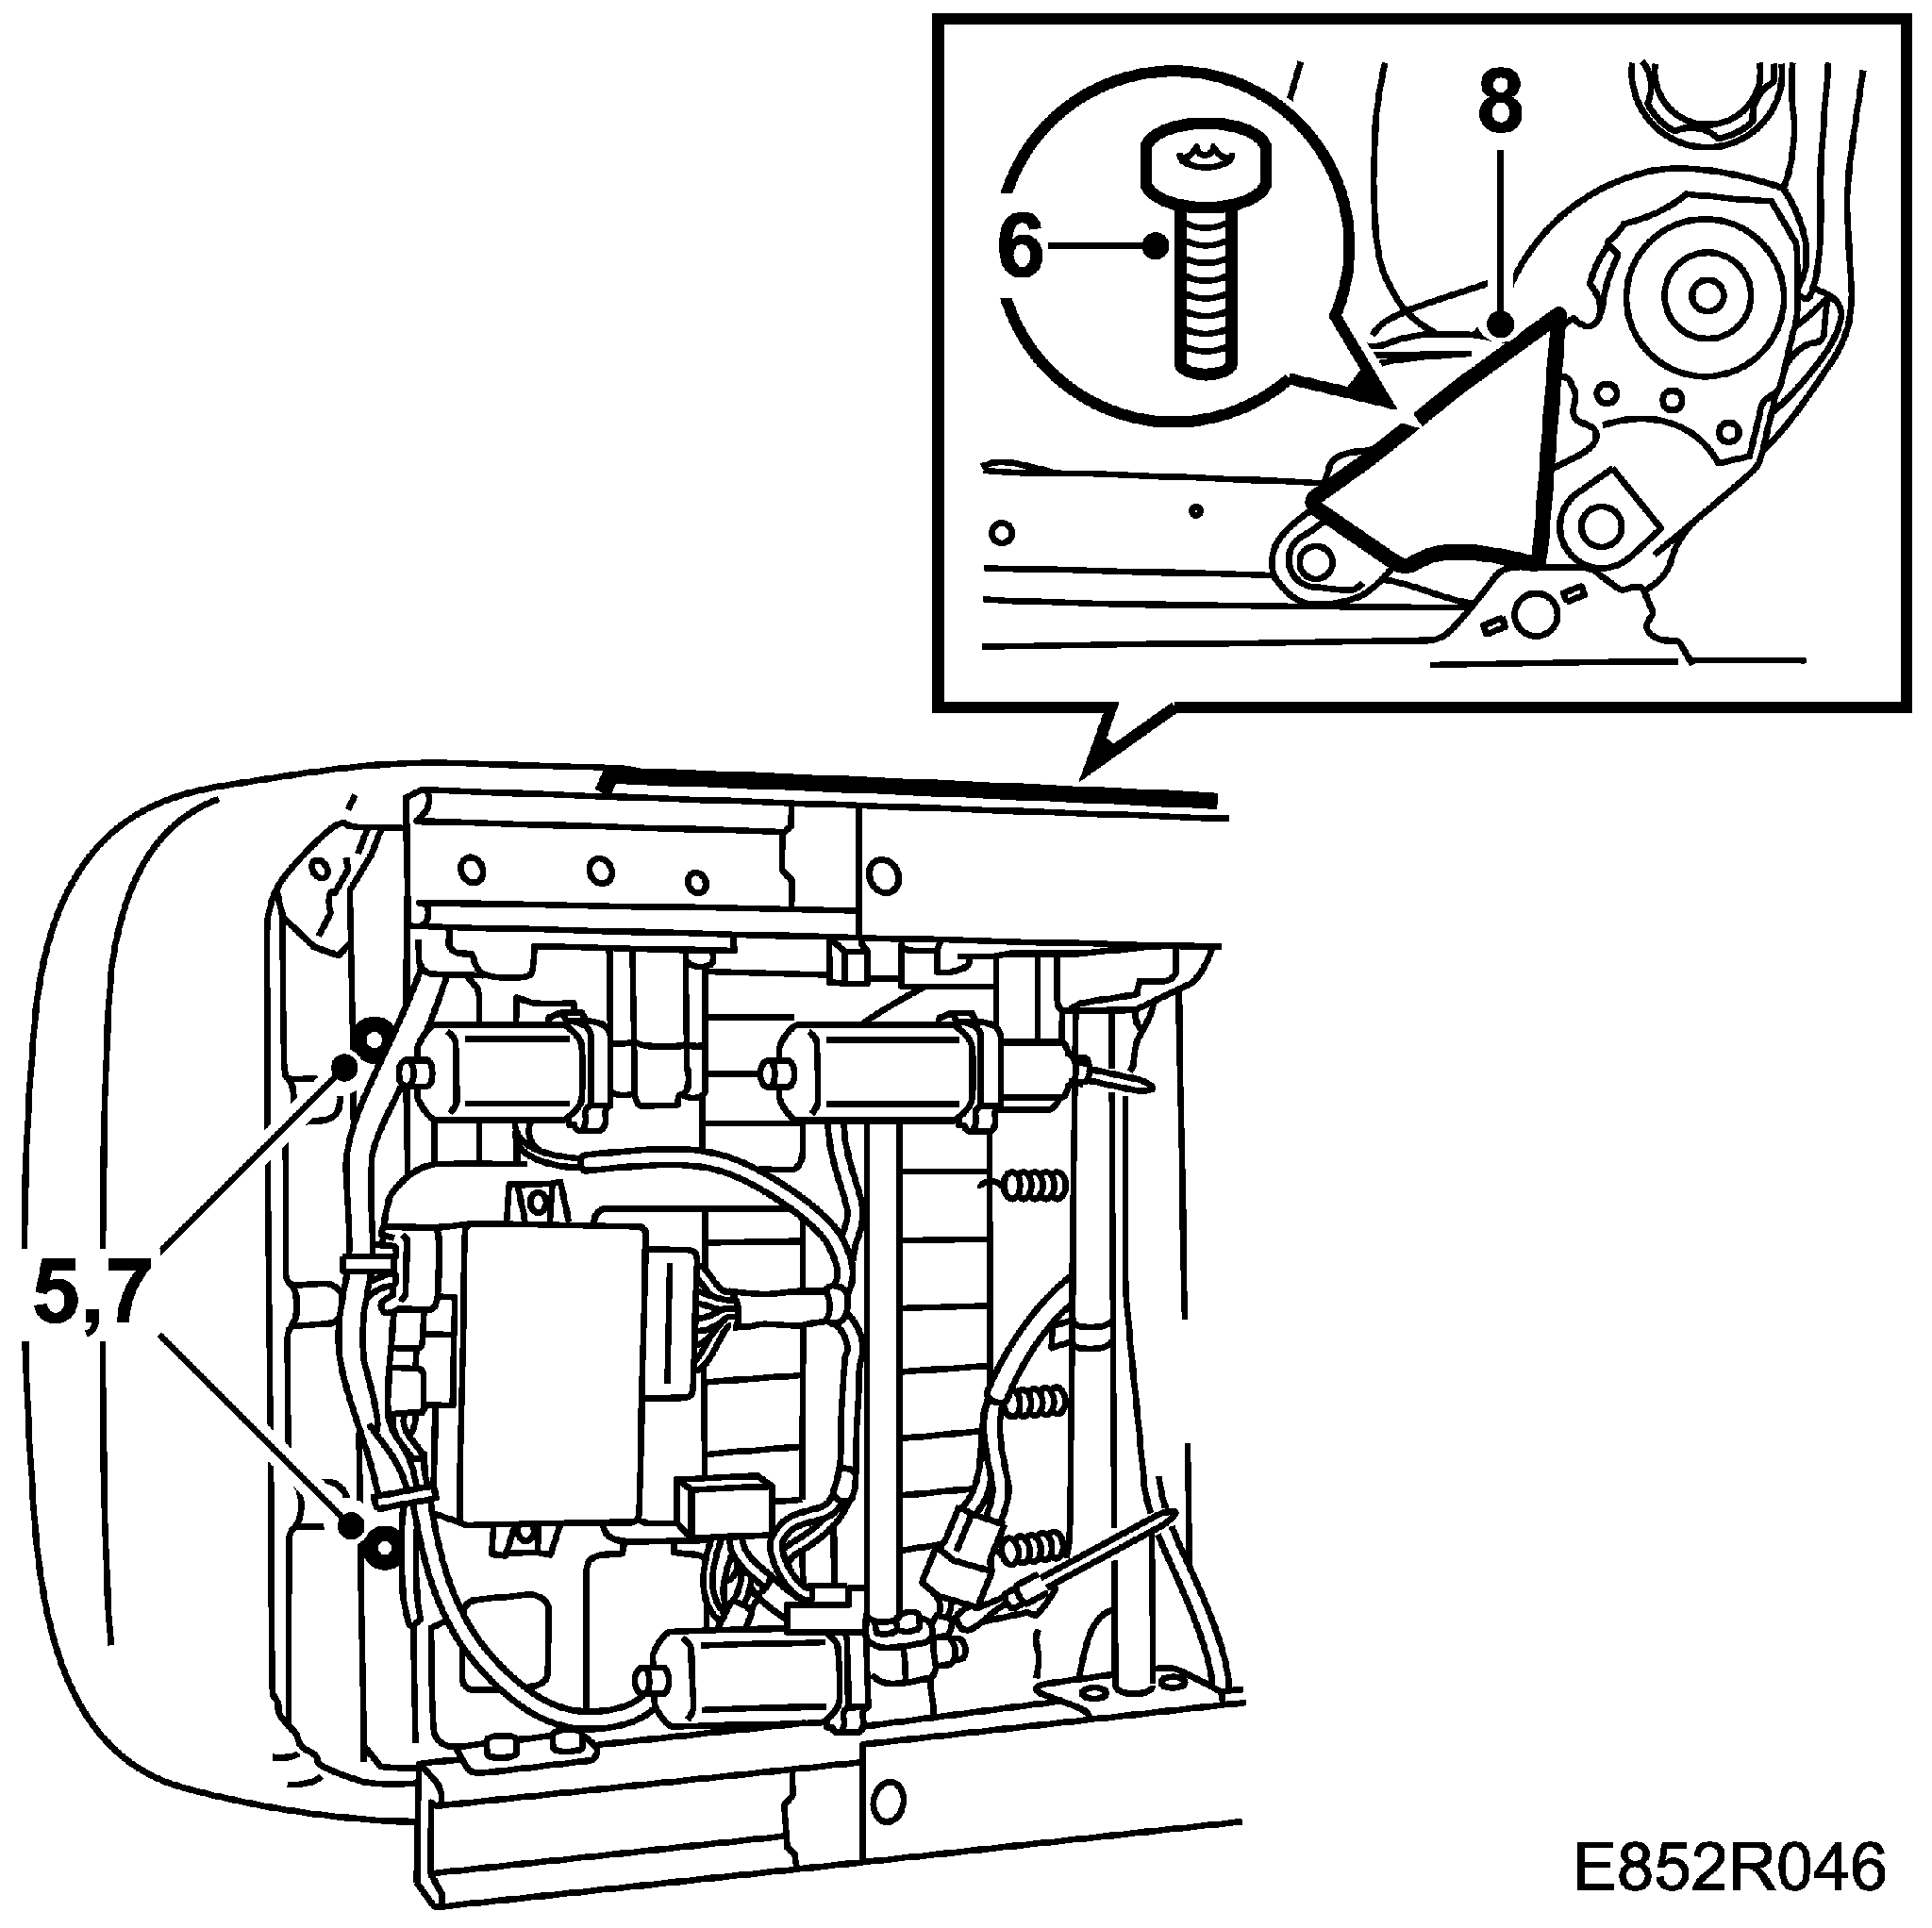
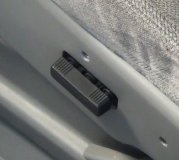
3. Un-clip the main socket connector from the seat. This is achieved by getting your fingernail(s) under the red plastic piece on one end and pulling it away from the body of the socket. This will allow the socket to be levered up and off the socket that is attached to the seat.

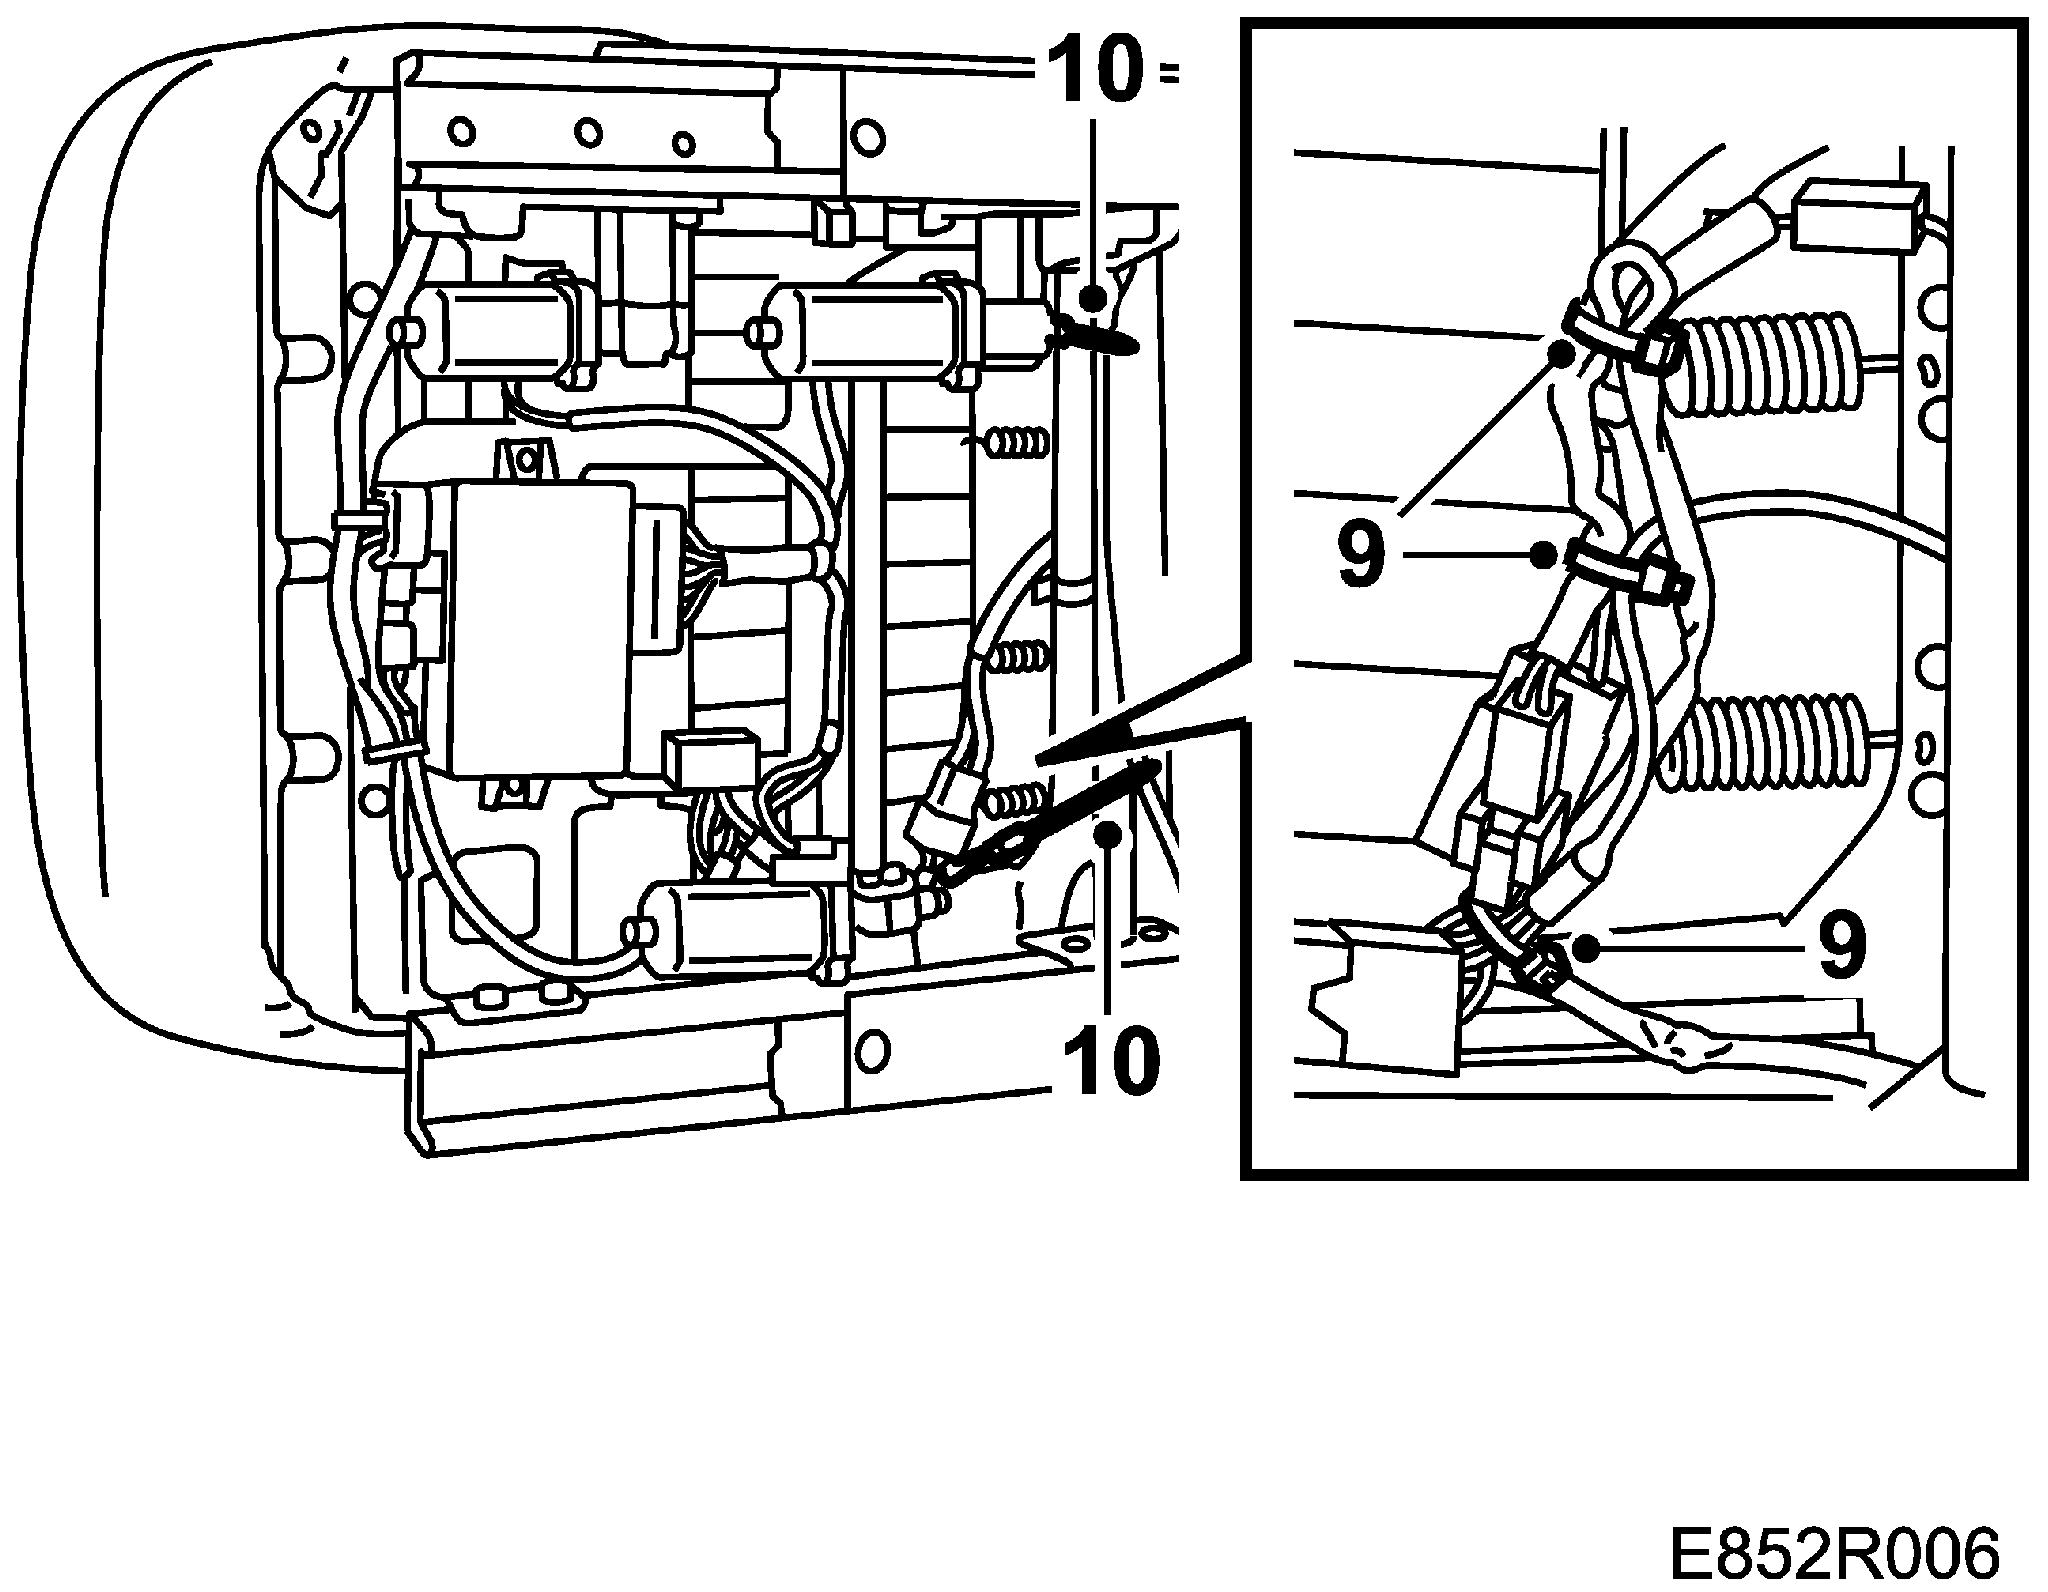
4. There is a clip/grommet that holds the black cable that comes from the socket to a part of the seat frame. Squeeze this clip/grommet so that it can be pushed back out of the hole that it is in.

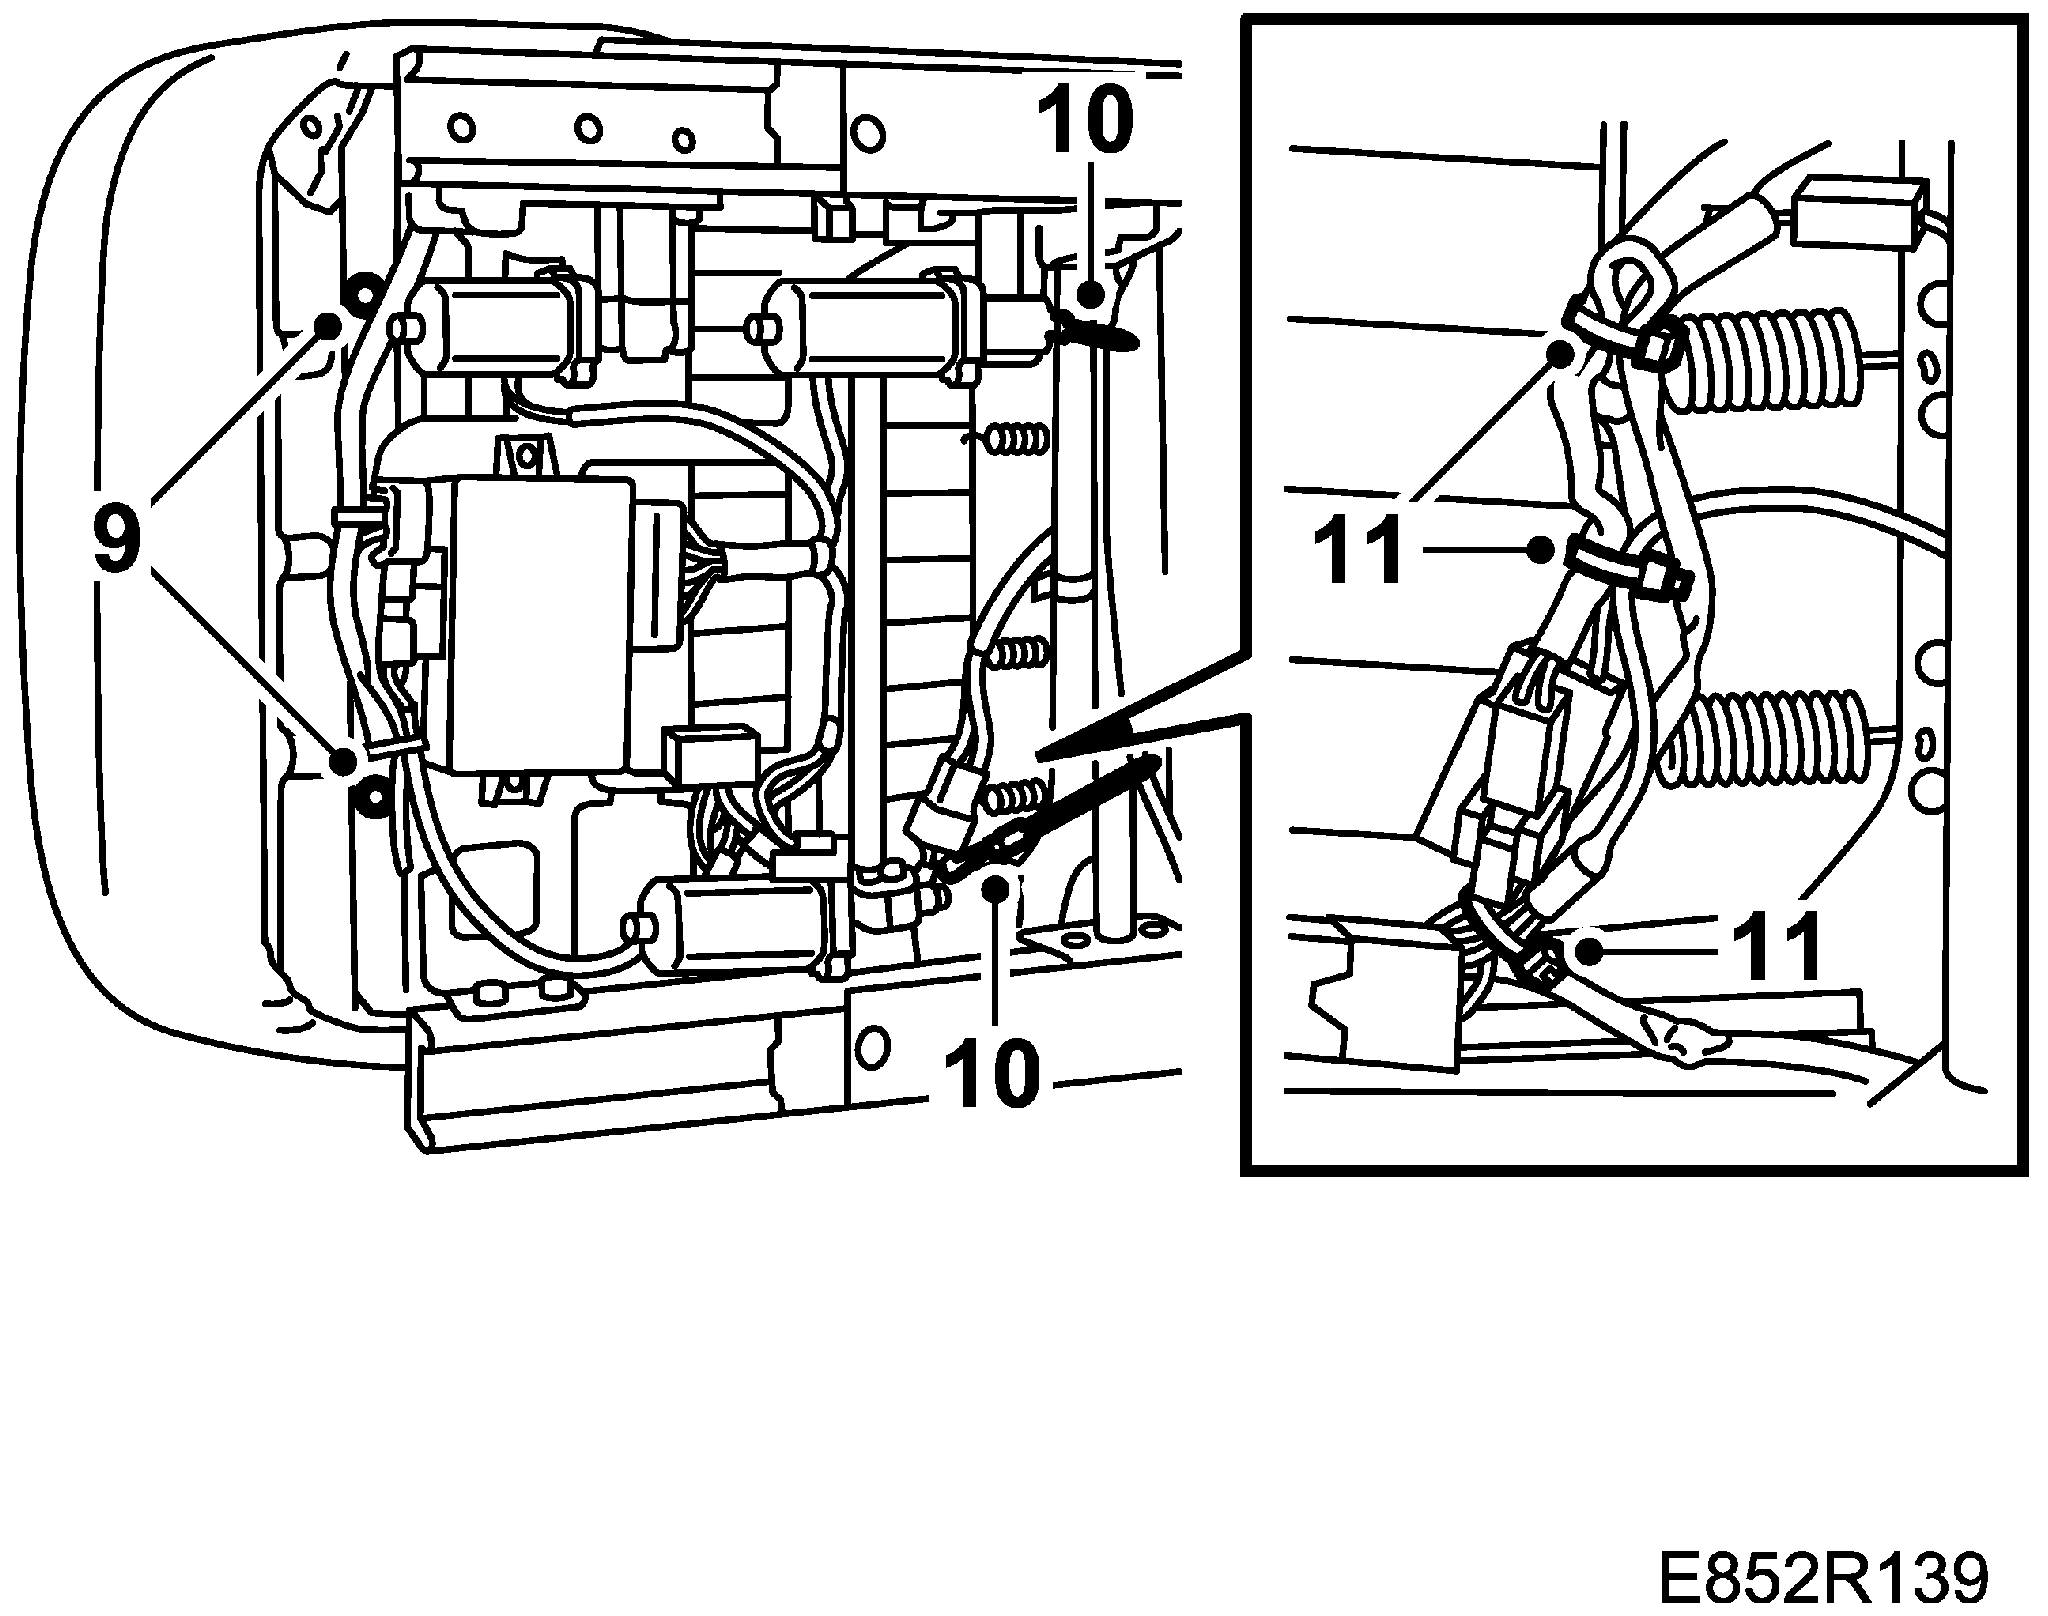
5. Un-attach the two clips that hold the socket cable to the seat spring structure.

6. You can now lift the seat out of the car through its front door.

7. Find a place to work on the seat where there is lots of room so you can access all parts of the seat easily. Place the seat here on its rails.

8. Adjust the seat back so that the seat back leans back at an angle. Observe the gap at the bottom of the seat back and adjust the seat back to the point where the gap between the bottom of the seat back and the seat is the largest.

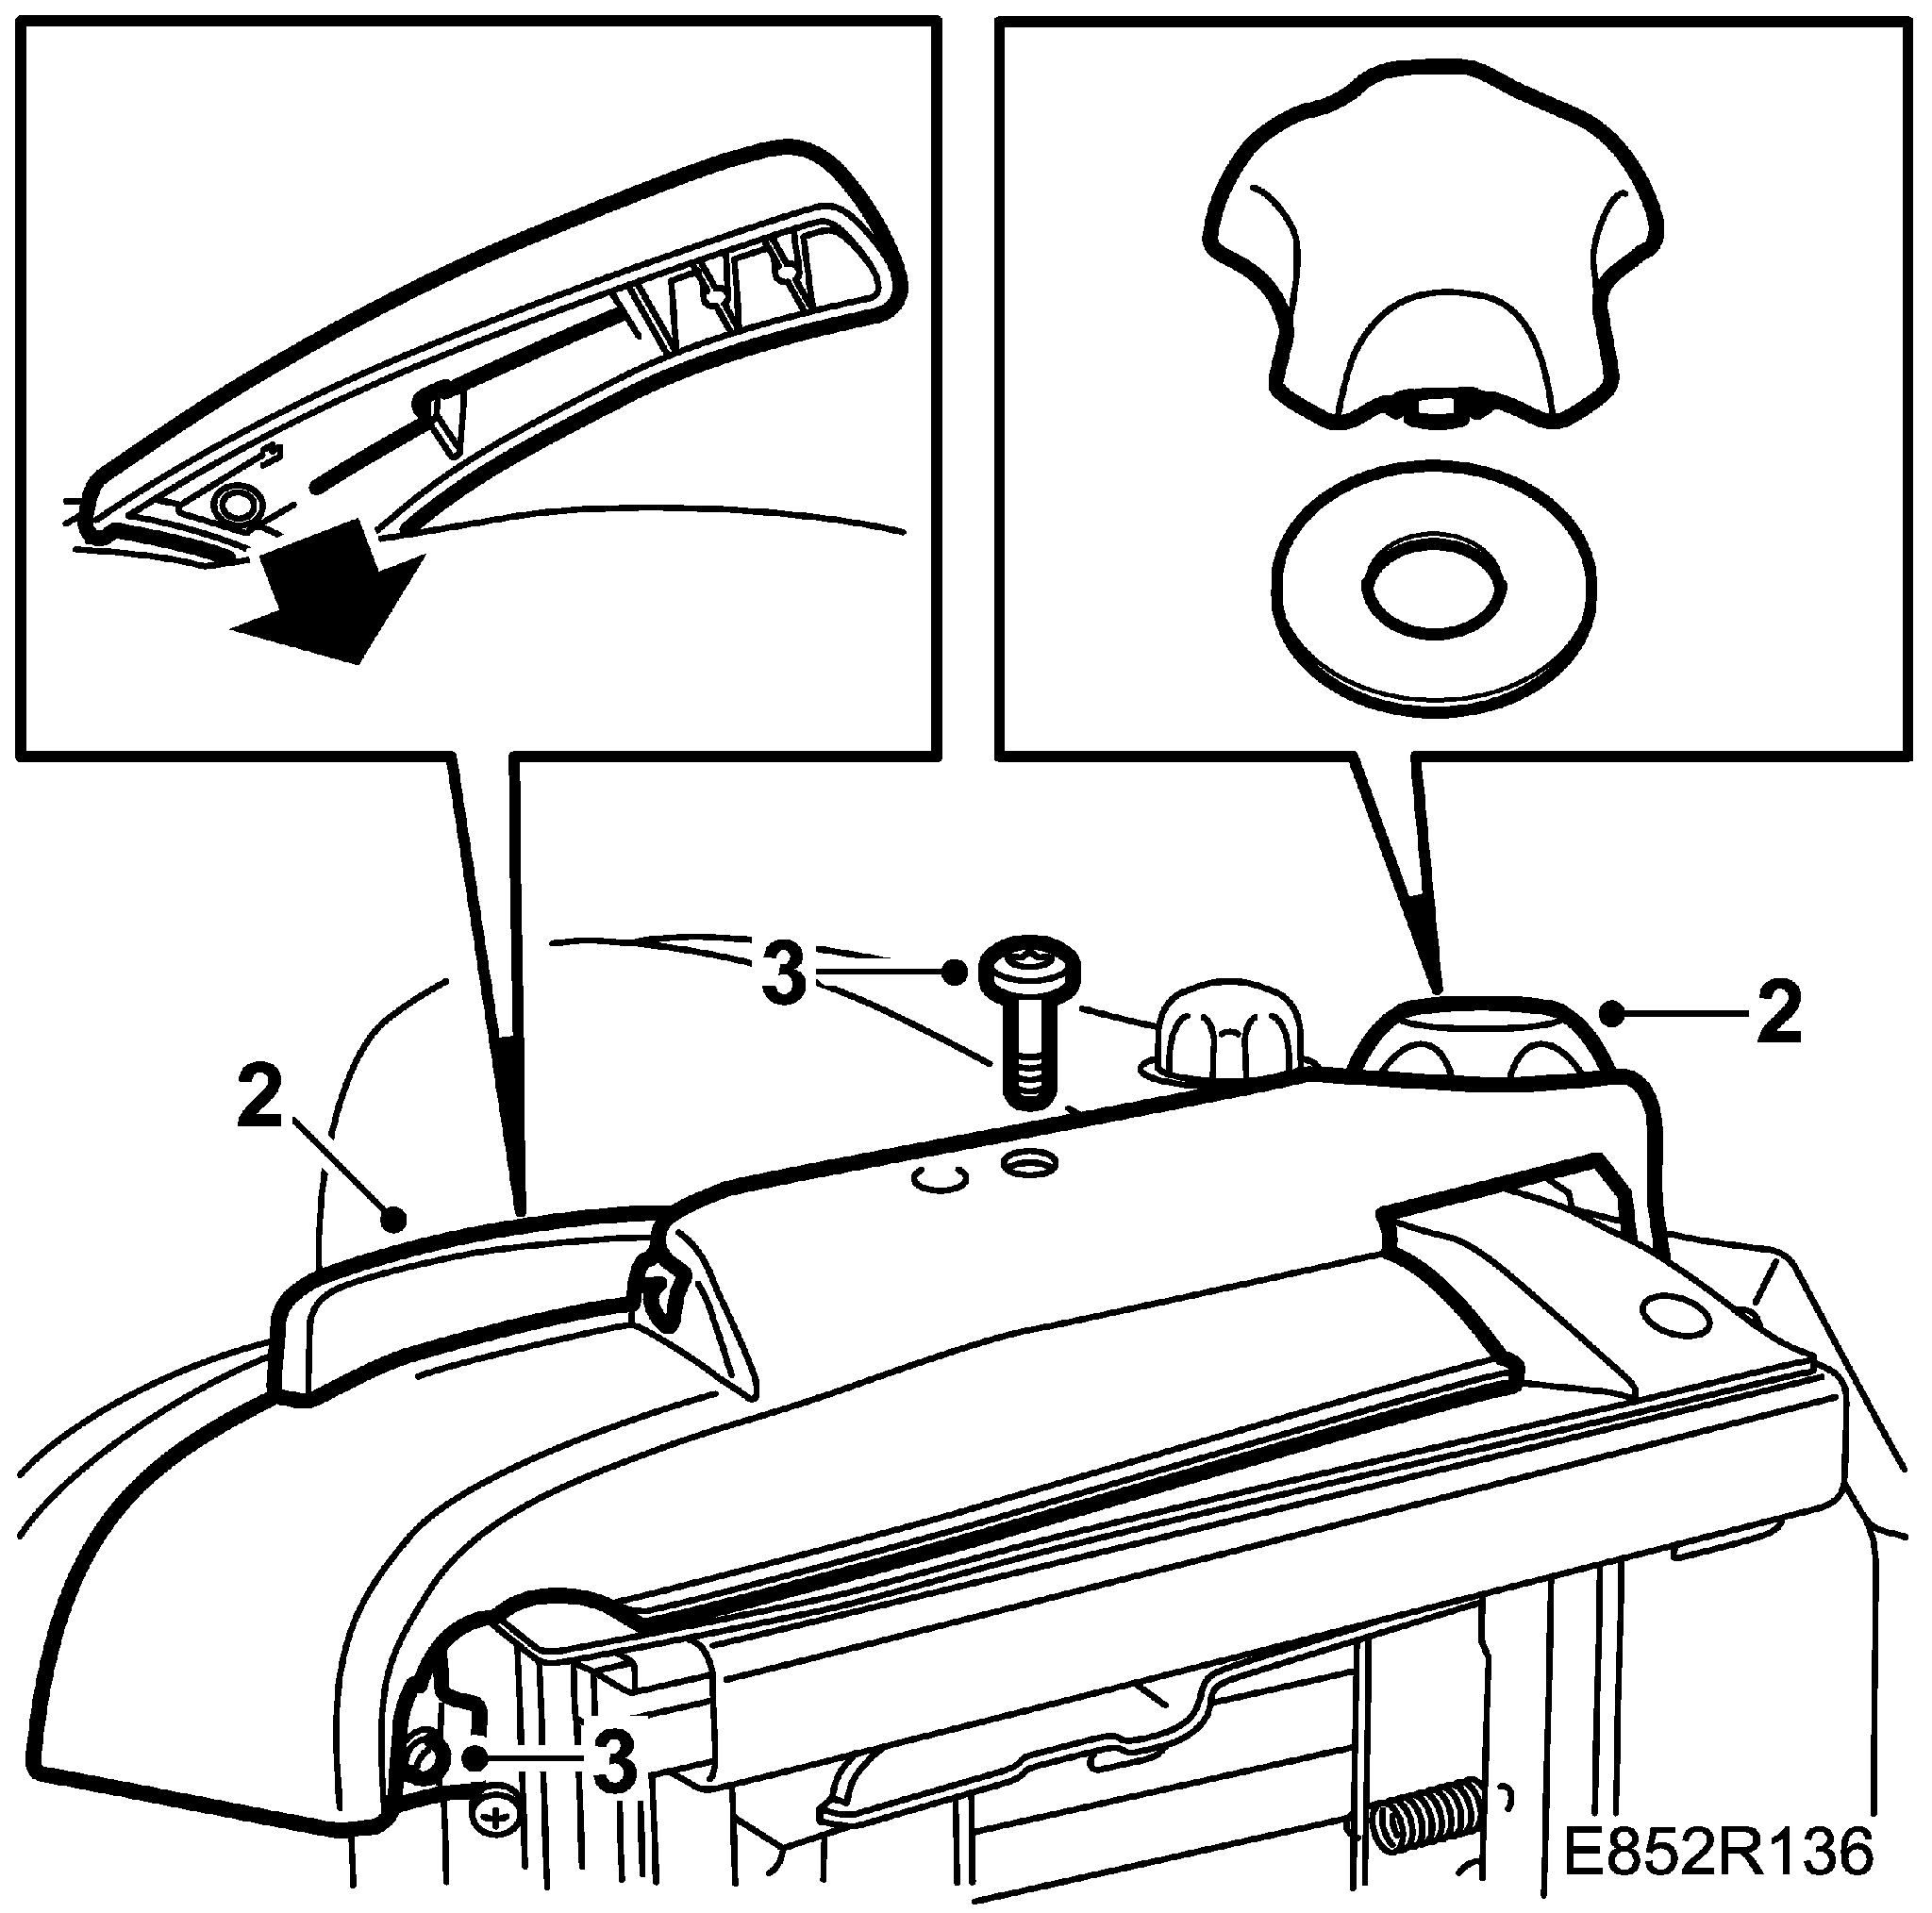
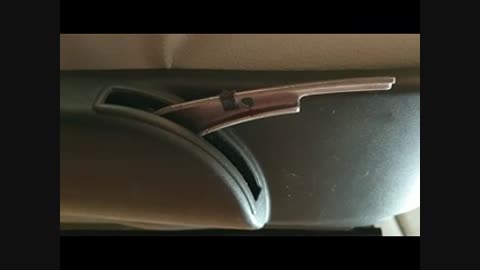
9. Take a small flat head screw driver and pry the lever cover off of the lever on the side of the seat. This is done by moving the lever down then fully up and taking the screw driver to the inside of the plastic cover and unlatching it from the metal part of the lever. See video from Thursday, August 1st, 2019 at 10:45 AM above.

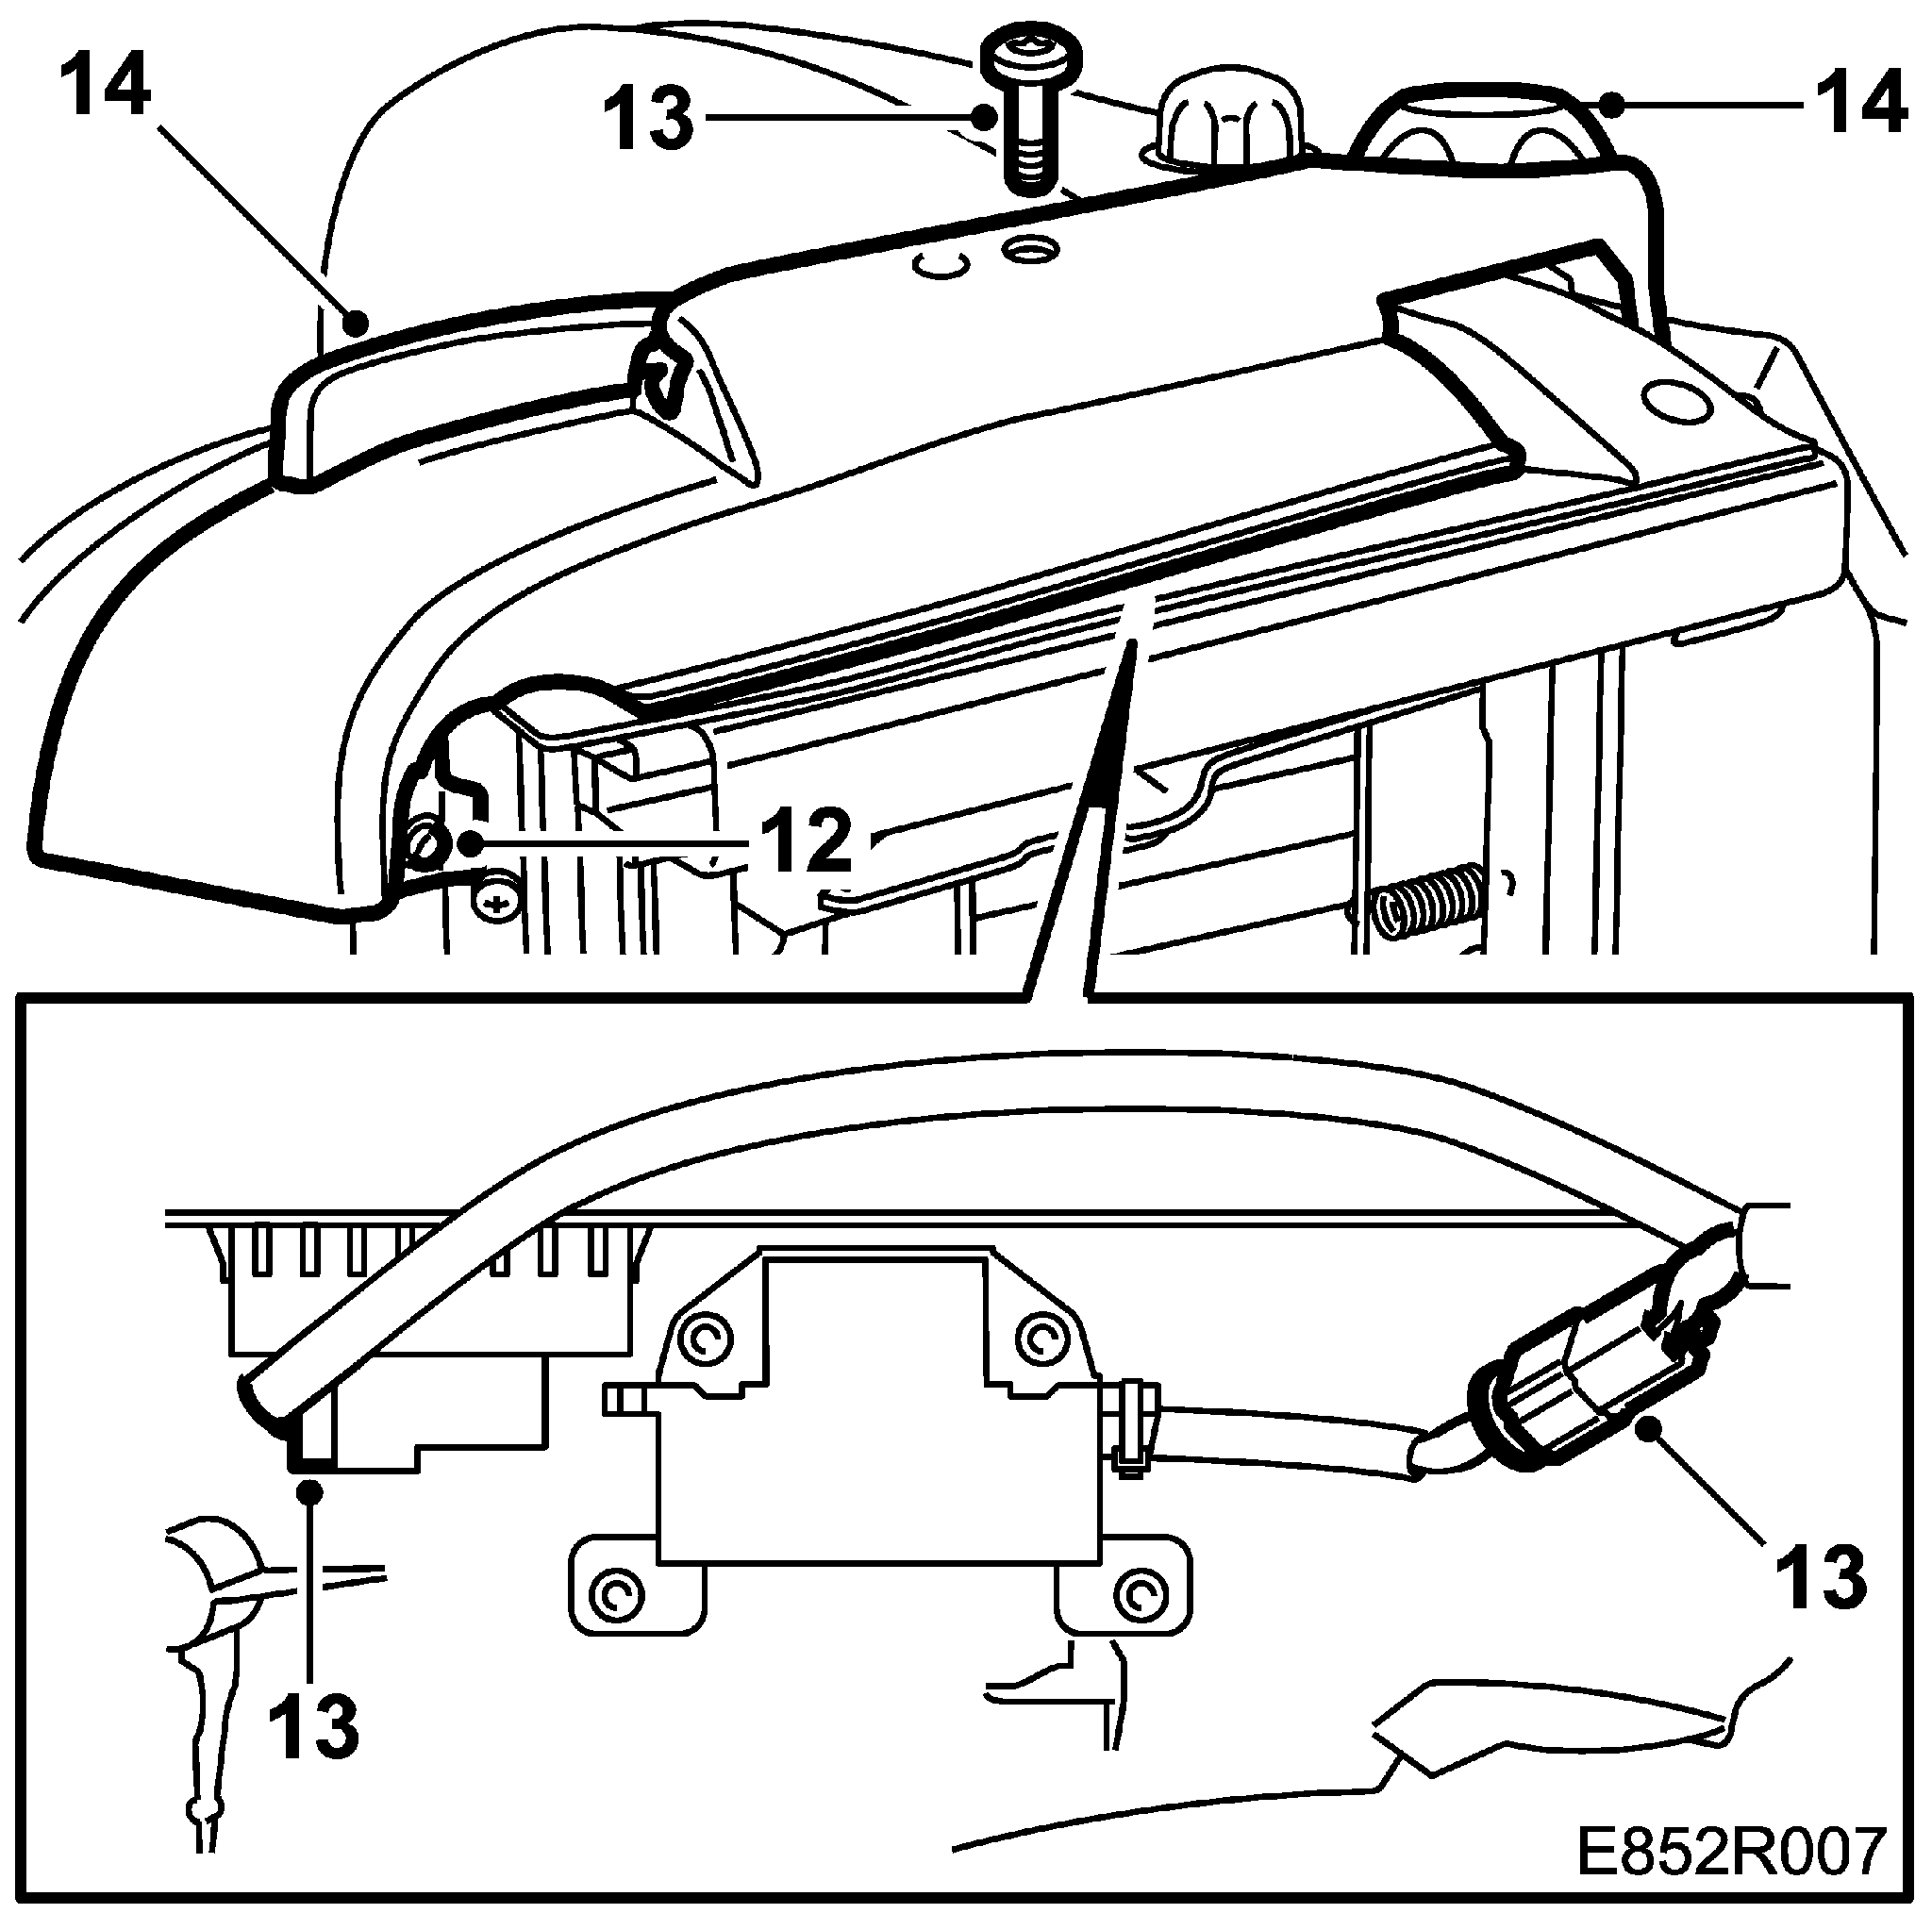
10. To take the plastic cowling trim off of the seat one has to first take off the large adjustment knob that changes the angle of the seat back. This knob clips onto the axle so one just has to use some pressure/force to pull it off. Then remove two torx screws (I think they are T20's - its best to get a complete Torx bit/screw driver set - you can also use a 1/8" wide flathead screw driver ) that keep the cowl attached to the seat frame. One screw is under the front of the seat where the cowling curves around the corner of the seat and the other is hidden behind a round plastic cover in the middle of the cowl on the side of the seat. After removing these two screws, slide the cowl forward making sure that the plastic trim at the back of the seat, where the seat back angle adjustment knob is usually located, clears the frame of the seat by lifting it away.

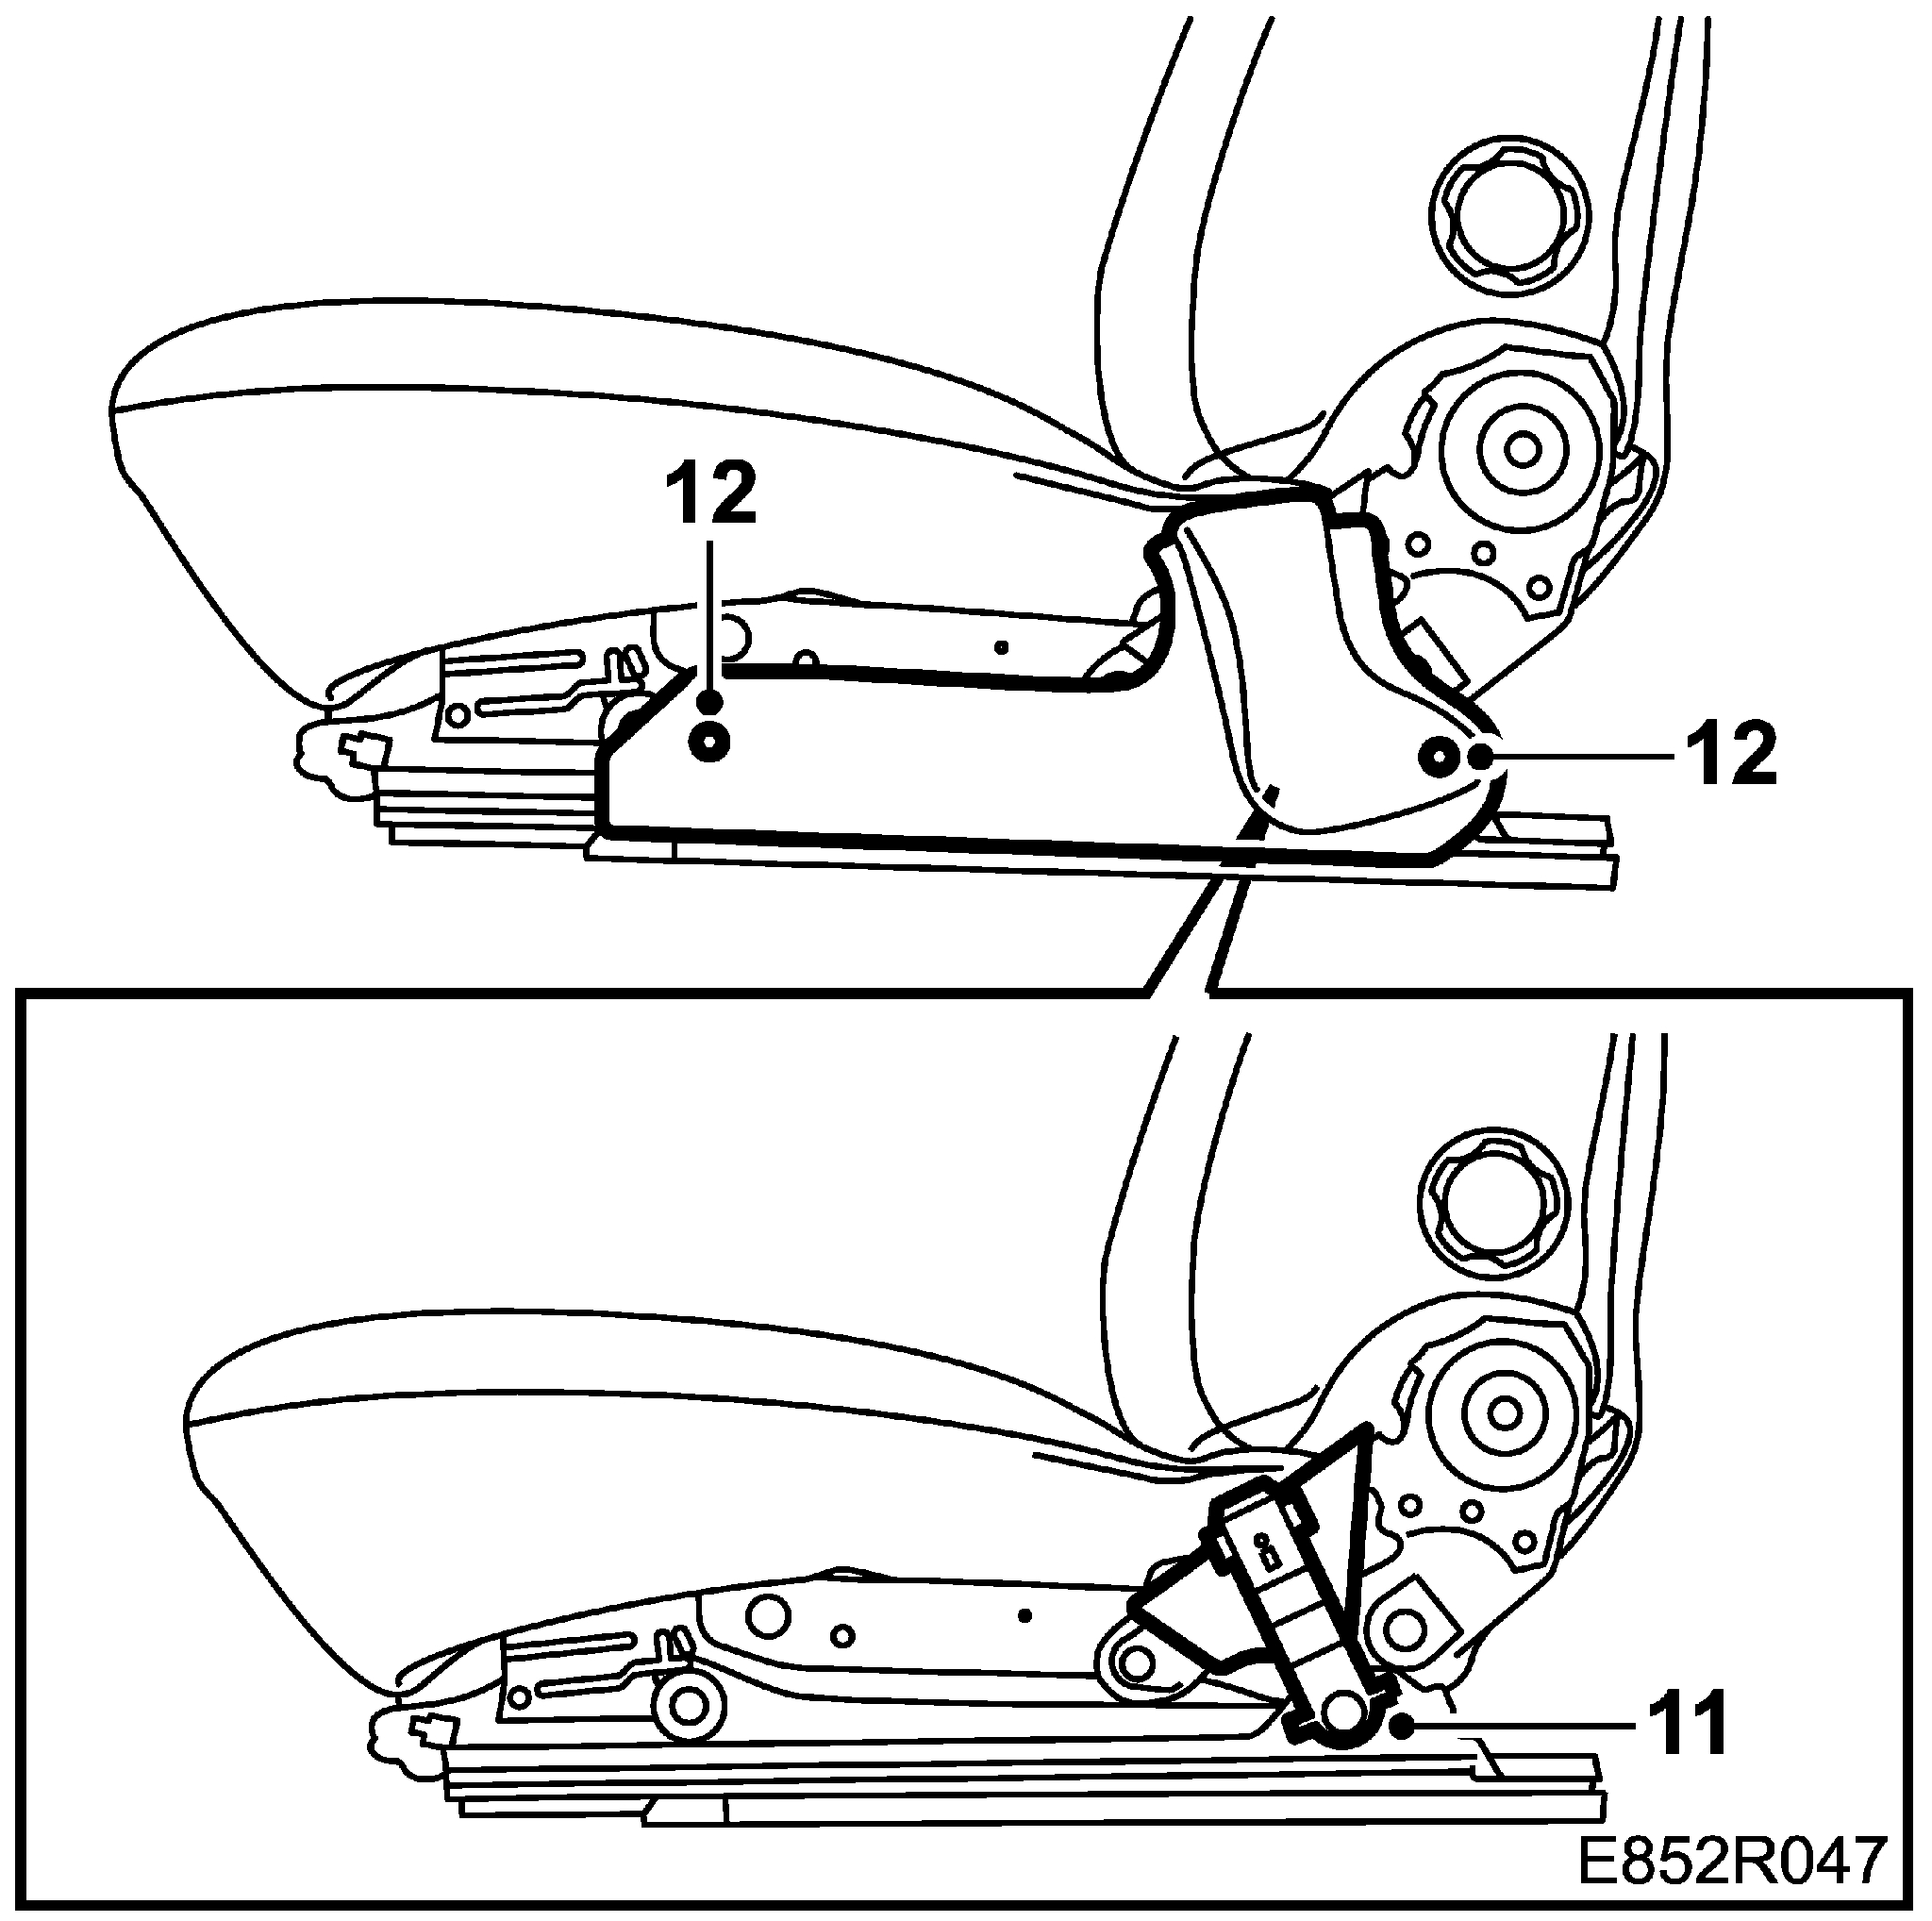
11. Unclip the small bungee cord that attaches the rear flap of the seat back cover to the seat frame under the seat.

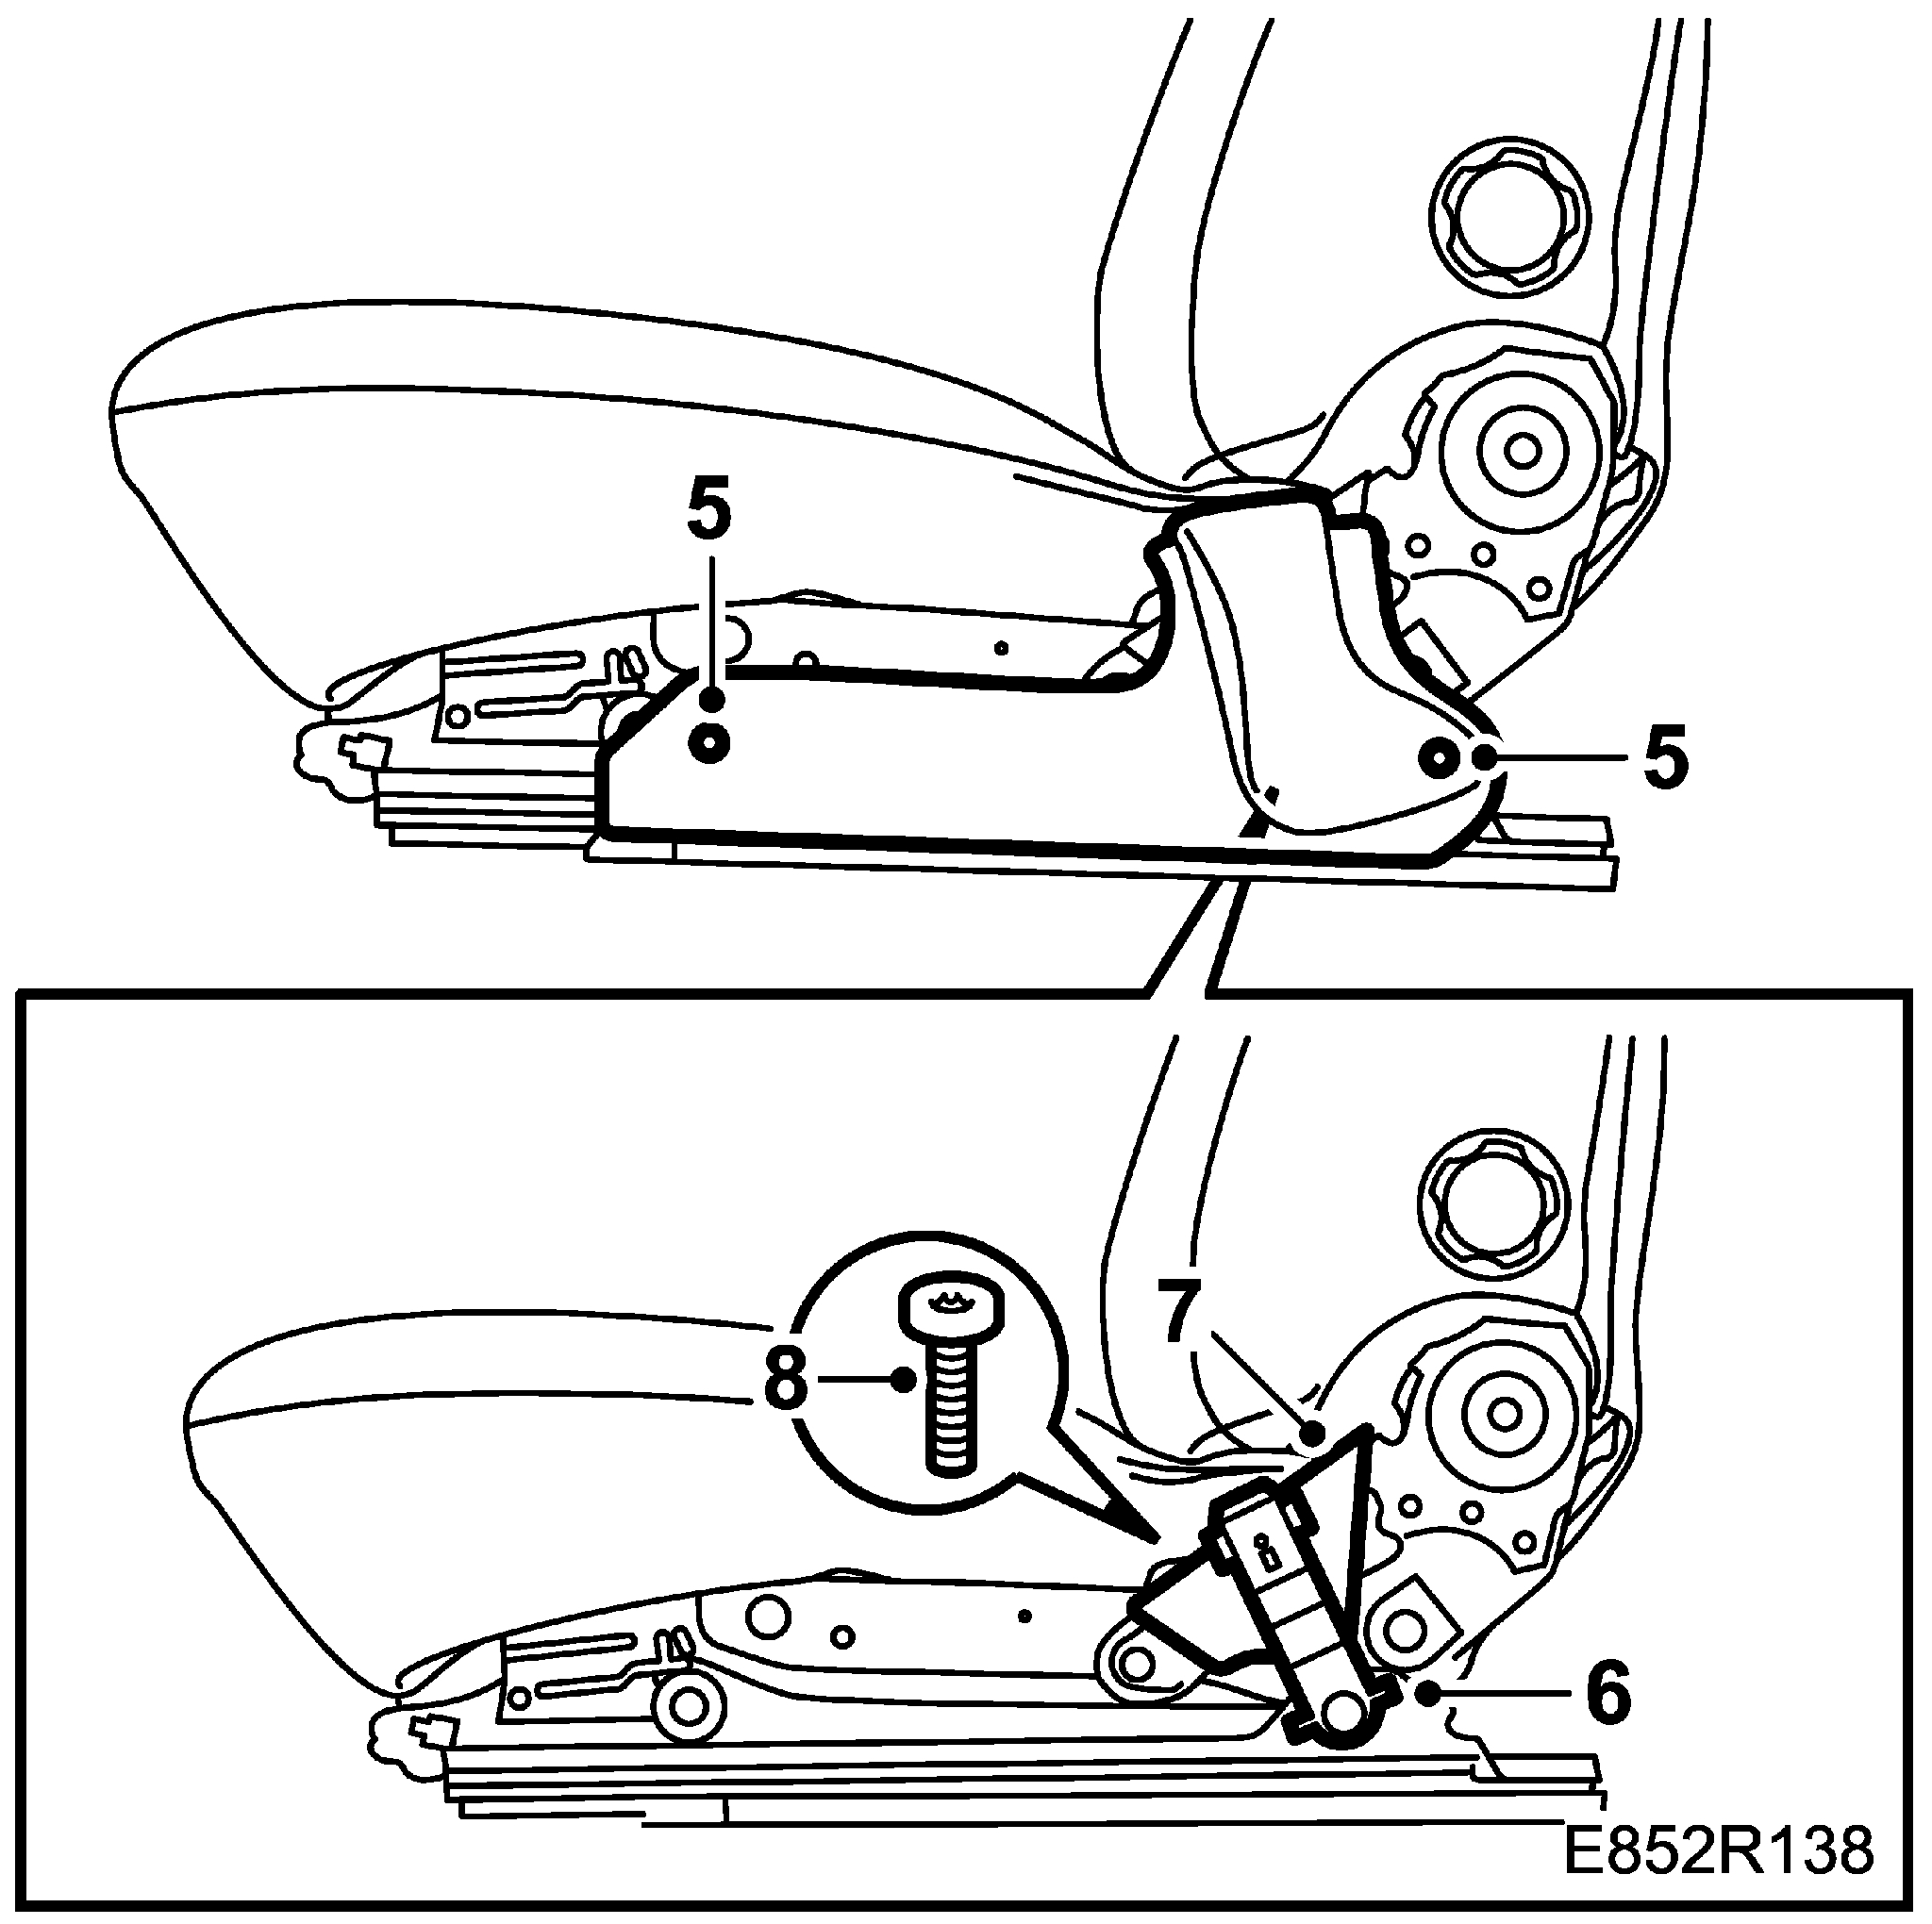
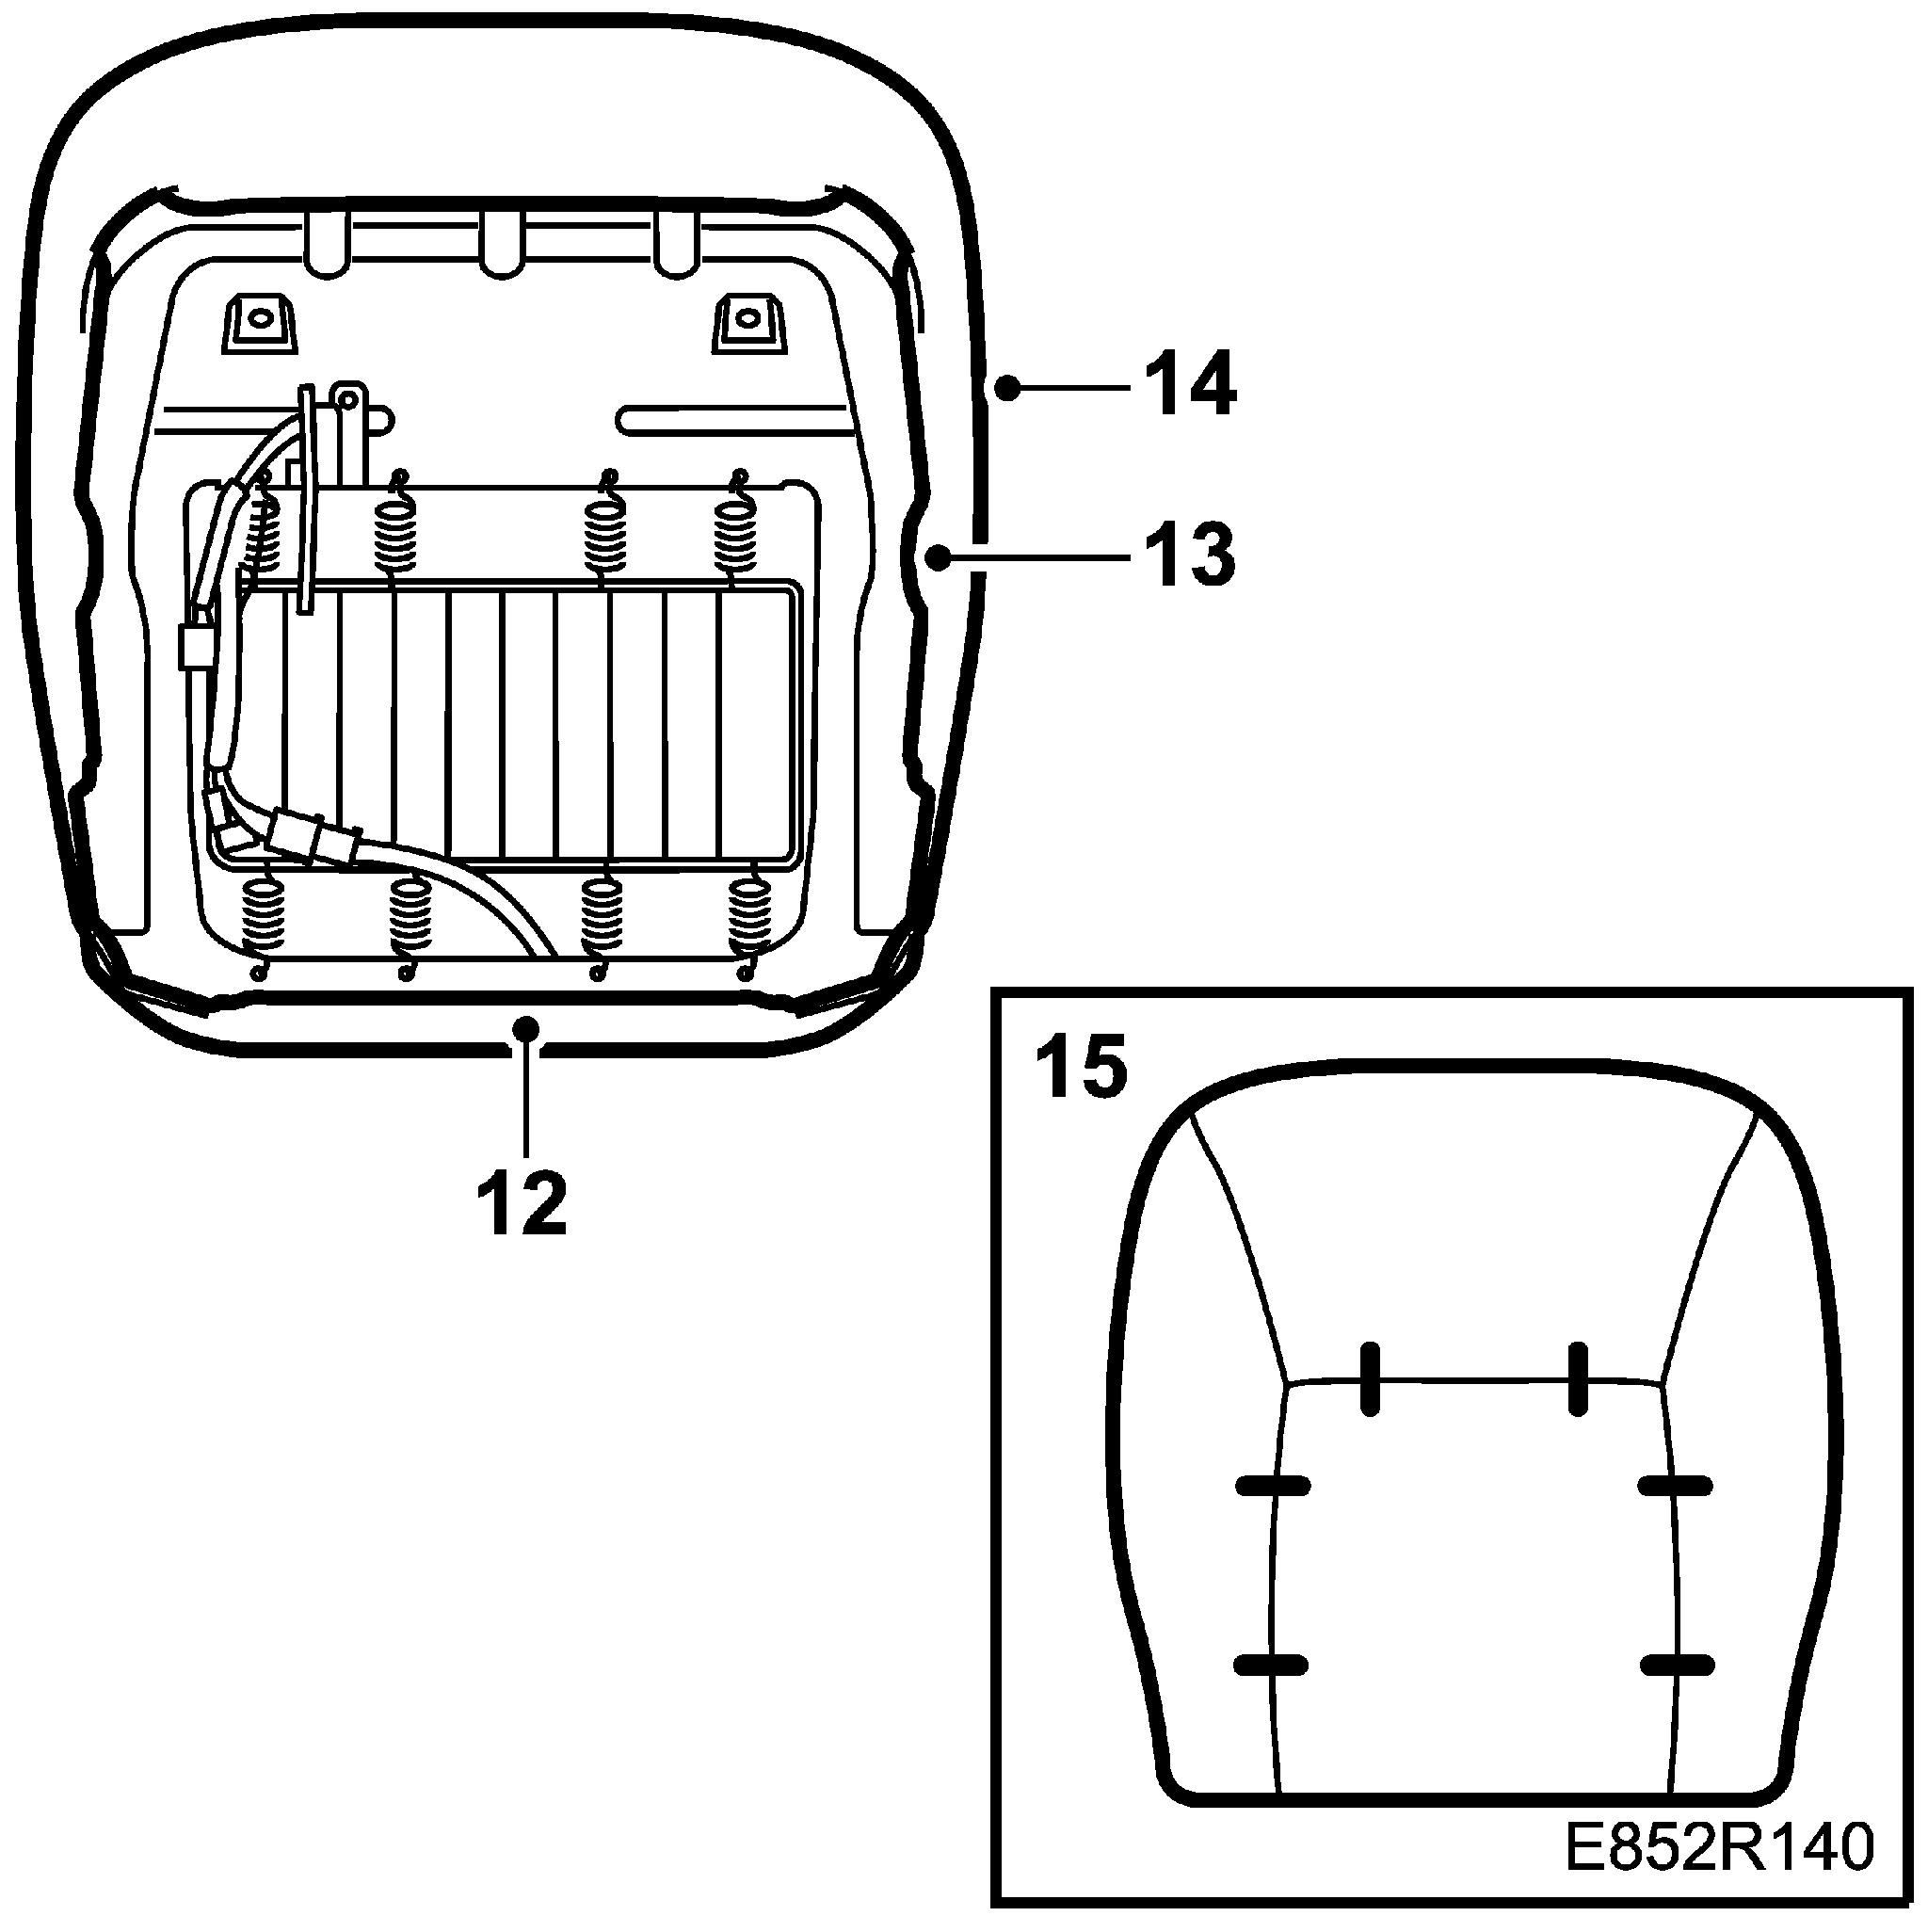
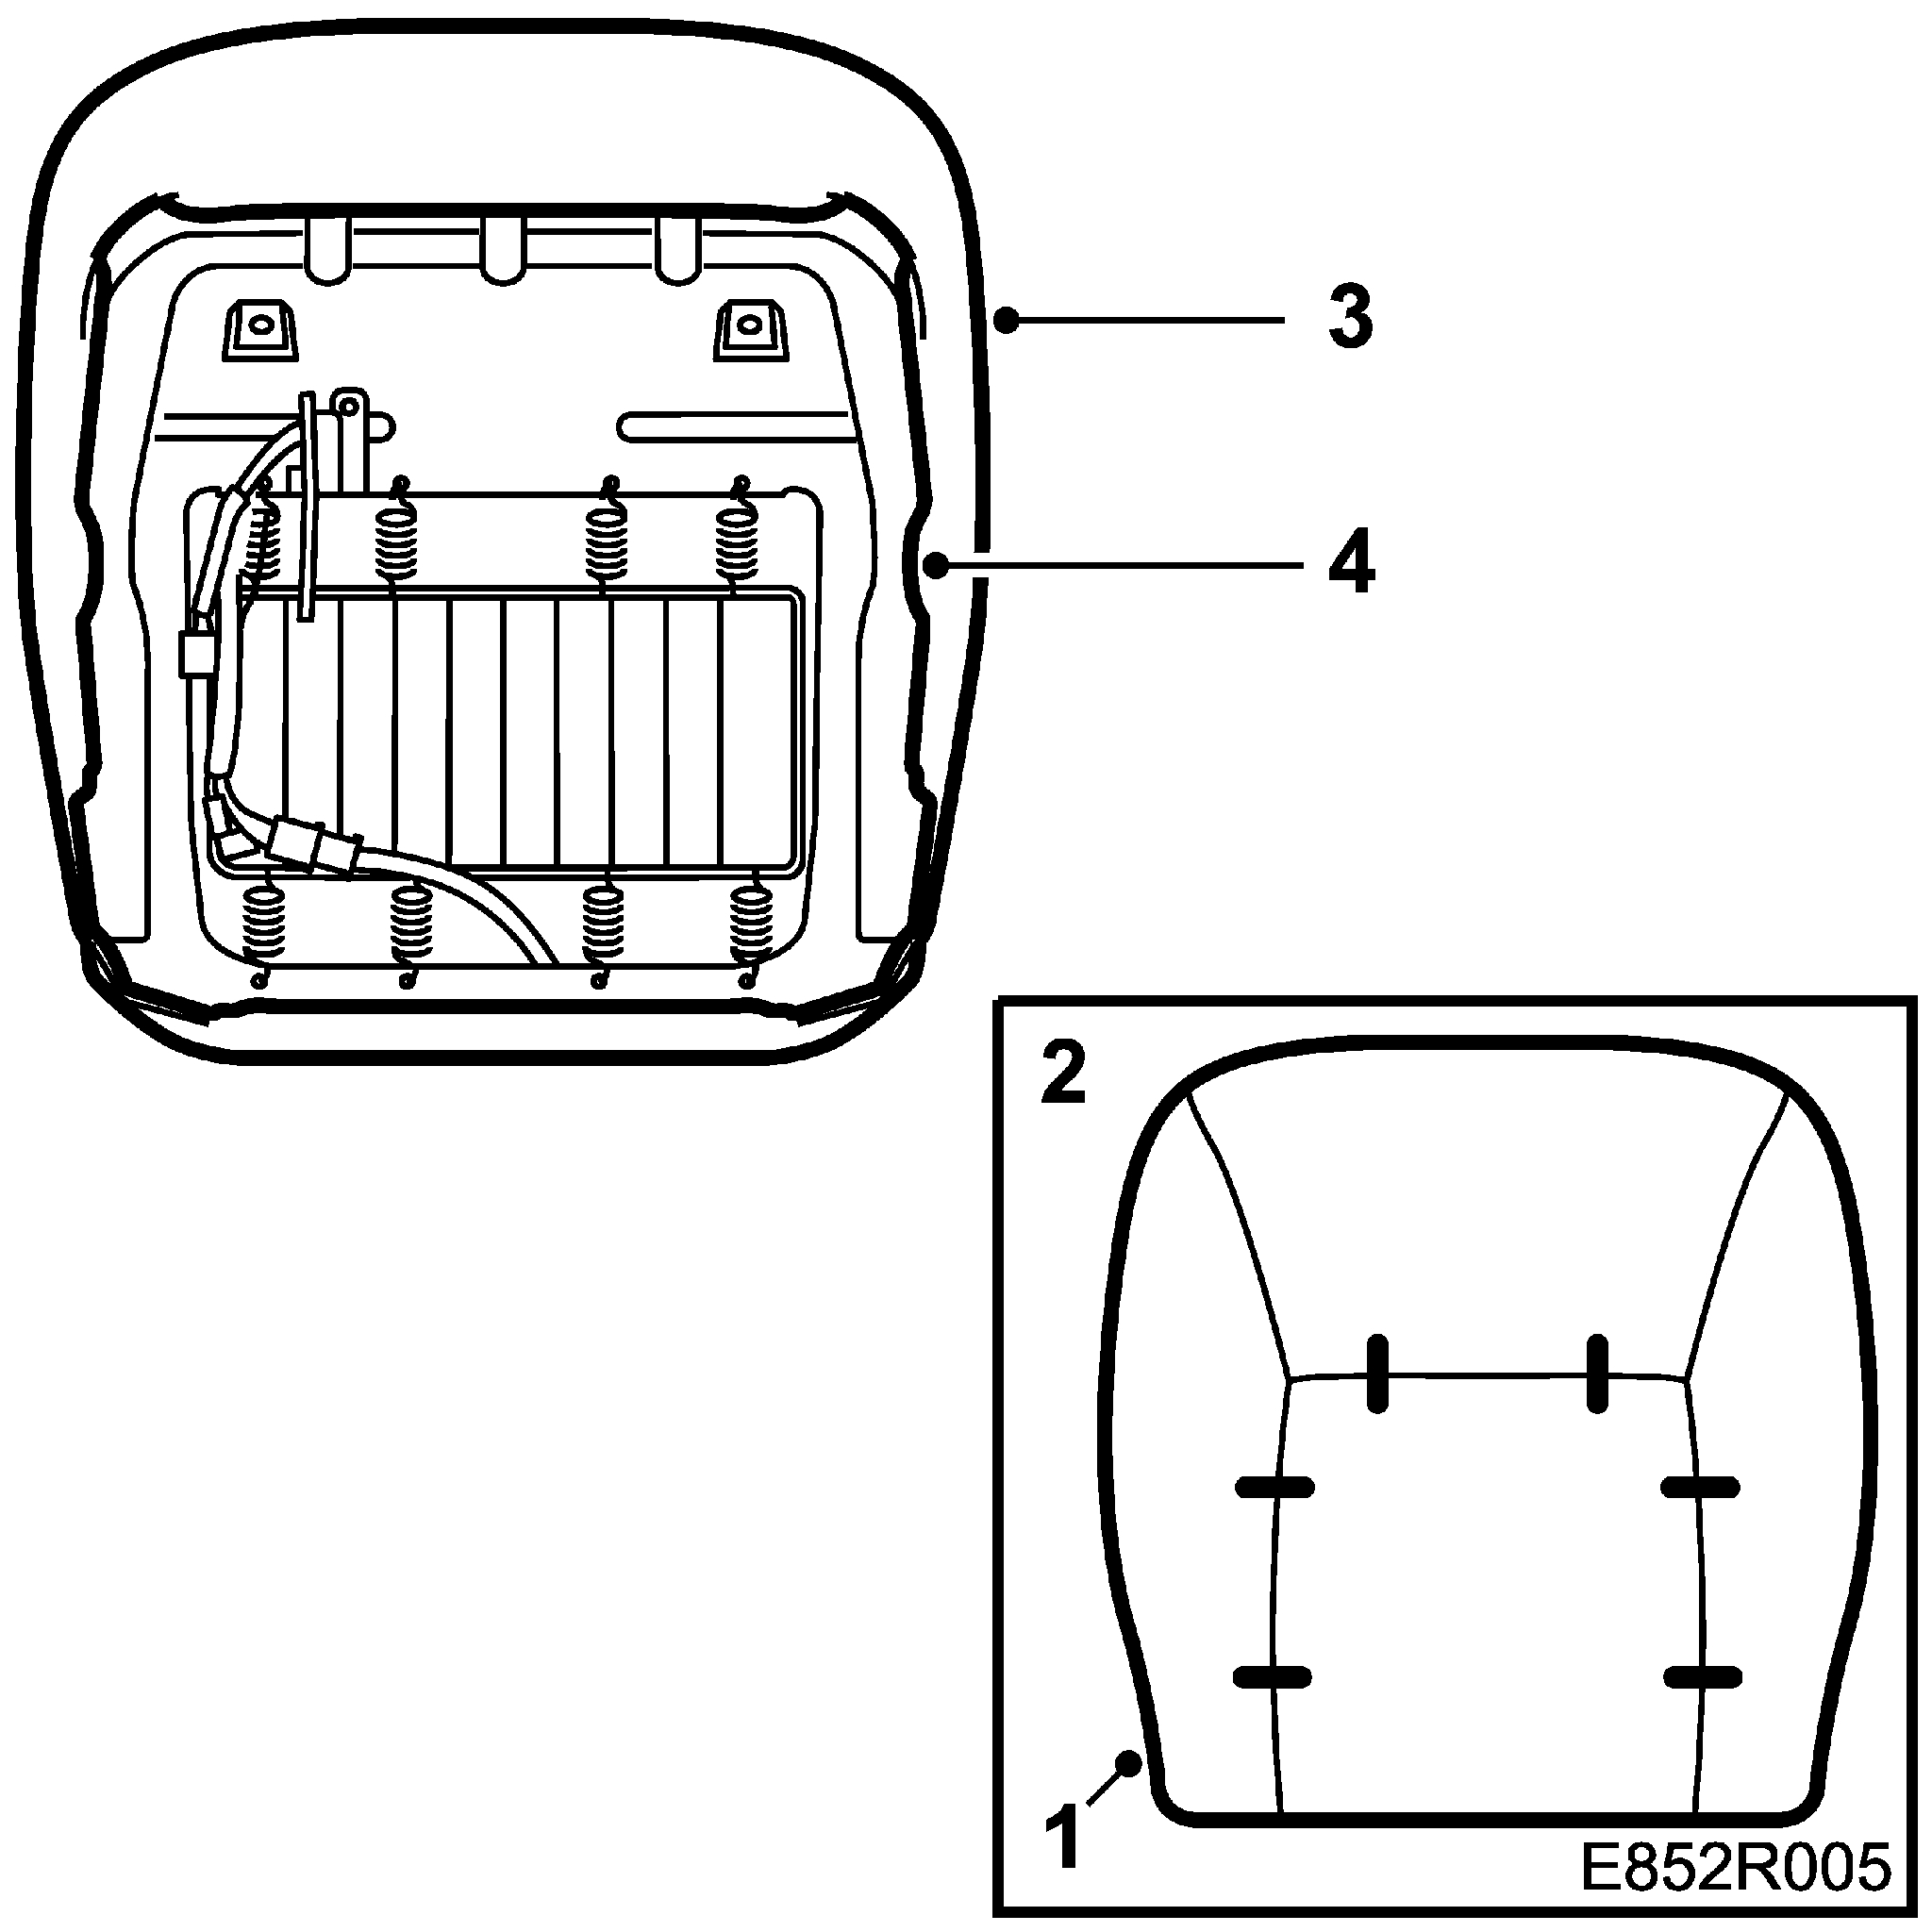
12. Undo the four T50 torx bolts (2 on each side) that attach the seat back to the bottom seat frame. These are the only two large torx bolts on each side so they are easy to spot. See if you can have someone help you hold the seat back so that it does not fall onto the ground. Place the seat back behind the seat as there are wires going from the seat back to the seat bottom. There should be about a 1 inch gap or so between the frame of the seat back and the seat bottom. This will give you enough room to get the seat cover off of the seat bottom frame at the back of the seat.

13. Underneath the back of the seat there are two hooks that come down from the seat cover which are attached to the seat spring frame. One is right by the connector block and the other is on the other side and is easier to get to. Using a pair of long nosed pliers pull these hooks towards you and then to the side and down so that they are no longer attached to the seat spring frame.

14. Starting at the front of the seat pry the rubber lip off of the frame of the seat. This can be a bit tough on your fingers but it is doable and does not need any special tools, just lots of patience. Work your way from the middle of the front of the seat down either side, working first on one side and then the other. Do this until the entire front part of this rubber lip is off the metal frame. Do the same for the 2-3 inch lengths of rubber lip that are on either side of the seat just in front of the rear section. Finally, take the rubber lip off the rear of the seat frame that holds the rear flap of the seat cover down.

15. The covers are very tight over the corners of the seat frame and they seem to need a lot of force applied to them to get them off this part of it.

16. Once you have accomplished the above you can remove the seat from the seat frame.

17. The seat cover is attached to the seat cushion (which is made of sturdy foam) by 6 metal †staples’. These staples are circular pieces of metal (similar to a key ring) that can be re-used if pried apart carefully. Starting on one side of the seat, fold back the leather to reveal the staples. Using two pairs of long nosed pliers hold one part of the staple (near the end) while prying apart the staple with the other pair of long nosed pliers (by prying apart the other end of the staple). Do this until a small gap appears between the two ends of the staple so that it can then be slipped off the rod. Do this for all other 5 staples, working on one side then the other and then finally the front. When all 6 staples are off of the rods you can then remove the cover from the cushion.

18. To put the seat cover on, the process is the reverse of the steps above starting with step 16 and working your way up to step 1.

Note: To recreate the holes for the staples in the underside of the new cover place the old cover’s underside to the new cover’s underside, with both in the same position †front of the new seat cover to front of the old seat cover, and make holes for the staples in the new cover’s underside according to the holes on the underside of the old cover. One can do this using a large, long nail †about 1/8” by 3 inches.

Starting at the front of the cover, attach each staple to the rod by holding the staple with a pair of long nosed pliers and threading the staple through the hole (which should be above the rod) that one has just made. Once the staple is threaded through take the other pair of pliers and bring the other end of the staple towards the end being held by the other pliers. Using just one pair of pliers force the staple closed so that the ends of the staple overlap. Do this with the 5 other staples going from the front, then down one side and then the other. Remember that the staples go around the metal rods which are on the underside of the cover, and go through the holes of the fabric that were made for this purpose with the nail.

19. Once the staples are in place, fold the cover down around the cushion and place the cover and cushion on the seat frame. Starting from the front of the seat fold over the rubber lip and push it onto the metal lip of the seat frame. This is not going backwards in sequence as I suggested above, but is done this way to make sure the seat is positioned correctly.

20. Next, push the side pieces of the rubber lip onto the side of the seat frame trying to make sure that the leather is in the correct position and not stretched towards one end.

21. The corners are the second-to-last items to be put on the frame and can be quite difficult to do as this section of the leather seat cover may seem too small, but all one has to do is exert a lot of force with one’s hands and fingers to push the cover over the corners and down. Make sure that the flap at the back is then pulled down. Then push the rear rubber lip onto the seat frame.

22. Re-attach the seat back by getting someone to hold the seatback in place while you re-attach the T50 torx bolts.

23. Attach the bungee cord of the seat back flap to the clip under the seat.

24. Swivel the seat up from the front and find the two hooks that come down from the top of the seat cushion. Re-attach them to the seat spring frame by using the long nosed pliers.

25. Slide on the seat cowl trim, being careful to make sure that the washer is still in place (in was held in place by some tacky glue on mine) in the middle of the side of the trim (where the round plastic cover is). Screw the side on first making sure the trim seats properly at the rear of the seat area where the adjustment knob goes on and at the front, under the seat, where the trim has a tab that goes under where the screw goes in. Then screw on the front torx screw that is under the seat.

26. Attach the adjustment knob for the seat back.

27. Attach the side lever plastic trim by sliding it on to the naked metal lever and make sure you hear a click which means that the small round tab has engaged the hole in the metal lever.

28. Adjust the seat back angle so that it is leaning as far forward as possible. Then take the seat out to the car and place it inside the car via the front door.

29. Swivel the front of the seat up (you can rest the seat on the rear seat) and attach the grommet on the black cable to the hole that it was in originally (the front one, as there are two).

30. Plug in the seat connector.

31. Re-attach the two clips on the black cable to the seat spring frame.

32. If needed, use a zip tie to re-attach the bundle of cables to the seat spring frame. Swivel forward the seat so that it sits flat on the chassis of the car. Make sure that all four holes are seen through the seat rails and that the seat rails are in their correct positions.

33. Attach the two front T50 torx bolts if the seat has not moved from its position on the seat rails when it was taken out of the car. If the seat has moved, lift the lever at the front up and move the seat as far back as possible making sure both seat rails do not move and then attach the T50 torx bolts.

34. Move the seat as far forward as possible and attach the two T50 torx bolts in the rear holes. Also attach the seat belt bolt after threading the seat belt through the slot in the seat trim cowl.

35. Arrange the seat as you want and you are finished.

Lots of text. Sorry about that. I didn’t have anyone who could spend the time with me videoing what I was doing.
Was this
answer
helpful?
Yes
No
Wednesday, August 7th, 2019 AT 9:29 AM
Tiny
JACOBANDNICKOLAS
  • MECHANIC
  • 108,300 POSTS
Welcome back:

Honestly, that is excellent. Do you work on all aspects of auto repair? And by the way, the idea that it is a lot of text simply means it is understandable and easy to follow.

Thank you so much for sharing that with us and everyone who will benefit from it. You work is appreciated.

Take care,
Joe
Was this
answer
helpful?
Yes
No
Thursday, August 8th, 2019 AT 7:51 PM
Tiny
CHRISTOPHER SA
  • MEMBER
  • 209 POSTS
Hi Joe,

That was the first time I did a re-covering of a seat. I will delve into anything car related even when I have never done anything in a particular area. To give an another example, my sister's Saab had window trim on the rear left corner of the car partly coming off. She purchased some windshield 'glue' (the black stuff) and I repaired the sections that were loose. One can't tell the difference between the repaired section and the original (un-repaired) section. The only areas I do not consider myself competent in is electronics and body repair (rust repair). But for the latter I am going to have bite the bullet as my BMW E36 back in Canada has rocker panels that need replacing and I am not happy giving that job out to a body shop unless I am there watching over them (which they may hate). So when I get back home you will get another question from me asking how to cut away the rocker panels in preparation for being replaced. I understand that the Alldata system has info on cut lines, etc. :)

Looking over this post, it has gone way beyond the 'plastic lever cover'! Will your search engine pick up on the fact that it encompasses an entire seat re-covering? If not, maybe the relevant sections can be copied over to a How-to page if you have something like that here.
Was this
answer
helpful?
Yes
No
Friday, August 9th, 2019 AT 6:28 AM
Tiny
JACOBANDNICKOLAS
  • MECHANIC
  • 108,300 POSTS
Welcome back:

It will be identified with the original title. However, I'm sure anyone having issues with a seat cover or repair will be looking at it.

Take care of yourself.

Joe
Was this
answer
helpful?
Yes
No
Friday, August 9th, 2019 AT 8:00 AM

Please login or register to post a reply.

Sponsored links