Hot short in electrical?

Tiny
SANDSTORM1958
  • MEMBER
  • 1998 CHRYSLER TOWN AND COUNTRY
  • 3.8L
  • V6
  • 2WD
  • AUTOMATIC
  • 136,000 MILES
The photo shows what the alleged "professional mechanic" left me to cause major problems, disconnected engine main ground wires! The car was in limp mode so weeks of searching for the cause, replacing an alternator that was blown out, and now getting a sparking upon connecting terminals to the battery I came to the conclusion that I have a shorted out hot wire grounded in my harnesses someplace.

How can I simply remove each individual section as a whole to check for the hot spot/fried wiring that's grounding? Can they be removed individually? I know on the driver side of the engine compartment several harnesses are connected by locking connectors.

I don't have detailed schematics to show me what harnesses go where or where the grounding points are (only that there are ground points). I only have the simplified schematics from a Haynes repair manual. That mechanic has cost me almost double what the transmission swap and labor combined did so I think I'll handle this myself locating/repairing the wiring short.

I already replaced the alternator, TCM, and won't be able to check for other damages this has done until I can hook up the battery without the shorting out problem. I'm assuming from experience the "no ground" caused the burning out of one "hot all the time" wire feeding power melting the insulation grounding it to either body work/frame/ground wire(s). I need help here.
Tuesday, December 26th, 2023 AT 10:58 AM

25 Replies

Tiny
CARADIODOC
  • MECHANIC
  • 33,752 POSTS
You have the right idea, but you're looking at this incorrectly. A ground wire that is disconnected will result in too little current flow, as in a dead circuit. What you started out describing is damage from too much current.

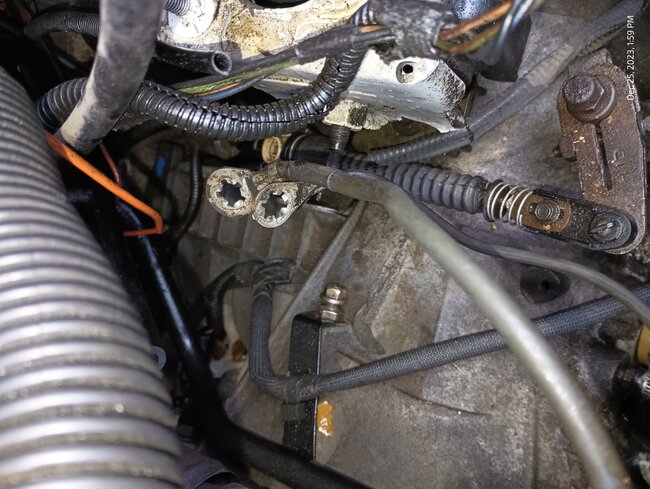
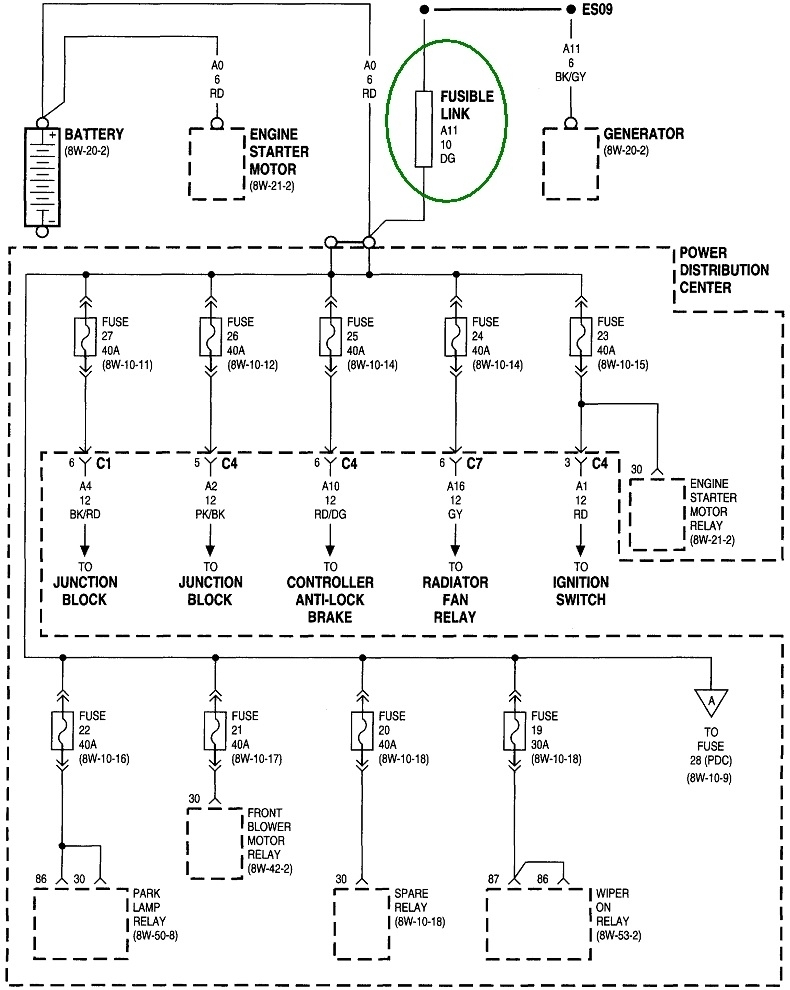
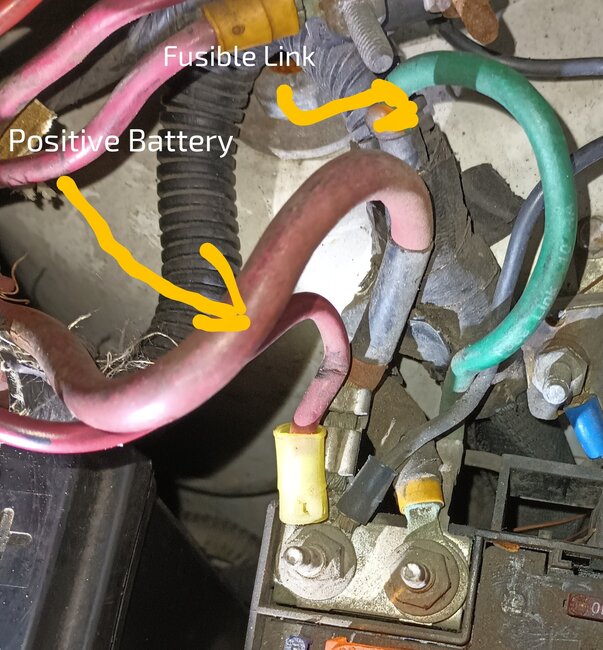
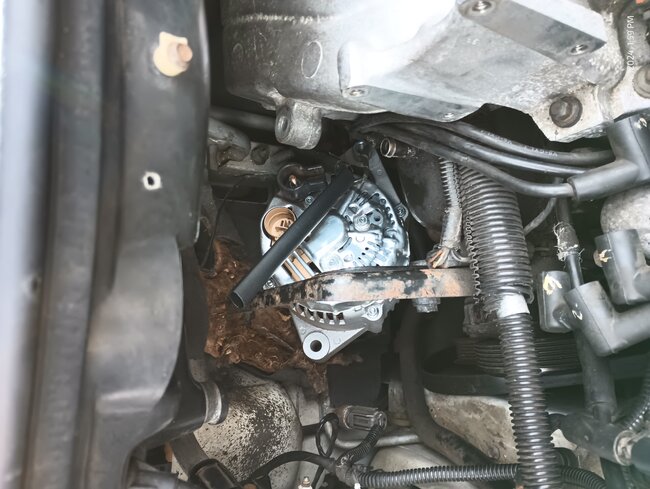
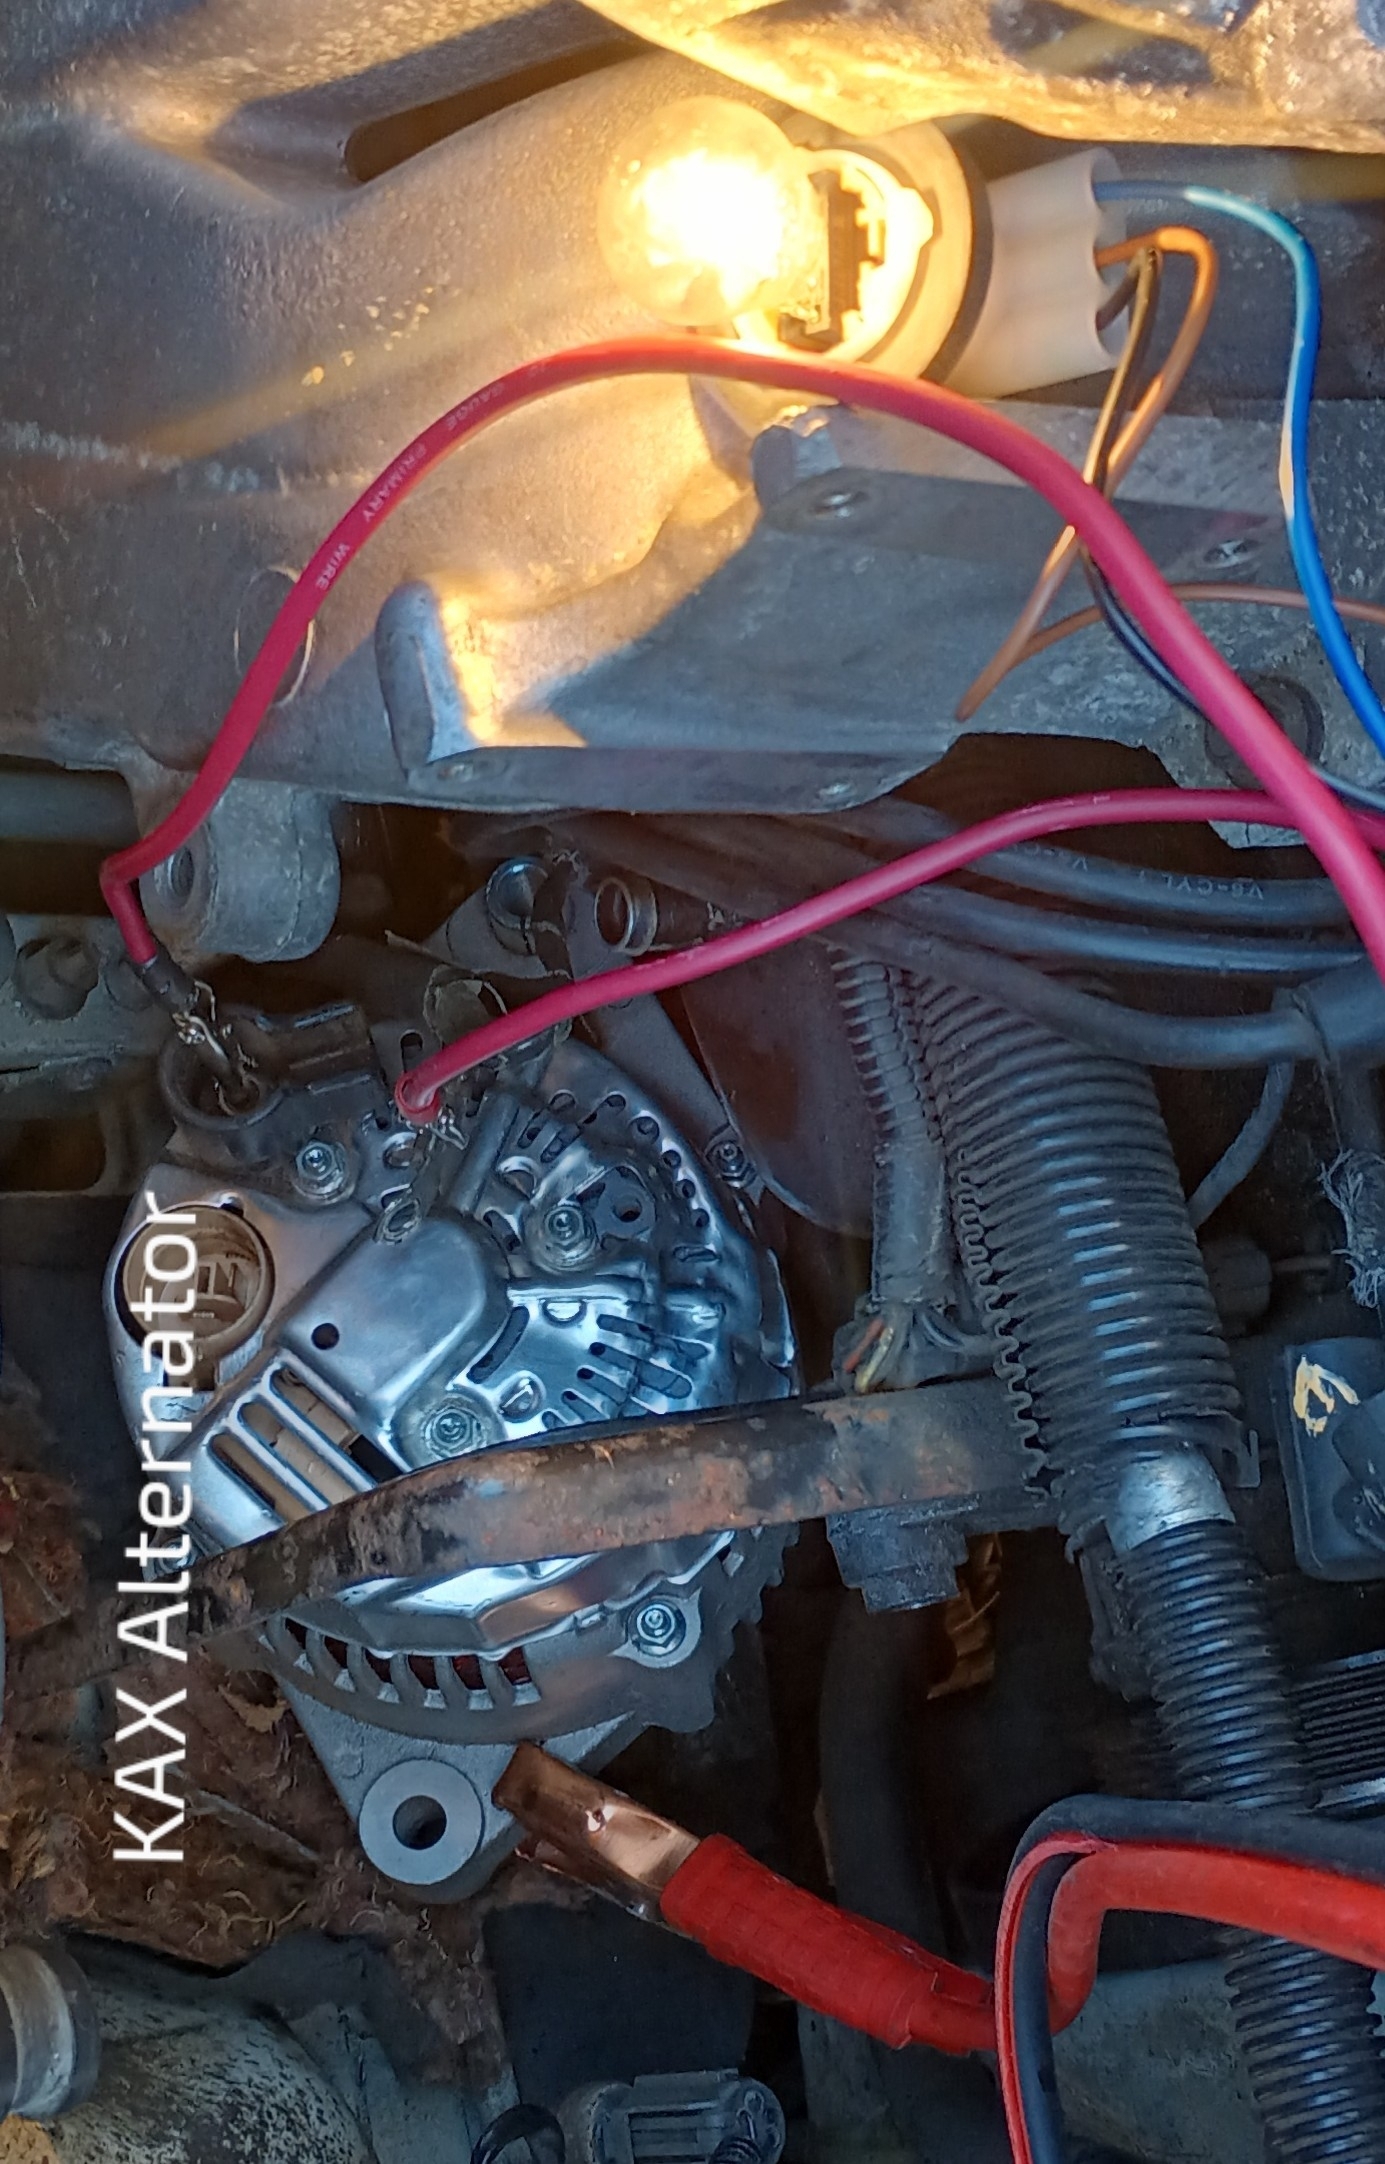
The wires that are hot all the time are few. The one that causes the most trouble is the fat one, usually red, that bolts to the back of the alternator. It's well protected, but if a wrench or socket touches that nut and anything metal on the engine at the same time, it will cause a fusible link wire to burn open on older models, or a very large fuse, usually bolted into the under-hood fuse box, to blow on newer models. Either way, once the fuse device has blown, you'll no longer get sparks when connecting the battery.

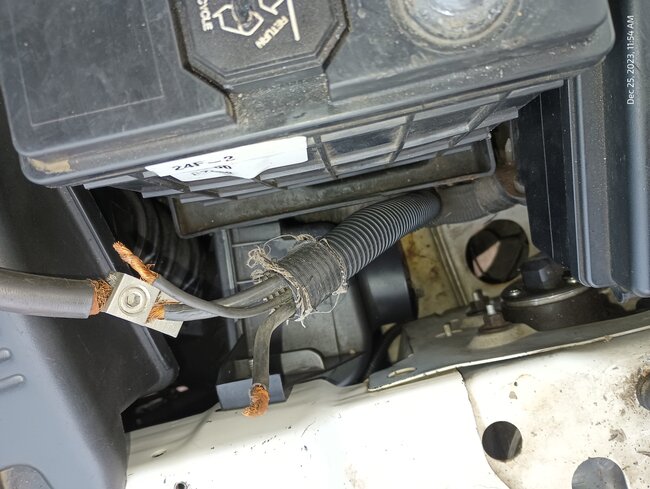
The next wire is the larger positive battery cable that runs down to the starter solenoid. That cable is never fused. It's hard to make it have a short by accident. A better suspect for that cable is an extra wire that was bolted on to the starter solenoid's large copper stud. GM is famous for adding a second wire on that stud to feed the rest of the vehicle. They use it a convenient tie point, rather than running that wire all the way back to the battery. Most mechanics are used to seeing that extra wire, and we've all run into problems we created for ourselves when we replace the starter and forget to reinstall that second, smaller wire. To add to the confusion, some manufacturers, mostly imports, use one of the starter bolts to attach one of the ground wires. It's not outside the realm of possibility someone mistakenly found a ground wire like that and put it on the battery cable stud. On Chrysler products, there's always just the one battery cable bolted onto the starter solenoid. If you find a second wire, it doesn't belong there.

The last wire that's always hot is the smaller red one on the battery's positive cable clamp. That one runs to the under-hood fuse box. Once it reaches that fuse box, every circuit it feeds is fused. Other than the alternator's output circuit fuse, the largest one in this box is generally no bigger than a 40-amp fuse. Here again, if a wire leaving that box is grounded, its fuse will blow, then there's no more sparking when you connect the battery cables.

There's a simple trick that will help you find the short. That is to remove one battery cable, (we usually do the negative one so nothing happens if you touch the metal tools to the cable and vehicle at the same time), then connect a small 12-volt light bulb between the cable and the battery post it came from. I typically use a 3157 brake light bulb. Those are easy to connect small jumper wires to. When a direct short is present, as you're describing, that bulb will light up full, normal brightness and limit current to a safe one amp. The bulb will get very hot, so be careful to not lay it against anything. Now you can disconnect plugs and move wire harnesses around. When you do something to make the short go away momentarily, the bulb will get dim or go out.

There's one major clinker with this method in this application. That comes into play more often when we're looking for the cause of a small drain on the battery. You'll need to be aware of this either way. That is it can take up to 20 minutes for some computers to go to "sleep mode". Until that happens, the electrical system can draw up to three amps. Right now those computers are dead, as in not functioning. That doesn't change if you get a shower of sparks when you reconnect the battery. The concern here is with my test bulb in the circuit, and it's full brightness, indicating something is shorted, when you do something that removes the short, the bulb is likely to remain bright. That's due to the computers trying to go to sleep mode. They won't be able to because the test bulb is using up too much of the 12 volts, leaving too little to turn the computers on so they can time out.

In this case, I would start out using a common 9004 headlight bulb instead of the 3157. Headlight bulbs draw five amps on low beam. It also gets very hot. Don't touch the glass part of that bulb. When it gets hot, your fingerprint grease will burn through the glass and damage the bulb. What you would need to do is unplug and wiggle things while watching that bulb's brightness. You should be able to detect a slight drop in brightness when the short is gone. Also, you are likely to see the brightness pulsating about once or twice per second, but that might take a while to show up. That pulsing is due to the computers trying to go to sleep mode, but the low voltage tricks them into waking up again. This can happen over and over. The secret now is to use a third jumper wire to short out the light bulb. The pulsing brightness proves there's no dead short at this time. Placing a jumper wire across the bulb is the same as reconnecting the negative cable to the battery post. Now the full three amps needed can get through to run the computers until they time out. The bulb will be off because it is being bypassed by the jumper wire. Now just wait at least 20 minutes, then remove that jumper wire across the bulb. What's flowing now is called, "ignition off-draw, (IOD) current. That must be less than 35 milliamps, (0.035 amps). That is way too low to cause the filament in the bulb to glow. Also, at such a low current, the bulb will be "dropping" very little of the 12 volts. The computers will get plenty of voltage to remain in sleep mode.

It's important to be aware that if you do anything now to break the circuit, even for an instant, the computers will wake up again and require another 20 minutes to time out. For those measuring IOD current, breaking the circuit even happens when simply changing the range on the multimeter. The meter, like the test bulb, must be bypassed with that third jumper wire while the meter is switched.

This light bulb trick works great to bypass a fuse that keeps blowing, or a relay when you want to power up and diagnose a circuit without needing to run the engine or even turn on the ignition switch. I put together a set of drawings to explain those procedures better. I never did that for your problem because we don't run into it very often. If it will help, let me know, but I have to do that at home, so it can take a day or two. The procedure is very simple, but a drawing does a better job of explaining what I'm asking you to do.

If you aren't familiar with the small jumper wires I referred to, Harbor Freight Tools has a pack of ten, in five different colors, for about $3.50. I buy them two or three packs at a time and cut them up for other projects. I've found that quite often, when they crimp the little alligator clips to the ends of the wires, they don't do a careful job and there can be intermittent connections. Doesn't help to have intermittent test equipment when you're trying to diagnose an intermittent problem. Now, as soon as I get a pack of these clip leads, I slide the boots off and solder the wires to the clips. Just another tidbit of knowledge to be aware of that might prevent some frustration.

Let me know if you understand what to do, and what you find. I'm here for a few hours almost every day, but don't panic if it takes almost a whole day for me to reply.
Was this
answer
helpful?
Yes
No
Tuesday, December 26th, 2023 AT 6:49 PM
Tiny
SANDSTORM1958
  • MEMBER
  • 35 POSTS
I can try what you suggested but I want to clarify something that took place after the transmission was installed. On the negative cable there are 2 smaller black grounds connected to the extension wire at the terminal. One of the cables has 2 smaller ground wires I recognized from rewiring my other car's coolant temp sensor and crankshaft position sensor which are blk/tan and blk/lt blu. That ground set is connected to a ground point in the body under the battery stand, also another ground wire is there as well and later traced to one of the engine ground wires that was not reconnected along with the main negative terminal ground cable (shown in previous photo). I realized that this ground wire set was the only ground functioning while the car was in operation for over 12 miles in limp mode. The car was started and idled various times over a couple of weeks, and it dawned on me to check that output voltage on the alternator which resulted in 16v +. The reason why I asked about harness removals was because the driver's side of the car holds 90% of the harnesses, the PDC, and the PCM and it's only that side any sign of a short has been taking place including at the top of the PDC where the 10-gauge fusible link is located. When I disconnected the ground set from the ground point under the battery stand but with the engine grounds connected, I put the negative cable on, and it sparked up but this time the fusible link began heating up. This is why I was thinking I have a damaged power feed wire grounding out to the body or frame. After all the damage I found left behind by the mechanics I wouldn't be surprised if they cut or broke the insulation on a feed wire sitting above the transmission which, again, is on the driver's side of the car. To my knowledge there's only 2 power feeds that run hot full time there, 1 is to the radiator cooling fans and the other is to the starter solenoid which I believe I ran across inside a harness right above the Shift Solenoid Block on the transmission coming from the PDC area. I couldn't get that harness completely opened up and unwrapped because the bottom of it felt like it was meshed together like the plastic wrap on the outside had been melted somewhat.

I'll let you know in a few days what took place. I have to deal with this outdoors in the cold after it stops raining. The car's been down for 3 months so it's not going to hurt to wait another few days.
Was this
answer
helpful?
Yes
No
Tuesday, December 26th, 2023 AT 7:43 PM
Tiny
CARADIODOC
  • MECHANIC
  • 33,752 POSTS
Don't forget the fat wire to the alternator.

Once you connect the test bulb, don't worry right now about any ground wires. Shorts are going to be on the hot or feed wires. Once we get that handled, we can look for any circuits that are dead or not working properly, then we can look at the ground wires. My concern for now is to prevent smoke from leaving a wire.

Also, some ground wires are redundant, especially if you come across any going from the engine to the firewall, hood, or inner fenders. Those are more for radio noise suppression and won't affect other things you would notice.
Was this
answer
helpful?
Yes
No
Tuesday, December 26th, 2023 AT 9:02 PM
Tiny
SANDSTORM1958
  • MEMBER
  • 35 POSTS
I'll try your method once a few things are replaced. I was using my multimeter to conduct a continuity test and came across the fact that I have a reverse polarity problem in the battery. It was confirmed by a mechanic up the road from me. He asked if I had an alternator overcharging and told him I did and replaced it but couldn't connect the battery up to check the new one. Then he asked if I ran across any problems inside the PDC (Junction Box) and I said no then we looked inside the PDC finding what you see in the photo. That's the EATX Shutdown Relay (ordered a new one) and it had electrical tape on it. Looked back at my photos I took before the car went to the shop, especially the PDC. I don't trust backwoods mechanics, so I photograph everything prior to any vehicle going into a shop. That relay was undamaged before but comes back with tape covering that damage. I assumed it's damaged inside as well, so I ordered a new one. All I know about the EATX Shutdown Relay is it controls power to the Shift Solenoid and deals with the TCM. Explains some of the symptoms I was getting before the alternator issue happened like the Limp Mode continuously. So, what will happen before I start your suggested method is replace the damaged battery with a fully charged new one. We have a state-of-the-art computerized charger I know won't damage it unlike my little Schumacher that may or may not have been the culprit in the cell burning out. I had some weird readings from it the last few times it was used. The other is replacing the EATX Shutdown Relay. I did look at the 20-amp fuse for the EATX, but it looked fine, not burnt or broken. All this was to let you know there'll be a delay in running that test method.

Thanks
Was this
answer
helpful?
Yes
No
Thursday, December 28th, 2023 AT 3:37 PM
Tiny
CARADIODOC
  • MECHANIC
  • 33,752 POSTS
Rather than buying new relays, you can get dozens of them from any salvage yard. They have very low failure rates, but it's always one of the first things we say to swap or try because it's a quick and easy step. Some of the yards around me will fill coffee cans with fuses and relays from cars about to be crushed, and sell those for $10.00 to $15.00.

If you want to simplify this, remove the transmission relay and the automatic shutdown, (ASD) relay and set them aside. The transmission won't shift and the engine won't run. That lets us concentrate on just being able to connect the battery and get other circuits working, one at a time.

The only fuse link wire I can find in the diagrams is shown below. It will be a 10-gauge dull dark green wire spliced into the wire going to the output stud on the back of the alternator. All "AC generators", ("alternator" is technically a Chrysler term), have a minimum of six "diodes" in their output circuits. Diodes are one-way valves for electrical current flow. When the engine is off, those diodes are in the circuit backward, making them "reverse-biased" or turned off. Those are what stops the battery from seeing a dead short and discharging through the alternator. If the battery is connected backward, as we read here much too often, those diodes will be forward-biased and act like pieces of wire. The only thing limiting how fast the battery discharges is the diameter of the wires, and the fuse link section is the smallest of those, so it is going to get the hottest just before it burns open. You will get that shower of sparks you described when connecting the battery. If you put my light bulb between the battery post and its cable clamp, it will light up full brightness. It will dim if the fat wire is unbolted from the alternator. Rather than wasting time with those steps, it makes more sense to just connect the battery correctly.

To test a fuse link wire, tug gently on it. If it's burned open, it will stretch like a rubber band. If it's good, it will act like a wire. When one is burned open, if the two halves are long enough, you can splice the ends together. As long as any part of the wire is intact, the safety valve feature is still there. You can also buy new ones from any auto parts store. The color denotes its current rating. You'll get a piece about 12" long which is enough to cut into two or three pieces to make multiple repairs. Don't use regular wire. The insulation on fuse link wires will always be a dull color and is designed to not burn or melt. The length of the fuse link wire is not important. This is the weak-link-in-the-chain. A half inch of this wire will do the job, so a one-inch piece will be like having two weak links.

When the battery has been connected backward, expect to find a lot of blown fuses in the Power Distribution Center, (PDC / under-hood fuse box), and in the Junction Box, (JB / fuse box in front of the brake pedal). There's a lot of computer modules on this van that can't tolerate reverse voltage. To address that, they usually have more than one 12-volt feed wire and all will have a reverse-biased diode inside, between the 12-volt supply and ground. Those diodes do nothing in normal operation, but when the battery or jumper cables are reversed, those diodes become forward-biased, act like a dead short, and cause the appropriate fuse to blow, thereby protecting the computer. Most often simply correcting the reversed connection and replacing the fuses is all that's needed.

Keep me updated on your progress.
Was this
answer
helpful?
Yes
No
Thursday, December 28th, 2023 AT 5:55 PM
Tiny
SANDSTORM1958
  • MEMBER
  • 35 POSTS
I have 10-gauge fusible links in my shop, automotive grade about 9" long on each. I have a business account with AutoZone so the EATX Shutdown Relay was not that expensive and will be delivered tomorrow with a new battery. Seeing as this is our only vehicle I haven't any choice but to have my stuff delivered, no wheels. I'll keep you updated but one question - Disconnect the alternator wire now or not? New alternator was put in prior to this electrical snafu happened and the battery was never reconnected completely after that sparking took place.
Was this
answer
helpful?
Yes
No
Thursday, December 28th, 2023 AT 6:11 PM
Tiny
CARADIODOC
  • MECHANIC
  • 33,752 POSTS
Dandy. I picked the alternator because that was the only fuse link wire I could find. Maybe I read this wrong. Is that the wire that was getting hot? If it is a different one, can you figure out a way to tell me what that wire goes to? The diagram I posted is only the first one out of 24. It takes me some time to format them in a way they can be uploaded. I'm going to do that at home later tonight for those 23 so I have them if we need them.
Was this
answer
helpful?
Yes
No
Thursday, December 28th, 2023 AT 7:00 PM
Tiny
SANDSTORM1958
  • MEMBER
  • 35 POSTS
No, that fusible link (dark green) sits just above the PDC and is the only one in the system, connects to a multi-hookup in the PDC with the main battery power wire from the terminal. That's the one that got hot AFTER I got the engine grounds connected back up. Prior to that one of the ground wires (see photo) that tied into the extension wire from the Negative terminal completely fried off. In that photo is the Main terminal ground, a medium ground that has 2 smaller system grounds (blk/lt blue sensor grounds, blk/tan the PCM ground) linked to it to a ground point under the battery stand, and a smaller ground that is attached to the ground point too. I have a new single piece cable coming tomorrow too because I bought new terminals that don't connect like the old version do.
Was this
answer
helpful?
Yes
No
Thursday, December 28th, 2023 AT 7:17 PM
Tiny
CARADIODOC
  • MECHANIC
  • 33,752 POSTS
I think I'm getting a better picture of this.

"Connects to a multi-hookup in the PDC with the main battery power wire from the terminal"

I think you're describing the two wires tied to one point right under the green circle I put on the diagram, is that right?

"That's the one that got hot"

Clear this up. Was it the battery cable or the fuse link that got hot?

I completely overlooked the two splices right above my green circle, (ES09). Those indicate additional wires are spliced in there, but they aren't shown because they aren't considered relative to that part. I'll need some time to dig through the diagrams to figure out what is connected there.
Was this
answer
helpful?
Yes
No
Thursday, December 28th, 2023 AT 7:41 PM
Tiny
SANDSTORM1958
  • MEMBER
  • 35 POSTS
The fusible link got hot nothing else. And the diagram didn't come through.
Was this
answer
helpful?
Yes
No
Thursday, December 28th, 2023 AT 7:57 PM
Tiny
SANDSTORM1958
  • MEMBER
  • 35 POSTS
I'll take a photo of that area in the morning.
Was this
answer
helpful?
Yes
No
Thursday, December 28th, 2023 AT 8:00 PM
Tiny
SANDSTORM1958
  • MEMBER
  • 35 POSTS
Big red is to battery, Fusible Link is fat dark green. This is a disability conversion van, so a lot of funky wiring tied into this area, but I've capped off most of all I've found because it'll be removed. Some wires go to toggle switches that some mechanic around here did long ago and messed it all up. None of those wires have been touched. None are hot because I wire nutted them off unless the tranny mechanics messed with this stuff too which wouldn't surprise me in the least.
Was this
answer
helpful?
Yes
No
Thursday, December 28th, 2023 AT 8:33 PM
Tiny
CARADIODOC
  • MECHANIC
  • 33,752 POSTS
I searched through all of the diagrams last night but couldn't find any second reference to splice ES09. As best I can tell, that is the splice for the fuse link wire. I know from previous experience that alternator output wire doesn't go anywhere else except back to the battery, or to there through the fuse box. My mind is telling me the same thing as before. If that green fuse link wire is getting hot, current has to be flowing through the alternator to ground, and that means at least two of its six diodes are shorted. Remove that wire from the back of the alternator, then see if you still get sparks or if the test light is still bright. If indications are the high current is gone, leave that wire off for now, then let's work on what it takes to get the engine running.
Was this
answer
helpful?
Yes
No
Friday, December 29th, 2023 AT 6:55 PM
Tiny
SANDSTORM1958
  • MEMBER
  • 35 POSTS
This is just an update.
Weather and health are my major issues holding me up for doing anything (Central Pennsylvania) but I have managed to get some stuff accomplished.
1] Several harnesses run along the radiator region from the PDC. One running into a multi-split off in different directions I began to break open because battery ground runs through it as does the 2 smaller grounds that connect battery ground to ground point under the battery stand. In this harness a 6 AWG Red cable also partially runs then splits off on it's own, the Starter Solenoid Power Feed from the PDC. That cable, at that point, WAS NOT DAMAGED, but I removed and replaced the Battery Ground Cable with a whole new one w/terminal and tied the other smaller grounds as they were originally setup.
2] Now I am in the process of replacing and extending the Positive Battery Cable Power/Charging Feed cables, 6 AWG. Problem here has been locating a store to get 6 AWG cable and butt connectors so that I have a clean and solid power feed. I ended up just now ordering all that on Ebay so it'll be next week before it all gets here. I tried using the screw down type connectors but they're too bulky and large to put heat shrink on to prevent another ground out problem. The cables I ordered are 1 ft in length and all I need in length is 6 inches. Butt connectors are the crimp type, round, and with heat shrink wrap insulation. It's all being replaced because as you saw in the previous photos the connections at the terminal was not wrapped or protected, and the cables went straight into the terminal molded in the lead which I hated when Chrysler used them.

Between 50 mph wind gusts, rain almost every day or snowing I can't get much done quickly due to no indoor shop at present. I suppose once I finish the PDC region I'll put the car up on axle stands and trace that Starter Solenoid Cable for damage from the split off point at the previously mentioned harness I tore down. That cable the transmission mechanics had to disconnect (was suppose to) to remove the starter from the bell housing, and it also runs the best I can tell across or under the transmission. They messed up a load of things already it wouldn't surprise me if they jury rigged a fix on their damage underneath too that didn't hold and grounded out the system. I know for certain they didn't fully charge the battery because it barely cranked over. Battery was drained when they picked up the car on rollback and were paid to fully charge it while it was being worked on. I'll get back to you once I get more accomplished. By the way, I did find a bunch of cracked and open ground cables while that harness was opened up. I have since heat shrink repaired what I could and used some heavy duty wrap electrical tape on the rest before rewrapping the harness so no more ground problems in that area.
Was this
answer
helpful?
Yes
No
Friday, January 12th, 2024 AT 9:07 PM
Tiny
CARADIODOC
  • MECHANIC
  • 33,752 POSTS
Happy to hear you're making progress. When you're ready, remove the wire from the alternator's output stud and cover it with a rag so it can't touch anything metal. Then use the light bulb between the negative battery post and cable clamp. Expect it to be bright for up to 20 minutes. If the bulb dims after 20 minutes, there is nothing shorted at this time and it's safe to connect the negative cable directly to the battery. See if the starter will crank the engine. If it does, the engine will not run if the ASD relay is still out. You'll have three chances to crank the engine, then the computer will deny additional attempts until you wait a few minutes.

Keep me updated with what you find and how far you get with these steps.
Was this
answer
helpful?
Yes
No
Saturday, January 13th, 2024 AT 10:26 AM
Tiny
SANDSTORM1958
  • MEMBER
  • 35 POSTS
A mechanic locally ran your light bulb test and found nothing, if he did it right. He said it made no sense since the battery has been out for weeks and told me I'm better off just finish searching the harnesses for damage as I have been doing.

I am going to be tracing the alternator cable, but I would like to see if there's a diagram out there that shows where the harnesses are supposed to run inside the engine compartment. I suspect that the alternator cable as the schematics show runs directly to the fusible link (dark green spliced in the photo) that ties in at the PDC. I know that the harness from the PDC runs under the PDC, under the battery stand and tied into the main harness in front (already tore down and checked) then branches off towards the back of the car across the transmission, splits off again and then (guessing here) over to the alternator along the backside of the plenum held up by metal brackets. Given good weather I will be removing the windshield cowling to get access to the back of the plenum. I saw it was inside fire resistant sheathing everywhere I looked so far. It's still shorting and the fusible link is still getting hot, so I have no choice but to locate the break or weld to ground.

In the charging system schematic if you follow the connections, you'll see that fusible link also ties in the 6-gauge starter solenoid wiring, so I'll be looking at that after the alternator. This is taking a long time due to the weather and my having to do this outdoors by myself. I ran a continuity test on everything by the way and the most highest probability is that alternator cable.
Was this
answer
helpful?
Yes
No
Monday, February 5th, 2024 AT 1:03 PM
Tiny
CARADIODOC
  • MECHANIC
  • 33,752 POSTS
The alternator's output wire doesn't go to the starter solenoid. GM did that a lot to save wire. Chrysler never did, in part. I suspect, because the starter and alternator are on opposite sides of the engine.

There are drawings that show the wire harness routing. I found one for the engine and one for under hood. I don't normally use these, so you'll have to see for yourself if these will be of help. These are actually meant to show splice locations, not where each wire runs.
Was this
answer
helpful?
Yes
No
Monday, February 5th, 2024 AT 1:27 PM
Tiny
SANDSTORM1958
  • MEMBER
  • 35 POSTS
That's what I needed. Particularly the top right and bottom right ones.
Was this
answer
helpful?
Yes
No
Monday, February 5th, 2024 AT 1:39 PM
Tiny
CARADIODOC
  • MECHANIC
  • 33,752 POSTS
Dandy. Let me know when you find something good or need help.
Was this
answer
helpful?
Yes
No
Tuesday, February 6th, 2024 AT 1:41 PM
Tiny
SANDSTORM1958
  • MEMBER
  • 35 POSTS
I undid the stud nut at the alternator and disconnected it as you said. Since one of our local "mechanics" ran that test I just skipped over that and went directly to connecting negative cable to battery. No Sparks, No Short Burning Wires At Top Of PDC. I removed the ASD Relay, and it cranked fine. Seems the only time all this shorting is going on is when this new alternator is fully installed. Defective diodes in the alternator maybe? I'll stop where I'm at searching for the shorted harness. I have had decent weather for a few days so will wait to see what you say. By the way, in this car you have to dismount the alternator, or you can't get to the wiring stud and connector plug because of the DIS, PLENUM AND ALTERNATOR HOLD BRACKET. See Pcture.
Was this
answer
helpful?
Yes
No
Thursday, February 8th, 2024 AT 11:09 AM

Please login or register to post a reply.

Sponsored links