DRIVE BELT AUTO-TENSIONER
Inspection
Check whether there is a change in the position of the auto-tensioner indicator before starting the engine and after starting the engine. If there is a change in the position, replace the auto-tensioner. See Fig. 2 .
Check for abnormal noise from the tensioner pulley. If abnormal noise is heard, replace the tensioner pulley.
Remove the drive belt. See DRIVE BELT .
Move the auto-tensioner within its limit with the belt tension release tool in the direction shown. See Fig. 14 . Check that the tensioner moves smoothly and without any abnormal noise. If the tensioner does not move smoothly or there is abnormal noise, replace the auto-tensioner.
Remove the auto-tensioner. See REPLACEMENT .
Install the tensioner pulley.
Clamp the auto-tensioner "A" by using two 8 mm bolts "B" and a vise "C". Do not clamp the auto-tensioner itself. See Fig. 15 .
Set the torque wrench "D" on the pulley bolt.
NOTE:If the indicator exceeds the center mark, recheck the torque.
Align the indicator "E" on the tensioner arm with center mark "F" on the tensioner base by using the torque wrench, and measure the torque. If the torque value of 20-36 ft.lbs (27-36 N.m) is out of specification, replace the auto-tensioner.
Fig. 14: Moving Auto-Tensioner
Courtesy of AMERICAN HONDA MOTOR CO., INC.
Fig. 15: Mounting Auto-Tensioner In Vise
Courtesy of AMERICAN HONDA MOTOR CO., INC.
Replacement
Remove the drive belt. See DRIVE BELT .
Remove the Power Steering (P/S) pump without disconnecting the P/S hoses.
Remove the tensioner pulley. See Fig. 17 .
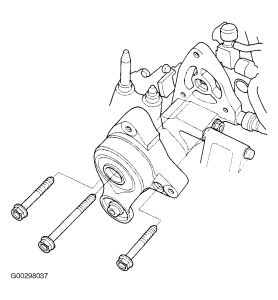
Remove the auto-tensioner. See Fig. 18 .
Install in the reverse order of removal.
Fig. 17: Removing Tensioner Pulley
Courtesy of AMERICAN HONDA MOTOR CO., INC.
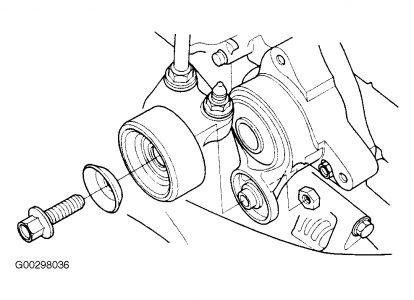
Fig. 18: Removing Auto-Tensioner
Courtesy of AMERICAN HONDA MOTOR CO., INC.
DRIVE BELT
Removal & Installation
Remove the splash shield.
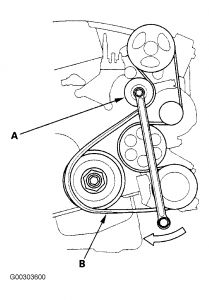
Move the auto-tensioner "A" to relieve the tension from the drive belt "B", and remove the drive belt. See Fig. 13 .
Install the new belt in the reverse order of removal.
Fig. 13: Removing Drive Belt
Courtesy of AMERICAN HONDA MOTOR CO., INC.
Jan 11, 2009 at 8:53 PM
