Hi bullhorn7,
So the car is older than you. ;)
Ok, let us try the manual overide ans see if we can come up with anything.
MANUAL OVERRIDE SYSTEM
If the shoulder belt does not move or stops before reaching rear lock position, perform the following steps before driving the vehicle.
1. Open and close door(s). Make sure the door is completely closed.
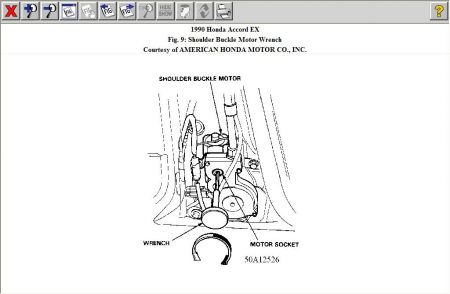
2. Remove cover at lower end of the front pillar interior trim panel. Insert wrench provided in the tool bag into motor socket. Turn wrench clockwise to move the shoulder belt manually until it stops at the front pillar see
WARNING: If it is necessary to Manually move the shoulder belt into position, have the system serviced by a qualified technician as soon as possible.
3. If the belt does not mover to the front pillar, the belt may be broken or the motor drive gear stripped. Grasp the belt and pull it towards the front pillar while turning the wrench on the motor clockwise. This should move the belt to the lowest position on the front pillar. This will allow the occupant(s) to position the belt manually over the shoulder until the system can be serviced properly.
There are a few test that can be carried out.
COMPONENT TESTS RETRACTOR SOLENOID/ SOLENOID SENSOR SWITCH TEST
NOTE: Perform this test on each shoulder seat belt retractor
1. Slide front seat forward to disconnect connector from shoulder seat belt retractor.
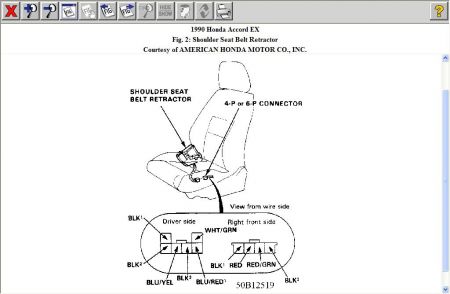
2. Connect voltmeter positive probe to the Blue/Yellow (driver side) or Red/Green (passenger side) terminal and the negative probe to Black (1) terminal of floor wire harness connector. There should be battery voltage when door is opened.
If there is no voltage, check for:
An open in Blue/Yellow (driver side) or Red/Green (passenger side) wire.
Poor ground at G501 or G502
Perform Control Unit Input Tests
3. With door open, check for continual clicks of solenoid plunger whenever connector is alternately connected and disconnected. If it does not click, replace shoulder seat belt retractor assembly (solenoid is not available separately).
4. Connect the 6-P or 4-P connector to shoulder seat belt retractor
5. Check for voltage between the Blue/Red (1)(+) and Black (2) (-) terminals of the 6-P connector (driver side), or between the Red (+) and Black (2) terminals of the 4-P connector (passenger side). Open and close door. There should be about 5 volts or more when door is closed. If voltage reading is not as specified, replace shoulder seat belt retractor assembly.
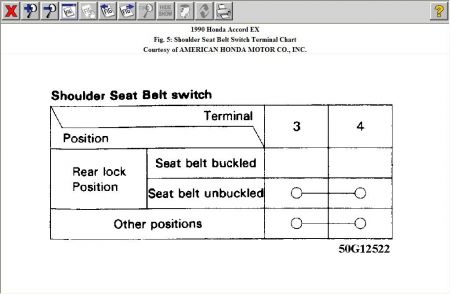
DRIVER'S LAP SEAT BELT SWITCH TEST
1. Slide the driver's seat forward to disconnect the 6-P connector from the shoulder seat belt retractor.
2. There should be continuity between WHITE/GREEN(2) and BLACK terminals when the driver's lap seat belt is not buckled.
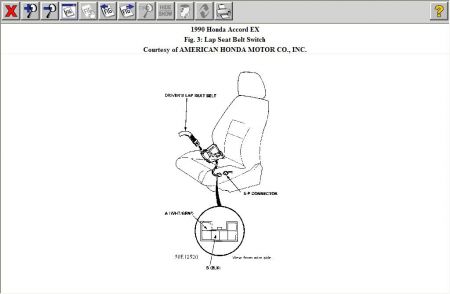
There should be no continuity when the driver's lap seat belt is buckled.
If there is a abnormality, replace the shoulder seat belt retractor assembly.
SHOULDER BUCKLE MOTOR TEST
1. Remove the center pillar lower trim panel.
2. Disconnect the 2-P connector from the shoulder buckle motor .
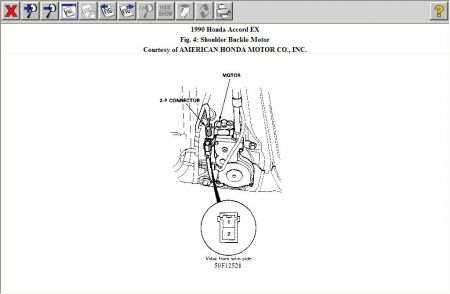
3. Test the motor operation by connecting battery leads to the No.1 and No. 2 terminals. Test the motor in each direction, by switching the leads from the battery.
CAUTION: When the motor stops running, disconnect a battery lead immediately.
4. If the motor dose not run, replace the shoulder seat belt rail assembly.
REAR LOCK POSITION SWITCH TEST
1. Remove the center pillar lower trim panel.
2. Disconnect the 2-P connector from the shoulder buckle motor and the 4-P connector from the rear lock position switch
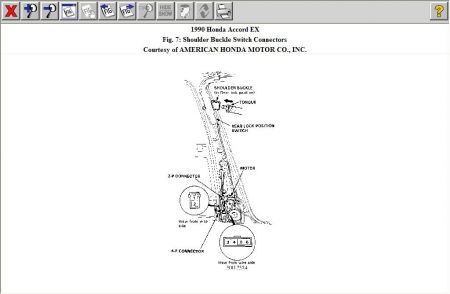
3. Check for continuity between the terminals in each buckle position
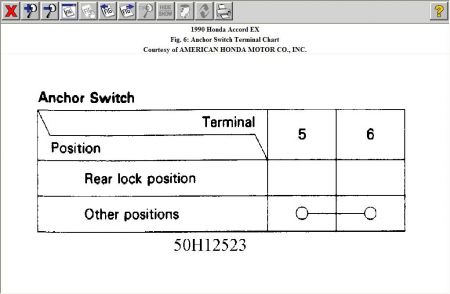
NOTE: When a battery is connected to terminals (No. 1 and No. 2), the shoulder buckle motor will run. Consequently, the shoulder buckle will move back and forth
CAUTION: When the motor stops running, disconnect a battery lead immediately.
FRONT POSITION SWITCH TEST
CAUTION: Always remove the No. 35(30A) or No. 36(30A) shoulder buckle motor fuse in the underhood relay box before testing, otherwise the motor may suddenly activate.
1. Disconnect the 2-P connector from the floor harness.
2. Check for continuity between the No. 7 and No. 8 terminals
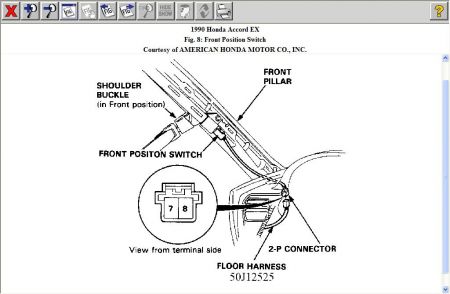
There should be no continuity when the shoulder buckle is in the front position. There should be continuity when the shoulder buckle is not in the front position.
NOTE: To operate the shoulder buckle motor manually, insert the wrench provided in the tool bag into the motor socket.
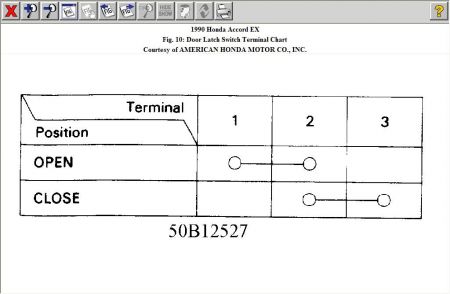
DOOR LATCH SWITCH TEST
1. Remove the door trim panel.
2. Disconnect the 3-P connector from the switch.
3. Check for continuity between the terminals in each door position.

Dec 15, 2008 at 3:34 PM
