You're about 20 steps ahead of where anyone else would be. I can offer a few suggestions.
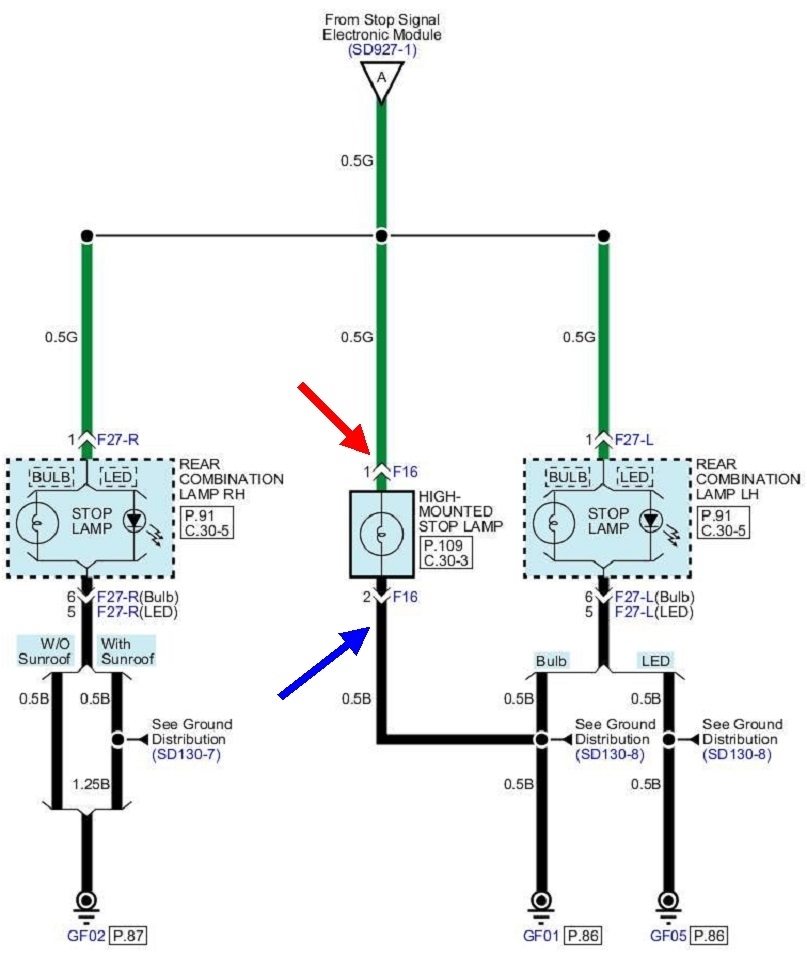
Here's the diagrams for your brake light circuit. We only are concerned with the second one. If it's too small to read, try copying it into a typing program such as MS Word where it can be expanded, or I can cut it into pieces that I can expand for you.
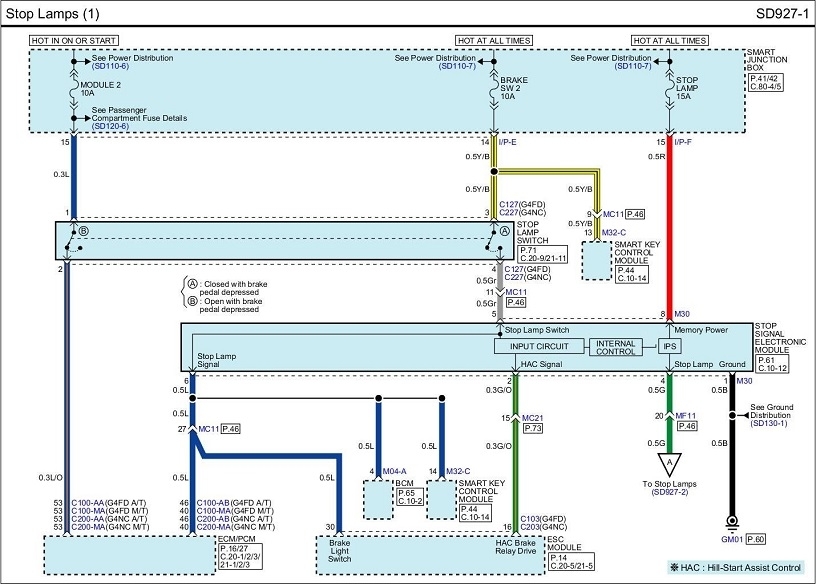
We know there's 12 volts getting to point "A" on top since the left and right brake lights work. That just leaves the 12 volt and ground wires you're already looking at. You didn't say how you tested for 12 volts feeding those center lights. A somewhat common point of confusion can be introduced if you unplug a connector to take the voltage reading. When a wire breaks from repeated flexing, there could be just one tiny strand left intact, or it could have broken completely, then arced between the break, leaving a carbon track behind inside the insulation. Either way, not enough current can get through to run a light bulb, but if unplugged, a very little voltage can sneak through for the voltmeter to incorrectly see the 12 volts, giving a misleading reading. To prevent that, recheck the 12 volt wire while the connector is plugged in.
If this is difficult to follow, think of stepping on a garden hose so it is 99 percent blocked. If you start with 50 psi at the faucet, you'll also have 50 psi at the nozzle, as long as the nozzle is closed. Open it and almost no water will be able to flow, and you'll have 0 psi everywhere after your foot. The break in the wire equates to your foot on the hose.
Use your specialty tool, (brick), or a stick between the seat and brake pedal, then check for 12 volts on the green wire, (red arrow). If it's missing, that is the wire with the break.
If you do have that 12 volts, next, with the assembly still plugged in, measure the voltage on the black ground wire, (blue arrow). If you find 12 volts there, that black wire has a break between the assembly and the splice. The voltage test is far superior to a continuity test. All that's needed is one strand of wire still intact to get a "good" reading but that won't allow enough current to pass to run even one light bulb.
As an alternative, if you're in a circuit where you absolutely have to unplug a connector to take a voltage reading, use an older-style inexpensive test light instead. Unlike with digital voltmeters, test lights use a standard bulb that requires current flow to work. That forces current to try to flow through a break and can make a dead circuit show up where a voltmeter won't.
When you splice in a new piece of wire, try to pull out enough of the old wire so the splices can be pushed back into a protected area where they won't flex. This is a fairly common repair on front doors on older minivans. They way I handled these at the dealership was to splice in wires twice as long as what I cut out. I pulled the harness out of the front of the door, and out of the "A" pillar so the cuts could be made in sections that had never been flexing. Those pieces were 11" long. Next, I spliced in new pieces 22" long. Tape the harness back together lightly so those wires can slide over each other rather than binding as the door opens and closes. Consider buying a roll of wire wrap at an auto parts store for this purpose. I never use electrical tape in a car as it will unravel into a gooey mess on a hot day. Wire wrap looks just like black electrical tape, but it's not sticky. Slide the rubber grommets over the ends of the tape or wire wrap to hold it in place. Some people use "convoluted tubing", but if that is only run up to the door and "A" pillar, the new wires will flex more than normal in those two spots. That tubing must also be run through the grommets. That makes the wire flex equally in every section.
"Convoluted tubing" is the plastic covering that is split along its length to allow it to be snapped over the wires. You can buy new tubing by the box or by the foot at any auto parts store. I just grab some during a visit to a salvage yard.
Half of that new bundle of wires gets stuffed into the "A" pillar, but be careful where it's placed so it won't catch on a parking brake pedal mechanism. It's harder to poke it into the door as there's less room and it might catch on the window assembly. The purpose for the extra wire is if this problem occurs again years from now, pull that extra wire out and the job is half done. The new wires are already there and they're already connected on one end.
Images (Click to enlarge)
Feb 28, 2023 at 3:55 PM