Good morning
It sounds like the blend door actuator is trying to move but is not responding to your commands. The actuator is a very common failure for this issue.
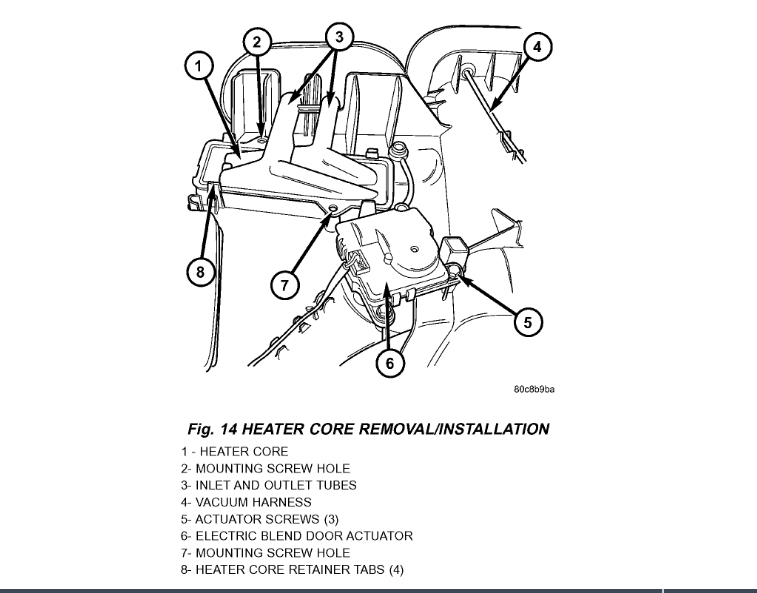
The dash board has to be removed to gain access to the motor. It is on top of the heater case. Once the dash is removed, it can be changed.
You should have someone confirm this before assuming it is the issue but from your description, it sounds like this may be your issue.
Roy
Warning: on vehicles equipped with airbags, disable the airbag system before attempting any steering wheel, steering column, or instrument panel component diagnosis or service. Disconnect and isolate the battery negative (ground) cable, then wait two minutes for the airbag system capacitor to discharge before performing further diagnosis or service. This is the only sure way to disable the airbag system. Failure to take the proper precautions could result in an accidental airbag deployment and possible personal injury.
1. Disconnect and isolate the battery negative cable.
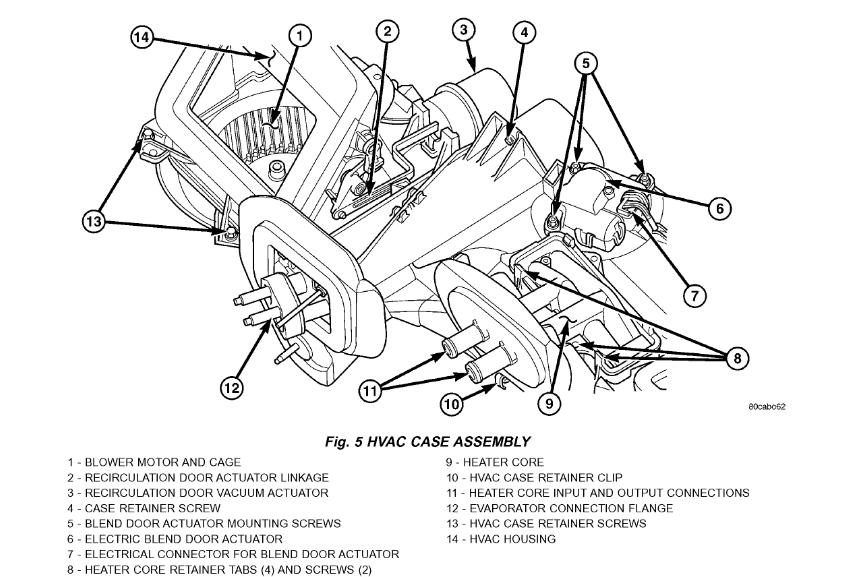
2. Remove A/C housing from vehicle.
Fig.14 Heater Core Removal/Installation
imageOpen In New TabZoom/Print
3. Remove the screws that secure the blend door actuator to the top of the HVAC housing.
4. Remove the blend door actuator.
INSTALLATION
1. Install the blend door actuator in place.
2. Install and tighten the screws that secure the blend door actuator to the housing. Tighten the mounting screws to 2.4 (± 0.34) Nm (21 (± 3) in. Lbs.).
3. Install the HVAC housing into the vehicle.
4. Install the blend door actuator electrical connector from the wiring harness through the glove box.
5. Connect the battery negative cable.
REMOVAL
Warning: on vehicles equipped with airbags, disable the airbag system before attempting any steering wheel, steering column, or instrument panel component diagnosis or service. Disconnect and isolate the battery negative (ground) cable, then wait two minutes for the airbag system capacitor to discharge before performing further diagnosis or service. This is the only sure way to disable the airbag system. Failure to take the proper precautions could result in an accidental airbag deployment and possible personal injury.
1. Disconnect and isolate the battery negative cable.
2. Remove the instrument panel from the vehicle. Refer to: Body and Frame, Interior Trim, Dashboard/Instrument Panel, Service and Repair, Instrument Panel Assembly Replacement, See: Dashboard / Instrument Panel > Removal and Replacement > Instrument Panel Assembly
3. If the vehicle is not equipped with air conditioning, go to Step 6. If the vehicle is equipped with air conditioning, recover the refrigerant from the refrigerant system. Refer to Heating and Air Conditioning/Service and Repair/Procedures See: Heating and Air Conditioning > Procedures
Fig.5 HVAC Case Assembly
imageOpen In New TabZoom/Print
4. Disconnect the liquid line refrigerant line fitting from the evaporator inlet tube. Refer to Hose/Line HVAC/Service and Repair/Procedures See: Hose/Line HVAC > Procedures
5. Disconnect the accumulator inlet tube refrigerant line fitting from the evaporator outlet tube. Refer to Hose/Line HVAC/Service and Repair/Procedures See: Hose/Line HVAC > Procedures. Install plugs in, or tape over all of the opened refrigerant line fittings.
6. Drain the engine cooling system.
7. Disconnect the heater hoses from the heater core tubes. Install plugs in, or tape over the opened heater core tubes.
8. Unplug the HVAC system vacuum supply line connector from the engine side harness.
9. Remove the nuts from the HVAC housing mounting studs.
10. Remove the HVAC housing from inside the vehicle taking care not to allow any remaining coolant to drain on the vehicles interior.
INSTALLATION
Warning: if the vehicle is equipped with air conditioning, review the warnings and cautions in plumbing before performing the following operation. See: Heating and Air Conditioning > Technician Safety Information
1. Position the HVAC housing to the dash panel. Be certain that the evaporator condensate drain tube and the housing mounting studs are inserted into their correct mounting holes.
2. Install and tighten the nuts onto the HVAC housing mounting studs. Tighten the nuts to 6.2 Nm (55 in. Lbs.).
3. Connect the HVAC system vacuum supply line connector.
4. Unplug or remove the tape from the heater core tubes. Connect the heater hoses to the heater core tubes and fill the engine cooling system.
5. If the vehicle is not equipped with air conditioning, go to Step 10.
6. Unplug or remove the tape from the liquid line and the evaporator inlet tube fittings. Connect the liquid line coupler to the evaporator inlet tube. Refer to Hose/Line HVAC/Service and Repair/Procedures. See: Hose/Line HVAC > Procedures
7. Evacuate the refrigerant system. Refer to Heating and Air Conditioning/Service and Repair/Procedures. See: Heating and Air Conditioning > Procedures
8. Charge the refrigerant system. Refer to Heating and Air Conditioning/Service and Repair/Procedures See: Heating and Air Conditioning > Procedures
9. Install the instrument panel in the vehicle. Refer to: Body and Frame, Interior Trim, Dashboard/Instrument Panel, Service and Repair, Instrument Panel Assembly Replacement, See: Dashboard / Instrument Panel > Removal and Replacement > Instrument Panel Assembly
10. Connect the battery negative cable.
11. Start the engine and check for proper operation of the heating and air conditioning systems.
Images (Click to make bigger)
Friday, November 16th, 2018 AT 6:12 AM