Hi,
When the air flow directions doesn't change, it is usually related to what is called a mode door actuator. This actuator is what is responsible for changing the air flow direction.
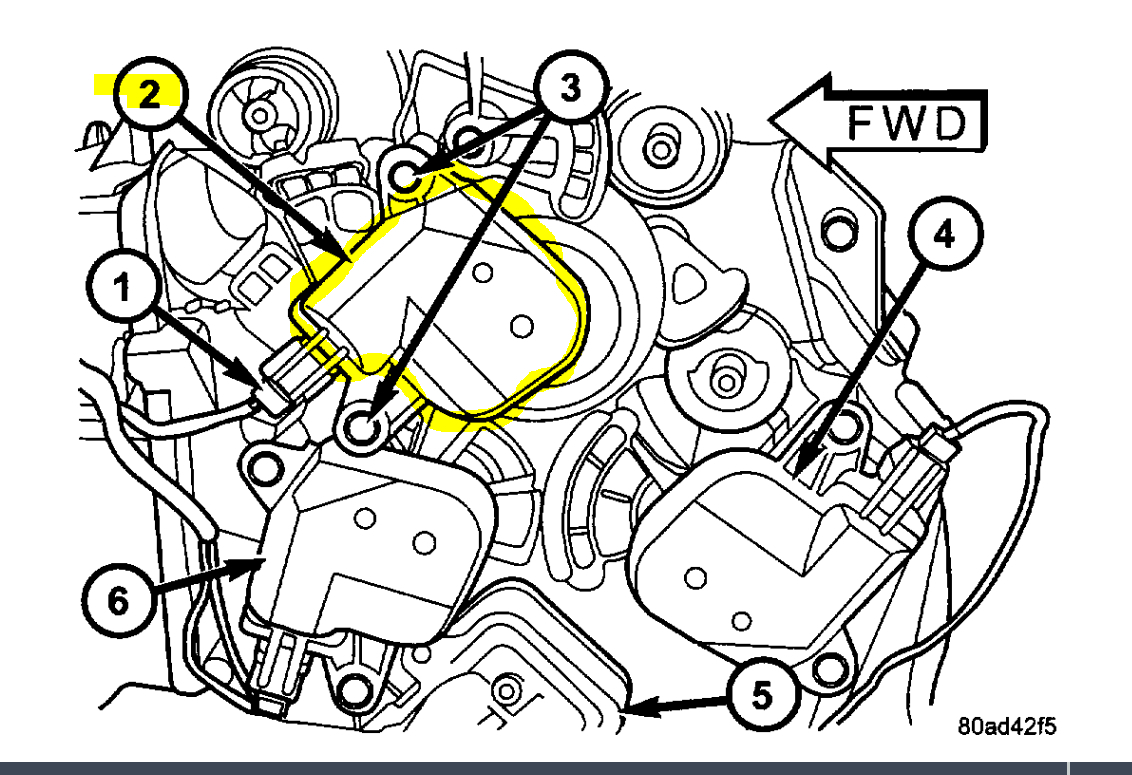
Here are the directions for replacing it. Note: Before replacing, confirm it doesn't react when you change air flow direction. The two pics below correlate with the directions. In the first picture, I highlighted the mode door actuator, and yes, it's under the dash.
______________________________________________
2001 Dodge or Ram Truck Caravan FWD V6-3.8L VIN L
Front
Vehicle Heating and Air Conditioning Air Door Actuator / Motor Service and Repair Procedures Mode Door Actuator Replacement Front
FRONT
REMOVAL
WARNING: ON VEHICLES EQUIPPED WITH AIRBAGS, DISABLE THE AIRBAG SYSTEM BEFORE ATTEMPTING ANY STEERING WHEEL, STEERING COLUMN, OR INSTRUMENT PANEL COMPONENT DIAGNOSIS OR SERVICE. DISCONNECT AND ISOLATE THE BATTERY NEGATIVE (GROUND) CABLE, THEN WAIT TWO MINUTES FOR THE AIRBAG SYSTEM CAPACITOR TO DISCHARGE BEFORE PERFORMING FURTHER DIAGNOSIS OR SERVICE. THIS IS THE ONLY SURE WAY TO DISABLE THE AIRBAG SYSTEM. FAILURE TO TAKE THE PROPER PRECAUTIONS COULD RESULT IN ACCIDENTAL AIRBAG DEPLOYMENT AND POSSIBLE PERSONAL INJURY.
1. Disconnect and isolate the battery negative cable.
2. Remove the silencer from beneath the driver side end of the instrument panel. Refer to: "Instrument Panel, Gauges and Warning Indicators : Instrument Panel : Service and Repair" See: Instrument Cluster / Carrier > Service and Repair
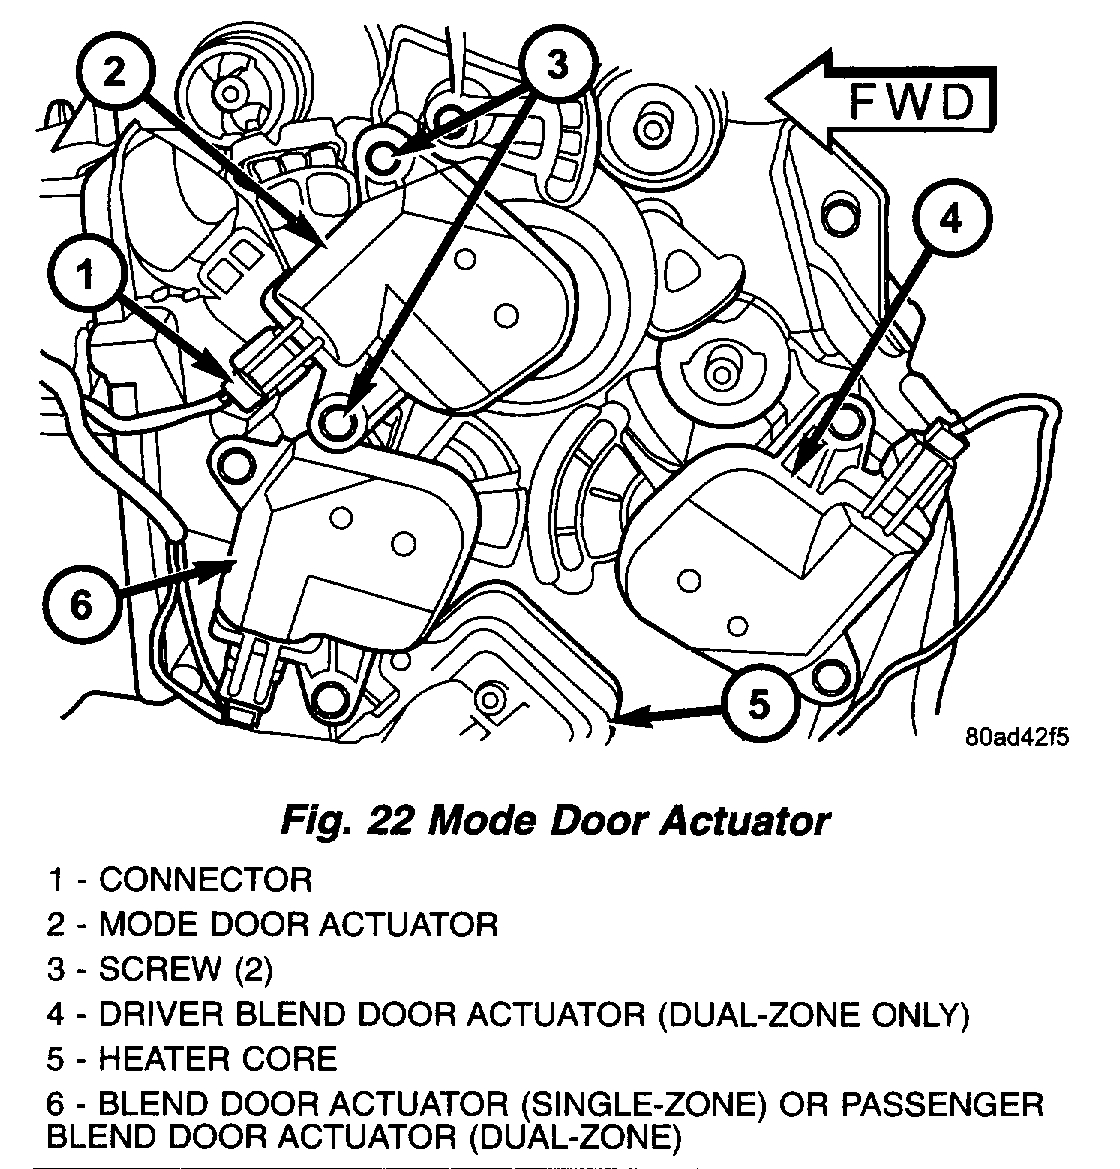
Fig.22 Mode Door Actuator
Pic 2
3. Disconnect the HVAC wire harness connector for the mode door actuator from the actuator connector receptacle.
4. Remove the two screws that secure the mode door actuator to the distribution housing.
5. Remove the mode door actuator from the distribution housing.
INSTALLATION
WARNING: ON VEHICLES EQUIPPED WITH AIRBAGS, DISABLE THE AIRBAG SYSTEM BEFORE ATTEMPTING ANY STEERING WHEEL, STEERING COLUMN, OR INSTRUMENT PANEL COMPONENT DIAGNOSIS OR SERVICE. DISCONNECT AND ISOLATE THE BATTERY NEGATIVE (GROUND) CABLE, THEN WAIT TWO MINUTES FOR THE AIRBAG SYSTEM CAPACITOR TO DISCHARGE BEFORE PERFORMING FURTHER DIAGNOSIS OR SERVICE. THIS IS THE ONLY SURE WAY TO DISABLE THE AIRBAG SYSTEM. FAILURE TO TAKE THE PROPER PRECAUTIONS COULD RESULT IN ACCIDENTAL AIRBAG DEPLOYMENT AND POSSIBLE PERSONAL INJURY.
1. Position the mode door actuator onto the heater/AC housing. If necessary, rotate the actuator slightly to align the splines on the actuator output shaft with those in the mode door linkage.
2. Install and tighten the two screws that secure the mode door actuator to the distribution housing. Tighten the screws to 2 Nm (17 in. lbs.).
3. Reconnect the HVAC wire harness connector for the mode door actuator to the actuator connector receptacle.
4. Reinstall the silencer under the driver side end of the instrument panel. Refer to: "Instrument Panel, Gauges and Warning Indicators : Instrument Panel : Service and Repair" See: Instrument Cluster / Carrier > Service and Repair
5. Reconnect the battery negative cable.
6. Perform the heater-A/C control calibration procedure. Refer to: "Control Assembly : Service and Repair" See: Control Assembly, HVAC > Service and Repair
_______________________________
When the new component is installed, it will need calibrated. Here are the directions.
_______________________________
2001 Dodge or Ram Truck Caravan FWD V6-3.8L VIN L
A/C Heater Control Calibration
Vehicle Heating and Air Conditioning Control Assembly Service and Repair Procedures A/C Heater Control Calibration
A/C HEATER CONTROL CALIBRATION
The heater-A/C control module must be recalibrated each time an actuator motor or the control module is replaced. This is necessary so that the control module can "learn" the feedback voltages for each actuator motor at both stop positions of each door in the front HVAC unit housing. If the vehicle is so equipped, the calibration procedure also includes rear HVAC positions for each actuator motor.
1. Turn the ignition switch to the ON position.
2. Simultaneously depress and hold the Power and Recirculation buttons on the heater-A/C control for at least five seconds. The manual heater-A/C control Delay Light Emitting Diode (LED) and Recirculation LED, or the Automatic Temperature Control (ATC) heater-A/C control Delay and Recirculation graphics will begin to flash when the calibration procedure has begun.
3. The calibration procedure should take less than three minutes to complete for the manual heater-A/C control, and less than twenty seconds for the ATC heater-A/C control. When the LEDs or graphics stop flashing, the calibration procedure is complete.
4. If the LEDs or graphics continue to flash beyond the normal three minute (manual) or twenty second (ATC) calibration time, it indicates that the heater-A/C control has detected a failure and a Diagnostic Trouble Code (DTC) has been set. Use a DRB III scan tool to perform further diagnosis. Refer to the appropriate diagnostic information. The LEDs or graphics will continue to flash even after the ignition switch is cycled OFF and ON, until a successful calibration is completed or until the vehicle has been driven about 5 kilometers (3 miles).
______________________________
Let me know if this helps or if you have other questions.
Take care,
Joe
Images (Click to enlarge)
Jan 11, 2020 at 5:15 PM