Hi,
Here are the directions for removal and replacement. The attached pictures correlate with the directions. However, before you begin, you must power down the system and when finished with the repair, power it up. I will provide those directions at the end of the replacement procedure.
___________________________________________
2014 Fiat 500e ELE-Electric Engine
Air Electric Heater (AEH) - Removal
Vehicle Heating and Air Conditioning Auxiliary Cabin Heater Service and Repair Removal and Replacement Air Electric Heater (AEH) - Removal
AIR ELECTRIC HEATER (AEH) - REMOVAL
REMOVAL
WARNING:
When performing any repairs that involve contact with high voltage components or systems, the technician performing repairs on the vehicle must verify that the system remains powered down during high voltage repairs.
- This must be done by removing the service disconnect.
- The high voltage check out procedure must also be performed to ensure that the vehicle is properly powered down.
- The technician must know the whereabouts of the service disconnect throughout the repair.
- The technician must ensure that no one reconnects the service disconnect while service is being performed.
- The technician must recheck that the service disconnect has not been reinstalled in cases where the vehicle was unattended.
WARNING:
On vehicles equipped with the high voltage system, disconnecting the 12-volt battery negative cable alone will not power down the 12-volt system. You must perform the 12-volt Power Down procedure before proceeding. Failure to follow these instructions may result in possible serious or fatal injury.
pic 1
1. Power down the 12-volt battery system. See: High Voltage System Disable / Enable, Electric Drive > Procedures.
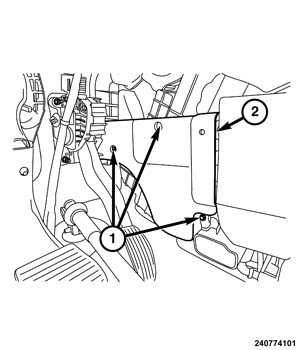
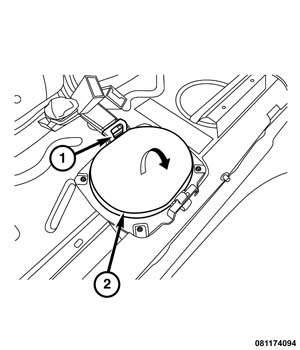
2. Remove the three air electric heater (AEH) high-voltage wiring cover screws (1), and the high-voltage wiring cover (2).
pic 2
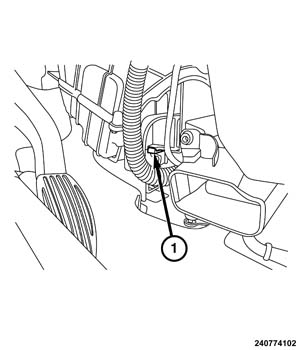
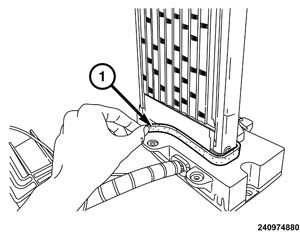
3. Release the tab (1) and detach the AEH high-voltage electrical connector bracket from the HVAC housing.
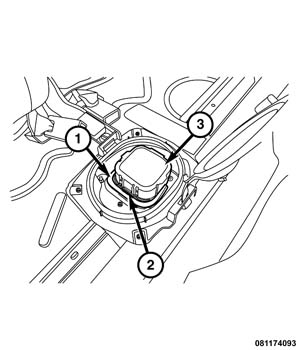
pic 3
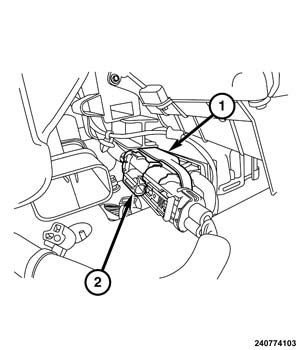
4. Detach the AEH high-voltage electrical connector (2) from the connector bracket (1) and disconnect the AEH high-voltage electrical connector.
pic 4
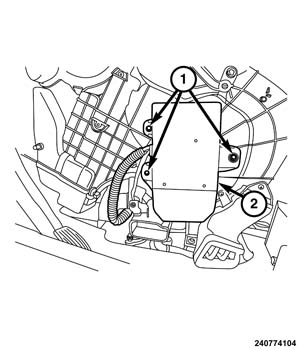
5. Remove the three AEH screws (1) and detach the AEH (2) from the HVAC housing.
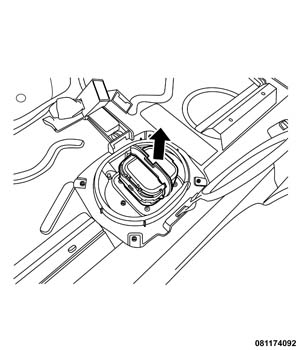
pic 5
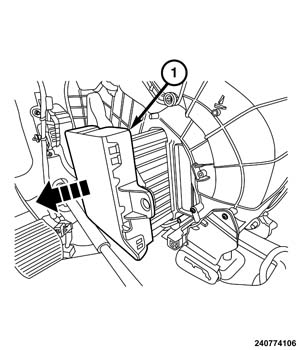
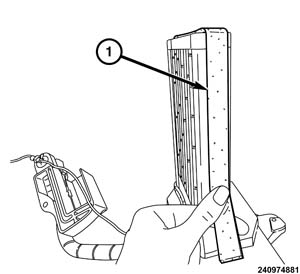
6. Remove the AEH (1).
___________________________
2014 Fiat 500e ELE-Electric Engine
Air Electric Heater (AEH) - Installation
Vehicle Heating and Air Conditioning Auxiliary Cabin Heater Service and Repair Removal and Replacement Air Electric Heater (AEH) - Installation
AIR ELECTRIC HEATER (AEH) - INSTALLATION
INSTALLATION
WARNING:
When performing any repairs that involve contact with high voltage components or systems, the technician performing repairs on the vehicle must verify that the system remains powered down during high voltage repairs.
- This must be done by removing the service disconnect.
- The high voltage check out procedure must also be performed to ensure that the vehicle is properly powered down.
- The technician must know the whereabouts of the service disconnect throughout the repair.
- The technician must ensure that no one reconnects the service disconnect while service is being performed.
- The technician must recheck that the service disconnect has not been reinstalled in cases where the vehicle was unattended.
NOTE:
If installing a new air electric heater (AEH), new foam seals which are available as a separate service part kit must be installed on the new AEH. If the seals are not installed, or are damaged, airflow from the blower motor will bypass the AEH resulting in poor heating performance and NVH concerns.
pic 6
1. If installing a new air electric heater (AEH), install the new wide seal (1) around the side and bottom surfaces of the AEH element as shown.
pic 7
2. If installing a new AEH, install the new thin foam seal (1) along the surface where the AEH element meets the AEH module.
pic 8
3. Install the AEH (2) into the HVAC housing, and install the three AEH screws (1).
pic 9
4. Attach the AEH high-voltage electrical connector (2) to the connector bracket (1), and connect the AEH high-voltage electrical connector.
pic 10
5. Attach the connector bracket onto the HVAC housing until the release tab (1) engages.
pic 11
6. Install the AEH high-voltage wiring cover (2), and the three high-voltage wiring cover screws (1).
7. Install the instrument panel See: Dashboard / Instrument Panel > Removal and Replacement.
8. Power up the 12-volt battery system. See: High Voltage System Disable / Enable, Electric Drive > Procedures
___________________________________________________
2014 Fiat 500e ELE-Electric Engine
12-Volt Power Down
Vehicle Electric Drive Systems High Voltage System Disable / Enable, Electric Drive Service and Repair Procedures 12-Volt Power Down
12-VOLT POWER DOWN
12-VOLT POWER DOWN
WARNING:
When performing any repairs that involve contact with high voltage components or systems, the technician performing repairs on the vehicle must verify that the system remains powered down during high voltage repairs.
This must be done by removing the service disconnect.
The high voltage power down procedure must also be performed to ensure that the vehicle is properly powered down.
The technician must know the whereabouts of the service disconnect throughout the repair.
The technician must ensure that no one reconnects the service disconnect while service is being performed.
The technician must recheck that the service disconnect has not been reinstalled in cases where the vehicle was unattended.
NOTE:
Because the high-voltage battery is used to charge the 12-volt battery via the power inverter module (PIM), disconnecting the 12-volt battery negative cable alone will not power down the 12-volt system. The following procedure must be carried out before any repairs, disassembly, or testing requiring 12-volt power down are carried out.
NOTE:
Even though the high-voltage battery manual service disconnect is removed during the 12-volt Power Down procedure, the 12-volt Power Down procedure will NOT safely and reliably power down the high-voltage system. If any high-voltage components are to be accessed, disconnected or tested, the High-Voltage Power Down procedure must first be carried out (Refer to 31 - Collision Information/Standard Procedure.
Turn the ignition to the OFF position, and wait five minutes to allow the high-voltage system to shut down without setting a fault code.
pic 12
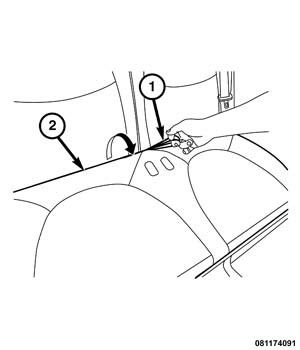
Pull the rear seat cushion release strap (1), and position the rear seat cushion (2) away from the high-voltage manual service disconnect cover.
pic 13
Release the tab (1) and position the high-voltage manual service disconnect cover (2) aside.
pic 14
Release the locking tab and position the high-voltage manual service disconnect release lever (1) partially upward until it stops. Release the locking tab (2), and position the release lever (1) fully upward until the high-voltage manual service disconnect latch (3) is fully disengaged.
pic 15
Lift out, and remove the high-voltage battery manual service disconnect.
Disconnect the negative 12-volt battery cable from the 12-volt battery.
The 12-volt electrical system is now powered down.
__________________
2014 Fiat 500e ELE-Electric Engine
12 Volt Power Up
Vehicle Electric Drive Systems High Voltage System Disable / Enable, Electric Drive Service and Repair Procedures 12 Volt Power Up
12 VOLT POWER UP
12 VOLT POWER UP
WARNING:
When performing any repairs that involve contact with high voltage components or systems, the technician performing repairs on the vehicle must verify that the system remains powered down during high voltage repairs.
- This must be done by removing the service disconnect.
- The high voltage check out procedure must also be performed to ensure that the vehicle is properly powered down.
- The technician must know the whereabouts of the service disconnect throughout the repair.
- The technician must ensure that no one reconnects the service disconnect while service is being performed.
- The technician must recheck that the service disconnect has not been reinstalled in cases where the vehicle was unattended.
1. Align the manual service disconnect with the manual service disconnect socket on the high-voltage battery, and install the manual service disconnect with the handle in the upright position.
pic 16
2. Rotate the manual service disconnect handle (2) downward until it is fully engaged and locked by the locking tab (1).
3. Gently pull the manual service disconnect (3) upward to ensure that it is fully seated in the socket and locked. If the manual service disconnect is able to be moved, repeat steps 2 - 4.
4. Close the high-voltage manual service disconnect cover.
5. Install the rear seat cushion.
6. Connect the 12-volt negative battery cable.
7. Install the electric motor trim cover.See: Drive Motor / Generator, Electric Drive > Removal and Replacement > Beauty Cover - Installation
_____________________________
Let me know if this helps or if you have other questions.
Take care,
Joe
.
Images (Click to enlarge)
Apr 22, 2020 at 8:40 AM