Welcome to 2CarPros.
There are sensors which determine where the lights should be positioned. Honestly, that is something that isn't adjustable on this vehicle.
Here are the directions for inspecting for operation:
Inspection
1. Ignition "ON".
2. Turn on the head lamp switch.
3. Check for operation. If the aim of the head lamps changes smoothly when the head lamp leveling switch is turned.
4. If the operation does not work well, inspect the connector and terminals to be sure they are all making good contact.
If the terminals are bent, loose or corroded, repair them as necessary, and recheck the system.
If the terminals look OK, go to step 5.
5. Substitute with a known-good head lamp assembly and check for proper operation.
__________________
Step 5 is used to determine if the headlamp assembly itself is bad. There is an actuator that is attached to a linkage. I attached a picture of it for you to see. Check to make sure nothing is damaged, bent, disconnected or stopping the light from proper movement. I am going to provide the directions for removal and install for you to help.
_______________________________
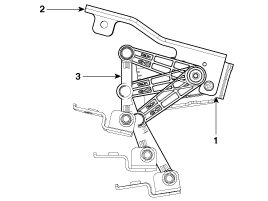
First, here is a list of the components identified in pic 1
Components
1. Auto head lamp leveling unit
1. Leveling unit & sensor
2. Sensor mounting bracket
3. Sensor linkage
_____________________________
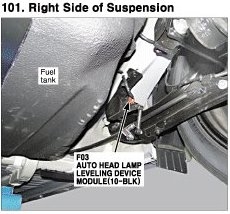
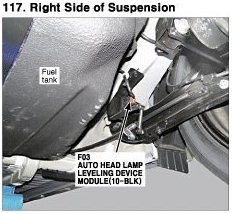
If the linkage appears in good condition and the wiring to it is also good, I need you to check the actual sensor modules to make sure one isn't disconnected. There are two different types. See pictures 2 and 3. If the module is disconnected, it will cause the light positioning to be off and not change.
____________________________
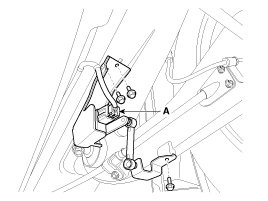
If you want to remove the actuator leveling unit for inspection, here are the directions for removal and replacement.
Removal
1. Remove the head lamp leveling unit connector (A).
picture 4
2. Loosen the mounting bolts (3EA) of automatic head lamp leveling unit assembly.
Tighting torque :
6.86±1.96 Nm (0.7±0.2 kgf.m, 5.06±1.44 lbf.ft)
3. Remove the head lamp leveling unit assembly.
Installation
1. Install the head lamp leveling unit.
2. Reconnect the head lamp leveling unit connector.
_______________________________________________________
Start with that and let me know what you find. However, my first suspect is the module under the vehicle that determines the rear of the vehicle's height.
Joe
Images (Click to enlarge)
Apr 21, 2019 at 8:29 PM