Fuel sending unit sending

Tiny
HERTCHU
  • MEMBER
  • 1993 HONDA PRELUDE
  • 2.2L
  • 4 CYL
  • 2WD
  • MANUAL
  • 200,000 MILES
My fuel and temperature gauge stopped working so I am wiring aftermarket ones. What is the sending wire to tie into for the fuel sending unit and what are the ohms empty and full so I can set my gauge?
Saturday, October 20th, 2018 AT 10:22 AM

13 Replies

Tiny
JACOBANDNICKOLAS
  • MECHANIC
  • 108,128 POSTS
Hi and thanks for using 2CarPros. Com.

I have attached two pictures for you to see. The first one is a wiring schematic for the system. It looks like you will need to find a yellow/white wire. The second picture shows the ohms of resistance based on fuel level.

Let me know if this is what you needed or if you have other questions.

Take care,
Joe
Was this
answer
helpful?
Yes
No
Saturday, October 20th, 2018 AT 5:27 PM
Tiny
HERTCHU
  • MEMBER
  • 10 POSTS
Okay, I thought mine was 240 E and 33 F as far as the wiring diagram I cannot tell from that I have tried the yellow and white wire but got no reading when I try the yell and red wire I get a reading but does not look correct for ohms? I will try setting the gauge for them readings tomorrow and see what happens.
Was this
answer
helpful?
Yes
No
Saturday, October 20th, 2018 AT 5:35 PM
Tiny
JACOBANDNICKOLAS
  • MECHANIC
  • 108,128 POSTS
Let me know how it goes.
Was this
answer
helpful?
Yes
No
Saturday, October 20th, 2018 AT 8:34 PM
Tiny
HERTCHU
  • MEMBER
  • 10 POSTS
I tapped into the yellow/white wire and I get an ohm reading 33-240, but once I cut the car on it stops reading. My aftermarket will not read on any setting but the factory gauge says half a tank. I also tried other wires with no luck not sure what to do. If I get aftermarket fuel level sending unit I have to modify it to fit. The factory gauge is fixing to go out I have had it go out before and I refuse to keep paying that crazy price for that chip it actually burnt up last time.
Was this
answer
helpful?
Yes
No
Sunday, October 21st, 2018 AT 9:53 AM
Tiny
JACOBANDNICKOLAS
  • MECHANIC
  • 108,128 POSTS
Are you connecting two gauges at the same time?
Was this
answer
helpful?
Yes
No
Sunday, October 21st, 2018 AT 5:43 PM
Tiny
HERTCHU
  • MEMBER
  • 10 POSTS
Yes, I was trying to make sure the new gauge would read right. The factory gauge is still hooked up. I cut and tied new gauge into the yellow/white wire and get no reading.
Was this
answer
helpful?
Yes
No
Sunday, October 21st, 2018 AT 6:05 PM
Tiny
JACOBANDNICKOLAS
  • MECHANIC
  • 108,128 POSTS
Interesting. I question if having the two connected at the same time is going to cause the issue. It will surly change the draw. Try disconnecting the original one.

Let me know what happens.

Joe
Was this
answer
helpful?
Yes
No
Sunday, October 21st, 2018 AT 6:24 PM
Tiny
HERTCHU
  • MEMBER
  • 10 POSTS
I just went and did it off your last question. The new gauge will go up to 1/4 tank then back to E not sure what to do other than get a universal sending unit that just has one connection.
Was this
answer
helpful?
Yes
No
Sunday, October 21st, 2018 AT 6:32 PM
Tiny
HERTCHU
  • MEMBER
  • 10 POSTS
If I hook the prong for yellow/white wire and prong for green/white it goes up for a second and then back to E. I tried all prongs separately and different ones together cannot get a solid reading. There are five wires on the factory plugin.
Was this
answer
helpful?
Yes
No
Sunday, October 21st, 2018 AT 6:33 PM
Tiny
JACOBANDNICKOLAS
  • MECHANIC
  • 108,128 POSTS
The gauge you purchased requires a supply and ground. Is that correct? If so, I am starting to question a ground issue. Do me a favor, at the 5 pin connector, perform this test.

COMPONENT TESTS AND GENERAL DIAGNOSTICS
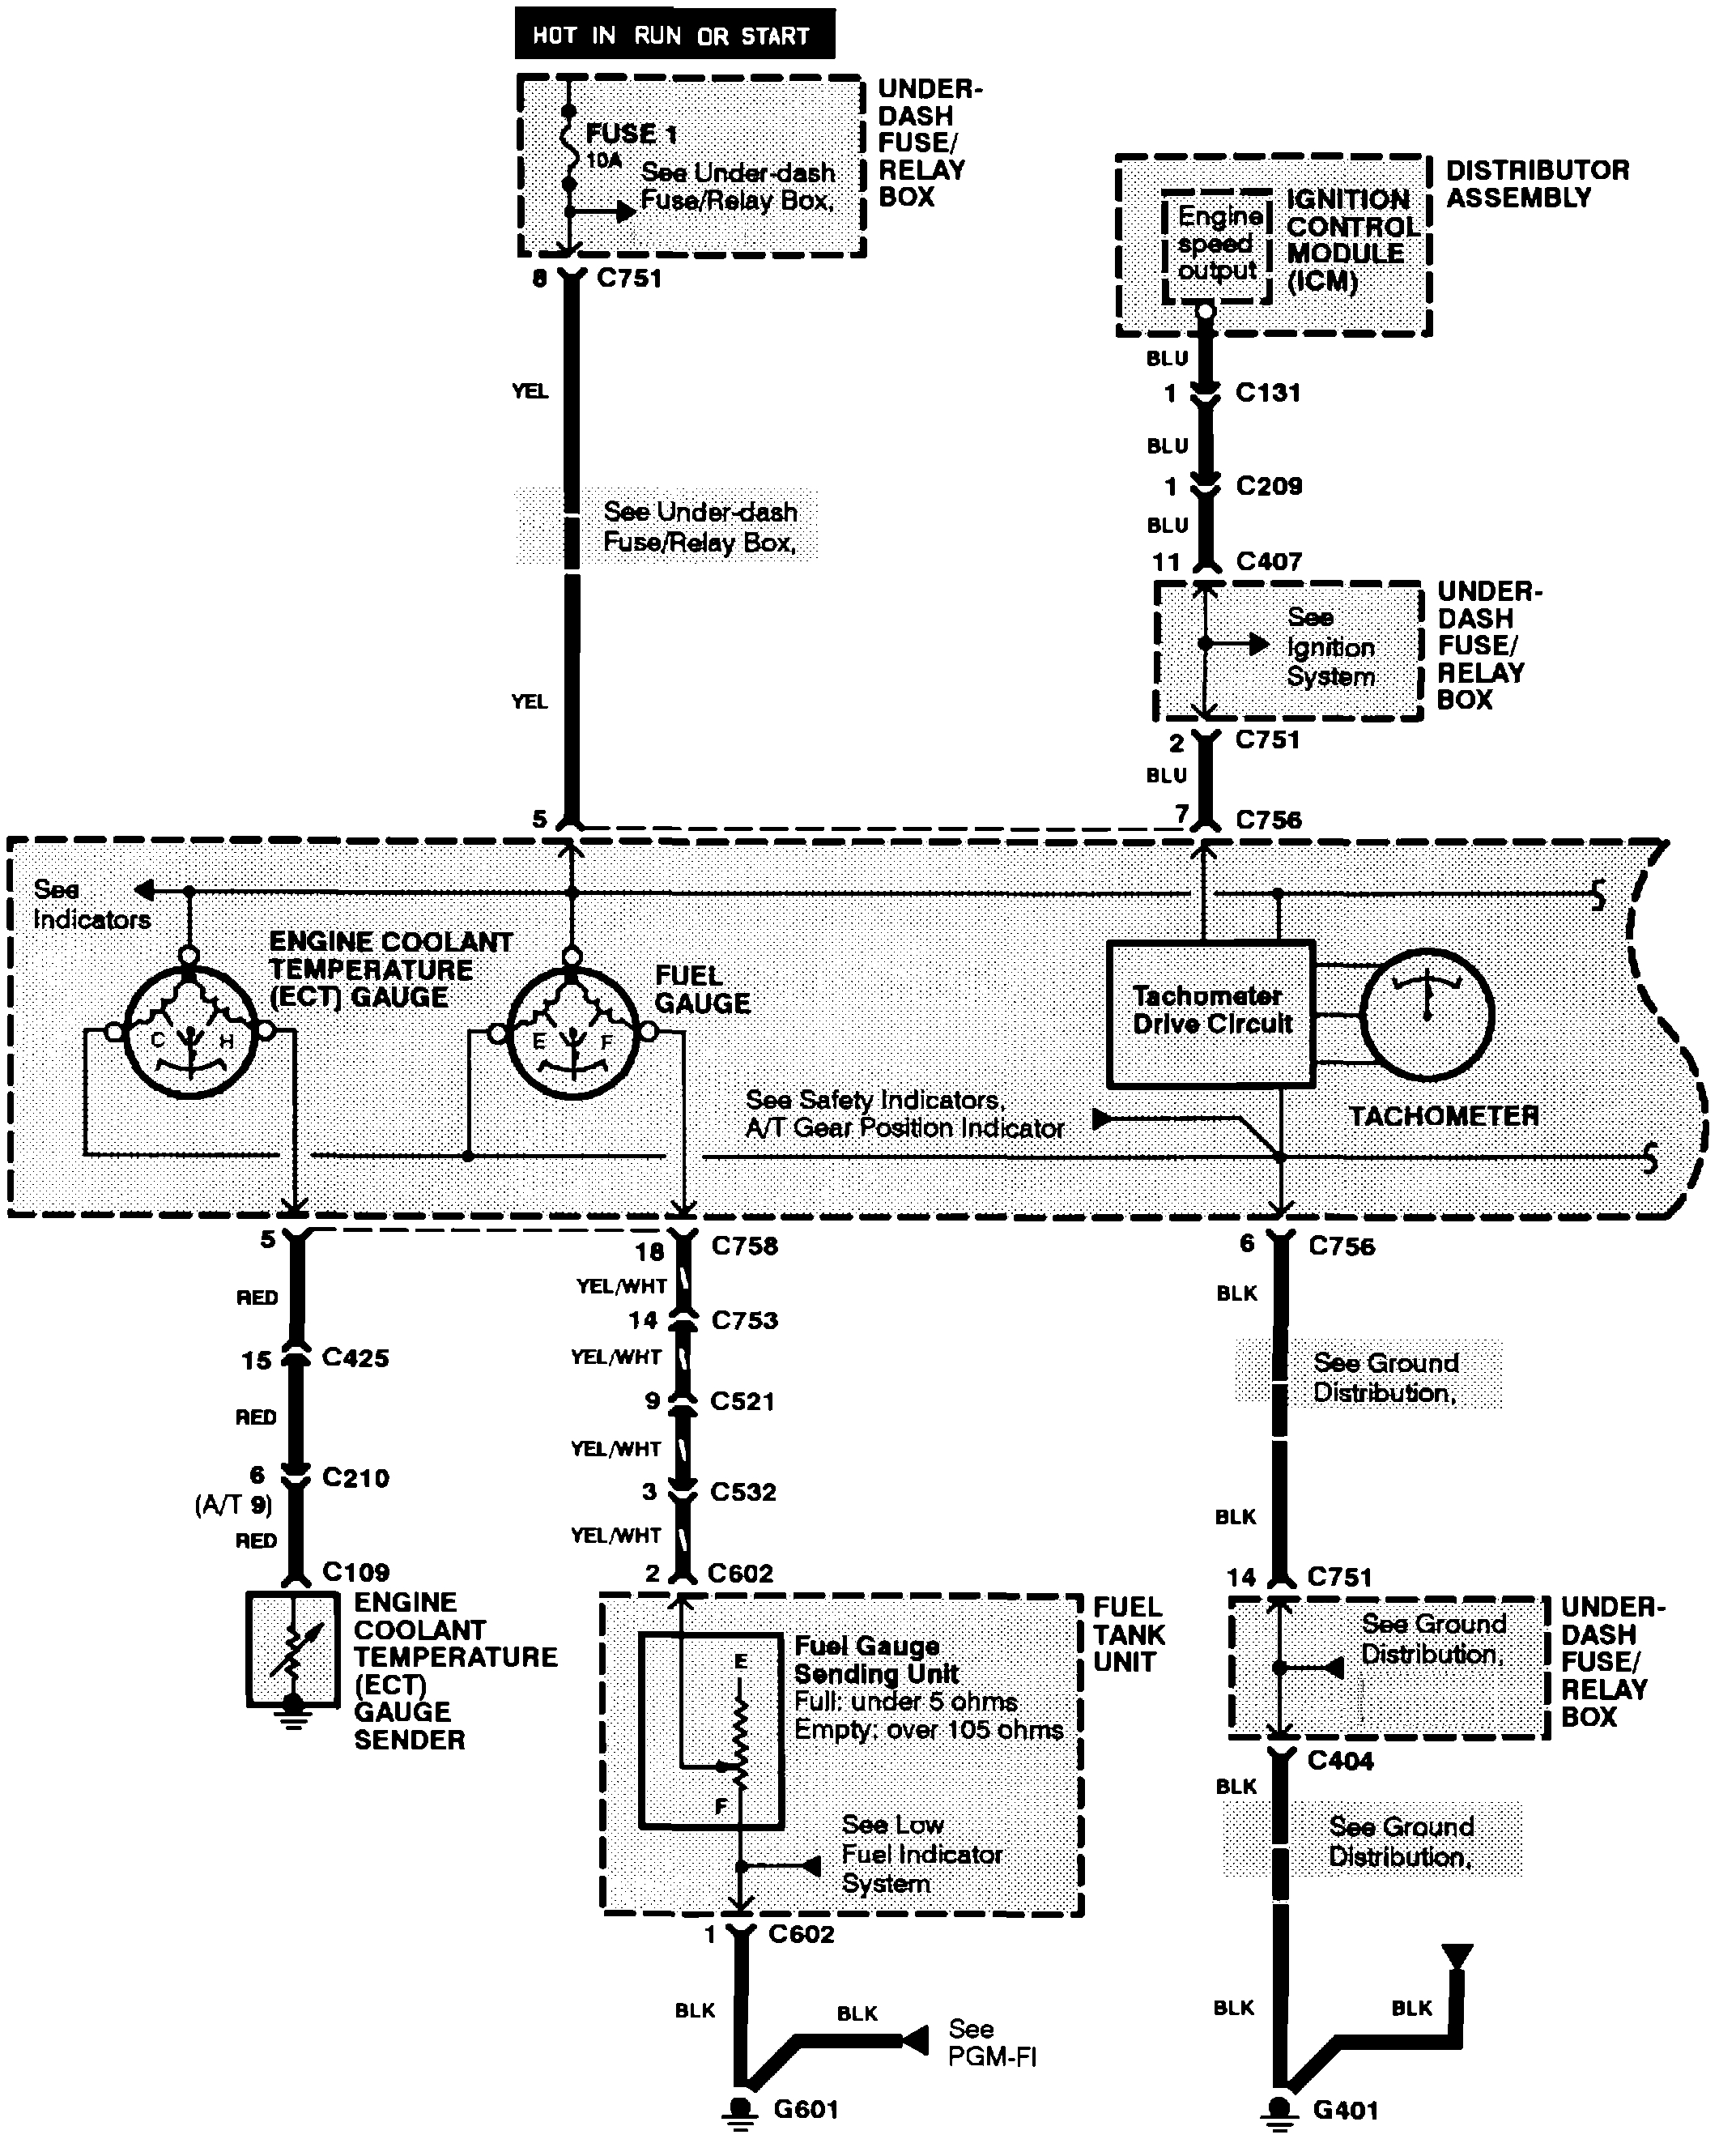
1. Check No. 13 (10A) fuse in under dash fuse/relay box before testing.
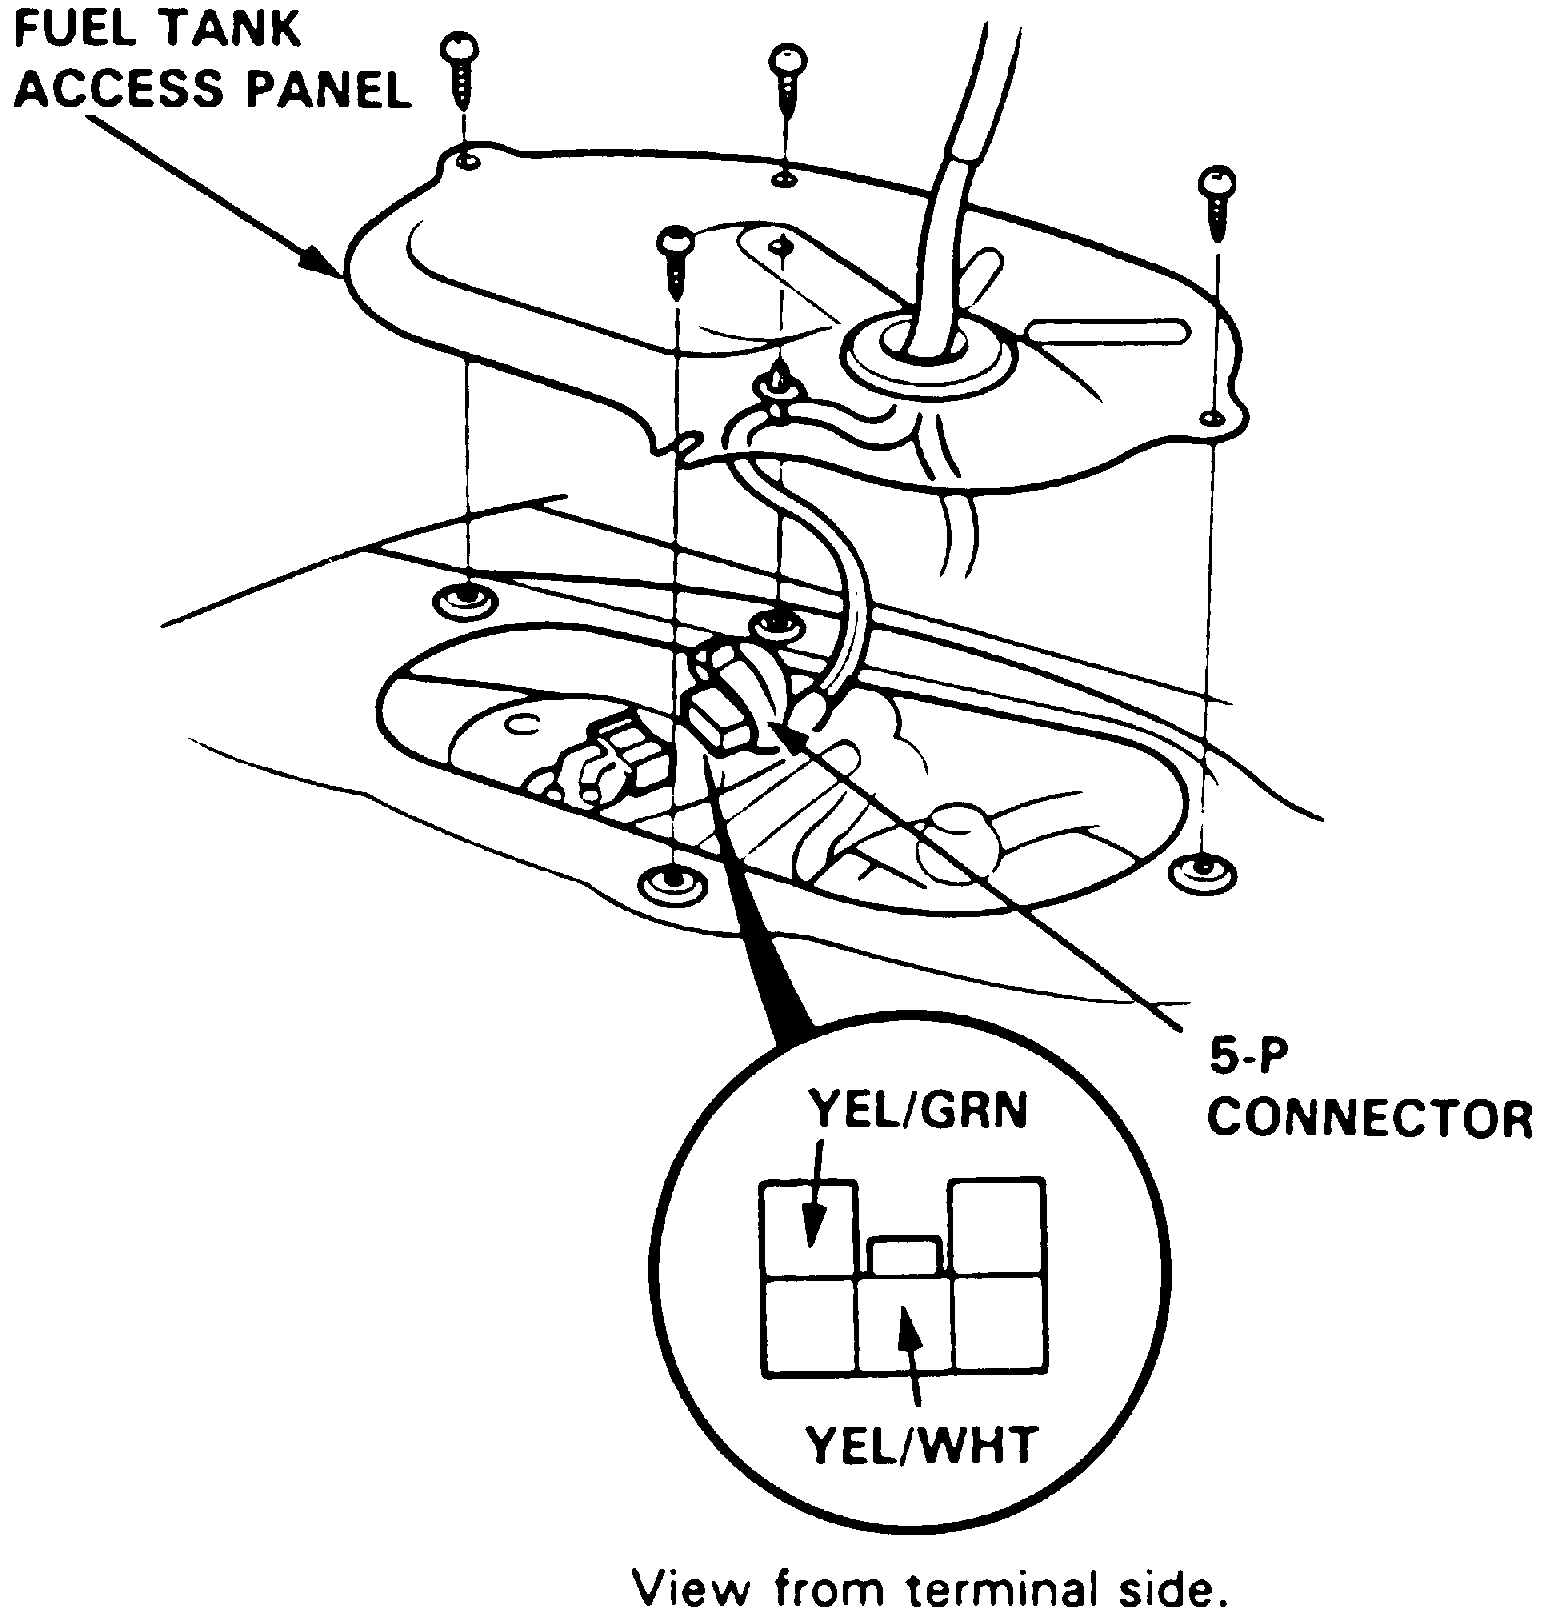
2. Disconnect 5-P connector from fuel gauge sending unit.

Fig. 5 Fuel Gauge Sending Unit (See pic 1)

3. Connect voltmeter positive probe to yellow/green terminal and negative probe to ground, then turn ignition switch to On position, Fig. 5.
4. Voltage should be between 5-8 volts.
5. If voltage is not as specified, check the following:
a. Check open yellow or yellow/green wire.
B. Check blown fuse or poor ground.
6. Turn ignition switch On, then check as pointer of fuel gauge starts moving toward F mark. Turn ignition switch to Off before pointer reaches F mark on gauge dial. Failure to do so may damage fuel gauge.
7. If pointer of fuel gauge does not move, replace gauge.
8. If gauge is satisfactory, inspect fuel gauge and sending unit.

_____________________

Let me know what you find.
Was this
answer
helpful?
Yes
No
Sunday, October 21st, 2018 AT 7:06 PM
Tiny
HERTCHU
  • MEMBER
  • 10 POSTS
Okay, will do Wednesday as that is the next time I am off work. I work twelve hour shifts. This is my gauge. https://www.glowshiftdirect.com/tinted-7-color-fuel-level-gauge/
Was this
answer
helpful?
Yes
No
Sunday, October 21st, 2018 AT 7:17 PM
Tiny
HERTCHU
  • MEMBER
  • 10 POSTS
Also, the ground for my gauge is fine it is ground to the same spot as temperature gauge and temperature gauge works fine. Also has the same constant power and same acc power.
Was this
answer
helpful?
Yes
No
Sunday, October 21st, 2018 AT 7:18 PM
Tiny
JACOBANDNICKOLAS
  • MECHANIC
  • 108,128 POSTS
Let me know what you find. Also, unless the temperature gauge uses the same wire, check it. It may have a weak connection.

I will watch for your reply on Wednesday. Have a good week.

Joe
Was this
answer
helpful?
Yes
No
Sunday, October 21st, 2018 AT 7:42 PM

Please login or register to post a reply.

Sponsored links