Hi and thanks for using 2CarPros.com. This problem can be the result of a few things. Items such as a partially clogged catalytic converter, low fuel pressure, a plugged fuel filter.
Here are symptoms of a catalytic converter issue:
https://www.2carpros.com/articles/bad-catalytic-converter-symptoms
Here is how to check one:
https://www.2carpros.com/articles/how-to-test-a-catalytic-converter
As far as a fuel pressure issue, here are directions on how to check fuel pump pressure:
Step 1
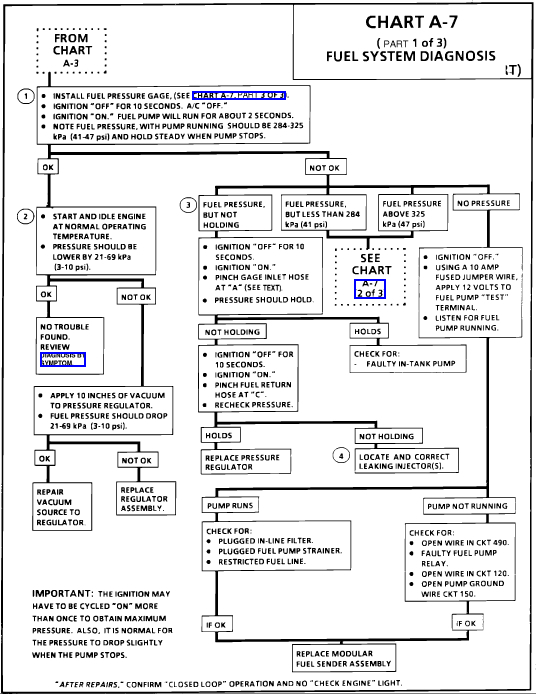
Chart A-7
Fuel Flow Diagram
CIRCUIT DESCRIPTION :
When the ignition switch is turned to the "ON" position, the ECM will activate the in-tank fuel pump. The fuel pump will operate as long as the engine is cranking or running, and the ECM receives ignition reference pulses. If no ignition reference pulses exist, the ECM will shut "OFF" the fuel pump within 2 seconds after ignition "ON" or engine stops. An electric fuel pump, attached to the fuel sender assembly (inside the fuel tank), pumps fuel through an in-line filter to the fuel passage within the lower manifold assembly. The pump is designed to provide fuel at a pressure above the regulated pressure needed by the injectors. A pressure regulator, attached to the lower manifold assembly, keeps fuel available to the injectors at a regulated pressure. Unused fuel is returned to the fuel tank by a separate line.
TEST DESCRIPTION : The numbers below refer to circled numbers on the diagnostic chart.
Install fuel pressure gauge. Turn ignition "ON," pump pressure should be 284-325 kPa (41-47 psi). This pressure is controlled by spring pressure within the regulator assembly.
When engine is idling, the manifold pressure is low (high vacuum) and is applied to the fuel regulator diaphragm. This will offset the spring and result in a lower fuel pressure. This idle pressure will vary somewhat depending on barometric pressure, however, the pressure idling should be less, indicating pressure regulator control.
Pressure that continues to fall is caused by one of the following:
In-tank fuel pump check valve not holding.
Partially disconnected fuel pulse dampener (pulsator).
Fuel pressure regulator valve leaking.
Injectors sticking open.
An injector sticking open can best be determined by checking for a fouled or saturated spark plugs.
Pictures 1 and 2 correlate with these directions.
___________________________________________________
Step 2
PART 2 OF 3
Chart A-7
Fuel Flow Diagram
TEST DESCRIPTION : The numbers below refer to circled numbers on the diagnostic chart.
Pressure below 284 kPa (41 psi) may cause a lean condition and may set a Code 44 or Code 32. It could also cause hard starting cold and poor driveability. Low enough pressure will cause the engine not to run at all. Restricted flow may allow the engine to run at idle, or low speeds, but may cause a surge and stall when more fuel is required, as when accelerating or driving at high speeds.
Restricting fuel flow at the fuel pressure gauge (at B) causes fuel pressure to build above regulated pressure. With battery voltage applied to the pump test terminal, pressure should rise above 325 kPa (47 psi) as the gauge outlet hose is restricted.
NOTE : DO NOT allow pressure to exceed 414 kPa (60 psi) as damage to the regulator may result.
This test determines if the high fuel pressure is due to a restricted fuel return line or a faulty fuel pressure regulator. High fuel pressure may cause a rich condition and may set a Code 45.
________________________________
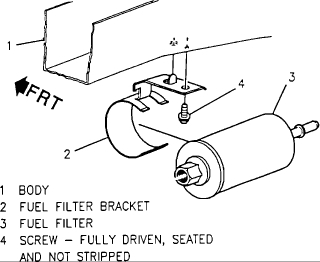
If the fuel filter is a concern, here are the directions for replacement.
The fuel filter is located under the rear of the car, rearward of
the fuel tank.
REMOVE OR DISCONNECT:
Relieve fuel system pressure. Refer to "FUEL SYSTEM PRESSURE RELIEF"
Raise vehicle and suitably support.
Using back-up wrench, remove fuel filter fining.
NOTE: If modular fuel sender nylon fuel lines become kinked, and cannot be straightened, they must be replaced.
Grasp filter and one nylon fuel connection line fitting. Twist quick-connect fitting 1/4 turn in each direction to loosen any dirt within fitting.
CAUTION: Safety glasses must be worn when using compressed air, as flying dirt particles may cause eye injury.
Using compressed air, blow out dirt from quick-connect fitting at end of fuel filter.
Quick connect fittings by squeezing plastic tabs of male end connector and pulling apart.
Fuel filter.
INSTALL OR CONNECT:
CAUTION: To Reduce the Risk of Fire and Personal Injury:
Before installing a new filter, always apply a few drops of clean engine oil to the male tube
end of the filter and to the fuel level meter assembly. This will ensure proper reconnection and prevent a possible fuel leak.
(During normal operation, the O-rings located in the female connector will swell and may prevent proper reconnection if not lubricated).
If new fuel line is nicked, scratched or damaged during installation, it must be replaced.
Remove protective caps from new filter.
New plastic connector retainers on filter inlet tube.
Filter in same position as old filter.
Quick connect fitting:
Apply, a few drops of clean engine oil to the male tube end of the filter and of the fuel sender assembly.
Push connectors together to cause the
retaining tabs/fingers to snap into place.
Once installed, pull on both ends of each
connection to make sure they are secure.
Fuel filter fitting using new O-ring.
TIGHTEN:
Use back-up wrench to prevent filter, O-ring, or fuel line damage. Tighten fitting to 27 N-m (20 lbs. ft.)
Lower vehicle.
Fuel filler cap.
Negative battery cable.
INSPECT:
Turn ignition to "ON" position for two seconds, then turn ignition to "OFF" for ten seconds. Again turn to "ON" position, and check for fuel leak's.
_______________________________________________________
The last two pictures are of the fuel filter replacement.
I hope this helps.
Let me know if you have other questions,
Take care,
Joe
Images (Click to make bigger)
Tuesday, June 5th, 2018 AT 6:42 PM