This is the most basic front shock absorber design, and it has been around since the early 1960s. It can be replaced by a competent do-it-yourselfer.
Basically, you must remove the lower bolt and nut, and the upper nut. That sounds too easy, so now let me describe it in more detail to include the problems we often run into.
Start by looking at this article:
https://www.2carpros.com/articles/replace-shock-absorber
They're replacing the same style of shock absorber, but it's on a different car model. The procedure is the same. Start with the top nut. They're showing putting a wrench on it in step 6. On well over half of the car models you can't get a wrench on it that easily. Also, you have to hold the shaft from spinning so you can turn the nut. That nut is usually rusted too tight for that to work. Assuming the old shock absorber is going to be discarded, a real fast solution is to pound on a deep socket, but it must be a six-point socket. This trick won't work with a 12-point socket. If you have enough working room, snap a long extension onto the socket, then use it as a lever to bend the shaft back and forth until it snaps off. Sometimes that occurs with just a few bends. Sometimes it takes a while and you'll be working up a sweat before it breaks.
If you can get the extension on the socket but there isn't enough room to work it back and forth, another trick is to bend it one way as far as possible, then use an air-powered impact wrench to run the nut off. Being bent will hold the shaft from spinning.
Another more miserable way to remove that nut is to cut through it with an air-powered cutoff tool. You only have to get 90 percent of the way through it, then it can be cracked off with a large flat-blade screwdriver, or it will spin off easily now with a socket and impact wrench. The most time-consuming method is to hold the shaft while you unscrew the nut. Only resort to that if you're going to reuse that shock absorber after it had to be removed for some other service.
Most of the time the lower bolt comes right out, but sometimes it gets rusted to the steel tube that runs through the rubber bushing. Once the nut is removed, you may be able to pound the bolt out of that sleeve. Place the nut back on the bolt a few turns if you have to do that to protect the threads. You may also be able to break the rusted bolt loose by turning it with a wrench or a socket and breaker bar. Air tools rarely work with rusted sleeves because the bolt will just bounce back and forth in the rubber bushing. Air tools won't turn it far enough to break it free like you can with a wrench. In the worst cases, I've had a few where I used a torch to melt the rubber bushing, or I've used the cutoff tool to cut through the metal loop on the bottom of the shock absorber. That lets me get the shock out of the vehicle, then I can work on cutting off the sleeve or even cutting the bolt. Thankfully they aren't that bad very often, but don't panic if this happens to you. We'll figure out what to do if it comes to that.
If you expect to do this job again years from now, clean the bolts with a wire wheel, then lightly coat them with anti-seize compound so they won't rust to the sleeves again.
There's two things do-it-yourselfers and inexperienced mechanics can do to cause problems when installing the new shock absorber. While this might not be a big deal here, that lower bolt has to be tightened while the vehicle is sitting at normal ride height. This is more important with other rubber bushings, particularly for control arms. That bushing is going to be held in the position it's in when the bolt is tightened. If the vehicle is jacked up with the suspension hanging down, and that's when the bolt is tightened, when it is lowered onto the tires and suspension parts pivot to their at-rest positions, those bushings will be clamped in a permanent twist. That will greatly shorten their life. We typically either bounce the vehicle or drive it around the parking lot to settle the suspension, then I drive it onto a drive-on hoist to finish tightening the bolts.
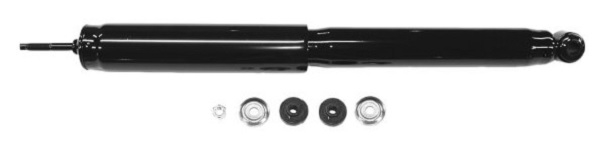
That doesn't apply to the upper nut. Those bushings don't move around as the suspension travels up and down, but they have their own pitfall to watch out for. You'll slide on a metal washer, one rubber bushing half which usually has a small raised area around the hole that fits into the hole in the body, then stick that shaft through the hole. Slide on the other half of the bushing, the other metal washer, then the nut. There is usually enough resistance to turning in the shaft to allow you to run the nut on by hand or with air tools, but where a lot of people run into trouble is they over-tighten that nut. Proper procedure is to watch the rubber bushing squish out as you tighten the nut. When it squeezes out to where it is exactly the same diameter as the metal washer, it is at the proper tightness. That allows it to flex and twist freely without putting excessive pressure on the bushing. If you leave that nut too loose, the shaft will be able to move up and down a little. That hammering action will pound out those bushings and they'll crack off. If the nut is too tight, the washers will cut into the rubber and crush them. Again, they'll split, then you'll have those metal washers banging against the metal body or bracket.
Also take a look at this dandy video:
https://youtu.be/0RnluM9d4gw
They're doing the job on a Ford, and while it went really well, the nuts and bolts aren't as easily accessible on all brands and models.
Feb 25, 2021 at 10:20 AM