Front brake caliper piston

Tiny
JACOBALDRICH96
  • MEMBER
  • 2014 SUBARU IMPREZA
  • 2.2L
  • 4 CYL
  • 4WD
  • AUTOMATIC
  • 70,000 MILES
Please help. What started as a routine brake pad replacement has resulted in the vehicle having no brakes at all.
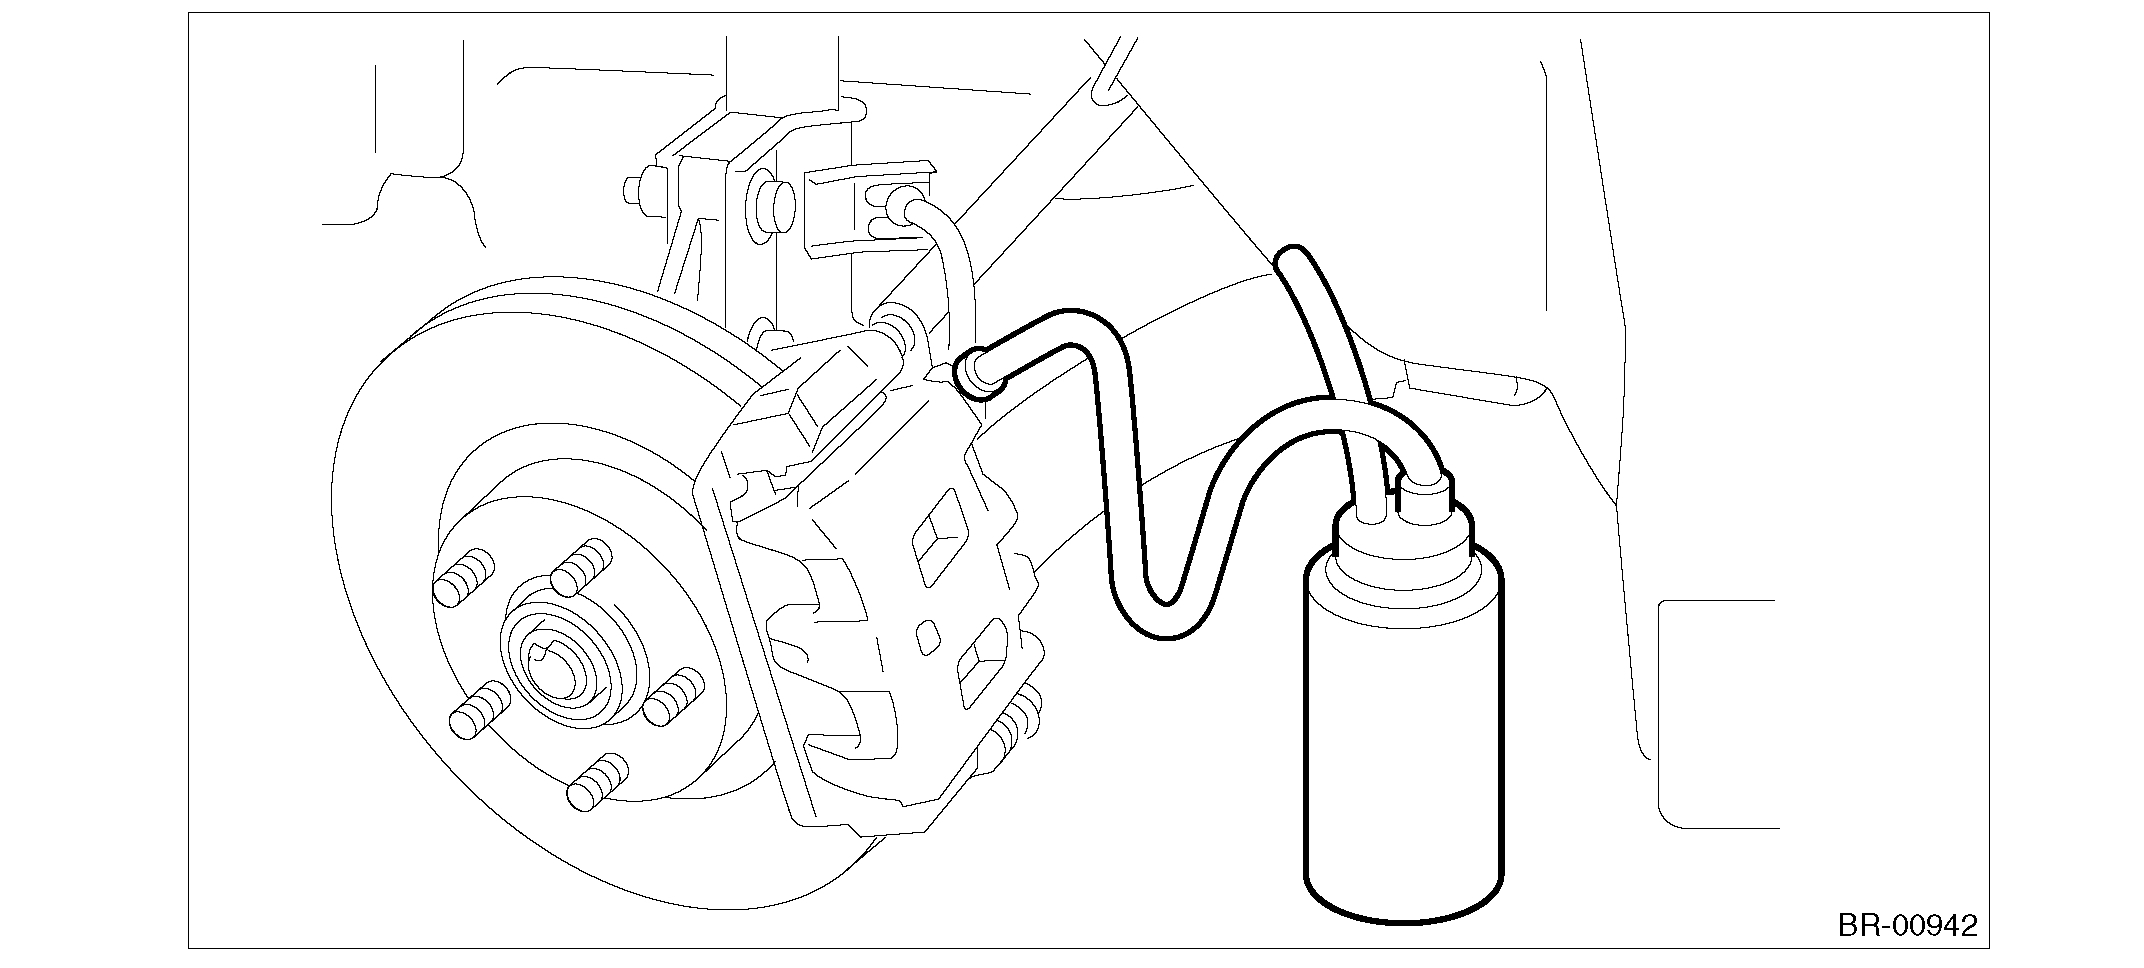
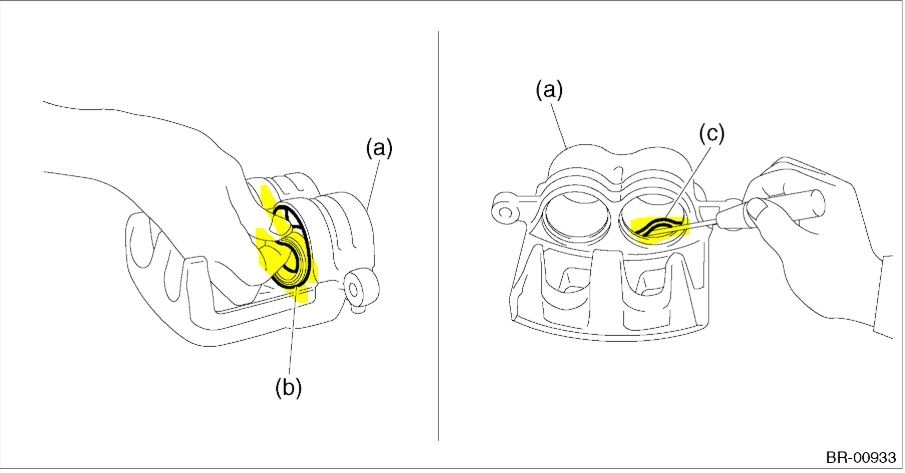
I recently replaced the brake pads on all four calipers (and replaced one rotor on the rear driver side). While replacing the pads, I noticed that both of the rubber boots on the front driver side caliper pistons were deteriorated. (This vehicle has two pistons in each front brake caliper.) I bought a Brake Caliper Repair Kit which included two boots and two square cut seals. I clamped the brake line to avoid loosing too much brake fluid and removed the two pistons (which are still in good working order). I then replaced the square cut seals and boots for both pistons. I opened the bleeder valve to allow air to be pushed out while I re-inserted the pistons into the caliper, then unclamped the brake line and pumped the brakes to remove any air from the brake lines. After I had a steady flow of brake fluid from the bleeder valve, I closed it and refilled the brake fluid reservoir. I then pumped the brakes several times to make sure that the pistons would move as intended with pressure to the brake, and they did not move. Not only were the pistons not moving like they should, but now my brakes won't hold any pressure either. The pedal goes to the floor and the brakes do not work. I put everything back together, and drove the car about 50 feet and parked it back in my driveway. I see no signs of leaking brake fluid. My only guess is that the new rubber boots on the pistons might not be making a secure enough seal to the inside of the caliper. I tried using a flat head screw driver to push the edge of the rubber boot into the lip on the inside of the caliper, but wasn’t able to push all of it into place because the screw drive wouldn’t fit in between some parts of the caliper.
Now I don't have any brakes, don't really know why, and cant get the pistons to move or get the brakes to hold any pressure. Any help would be greatly appreciated. Thank you!
Wednesday, July 17th, 2019 AT 2:23 PM

7 Replies

Tiny
JACOBANDNICKOLAS
  • MECHANIC
  • 108,128 POSTS
Welcome to 2CarPros.

When you bled the brakes, did you have a helper pump while the bleeder was closed, then hold pressure on the pedal while you opened the bleeder and allowed the brake pedal to go to the floor, and then closed the bleeder and released the brake pedal?

If the master cylinder reservoir never went empty, here are the directions for bleeding the brakes. See if there is anything you may have done differently.

__________________________

2. BRAKE LINE

1. When the master cylinder assembly is replaced or the reservoir tank is empty, bleed the master cylinder assembly before bleeding the brake line.
2. Fill the reservoir tank of the master cylinder assembly with brake fluid.

NOTE: While bleeding air, keep the reservoir tank filled with brake fluid to prevent entry of air.

3. Attach one end of the vinyl tube to the bleeder - screw and the other end to the brake fluid container.

Pic 1

4. Depress the brake pedal several times, and hold it.
5. Loosen the bleeder - screw to drain brake fluid. Tighten the bleeder - screw quickly, and release the brake pedal.
6. Repeat the steps 4) to 5) until there are no more air bubbles in the vinyl tube.
7. Repeat the steps from 2) to 6) above to bleed air from each wheel.

NOTE: Perform air bleed starting in the order from the farthest wheel cylinder from the master cylinder assembly.

8. Securely tighten the bleeder - screw.

Tightening torque:
Bleeder - screw: 8 N.M (0.82 kgf-m, 5.9 ft-lb)

9. Check that there are no brake fluid leaks in the entire brake system.
10. Check the pedal stroke.
(1)Warm up the engine until the engine speed stabilizes.
(2)Depress and hold the brake pedal with a force of 500 N (51 kgf, 112 lbf).
(3)Adjust the tilt position of the steering wheel to the lowest position.
(4)Measure the distance between brake pedal and steering wheel.
(5)Release the pedal, and measure the distance between pedal and steering wheel again.

Pic 2

Specification of pedal stroke: 110 mm (4.33 in) or less when depressing the pedal with a force of 500 N (51 kgf, 112 lbf)

11. If the distance is more than specification, there is a possibility of air being caught in the brake line. Bleed the brake line of all air until the pedal stroke meets the specification.
12. Operate the hydraulic control unit in the sequence control mode.
13. Check the pedal stroke again.
14. If the distance is more than specification, there is a possibility of air being caught in the hydraulic unit. Repeat above steps 2) to 9) until the pedal stroke meets the specification.
15. Fill the reservoir tank with brake fluid up to the "MAX" level.
16. Perform a road test and ensure that the brakes operate normally.

_______________________________

Let me know if this helps.

Take care,
Joe
Was this
answer
helpful?
Yes
No
Wednesday, July 17th, 2019 AT 6:57 PM
Tiny
JACOBALDRICH96
  • MEMBER
  • 4 POSTS
The brakes are not building/holding any pressure. I don’t think I’ll be able to bleed the lines if there’s no pressure in the system.
Was this
answer
helpful?
Yes
No
Wednesday, July 17th, 2019 AT 7:55 PM
Tiny
JACOBANDNICKOLAS
  • MECHANIC
  • 108,128 POSTS
Welcome back:

There really isn't any pressure until the brake pedal is pressed. Did you have a helper when you bled them the first time? Were the directions listed above followed?

Let me know.
Joe
Was this
answer
helpful?
Yes
No
Wednesday, July 17th, 2019 AT 9:50 PM
Tiny
JACOBALDRICH96
  • MEMBER
  • 4 POSTS
No, I was by myself. And I did not do it as you described. All I did was pump the brakes and used the bleeder valve as I described it in the post.
Was this
answer
helpful?
Yes
No
Thursday, July 18th, 2019 AT 5:03 AM
Tiny
JACOBANDNICKOLAS
  • MECHANIC
  • 108,128 POSTS
Welcome back:

Okay, when you push the brake, fluid will go to the caliper. When you release the brake pedal if the bleeder is still open, it will suck air back in. You have to close the bleeder before you release the brake pedal or you will never get the air out of the system. You keep sucking more in. That's why you have no brake pedal.

Try what I suggested and let me know the results. If you need me to better explain, let me know.

Take care,
Joe.
Was this
answer
helpful?
Yes
No
Thursday, July 18th, 2019 AT 6:15 PM
Tiny
JACOBALDRICH96
  • MEMBER
  • 4 POSTS
Thanks for all the help Joe. I think, in addition to getting air in the brake line, the biggest issue was that I wasn't able to get the rubber boot to create an air tight seal inside the caliper. The rubber boot fit snug and in place as it should around the piston, but I couldn't get the other end to sit as it should inside the caliper and brake fluid was leaking out through that opening where the boot should've made the seals. I brought it to the dealership and they wanted over $450.00 to replace the caliper and bleed the lines. I brought it home, changed the caliper myself, and had someone give me a hand with properly bleeding the brake line to that caliper. Cost me about $64.00 and two hours of my time. (In hindsight, it would've been easier to spend that $64 to swap out the entire caliper to begin with instead of trying to save money and replace the boots for $6.00 and deal with the headache.) Thank you for all of your help with this process. The car is put back together and I have working brakes again! There is a slight friction-like sliding sort of noise when I drive now. But I'm hoping that just goes away as the calipers and brake pads settle. Thanks again! :)
Was this
answer
helpful?
Yes
No
Wednesday, July 24th, 2019 AT 10:32 AM
Tiny
JACOBANDNICKOLAS
  • MECHANIC
  • 108,128 POSTS
Welcome back:

You are very welcome. I'm glad you got it taken care of. I have to be honest, if you had a leak coming from the dust seal, chances are the piston seal got damaged when installing. They need to be lubricated with brake fluid before you reinstall the pistons. I'm not sure if you did that. As far as the dust cover, it isn't responsible for doing anything but keeping dust and dirt from getting between the caliper and pistons. I attached a pic. The left one is the dust seal which you would have installed after the pistons were reinstalled, and the right picture is the actual seal in the bore. That is the one that had to cause the leak.

Regardless, I'm glad to hear it's fixed. Please feel free to come back anytime you have a question.

Take care,
Joe
Was this
answer
helpful?
Yes
No
Wednesday, July 24th, 2019 AT 10:45 PM

Please login or register to post a reply.

Sponsored links