Hello, the parking brake shoes do not affect the ability or difficulty of a rear brake job on this vehicle, unless they are rusted to the drum, or unless you are planning on replacing them. Make sure the parking brake is off before beginning this work. I will attach the exploded diagrams and the procedure below. There is a type A and B for this vehicle, however the instructions are the same for both, be sure of what shape brake pad you have to compare with the new one.
Upon installation for both sides, the caliper piston must be pressed in, which is easily done with a large C-clamp and the old brake pad. If you are planning on bleeding the brakes anyway, I would crack the bleeder on the caliper and press the fluid out of the caliper this way.
After making sure the brake fluid is at an adequate level, you will need to step on the brake a few times to seat the pads, and to begin bleeding you will need a helper or tool of some sort to keep the brake pedal down. Starting from the furthest side (passenger rear), you should pump the brakes 3 times, hold, crack the bleeder and wait for the fluid to stop, close the bleeder, and pump the brakes again. Keep a check on the brake fluid level during this time. You should be able to do 3 rounds per wheel, and as long as you don't hear or see any air / bubbles in the fluid you should be fine. I like to connect a small hose leading to a bottle for easy cleanup.
Please let us know if you have any other questions.
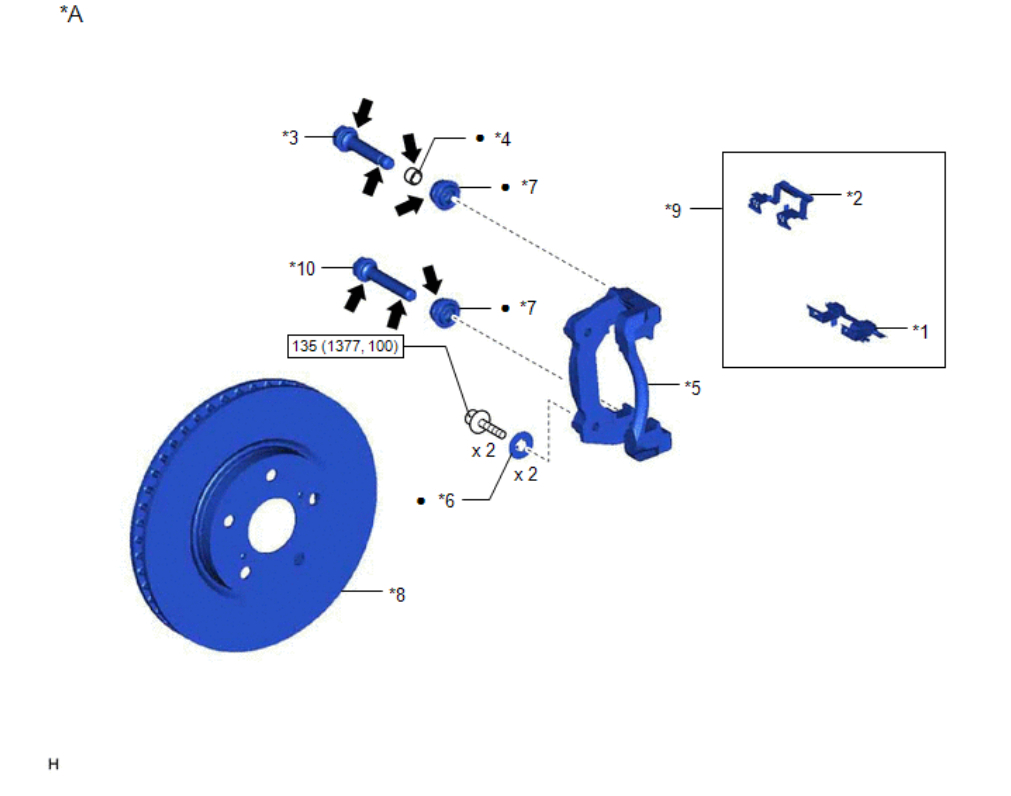
FRONT BRAKE PAD / ROTOR REPLACEMENT
PROCEDURE
REMOVE FRONT WHEEL
REMOVE FRONT DISC BRAKE CYLINDER ASSEMBLY
Hold the 2 front disc brake cylinder slide pins and remove the 2 bolts and front disc brake cylinder assembly.
REMOVE FRONT DISC BRAKE PAD
Remove the 2 front disc brake pads from the front disc brake cylinder mounting.
REMOVE FRONT DISC BRAKE ANTI-SQUEAL SHIM KIT
Remove the front No. 1 disc brake anti-squeal shim and front No. 2 disc brake anti-squeal shim from each front disc brake pad.
Remove the front disc brake pad wear indicator plate from each front disc brake pad.
REMOVE FRONT DISC BRAKE PAD SUPPORT PLATE
NOTICE:
Each front disc brake pad support plate has a different shape. Be sure to put an identification mark on each front disc brake pad support plate so that it can be reinstalled to its original position.
Remove the 2 front No. 1 disc brake pad support plates and 2 front No. 2 disc brake pad support plates from the front disc brake cylinder mounting.
REMOVE FRONT DISC BRAKE CYLINDER SLIDE PIN
Remove the front disc brake cylinder slide pin from the front disc brake cylinder mounting.
Remove the front No. 2 disc brake cylinder slide pin from the front disc brake cylinder mounting.
Remove the front disc.
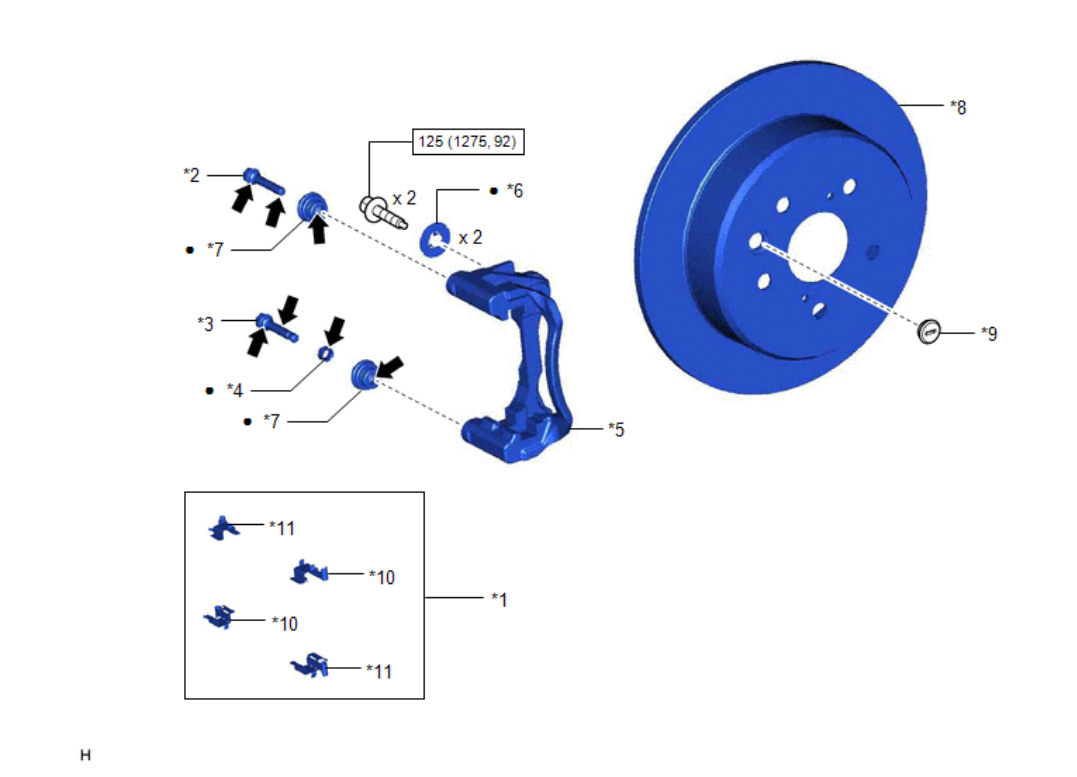
REAR BRAKE PAD / ROTOR REMOVAL
REMOVE REAR WHEEL
REMOVE REAR DISC BRAKE CYLINDER ASSEMBLY
Hold the 2 rear disc brake cylinder slide pins and remove the 2 bolts and rear disc brake cylinder assembly.
REMOVE REAR DISC BRAKE PAD
Remove the 2 rear disc brake pads from the rear disc brake cylinder mounting.
REMOVE REAR DISC BRAKE ANTI-SQUEAL SHIM KIT
Remove the rear No. 2 disc brake anti-squeal shim from the rear disc brake pad (inside).
Remove the rear No. 1 disc brake anti-squeal shim from each rear disc brake pad.
Remove the rear disc brake pad wear indicator plate from each rear disc brake pad.
REMOVE REAR DISC BRAKE PAD SUPPORT PLATE
NOTICE:
Each rear disc brake pad support plate has a different shape. Be sure to put an identification mark on each rear disc brake pad support plate so that it can be reinstalled to its original position.
Remove the 2 rear No. 1 disc brake pad support plates and 2 rear No. 2 disc brake pad support plates from the rear disc brake cylinder mounting.
REMOVE REAR NO. 1 DISC BRAKE CYLINDER SLIDE PIN
Remove the rear No. 1 disc brake cylinder slide pin from the rear disc brake cylinder mounting.
REMOVE REAR NO. 2 DISC BRAKE CYLINDER SLIDE PIN
Remove the rear No. 2 disc brake cylinder slide pin from the rear disc brake cylinder mounting.
REMOVE REAR DISC BRAKE CYLINDER MOUNTING
Remove the 2 bolts and rear disc brake cylinder mounting.
Remove the 2 rear No. 1 disc brake caliper plates from the rear disc brake cylinder mounting.
REMOVE PARKING BRAKE SHOE ADJUSTING HOLE PLUG
Remove the parking brake shoe adjusting hole plug.
REMOVE REAR DISC
Release the parking brake and remove the rear disc.
HINT:
If the rear disc cannot be removed easily, use a screwdriver to turn the shoe adjuster as shown in the illustration in order to contract the parking brake shoes.
William
Images (Click to enlarge)
Mar 9, 2025 at 6:34 AM