Front A/C vents do not blow air out

Tiny
CONCORD925
  • MEMBER
  • 2002 CHEVROLET TRAILBLAZER
  • 4.2L
  • 6 CYL
  • 4WD
  • AUTOMATIC
  • 168,000 MILES
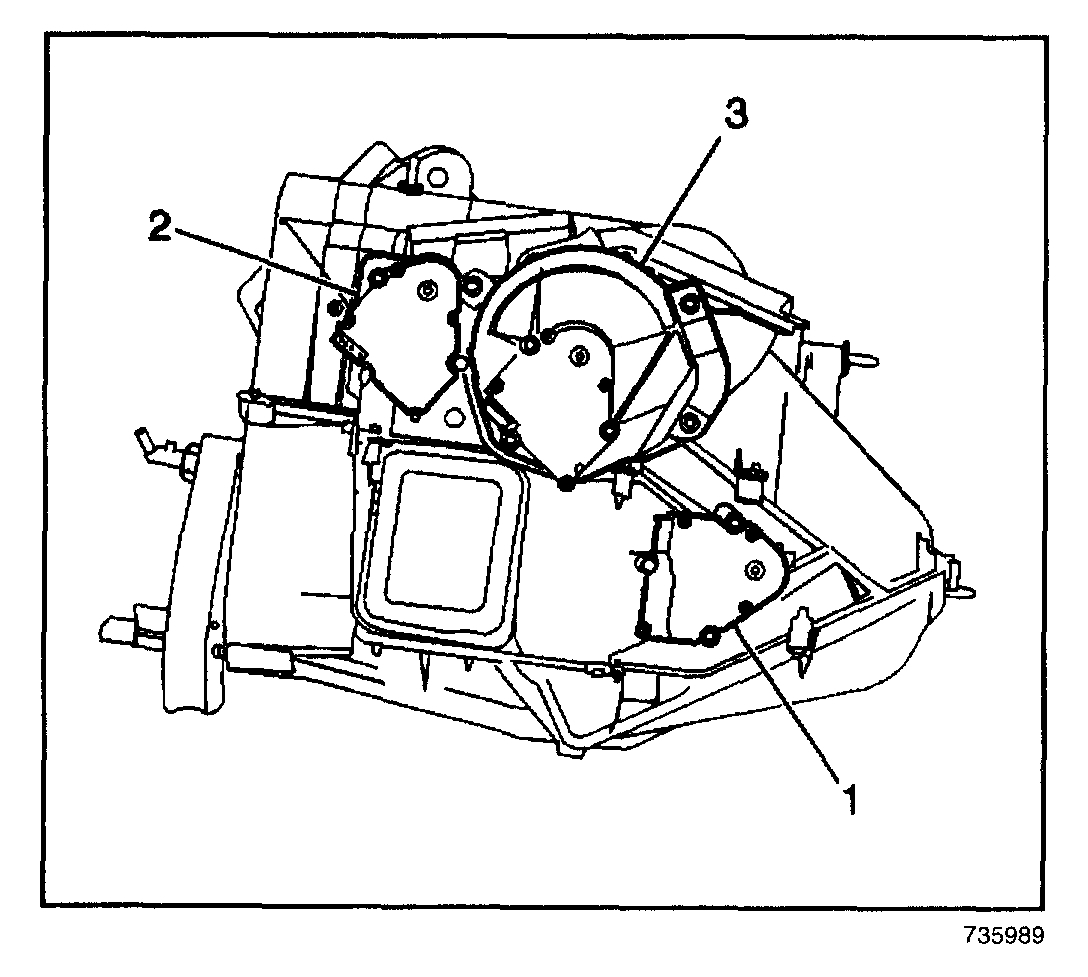
The top front vents will not blow but the defrost works fine and so does the lower vents the back works amazingly, just the front ones. It's going to be getting cold soon I could feel a very little bit of air coming through the vents but I tried disconnecting the HVAC fuses and all that and the battery but still nothing. I feel like it might be the actuator but I'm not sure how to check that. I'm not trying to take apart my car so much. So is there a way to a manually open the vents? I saw on YouTube that there is but it's a pain in the neck. The guy made it look easy though. Is there any other way I can manually open the vents? I'd rather have him stuck open rather than closed. I would really appreciate it if you could help me.
Sunday, October 25th, 2020 AT 7:21 PM

3 Replies

Tiny
JACOBANDNICKOLAS
  • MECHANIC
  • 108,336 POSTS
Hi,

What you described sounds like the mode door actuator isn't working properly. I wouldn't recommend forcing the door open simply because you can't change it unless you take it apart again.

As far as the mode actuator, that is what determines where the air flow is directed. I would remove it and inspect it for operation. It really isn't too hard to replace. Here are the directions. The attached pics correlate with the directions.

___________________________________

2002 Chevy Truck TrailBlazer 4WD L6-4.2L VIN S
Mode Actuator
Vehicle Heating and Air Conditioning Air Door Actuator / Motor Service and Repair Procedures Automatic Control Mode Actuator
MODE ACTUATOR
REMOVAL PROCEDURE

pic 1

1. Remove the I/P carrier.
2. Disconnect the electrical connector from the mode actuator.
3. Remove the screws from the mode actuator (3).
4. Remove the mode actuator.

INSTALLATION PROCEDURE

pic 2

1. Install the mode actuator (3).

NOTE: Refer to Fastener Notice in Service Precautions.

2. Install the screws to the mode actuator (3).

Tighten
Tighten the screws to the to 1.9 N.M (18 lb in).

3. Install the I/P carrier.

__________________

Let me know if that helps or if you have other questions.

Take care,
Joe
Was this
answer
helpful?
Yes
No
Sunday, October 25th, 2020 AT 7:39 PM
Tiny
CONCORD925
  • MEMBER
  • 3 POSTS
Okay, thanks for the reply and the info I greatly appreciate it. Hopefully I can fix it myself with the instructions you have provided me. This is one place I will be back to if I have anymore question which i'm sure I will.
Was this
answer
helpful?
Yes
No
+1
Sunday, October 25th, 2020 AT 10:22 PM
Tiny
JACOBANDNICKOLAS
  • MECHANIC
  • 108,336 POSTS
First, you are very welcome. Second, you are always welcome to return. LOL

Let me know if you run into any trouble. I'll try my best to help from here.

Take care,

Joe
Was this
answer
helpful?
Yes
No
Monday, October 26th, 2020 AT 6:50 PM

Please login or register to post a reply.

Sponsored links