This sounds like the same problem I just had and fixed myself for $72.00. $62 for actuator (Dealer) and $7 for stereo removal tool (AutoZone) + tax. Difficulty rating = easy/medium.
Turn on the van and the fan making sure the temp is set for hot and the van coolant is warm.
No heat from the front, turn on the rear fan and check for heat. I had heat coming out of the back.
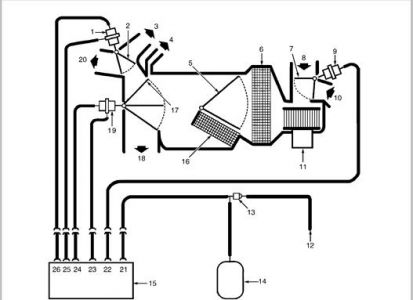
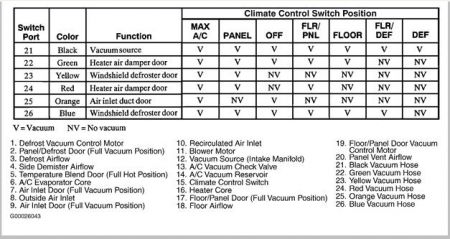
Problem was the actuator (white plastic squarish-shaped piece approximately the size of a deck of cards). It is located directly behind the stereo.
Tools needed: Stereo removal tool (Pair of U-shaped metal bars, size of your hand), phillips & flathead screw driver, socket set with small, med, and long extensions, and adjustable wrech.
Start by disconnecting the neg (-) battery cable (adjustable wrech). Using the stereo removal tools "poke" them into the two holes on each side of the stereo until you feel the clips inside "pop". There are four clips that hold the stereo in place, you need to release them and pull/wiggle/shimmy the stereo loose and forward. Remember the stereo has probably been in for 10 years. Once you feel it move forward even an 1/8 or 1/4 inch this means the clips are free. Now it was a test of my patience not to ruin the removal tools by bending them or grab the tape deck and pull because all I would do is break the plastic or cut my fingers. Take your time and wiggle while pulling forward. It will come.
Then you remove the stereo and disconnect the connectors (wires) from the back of the stereo. Now you look deep and into the stereo opening and you will see the actuator mounted to the firewall inside the stereo opening against the engine compartment. I do not recommend trying to remove it just yet.
Next you will need to remove the center console below the stereo. Two plastic screws on either side at floor-level (phillips & flathead screw driver). Open ashtray and remove two small screws (socket set looking up from the floor). Open lower CD holder/tray and remove two small screws (socket set looking up from the floor). Remove two small screws on the top underside of the stereo opening (socket set). Pull while also disconnecting the wires to the cigarette lighter, 12 Volt charger, etc. Now when you drop a socket when removing the actuator you can retrieve it easily. :0)
The rest is easy. Using the socket set and extensions remove the three screws holding the acuator to the firewall and unplug the connector (wire) from the unit itself. Using a magnetic socket set is advised.
Take your new actuator out of the box and start working backwards. It took me approximately 2 hours, but I like to walk around, have a drink, it happened to be 60 degrees and sunny. A perfect project and it feels good to save hundreds of dollars compared to the dealer costs. As a bonus I found two CDs that we lost several years ago.
Good luck!
Tuesday, December 20th, 2016 AT 6:08 PM