Replacing the rack and pinion will fix the problem?

Tiny
TAMMY PROCTOR
  • MEMBER
  • 2005 FORD TAURUS
  • 3.0L
  • 6 CYL
  • 2WD
  • AUTOMATIC
  • 200,000 MILES
I was told replacing the rack and pinion will fix the problem. Please advise.
Do you
have the same problem?
Yes
No
Saturday, October 27th, 2018 AT 11:48 PM

17 Replies

Tiny
DANNY L
  • MECHANIC
  • 5,648 POSTS
Hello, I'm Danny.

Here is the information you requested on removing and replacing the steering gear-rack and pinion gear assembly. I've attached picture steps below for replacement of the rack and pinion gear on your car. Here is a tutorial showing how to replace tie rod ends which will have to be removed from the gear assembly:

https://www.2carpros.com/articles/tie-rod-end-replacement

After replacement I would suggest turn the steering wheel lock to lock with the engine running to remove air bubbles from the steering system. I would also suggest having a front end alignment performed after re-assembly. The power steering fluid recommended for your car is Mercon Multi Purpose ATF. Hope this helps and thanks for using 2CarPros.
Was this
answer
helpful?
Yes
No
Tuesday, May 4th, 2021 AT 6:58 PM
Tiny
MOMARIES359
  • MEMBER
  • 2 POSTS
  • 2004 FORD TAURUS
  • 6 CYL
  • FWD
  • AUTOMATIC
  • 90,000 MILES
My car starts but the steering wheel will not turn the wheels.
Was this
answer
helpful?
Yes
No
Monday, June 7th, 2021 AT 5:40 PM (Merged)
Tiny
CARADIODOC
  • MECHANIC
  • 33,689 POSTS
This happens when the selector shaft inside the rack and pinion breaks here are diagrams that will help you see how to fix the problem.

Check out the diagrams (Below). Please let us know if you need anything else to get the problem fixed.

Cheers
Was this
answer
helpful?
Yes
No
+19
Monday, June 7th, 2021 AT 5:40 PM (Merged)
Tiny
MOMARIES359
  • MEMBER
  • 2 POSTS
It just happened yesterday but it has been making a noise for months prior to that. Not the clicking noise usually meaning the CV boots/joints? So I am glad to say I used the daigrams above and changed it out had it aligned nowe all good I love this site.
Was this
answer
helpful?
Yes
No
+2
Monday, June 7th, 2021 AT 5:40 PM (Merged)
Tiny
FIXITMR
  • MECHANIC
  • 9,990 POSTS
Glad you could get it fixed, that kind of problem can be tough. Please use 2CarPros anytime we are here to help

Cheers
Was this
answer
helpful?
Yes
No
+3
Monday, June 7th, 2021 AT 5:40 PM (Merged)
Tiny
LEASHMKEITWETWELTON
  • MEMBER
  • 1 POST
  • 2004 FORD TAURUS
  • 11,800 MILES
I have an 04 ford taurus, and my steering wheel is hard I replaced the power steering pump and the fluid is still shooting up from the pump what do I now?
Was this
answer
helpful?
Yes
No
Monday, June 7th, 2021 AT 5:40 PM (Merged)
Tiny
KEN L
  • MASTER CERTIFIED MECHANIC
  • 42,468 POSTS
This happens when you have a bad rack selector valve. Here are diagrams that will show you how to replace the rack. When doing the job you should flush the system as well, here is a guide to help you.

https://www.2carpros.com/articles/power-steering-fluid-flush

You will need to remove the tie rod end here is an easier way to do it.

https://www.2carpros.com/articles/tie-rod-end-replacement

Here are diagrams to help you get the job done (below)

Please let us know if you need anything else to get the problem fixed.

Cheers, Ken
Was this
answer
helpful?
Yes
No
Monday, June 7th, 2021 AT 5:40 PM (Merged)
Tiny
CYBERSOLE55
  • MEMBER
  • 1 POST
  • 2003 FORD TAURUS
I have developed a power steering fluid leak on the drivers side of the steering rack unit, it appears to be coming out of the boot (dust cover) area at the clamp. Will I have to replace the whole steering rack unit or just remove the boot and possibly a seal? And what is the difficulty?
Was this
answer
helpful?
Yes
No
Monday, June 7th, 2021 AT 5:40 PM (Merged)
Tiny
MERLIN2021
  • MECHANIC
  • 17,250 POSTS
I would say you are better of with a rebuilt rack, you would need some experience with fitting new bushing and seal. Racks are pretty checp, so go with the long rack, it comes with the tie rods installed.
Was this
answer
helpful?
Yes
No
+1
Monday, June 7th, 2021 AT 5:40 PM (Merged)
Tiny
TEDBURTON
  • MEMBER
  • 2 POSTS
  • 2003 FORD TAURUS
  • 6 CYL
  • FWD
  • AUTOMATIC
  • 140,000 MILES
Power steering replaced with new power steering pump still have the same problem.
Was this
answer
helpful?
Yes
No
Monday, June 7th, 2021 AT 5:41 PM (Merged)
Tiny
KASEKENNY
  • MECHANIC
  • 18,907 POSTS
Here is a guide that will help with this process:

https://www.2carpros.com/articles/power-steering-problems

Below is the process from the manual that will help with this as well. Please let us know if you have other questions.
Was this
answer
helpful?
Yes
No
Monday, June 7th, 2021 AT 5:41 PM (Merged)
Tiny
CHEFWIL
  • MEMBER
  • 1 POST
  • 2001 FORD TAURUS
  • 6 CYL
  • FWD
  • AUTOMATIC
  • 123,000 MILES
How to change a rack and pinion. Is it very hard?
Was this
answer
helpful?
Yes
No
+1
Monday, June 7th, 2021 AT 5:41 PM (Merged)
Tiny
BMRFIXIT
  • MECHANIC
  • 19,053 POSTS
Not an EZ thing to do here are the steps
good luck

POWER RACK & PINION -2001 Ford Taurus SE

Removal & Installation
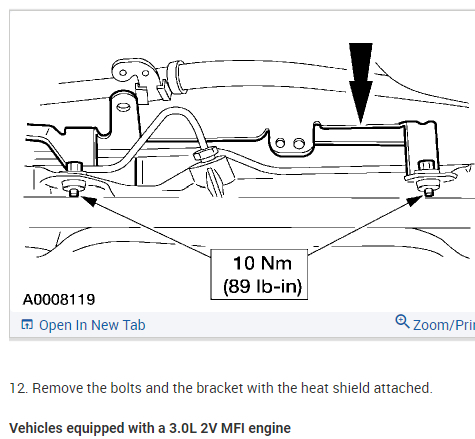
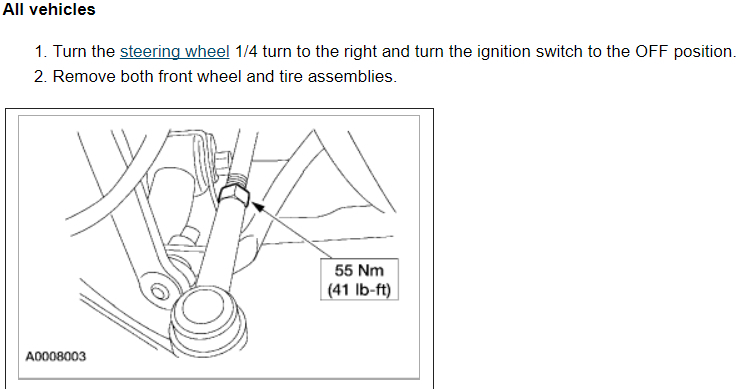
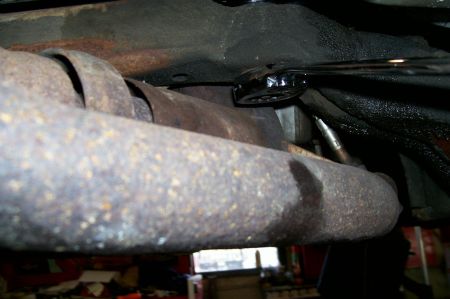
1. Turn the steering wheel 1/2 turn to the right and turn the ignition switch to the number 0 position. 2. Remove the air cleaner outlet pipe. 3. Remove the bolts and the engine roll restrictor.

Fig. 43: Removing Engine Roll Restrictor
Courtesy of FORD MOTOR CO.
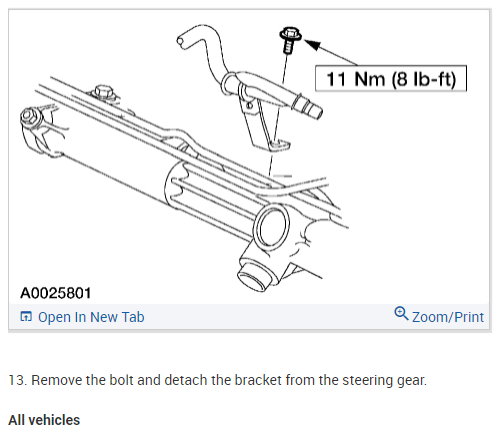
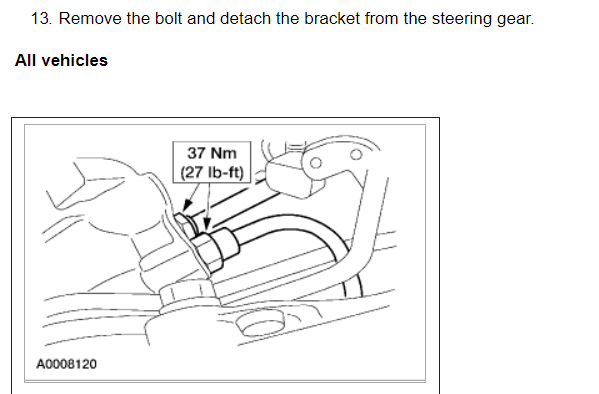
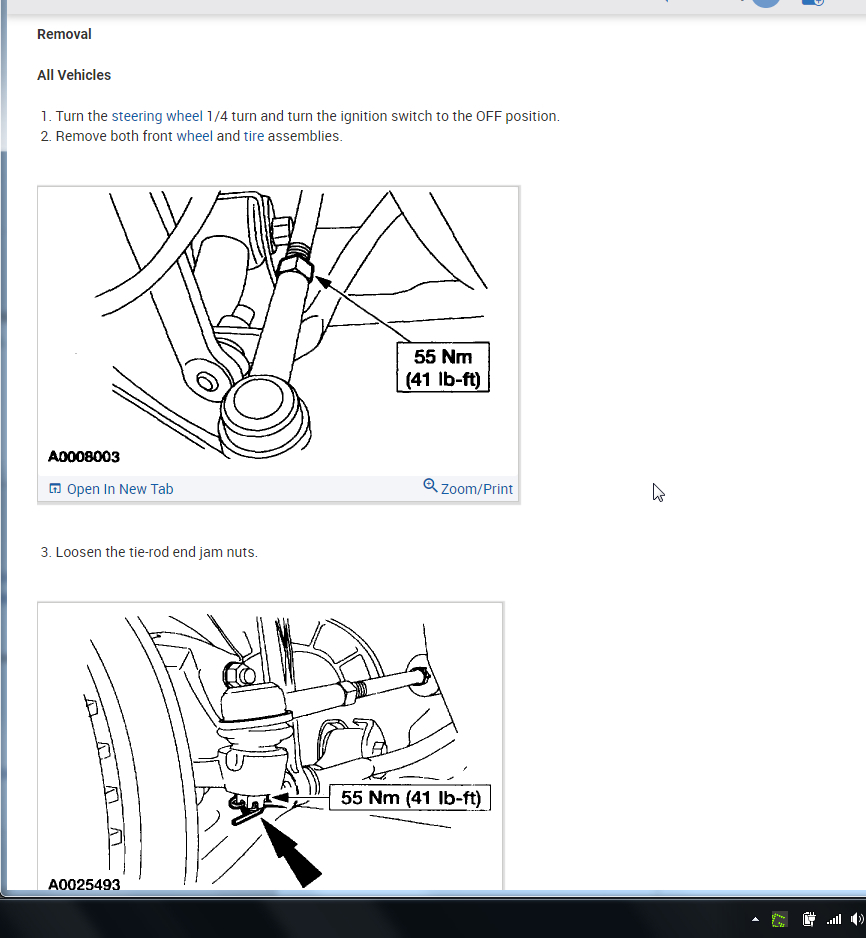
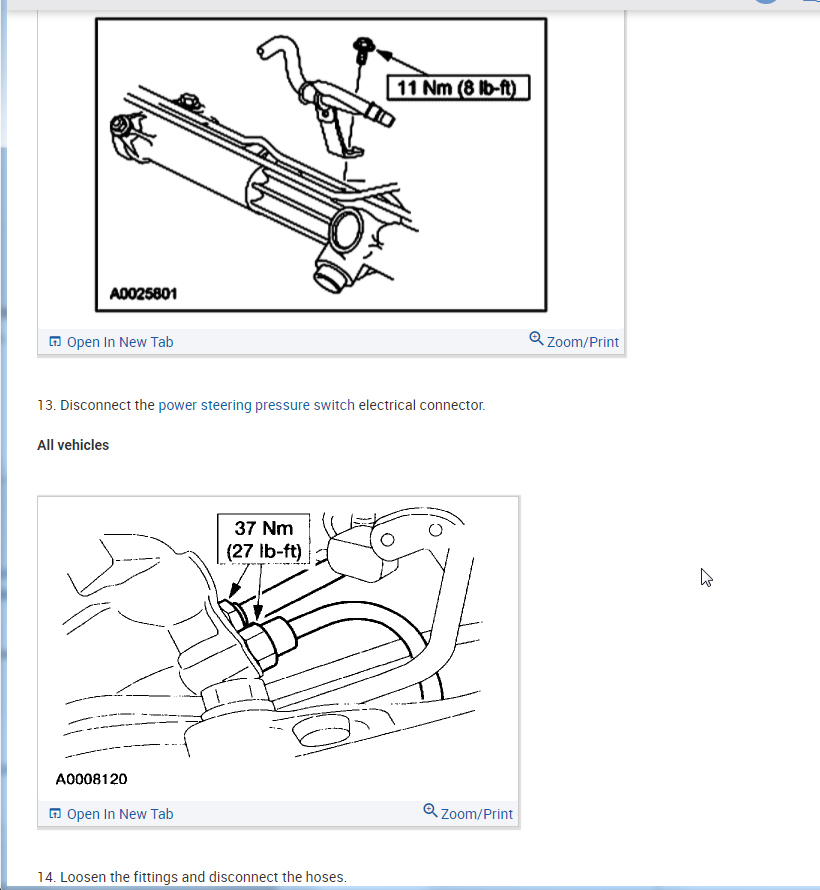
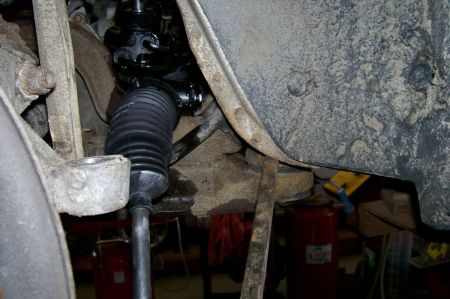
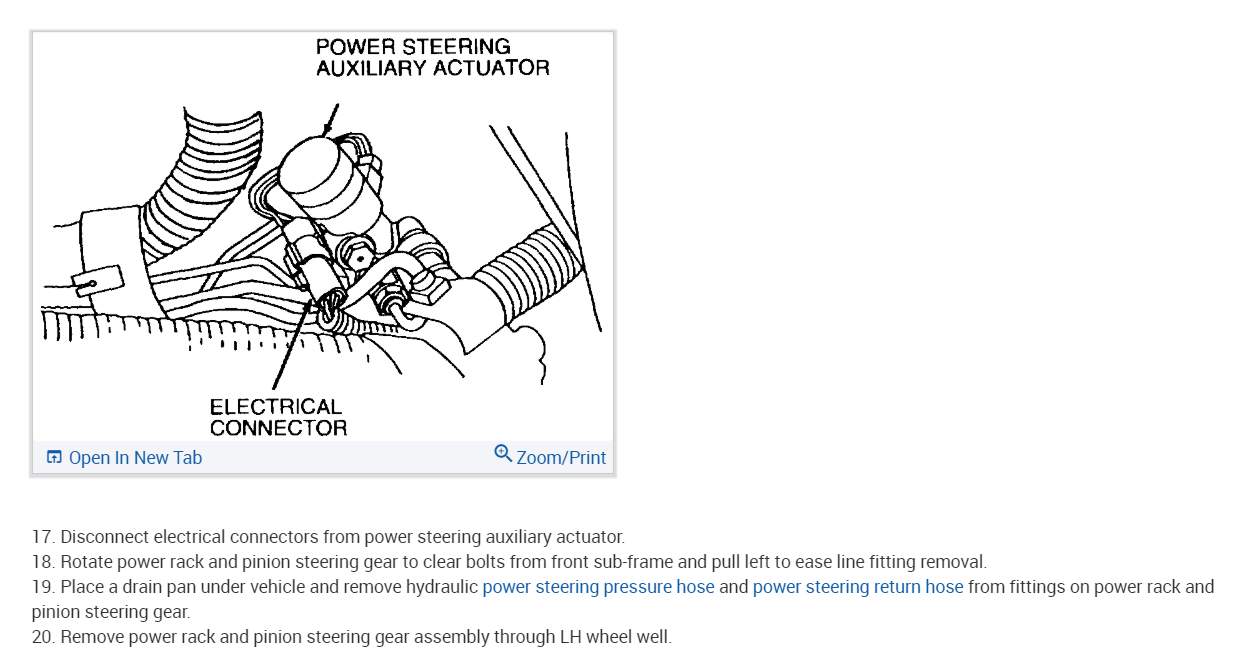
4. Remove the bolt and detach the power steering pressure hose.

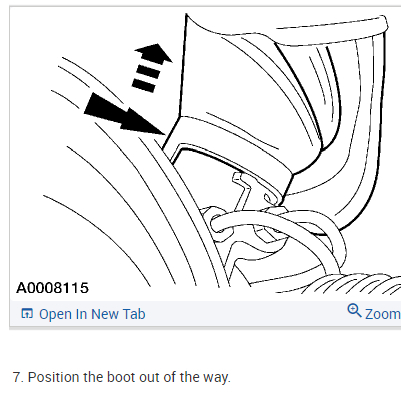
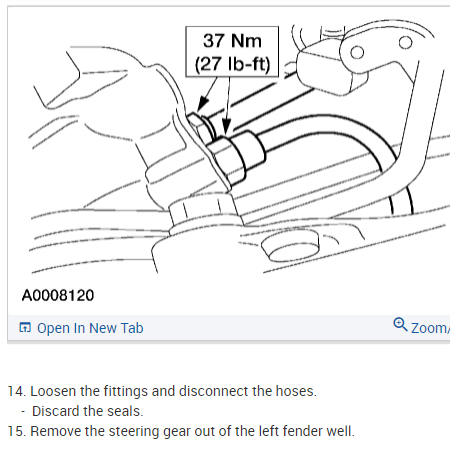
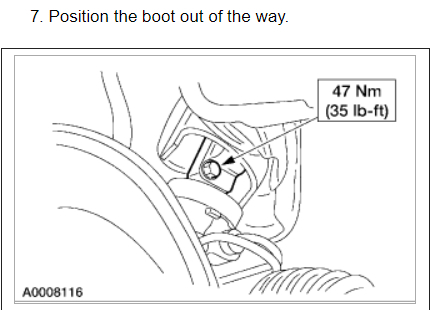
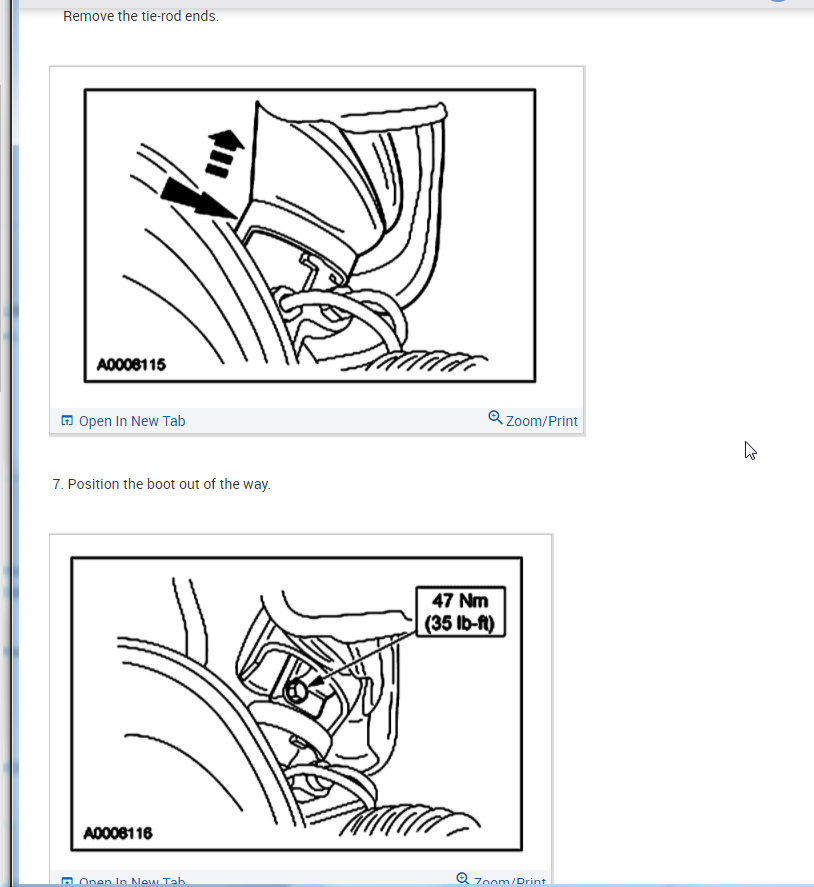
5. Loosen the fittings and disconnect the hoses.. 6. Position the boot out of the way.

Removing Power Steering Hoses )
Courtesy of FORD MOTOR CO.

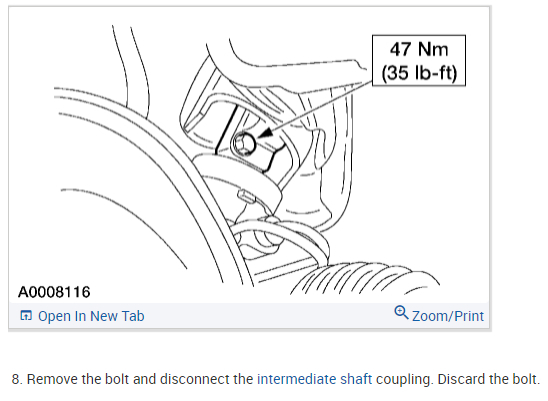
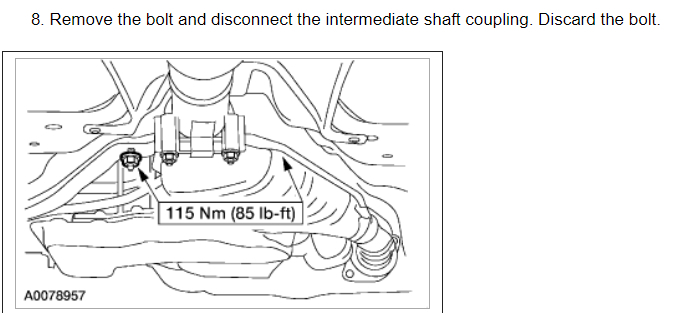
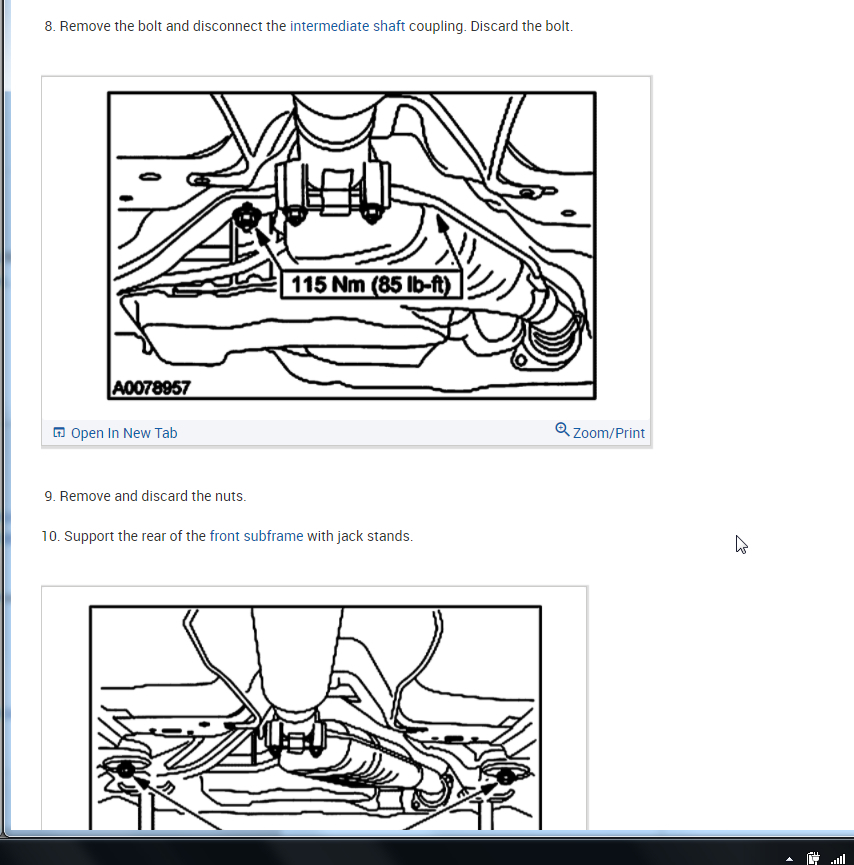
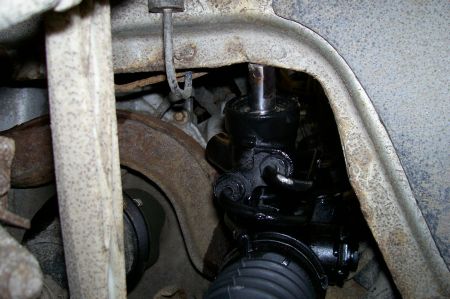
7. Remove the bolt and disconnect the intermediate shaft coupling. DISCARD the bolt.
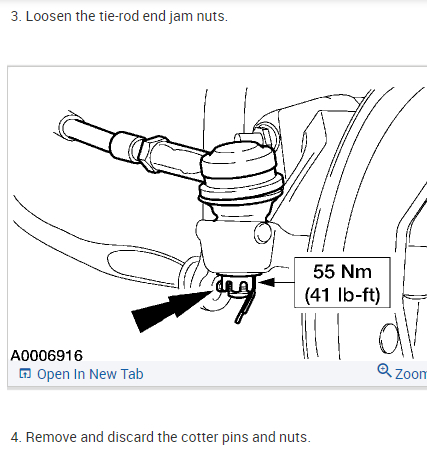
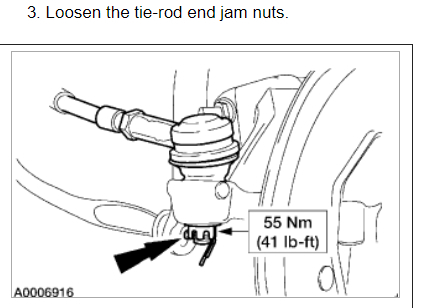
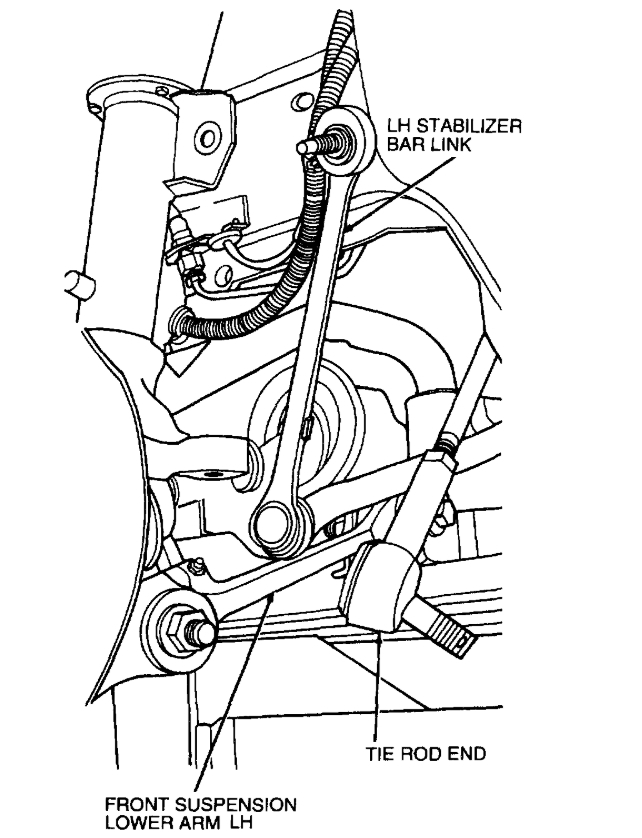
8. Remove the front wheel and tire assemblies. 9. Loosen the tie-rod end jam nuts..

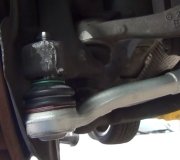
Loosening Tie-Rod End Jam Nuts

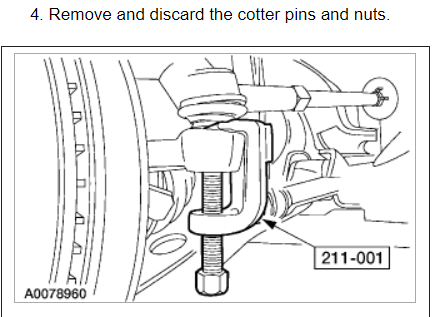
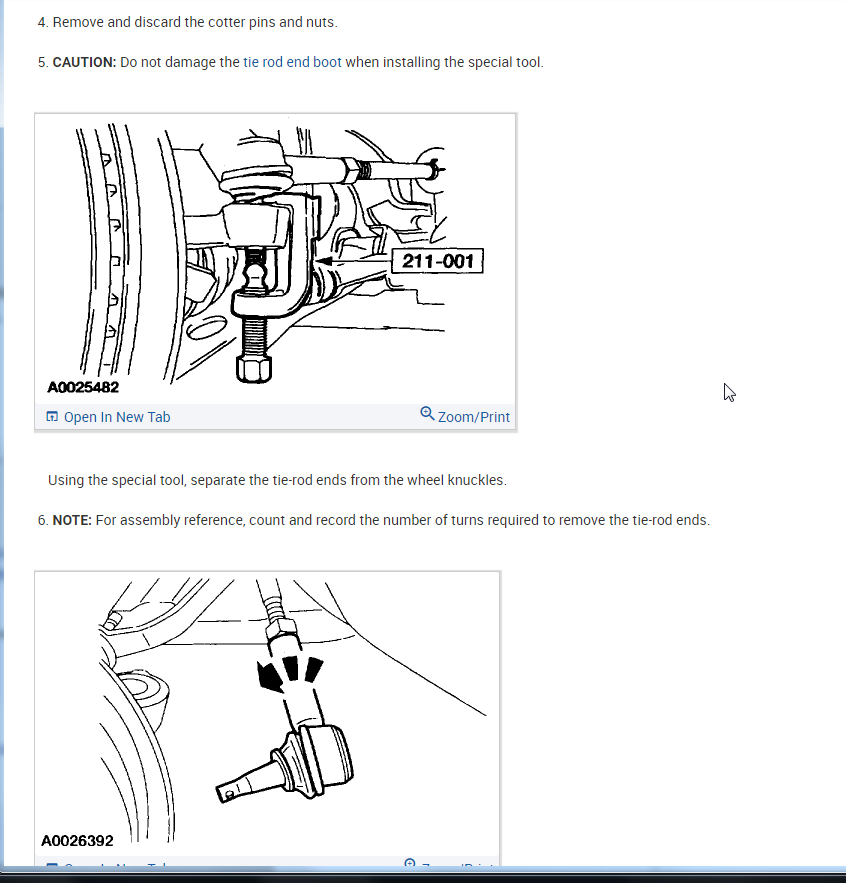
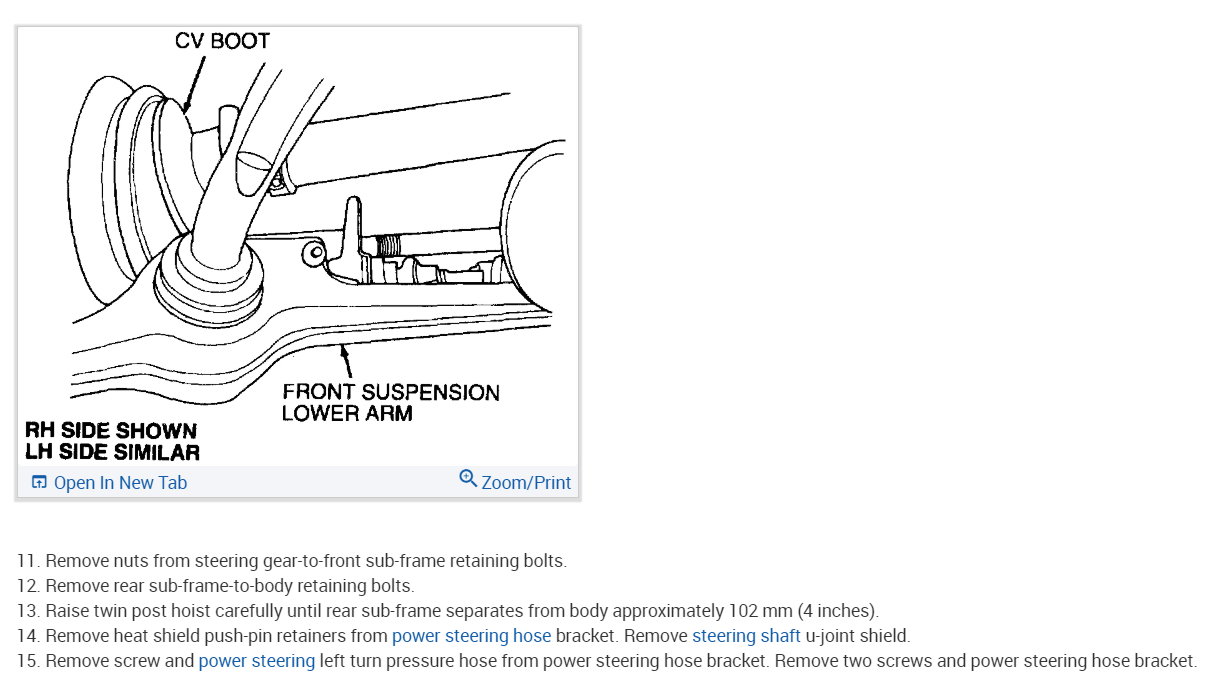
10. Remove and discard the cotter pins and nuts. See

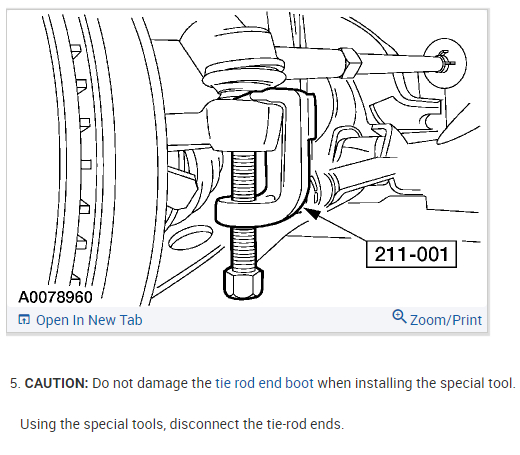
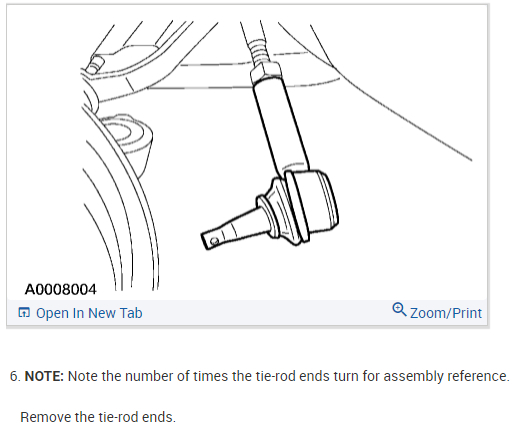
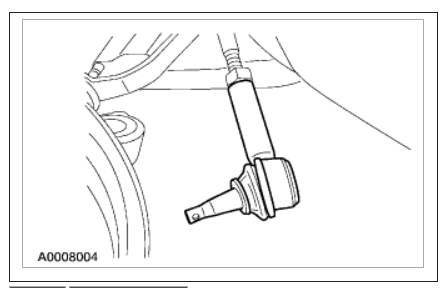
11. Using the Pittman Arm Puller (211-003), disconnect the tie-rod ends.

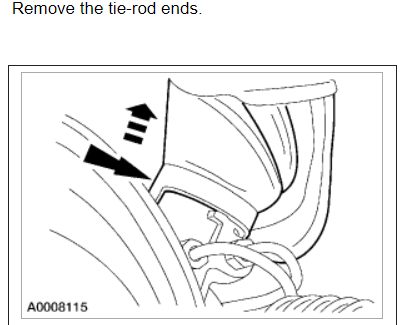
NOTE: Note the number of times the tie-rod ends turn for assembly reference.
12. Remove the tie-rod ends.
CAUTION:Do not use power tools to remove the nuts. The stabilizer bar link ball joint or boot can be damaged.
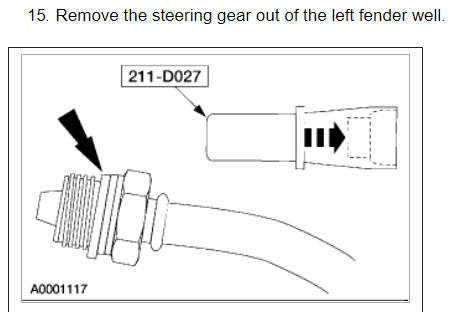
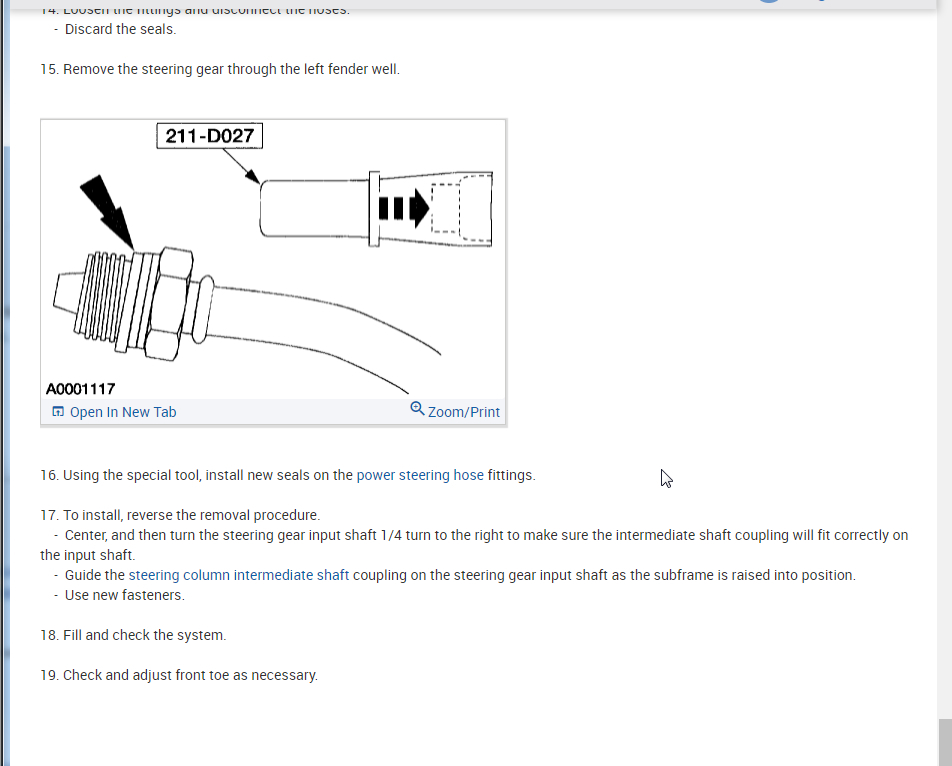
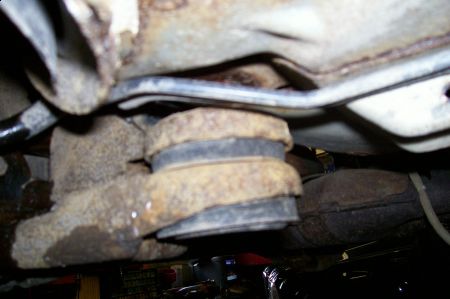
13. Remove the nuts and detach both stabilizer bar links. To remove the nut, first loosen the nut, then use the hex holding feature to prevent the stabilizer bar link ball joint from turning while removing the nut. DISCARD the nuts.
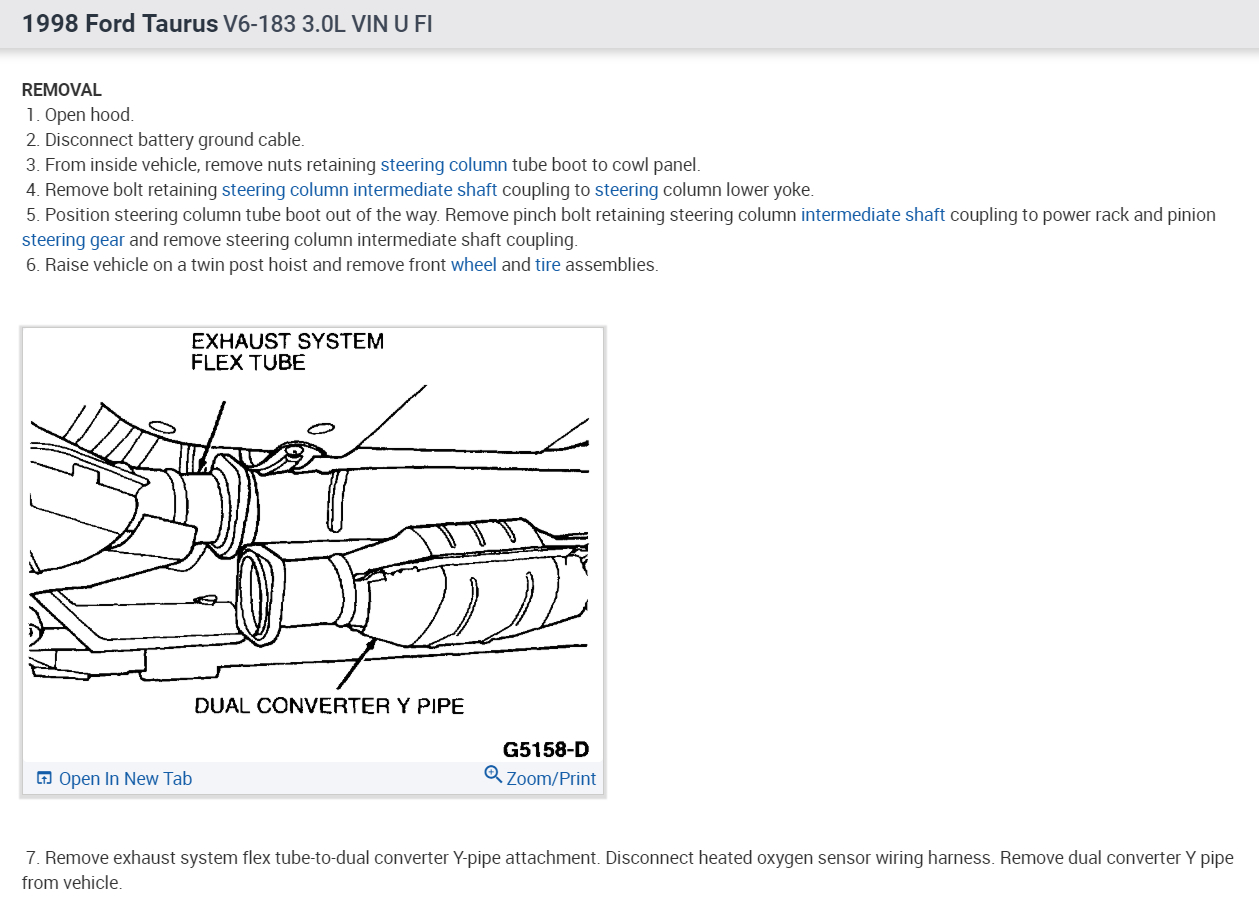
14. Remove and discard the exhaust Y-pipe nuts.

15. Remove and discard the nuts and the U-bolt. Remove the catalytic converter. Support the muffler inlet pipe.

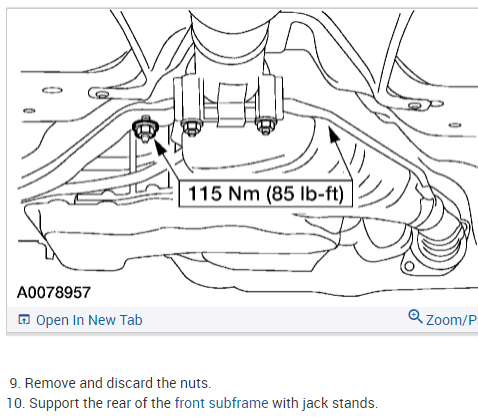
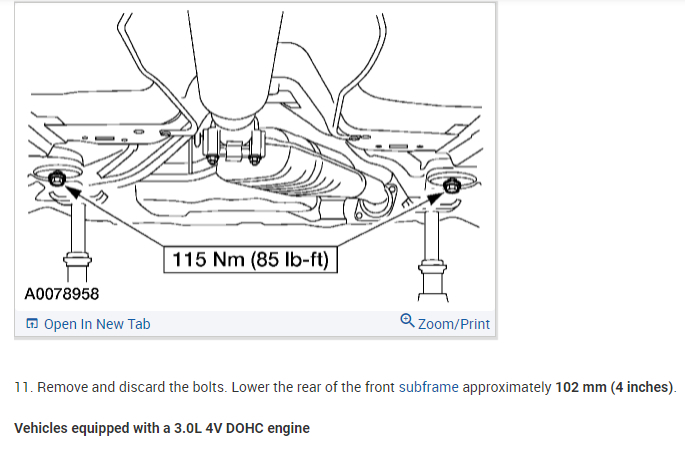
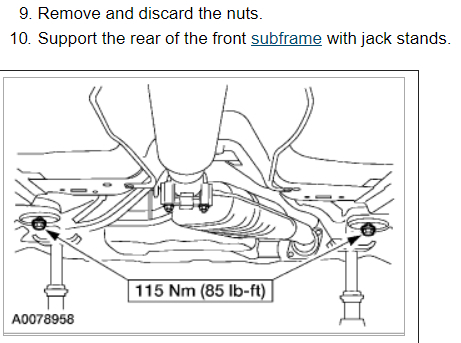
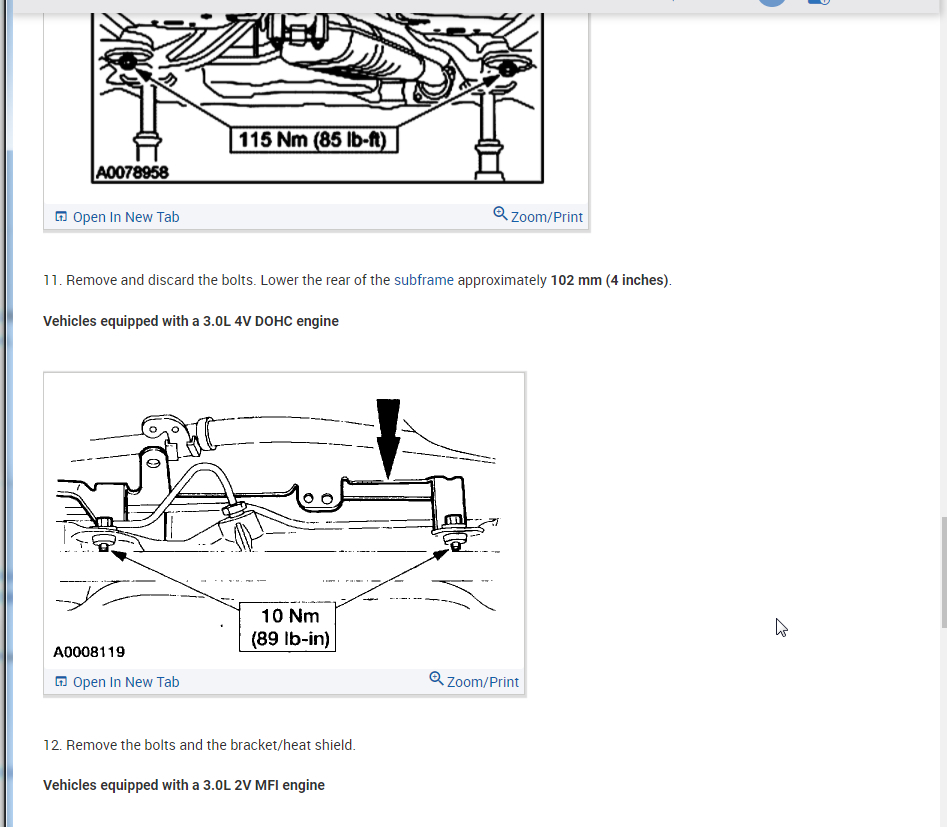
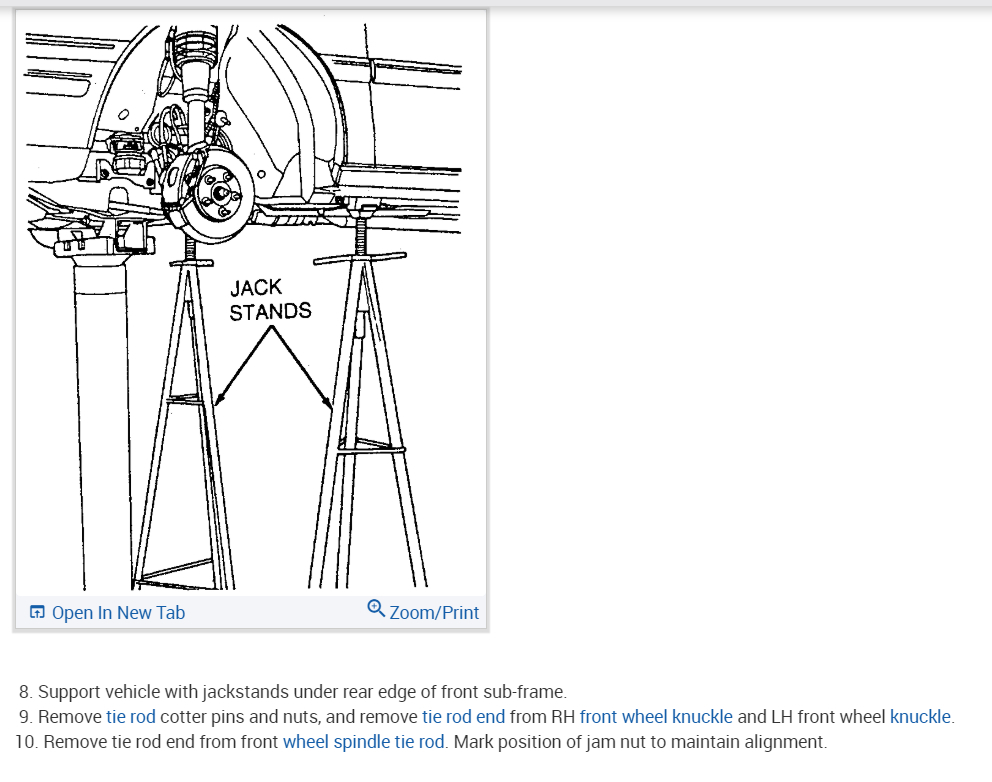
16. Remove and DISCARD the front subframe mounting nuts..

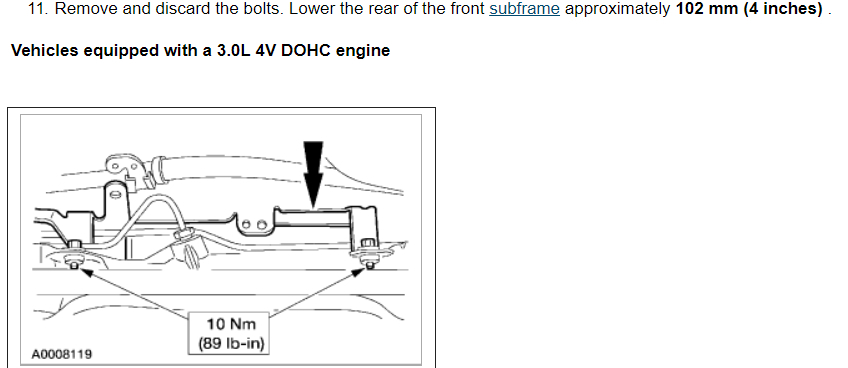
17. Support the rear of the front subframe with jack stands. 18. Remove and DISCARD the bolts. Lower the rear of the front subframe approximately 4" (102 mm).

19. Remove the steering gear out of the left fender well. 20. Install new seals on power steering hose fittings. See HOSES. 21. To install, reverse the removal procedure using new nuts and bolts where specified. 22. Center, and then turn the steering gear input shaft 1/2 turn to the right to make sure the intermediate shaft coupling will fit correctly on the input shaft. Guide the steering column intermediate shaft coupling on the steering gear input shaft as the subframe is raised into position. Use new fasteners and tighten to specification. See TORQUE SPECIFICATIONS. 23. Fill and leak check the system. See SYSTEM FILL under LUBRICATION. 24. Check and adjust toe settings as necessary. See SPECIFICATIONS & PROCEDURES -- CARS article in SUSPENSIONS.
Was this
answer
helpful?
Yes
No
+3
Monday, June 7th, 2021 AT 5:41 PM (Merged)
Tiny
HALLEOWL
  • MEMBER
  • 1 POST
  • 1999 FORD TAURUS
  • 6 CYL
  • FWD
  • AUTOMATIC
  • 116,000 MILES
I am removing the steering box from my taurus wagon due to steering fluid leaking out. I need an illustration showing me how to remove the pinch bolt from the intermediate shaft coupling, and illustrations showing me some removal and installation details.
Was this
answer
helpful?
Yes
No
Monday, June 7th, 2021 AT 5:41 PM (Merged)
Tiny
MERLIN2021
  • MECHANIC
  • 17,250 POSTS
Per Jeremy at Village center care.
Here is a faster procedure to R&R rack & save you guys alot of headaches. Y-pipe doesn't need to be removed as per procedure. The right rack bolt has a 24mm nut above the Y-pipe, but can easily be removed with use of 24mm gear wrench. Next loosen but don't remove right rear sub-frame bolt. Now loosen & remove left sub-frame bolt. This will open things up on the left side for removal. No need to unhook column on the inside, it can be accessed by lifting the boot on the firewall & remove pinch bolt(10mm) throught the left fender well. No need to unhook left swaybar link either. Next from above remove air intake to gain access down to steering lines. With the subframe lowered the rack will slide out the drivers side with ease. Total time to R&R should be cut in half by going this route. Good Luck out there guys....
By the book..
1. Open hood. 2. Disconnect battery ground cable. 3. From inside vehicle, remove nuts retaining steering column tube boot to cowl panel. 4. Remove bolt retaining steering column intermediate shaft coupling to steering column lower yoke. 5. Position steering column tube boot out of the way. Remove pinch bolt retaining steering column intermediate shaft coupling to power rack and pinion steering gear and remove steering column intermediate shaft coupling. 6. Raise vehicle on a twin post hoist and remove front wheel and tire assemblies. 7. Remove exhaust system flex tube-to-dual converter Y-pipe attachment. See Fig. 32 . Disconnect heated oxygen sensor wiring harness. Remove dual converter Y pipe from vehicle. 8. Support vehicle with jack stands under rear edge of front sub-frame. See Fig. 33 . 9. Remove tie rod cotter pins and nuts, and remove tie rod end from right front wheel knuckle and left front wheel knuckle. 10. Remove tie rod end from front wheel spindle tie rod. Mark position of jam nut to maintain alignment. 11. Remove nuts from steering gear-to-front sub-frame retaining bolts. See Fig. 34 . 12. Remove rear sub-frame-to-body retaining bolts. 13. Raise twin post hoist carefully until rear sub-frame separates from body approximately 4" (102 mm). 14. Remove heat shield push-pin retainers from power steering hose bracket. Remove steering shaft U-joint shield. 15. Remove screw and power steering left turn pressure hose from power steering hose bracket. Remove two screws and power steering hose bracket. 16. Remove left stabilizer bar link. See Fig. 35 . 17. Disconnect power steering pressure switch electrical connector. 18. Rotate power rack and pinion steering gear to clear bolts from front sub-frame and pull left to ease line fitting removal. 19. Place a drain pan under vehicle and remove hydraulic power steering pressure hose and power steering return hose from fittings on power rack and pinion steering gear. 20. Remove power rack and pinion steering gear assembly through left wheel well.
Installation 1. Install new Teflon(R) O-rings on both line connector assemblies. See HOSES . 2. Place steering gear retaining bolts in steering gear housing. 3. Install power rack and pinion steering gear through left wheel well. 4. Install power steering hose bracket and two screws. Tighten to specification. See TORQUE SPECIFICATIONS . 5. Install hydraulic power steering pressure hose and power steering return hose to fittings on power rack and pinion steering gear. Tighten hoses to specification. See TORQUE SPECIFICATIONS . 6. Install power steering pressure hose and screw. Tighten to specification. See TORQUE SPECIFICATIONS . 7. Connect power steering pressure switch electrical connector. 8. Position power rack and pinion steering gear into front sub-frame. 9. Install tie rod ends onto front wheel spindle tie rods. 10. Install push-pin retainers at top of heat shield. 11. Install tie rod end to right front wheel knuckle and left front wheel knuckle. Install nuts and tighten to specification. See TORQUE SPECIFICATIONS . Install new cotter pins. 12. Install left stabilizer bar link. See Fig. 35 . Tighten to specification. See TORQUE SPECIFICATIONS . 13. Lower hoist until rear sub-frame contacts body. 14. Install rear sub-frame retaining bolts. Tighten to specification. See TORQUE SPECIFICATIONS . 15. Install power rack and pinion steering gear-to-sub-frame nuts and tighten to specification. See TORQUE SPECIFICATIONS . 16. Install exhaust system flex tube to dual converter Y pipe. Connect heated oxygen sensor wiring harness. See Fig. 32 . 17. Install tire and wheel assemblies. 18. Remove jack stands and lower vehicle. 19. From inside vehicle, push steering column tube boot end out of vehicle and install over steering gear housing. 20. Install steering column intermediate shaft coupling to power rack and pinion steering gear. Tighten bolt to specification. See TORQUE SPECIFICATIONS . 21. Install inner steering column tube boot to cowl panel. 22. Install steering column intermediate shaft coupling to steering column lower yoke. See STEERING COLUMN article. 23. Fill power steering system with Motorcraft MERCON Multi -Purpose (ATF) Transmission Fluid XT-2-QDX or equivalent meeting Ford MERCON specification. See SYSTEM FILL under LUBRICATION. 24. Reconnect battery ground cable. 25. Bleed power steering system. See PURGING SYSTEM OF AIR under LUBRICATION. 26. Check system for leaks and proper operation.
6/16/2009


https://www.2carpros.com/forum/automotive_pictures/62217_t1_1.jpg


https://www.2carpros.com/forum/automotive_pictures/62217_t2_1.jpg


https://www.2carpros.com/forum/automotive_pictures/62217_t3_1.jpg


https://www.2carpros.com/forum/automotive_pictures/62217_t4_1.jpg


https://www.2carpros.com/forum/automotive_pictures/62217_t5_1.jpg

Was this
answer
helpful?
Yes
No
-1
Monday, June 7th, 2021 AT 5:41 PM (Merged)
Tiny
J.R.REPAIR
  • MEMBER
  • 1 POST
  • 1998 FORD TAURUS
  • 6 CYL
  • FWD
  • AUTOMATIC
  • 152,000 MILES
How do I replace the rack and pinion?
Was this
answer
helpful?
Yes
No
Monday, June 7th, 2021 AT 5:41 PM (Merged)
Tiny
BLUELIGHTNIN6
  • MECHANIC
  • 16,542 POSTS
Hello,

Here are the instructions to replace the steering rack in the diagrams below. Check out the diagrams (Below). Please let us know if you need anything else to get the problem fixed.
Was this
answer
helpful?
Yes
No
+1
Monday, June 7th, 2021 AT 5:41 PM (Merged)

Please login or register to post a reply.

Sponsored links