REMOVAL & INSTALLATION
TIMING BELT
Removal
Disconnect negative battery cable. Rotate engine clockwise and position cylinder No. 1 on TDC of compression stroke. Ensure "O" mark on crankshaft pulley aligns with "O" mark on outer timing belt cover.
Looking through plug hole of outer timing belt cover, ensure camshaft sprocket timing mark aligns with cover pointer. See Fig. 1 .
Remove fan guard, cooling shroud, cooling fan and fan shroud. Remove drive belt, water pump pulley and automatic belt tensioner. Discharge A/C system (if equipped) using approved refrigerant recovery equipment. Remove A/C compressor mounting bracket with power steering pump attached, and position aside. Drain cooling system. Remove upper radiator hose. Remove thermostat housing and gasket.
Remove retaining bolt and crankshaft pulley. Remove hub assembly retaining bolt from crankshaft. Remove outer timing belt cover. Ensure camshaft sprocket timing mark aligns with cover pointer. See Fig. 1 .
Loosen belt tensioner bolts. Using Camshaft Belt Tensioner (T74P-6254-A) or equivalent, release spring tension on belt tensioner. Rotate belt tensioner away from timing belt and tighten bolts.
On distributorless models, remove retaining bolts and pull crankshaft sensor from dowel pins. See Fig. 1 . Remove hub assembly. On all models, note direction of belt guide installation, and remove belt guide. Remove timing belt.
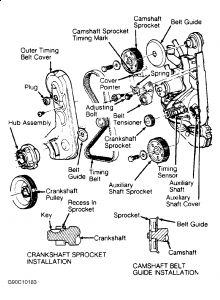
Fig. 1: Exploded View Of Timing Belt & Components (Typical)
Courtesy of FORD MOTOR CO.
Installation (Models With Distributor)
Install crankshaft sprocket (if removed) with recessed area toward crankshaft. See Fig. 1 . Install belt guide with flat side toward camshaft sprocket. Install camshaft sprocket with timing mark outward.
CAUTION:If camshaft sprocket was removed, install NEW camshaft sprocket bolt. DO NOT reuse bolt.
Install NEW camshaft sprocket bolt, and tighten to specification while holding camshaft with camshaft sprocket holder. See TORQUE SPECIFICATIONS .
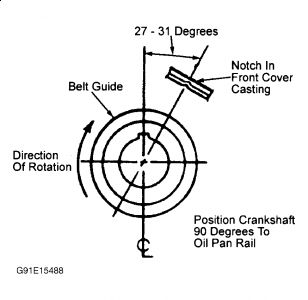
Align camshaft sprocket timing mark with pointer. Properly position crankshaft so timing mark aligns with notch in front cover casting. See Fig. 2 . Remove the distributor cap, and ensure that the distributor rotor is facing the No. 1 position.
Install timing belt over crankshaft sprocket, then counterclockwise over auxiliary shaft and camshaft sprockets. Loosen belt tensioner bolt, allowing tension to be applied on timing belt.
NOTE:It may be necessary to push belt tensioner against timing belt, as spring tension may not move belt tensioner against timing belt.
Remove one spark plug from each cylinder. Rotate engine clockwise (viewed from front of engine) 2 complete revolutions. Tighten timing belt tensioner bolts to specification. See TORQUE SPECIFICATIONS . Ensure all timing marks align properly. See Fig. 1 . Install belt guide on crankshaft.
To install remaining components, reverse removal procedure. Tighten bolts to specification. See TORQUE SPECIFICATIONS .
Disconnect heater hose from fitting on thermostat housing to bleed air from cooling system when filling. Fill cooling system with Ford Coolant (E2FZ-19549-AA), or equivalent, until coolant flows from fitting. Install heater hose. Refill radiator. Adjust drive belts to proper tension.
Wednesday, April 1st, 2009 AT 9:08 PM