Removal
1. Disconnect the battery ground cable.
2. Remove the air cleaner outlet tube.
3. Remove the radiator sight shield.
4. Remove the coolant recovery reservoir.
1 Disconnect the hose.
2 Remove the bolts.
3 Remove the coolant recovery reservoir.
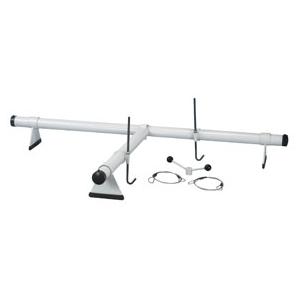
5. Install the special tool.
6. Install the special tool.
7. Install the special tool.
8. Raise the vehicle on a hoist.
9. Remove the LH engine mount nut.
10. Remove the RH engine mount nut.
11. Lower the vehicle.
12. Raise the engine.
13. Raise the vehicle on a hoist.
14. Remove the oil pan drain plug and drain the engine oil.
15. Remove the starter motor.
16. Position the wiring harness bracket aside.
17. Remove the lower bellhousing bolts.
18. Remove the oil pan bolts.
19. Position a safety stand under the subframe crossmember.
20. Remove the four lower subframe bolts.
21. Remove the two upper subframe bolts.
22. NOTE: Do not completely remove these bolts.
Loosen the two bolts.
23. Lower the front subframe.
24. Remove the oil pan.
Installation
1. NOTE: If the oil pan is not installed within four minutes, remove the sealer and reapply.
Clean and apply sealant to the oil pan sealing areas indicated and install the oil pan rear seal.
1 Apply sealer to the rear main bearing cap.
2 Install the oil pan rear seal.
3 Apply sealer to the oil pan mating surface.
* Use metal surface cleaner.
* Use silicone gasket and sealant.
2. Position the oil pan and start the bolts.
3. Tighten the bolts in the sequence indicated, in two stages.
o Stage 1: Tighten to 5 Nm (44 inch lbs.) .
o Stage 2: Tighten to 10 Nm (89 inch lbs.) .
4. install the lower bellhousing bolts.
5. Install the oil pan drain plug.
6. Raise the front subframe into position.
7. Tighten the two bolts.
8. Install the two bolts.
9. Install the four lower subframe bolts.
10. Position the safety stand aside.
11. Install the bracket.
12. Install the starter motor.
13. Lower the vehicle.
14. Lower the engine.
15. Raise the vehicle.
16. Install the RH engine mount nut.
17. Install the LH engine mount nut.
18. Lower the vehicle.
19. Remove the special tools.
20. Install the coolant recovery reservoir.
21. Install the radiator sight shield.
22. Install the air cleaner outlet tube.
23. Connect the battery ground cable.
24. Fill the engine with clean engine oil.
25. CAUTION: Correct coolant bleeding is critical for correct engine cooling.
Fill and bleed the engine cooling system.
Oct 27, 2010 at 11:15 AM