Hello -
I gave you the info for both 60 and 40.
FRONT SEAT - 60 PERCENT
Removal
NOTE: Removing the 60 percent front bench requires more than one technician.
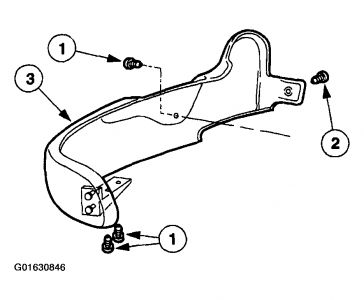
1. Remove the 60 percent front bench.
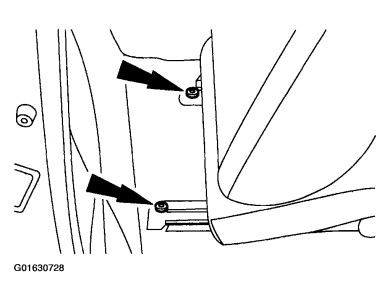
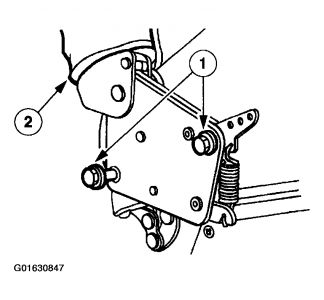
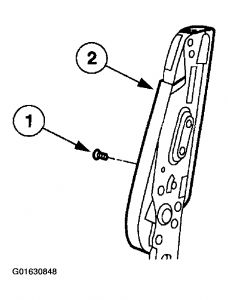
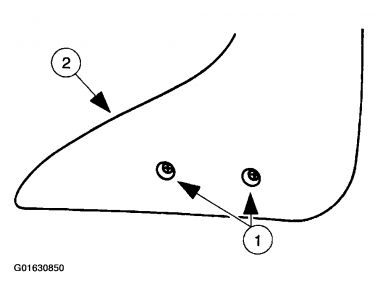
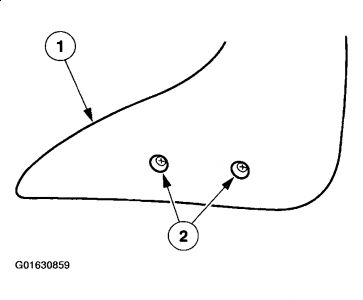
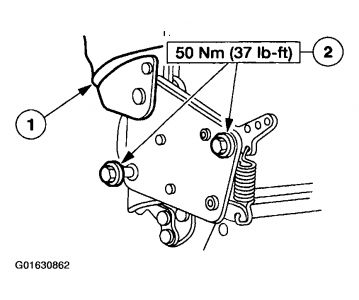
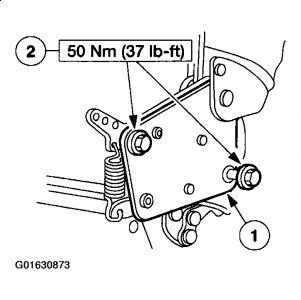
1. Remove the seat riser bolts and the safety belt bolt.
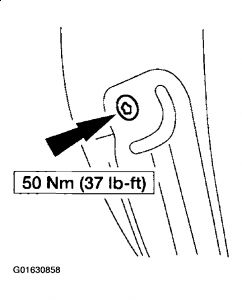
2. Remove the nut.
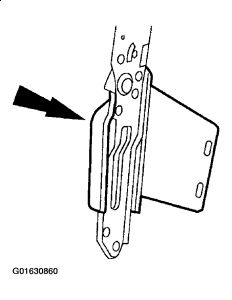
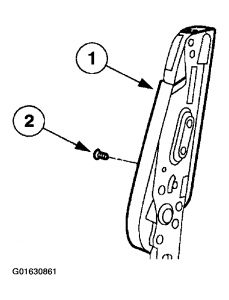
3. Disconnect the electrical connectors (if equipped) and remove the seat.
Fig. 117: Removing Front Bench Seat - 60 Percent
Courtesy of FORD MOTOR CO.
Installation
1. To install, reverse the removal procedure.
Fig. 118: Installing Front Bench Seat - 60 Percent
Courtesy of FORD MOTOR CO.
2. Check the active restraint system for correct operation. Refer to SAFETY BELT SYSTEM .
FRONT SEAT - 40 PERCENT AND CAPTAIN'S CHAIR
Removal and Installation
All vehicles
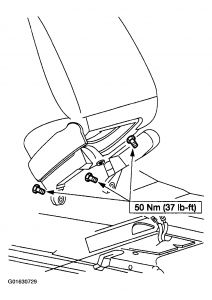
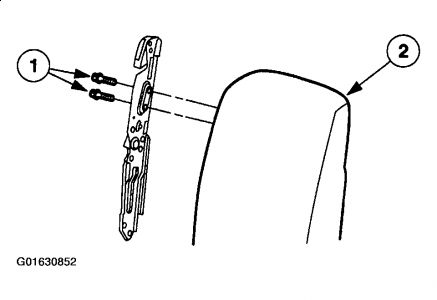
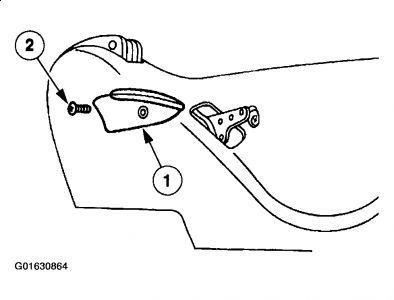
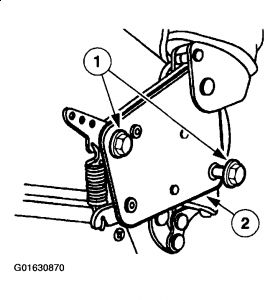
1. Remove the two front bolts.
Fig. 119: Removing Two Front Bolts
Courtesy of FORD MOTOR CO.
2. Position the seat fully forward.
Vehicles with power seat
3. Raise the seat to its maximum height.
4. Disconnect the battery ground cable (14301).
All vehicles
5. Remove the front seat (60012).
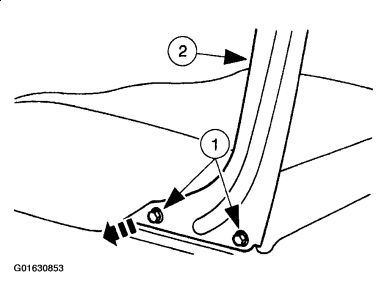
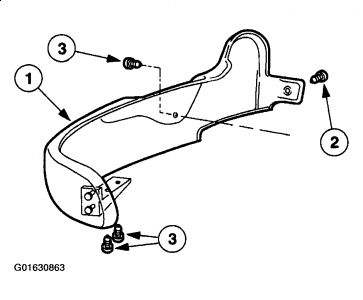
1. Remove the rear bolts.
2. If equipped, disconnect the seat control switch electrical connector.
3. Disconnect the safety belt warning indicator electrical connector.
4. Remove the front seat.
Fig. 120: Removing Two Rear Bolts
Courtesy of FORD MOTOR CO.
6. To install, reverse the removal procedure.
Fig. 121: Installing Seat Bolts
Courtesy of FORD MOTOR CO.
7. Check the active restraint system for correct operation.
SEAT - 60 PERCENT FRONT BENCH
Disassembly
1. Remove the seat track. Refer to SEAT TRACK-MANUAL.
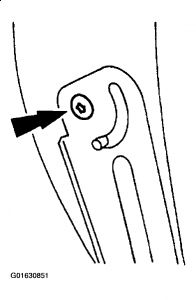
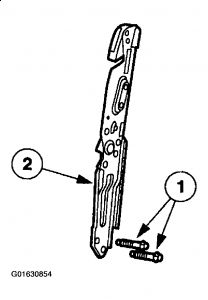
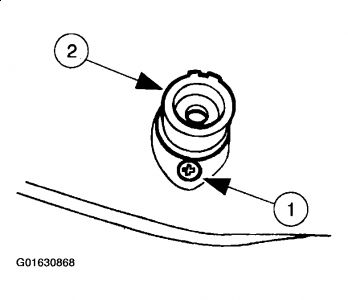
2. Remove the front seat recliner dump handle (62762).
Fig. 236: Removing Front Seat Recliner Dump Handle
Courtesy of FORD MOTOR CO.
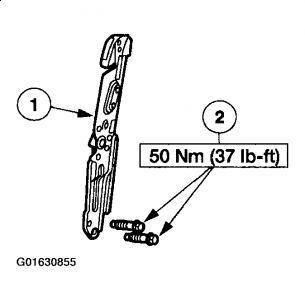
3. Remove the front seat back recliner handle.
1. Remove the screw.
2. Remove the front seat back recliner handle.
Fig. 237: Removing Front Seat Back Recliner Handle
Courtesy of FORD MOTOR CO.
4. Remove the front seat track side shield (62187).
1. Remove the screws.
2. Remove the pin-type retainer.
3. Disconnect the electrical connectors (if equipped) and remove the front seat track side shield.
Fig. 238: Removing Front Seat Track Side Shield
Courtesy of FORD MOTOR CO.
NOTE: Do not damage the plastic pivot bushing when removing the front seat back frame.
5. Remove the front seat back frame.
1. Remove the bolts.
2. Pull the front seat back frame away from the inboard front seat hinge and remove the front seat back frame.
Fig. 239: Removing Front Seat Back Frame
Courtesy of FORD MOTOR CO.
6. Remove the front seat center armrest bracket cover.
1. Remove the screw.
2. Remove the front seat center armrest bracket cover.
Fig. 240: Removing Front Seat Center Armrest Bracket Cover
Courtesy of FORD MOTOR CO.
7. Remove the front seat center armrest bracket lower cover.
Fig. 241: Removing Front Seat Center Armrest Bracket Lower Cover
Courtesy of FORD MOTOR CO.
8. Remove the outboard front seat armrest shield.
1. Remove the screws.
2. Remove the outboard front seat armrest shield.
Fig. 242: Removing Outboard Front Seat Armrest Shield
Courtesy of FORD MOTOR CO.
9. Remove the pivot side inner cover.
10. Remove the front seat center armrest bracket bolt.
Fig. 243: Removing Front Seat Center Armrest Bracket Bolt
Courtesy of FORD MOTOR CO.
11. Remove the front seat center armrest.
1. Remove the bolts.
2. Remove the front seat center armrest.
Fig. 244: Removing Front Seat Center Armrest
Courtesy of FORD MOTOR CO.
12. Remove the front seat center armrest mounting bracket.
1. Remove the bolts.
2. Remove the front seat center armrest mounting bracket.
Fig. 245: Removing Front Seat Center Armrest Mounting Bracket
Courtesy of FORD MOTOR CO.
13. Remove the front seat center armrest latch.
1. Remove the bolts.
2. Remove the front seat center armrest latch.
Fig. 246: Removing Front Seat Center Armrest Latch
Courtesy of FORD MOTOR CO.
Assembly
1. Install the front seat center armrest latch.
1. Position the front seat center armrest latch.
2. Install the bolts.
Fig. 247: Installing Front Seat Center Armrest Latch
Courtesy of FORD MOTOR CO.
2. Install the front seat center armrest mounting bracket.
1. Position the front seat center armrest mounting bracket.
2. Install the bolts.
Fig. 248: Installing Front Seat Center Armrest Mounting Bracket
Courtesy of FORD MOTOR CO.
3. Install the front seat center armrest.
1. Position the front seat center armrest.
2. Install the bolts.
Fig. 249: Installing Front Seat Center Armrest
Courtesy of FORD MOTOR CO.
4. Install the front seat center armrest bracket bolt.
Fig. 250: Installing Front Seat Center Armrest Bracket Bolt
Courtesy of FORD MOTOR CO.
5. Install the pivot side inner cover.
6. Install the outboard front seat armrest shield.
1. Position the outboard front seat armrest shield.
2. Install the screws.
Fig. 251: Installing Outboard Front Seat Armrest Shield
Courtesy of FORD MOTOR CO.
7. Install the front seat center armrest bracket lower cover.
Fig. 252: Installing Front Seat Center Armrest Bracket Lower Cover
Courtesy of FORD MOTOR CO.
8. Install the front seat center armrest bracket cover.
1. Position the front seat center armrest bracket cover.
2. Install the screw.
Fig. 253: Installing Front Seat Center Armrest Bracket Cover
Courtesy of FORD MOTOR CO.
NOTE: Inspect the seat back pivot bushing and replace it if it is damaged.
9. Install the front seat back frame.
1. Position the front seat back frame.
2. Install the bolts.
Fig. 254: Installing Front Seat Back Frame
Courtesy of FORD MOTOR CO.
10. Install the front seat track shield.
1. Connect the electrical connectors (if equipped) and position the front seat track shield.
2. Install the pin-type retainer.
3. Install the screws.
Fig. 255: Installing Front Seat Track Shield
Courtesy of FORD MOTOR CO.
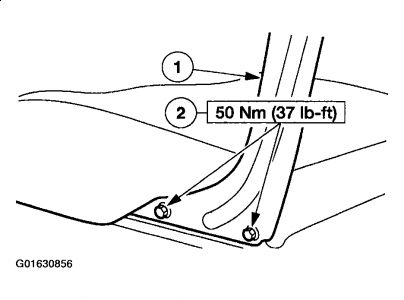
11. Install the front seat back adjust handle.
1. Position the front seat back adjust handle.
2. Install the screw.
Fig. 256: Installing Front Seat Back Adjust Handle
Courtesy of FORD MOTOR CO.
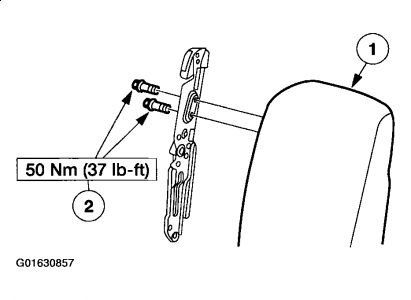
12. Install the front seat recliner dump handle.
Fig. 257: Installing Front Seat Recliner Dump Handle
Courtesy of FORD MOTOR CO.

SEAT - 40 PERCENT AND CAPTAIN'S CHAIR
Disassembly
1. Remove the seat track. Refer to SEAT TRACK-MANUAL or SEAT TRACK-POWER.
NOTE: Manual seat is shown, power seat is similar.
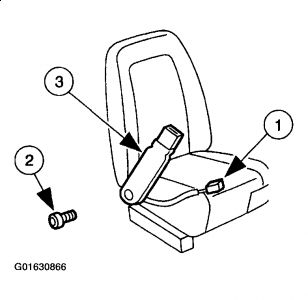
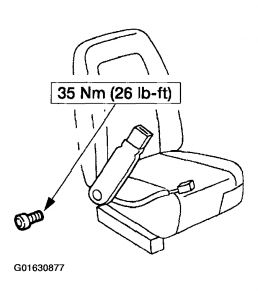
2. Remove the safety belt buckle.
1. Disconnect the safety belt warning indicator switch electrical connector.
2. Remove the fastener.
3. Remove the safety belt buckle (61203).
Fig. 258: Removing Safety Belt Buckle
Courtesy of FORD MOTOR CO.
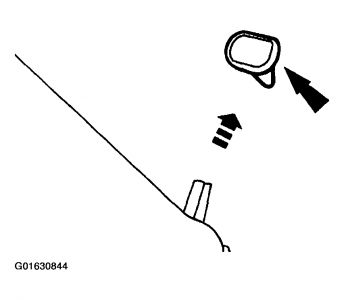
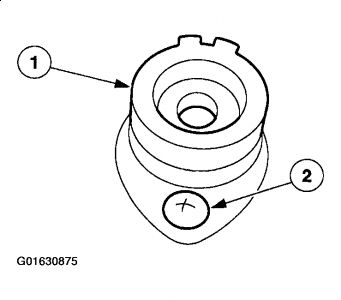
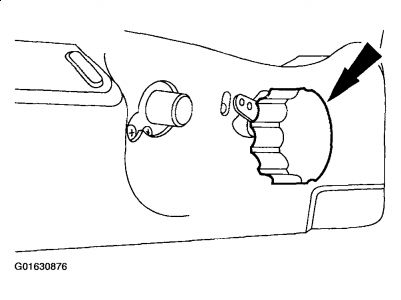
3. Pull to remove the lumbar support adjuster knob (62622).
Fig. 259: Removing Lumbar Support Adjuster Knob
Courtesy of FORD MOTOR CO.

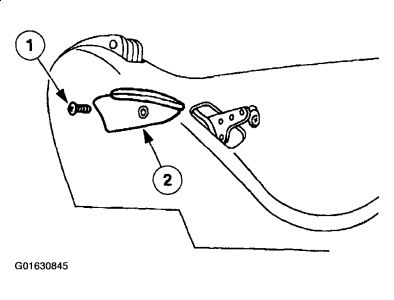
4. Remove the lumbar support adjuster (65501).
1. Remove the two screws.
2. Remove the lumbar support adjuster.
Fig. 260: Removing Lumbar Support Adjuster
Courtesy of FORD MOTOR CO.
NOTE: The lumbar support assembly must be fully relaxed.
5. Fig. 261: Identifying Lumbar Support Adjuster
Courtesy of FORD MOTOR CO.
6. Separate the lumbar support adjuster from the adjuster cable.
7. Disconnect the front seat back recliner from the front seat cushion frame (63101).
1. Remove the bolts.
2. Disconnect the front seat back recliner (62187).
Fig. 262: Disconnecting Front Seat Back Recliner From Front Seat Cushion Frame
Courtesy of FORD MOTOR CO.
NOTE: Do not damage the plastic pivot bushing when removing the seat back frame.
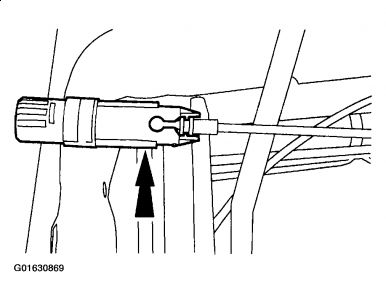
8. Pull the front seat back frame away from the inboard front seat hinge.
"¢ If equipped, feed the lumbar support cable through the seat cushion opening while removing the front seat back.
Fig. 263: Pulling Front Seat Back Frame Away From Inboard Front Seat Hinge
Courtesy of FORD MOTOR CO.
Assembly
NOTE: Inspect the seat back pivot bushing and replace if damaged.
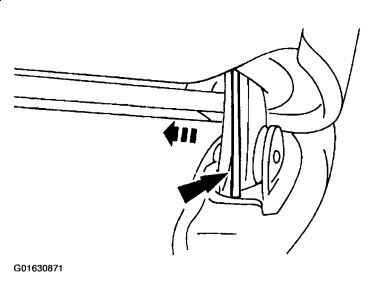
1. Push the seat back frame onto the front seat hinge.
"¢ If equipped, feed the lumbar support adjuster cable through the seat cushion.
Fig. 264: Pushing Seat Back Frame Onto Front Seat Hinge
Courtesy of FORD MOTOR CO.

2. Connect the front seat back recliner to the front seat cushion frame.
1. Position the front seat back recliner.
2. Install the bolts.
Fig. 265: Connecting Front Seat Back Recliner To Front Seat Cushion Frame
Courtesy of FORD MOTOR CO.
3. Connect the lumbar support adjuster to the adjuster cable.
Fig. 266: Connecting Lumbar Support Adjuster To Adjuster Cable
Courtesy of FORD MOTOR CO.

4. Install the lumbar support adjuster.
0. Position the lumbar support adjuster.
1. Install the two screws.
Fig. 267: Installing Lumbar Support Adjuster
Courtesy of FORD MOTOR CO.
5. Install the lumbar support adjuster knob.
Fig. 268: Installing Lumbar Support Adjuster Knob
Courtesy of FORD MOTOR CO.
NOTE: Manual seat is shown, power seat is similar.
NOTE: Apply Ford Threadlock 262 E2FZ-19554-B meeting Ford specification WSK-M2G351-A6 or equivalent to fasteners when installing safety belt buckle or retractor assemblies.
6. Install the safety belt buckle.
0. Install the safety belt buckle.
1. Install the safety belt fastener.
2. Connect the safety belt warning indicator switch electrical connector.
Fig. 269: Installing Safety Belt Buckle
Courtesy of FORD MOTOR CO.
7. Install the front seat track. Refer to SEAT TRACK-MANUAL or SEAT TRACK-POWER.
8. Check the restraint system for correct operation.
Nov 4, 2009 at 10:02 PM